
Rear windscreen brake light fix FAQ
#1
 07-30-2011 | 06:57 PM
Thread Starter
|
Senior Member
Joined: Jun 2011
Posts: 307
Likes: 67
From: Cypress, TX
The brake light that sits at the bottom of the rear windscreen was sagging on one side, so I decided to get out there and fix it. The following is a (mostly pictorial) step-by-step guide to fixing it.
This first photo shows the outer housing and the bulb housing:
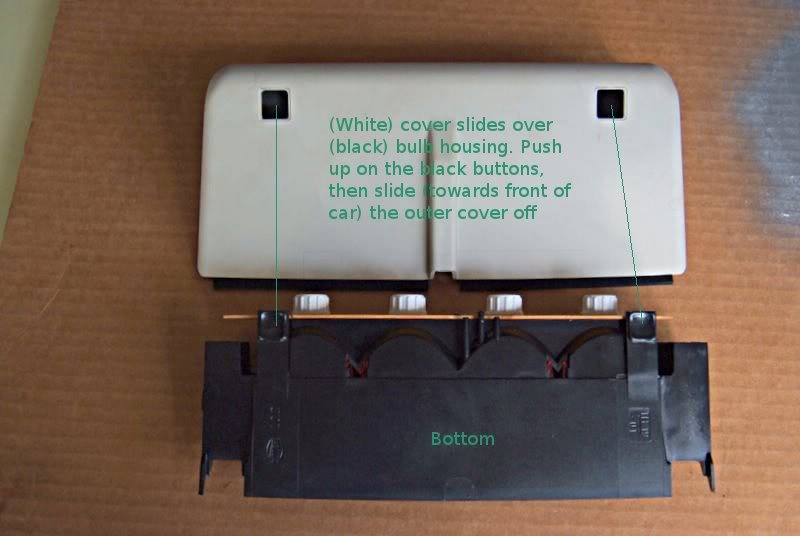
This first photo shows the outer housing and the bulb housing:
#2
07-30-2011 | 07:00 PM
Thread Starter
|
Senior Member
Joined: Jun 2011
Posts: 307
Likes: 67
From: Cypress, TX
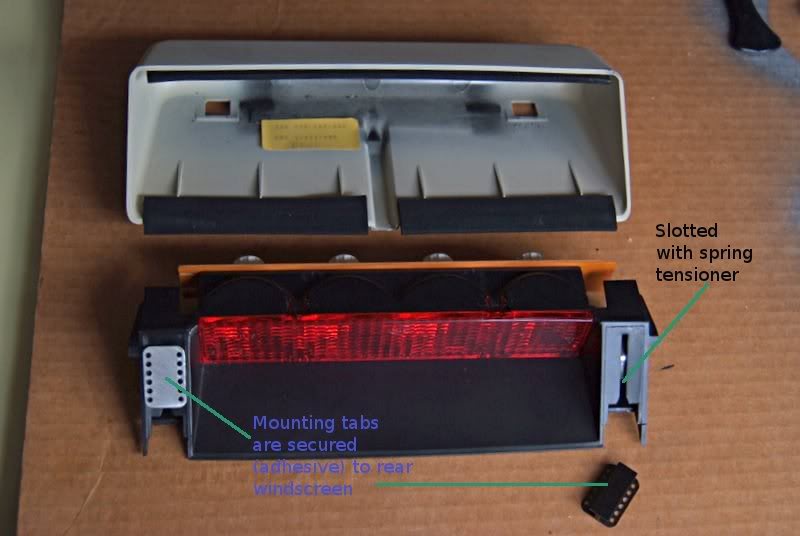
This photo shows the two housings from the rear view. The mounting tabs are adhered to the rear windscreen. The black bulb housing slides down onto these mounting tabs, then "snap" into place. To remove the black housing, push down at the bottom, then slide up. Finally, the outer (white) housing slides over the black bulb housing, and snaps into place:
Last edited by caldercay; 07-30-2011 at 07:26 PM.
#3
07-30-2011 | 07:05 PM
Thread Starter
|
Senior Member
Joined: Jun 2011
Posts: 307
Likes: 67
From: Cypress, TX
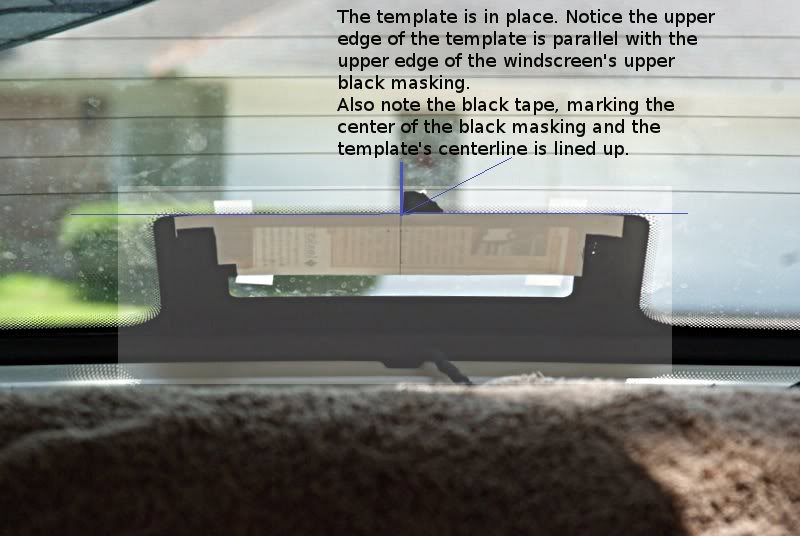
This is the template that will be used as a guide to ensure the mounting tabs are secured to the rear windscreen in their proper location. The paper template I made is 2" high and wide enough so that the upper "wings" are above the mounting tabs.
I would give dimensions, but it's possible each car is slightly different. The idea is to ensure the mounting tabs are at the proper (90*) angle so that the black bulb housing will slide down onto the mounting tabs. I slid the mounting tabs into place in the black housing, then measured the distance between the inner edges of each mounting tab. Be sure the mounting tabs are *centered* within the slots of the black bulb housing ... this will ensure there is some "play" when you eventually slide the black housing onto the newly epoxied mounting tabs.
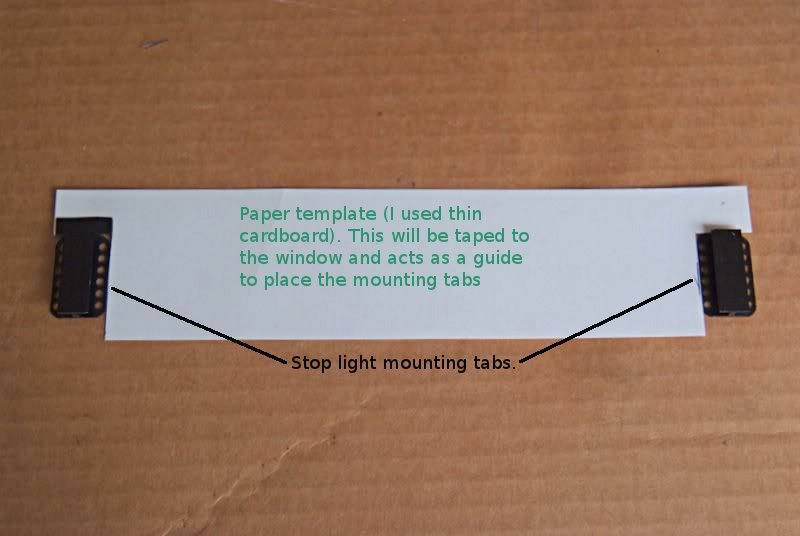
I would give dimensions, but it's possible each car is slightly different. The idea is to ensure the mounting tabs are at the proper (90*) angle so that the black bulb housing will slide down onto the mounting tabs. I slid the mounting tabs into place in the black housing, then measured the distance between the inner edges of each mounting tab. Be sure the mounting tabs are *centered* within the slots of the black bulb housing ... this will ensure there is some "play" when you eventually slide the black housing onto the newly epoxied mounting tabs.
Last edited by caldercay; 07-30-2011 at 07:29 PM.
#4
07-30-2011 | 07:08 PM
Thread Starter
|
Senior Member
Joined: Jun 2011
Posts: 307
Likes: 67
From: Cypress, TX
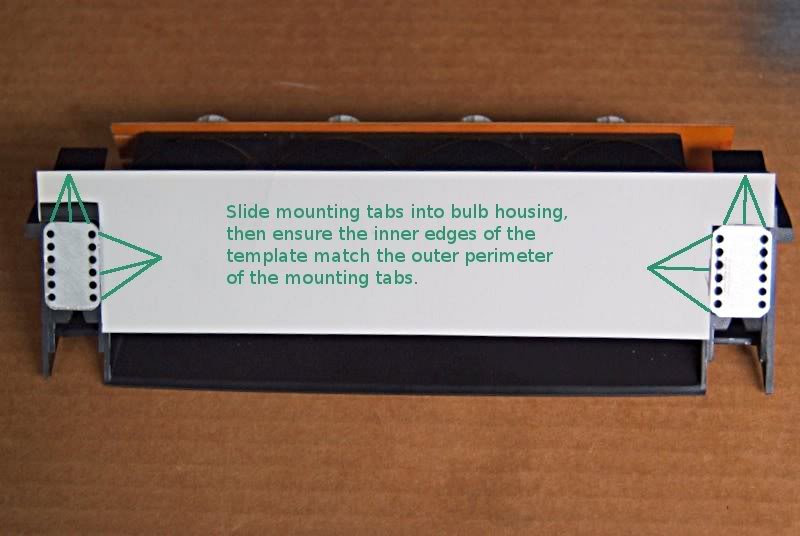
In this photo, I am "testing" the template to be sure that the alignment of the cuts are at proper right angles for the mounting tabs. When you slide the mounting tabs into the black bulb housing, be sure to "center" the mounting tabs in their slots - this will eventually allow for some "side play" when you slide the black bulb housing onto the mounting tabs.
Last edited by caldercay; 07-30-2011 at 07:30 PM.
#5
07-30-2011 | 07:11 PM
Thread Starter
|
Senior Member
Joined: Jun 2011
Posts: 307
Likes: 67
From: Cypress, TX
Prior to removing the complete stop light housing, I made a mental note how the housing was mounted in relation to the windscreen's black masking. For my vehicle, the very top edge of the mounting tabs are 5/8" down from the top edge of the black masking.
For my car, the very top edge of the white outer housing rests just parallel with the upper edge of the black masking.
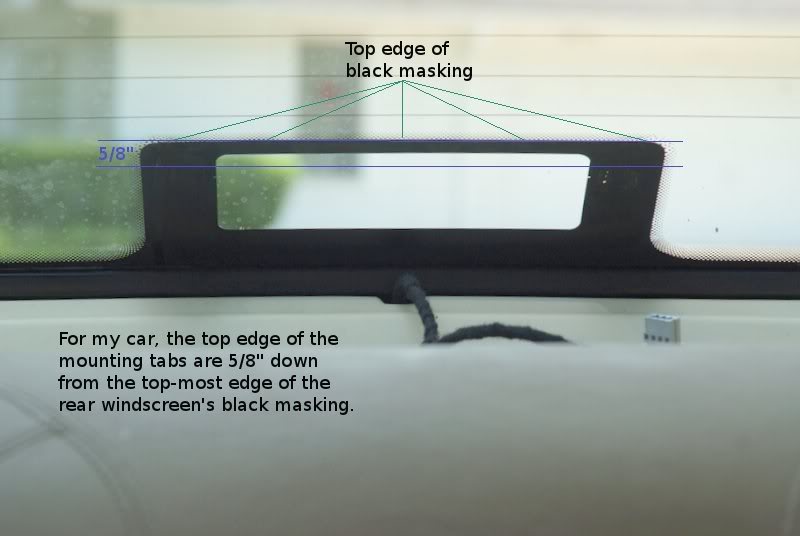
For my car, the very top edge of the white outer housing rests just parallel with the upper edge of the black masking.
Last edited by caldercay; 07-30-2011 at 07:31 PM.
#6
07-30-2011 | 07:12 PM
Thread Starter
|
Senior Member
Joined: Jun 2011
Posts: 307
Likes: 67
From: Cypress, TX
#7
07-30-2011 | 07:16 PM
Thread Starter
|
Senior Member
Joined: Jun 2011
Posts: 307
Likes: 67
From: Cypress, TX
I've epoxied each one of the mounting tabs into their respective "slots" at each edge of the template. I used 5-minute clear epoxy ... I mixed the epoxy in-car, because of the high heat and humidity .... I mixed, then applied to the surface of the mounting tab, then placed it into the respective corner of the template and held in place for 5 minutes ...
Please !!! Do each one ONE AT A TIME
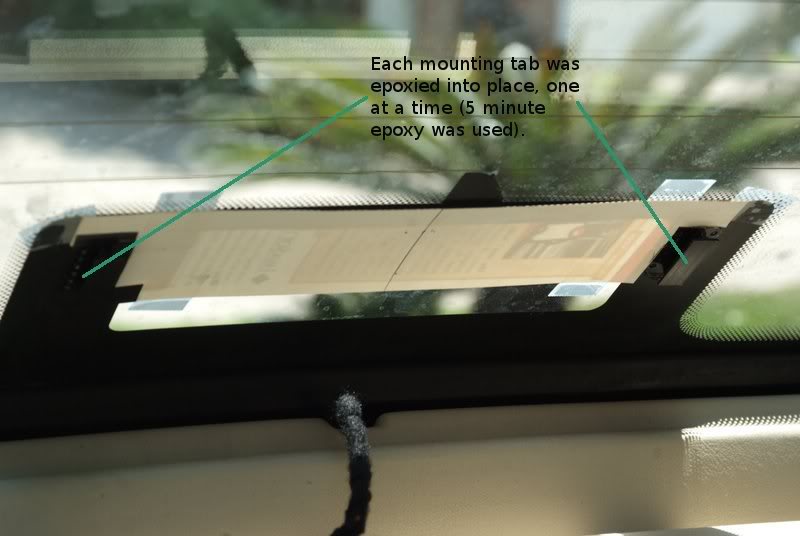
Please !!! Do each one ONE AT A TIME
Trending Topics
#8
07-30-2011 | 07:19 PM
Thread Starter
|
Senior Member
Joined: Jun 2011
Posts: 307
Likes: 67
From: Cypress, TX
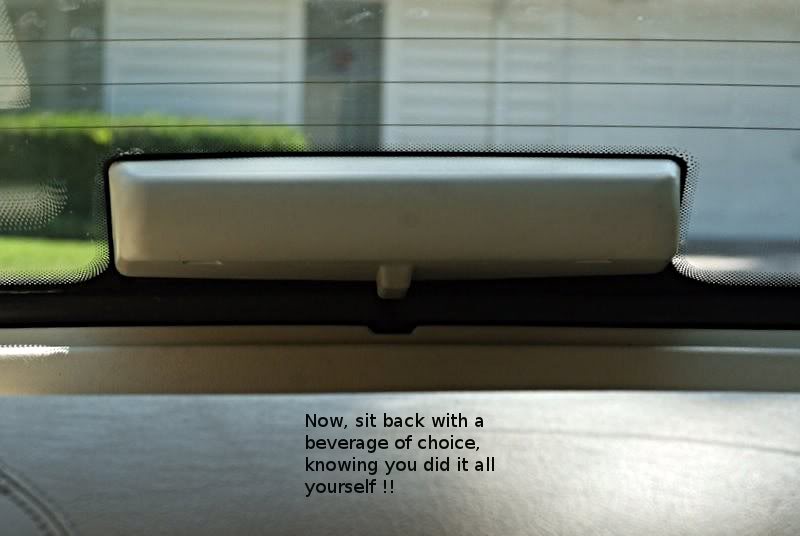
I waited 15 minutes, then CLEANED the windscreen around the areas of the housing, both inside and out. PLEASE ... clean the glass before re-mounting the black bulb housing and the outer cover housing. Simply slide the black bulb housing down onto the mounting tabs, then hook up the wiring, then side the outer cover over the black housing.
For me, a vodka/grapefruit was in order
For me, a vodka/grapefruit was in order
Last edited by caldercay; 07-30-2011 at 07:34 PM.
The following users liked this post:
gibbon (12-16-2017)
#11
05-31-2015 | 05:22 PM

Member
Joined: Feb 2015
Posts: 66
Likes: 29
From: Canada
I tried to re-attach the stop lamp several times, without success, trying epoxy and dbl sided tape. (I had an autoglass fellow try it as well...)
I suspected that the tape I used was not up to the job, so I gave it a try with the strongest tape I could find (3M Automotive Acrylic Plus Attachment tape - Part # 051131).
After cleaning the tabs and glass thoroughly, I simply reinstalled the tabs, put the tape on and pressed hard for about a minute. After that I simply slid the plastic cover on and after one month of hot weather (by Vancouver Island standards), the 96 and 97 are still holding strong.
If it fails, I have another 20 feet of tape. It'll last longer than I do!
#12
07-30-2015 | 10:39 AM

Senior Member
Joined: Oct 2008
Posts: 293
Likes: 47
This photo shows the two housings from the rear view. The mounting tabs are adhered to the rear windscreen. The black bulb housing slides down onto these mounting tabs, then "snap" into place. To remove the black housing, push down at the bottom, then slide up. Finally, the outer (white) housing slides over the black bulb housing, and snaps into place:

How to unlock the tabs to be able to just slide out the black housing?
#13
07-30-2015 | 11:04 AM
Senior Member
Joined: Oct 2008
Posts: 293
Likes: 47
#14
07-30-2015 | 11:53 AM
Veteran Member
Joined: Mar 2014
Posts: 3,750
Likes: 675
From: Sanford, NC
Yes, that is normally how you remove the third brake light. After you remove the vanity cover, you gently push the black lamp housing/assembly toward the window and you will feel it "give" as the metal springs in the housing compress.
While it is compressed against the window you can then gently push/pull the housing up along the plane of the inside of the window. The "T" brackets affixed to the window (assuming they haven't unglued and come off the glass) will now slide free of the housing. Sometimes you have to gently work each end of the housing alternating pressure to get it to come loose as the housing has probably never been removed since it was installed at the factory.
If you want to clean the inside of the red lens and reflector, the lens will separate if you gently disengage the plastic clips you'll see along the top & bottom where the red plastic clips to the black housing. The lens is not glued on. However you only need to free the top, then the pull the lens off and then the bottom will come free. The red lens plastic seems more durable and flexible than the black ABS housing so the "clips" will allow you to bend them with a small screwdriver, but still take care. If you break the lens clips, don't worry too much though as they are all over eBay for cheap. BTW I used some plastic polish on my lens to clear up some oxidation and it looked like new.
Another tip, when removing the cover, take care not to press on the two black catches too hard. They need to just be barely pressed enough to allow the cover to slide back and free. If one presses to hard or deeply, they are prone to breaking off as the ABS has gotten brittle with age/heat. They usually come from the factory with a rubber bump-stop under them so you can't push them too far, but more often than not you'll find that bump stop "migrated" or fallen off from age, heat and vibration. This is a good time to reglue that stop or find a suitable replacement like a felt bumper.
Hope that helps!
.
Last edited by al_roethlisberger; 07-30-2015 at 11:57 AM.
#16
08-01-2015 | 07:55 AM
Veteran Member
Joined: Mar 2014
Posts: 3,750
Likes: 675
From: Sanford, NC
The point of the FAQ above is to tell you how to reattach the troublesome brackets/tabs that tend to fall off either on their own over time causing the light to sag or completely detach from the window, or when the brackets/tabs break off when people try to remove the third light assembly (this is why I cautioned being very careful when removing the assembly).
Good luck!
#17
05-20-2016 | 09:15 PM
Veteran Member
Joined: Mar 2014
Posts: 3,750
Likes: 675
From: Sanford, NC
Adding a TSB for the X308 that specifies the prep and adhesive:
https://www.jaguarforums.com/forum/a...17-03-hmsl.pdf
.
https://www.jaguarforums.com/forum/a...17-03-hmsl.pdf
.

Thread
Thread Starter
Forum
Replies
Last Post
BrentGardner
XJ XJ6 / XJ8 / XJR ( X350 & X358 )
28
04-26-2024 03:08 AM
Currently Active Users Viewing This Thread: 1 (0 members and 1 guests)