Slow Coolant Leak, etc.
#61
 09-29-2013, 08:01 PM

In regard to removing the back bolt from the thermostat tower housing base plate, Jim wrote:
Was the quarter inch drive used IN CONJUNCTION with a crows foot wrench head or just with a socket?
Was the quarter inch drive used IN CONJUNCTION with a crows foot wrench head or just with a socket?
#63
09-30-2013, 06:53 AM
Isn't the manifold in the way of getting the bolt all the way out of the hole? How did you manage to get the bolt out even after getting it loose? I have heard that you can loosen the manifold enough to get the bolt out, but I haven't heard that you can just plain get the bolt out. Am I wrong?
I ran into two problems -- instead of getting a crows foot, I got a closed end ratcheting wrench that was too big to get over the top and behind the bolt, so it was worthless. The second problem was my clumsiness - I broke a connector off the radiator for the pipe from the coolant tank by leaning on it while I was trying to figure out how to get that darn bolt out!
I ran into two problems -- instead of getting a crows foot, I got a closed end ratcheting wrench that was too big to get over the top and behind the bolt, so it was worthless. The second problem was my clumsiness - I broke a connector off the radiator for the pipe from the coolant tank by leaning on it while I was trying to figure out how to get that darn bolt out!
#64
09-30-2013, 07:27 AM

Veteran Member
The bolt will come out of the hole after all of the bolts are loose.
That said, the best way to change the thermostat housing (assuming you still have the plastic one installed) is to break the old one apart with a pair of pliers so you can remove the bolts with a socket (and it breaks easily!), then replace the bolts with socket head cap screws, using a ball end driver. I sure wish I had known this method on the first one I changed!
That said, the best way to change the thermostat housing (assuming you still have the plastic one installed) is to break the old one apart with a pair of pliers so you can remove the bolts with a socket (and it breaks easily!), then replace the bolts with socket head cap screws, using a ball end driver. I sure wish I had known this method on the first one I changed!
The following users liked this post:
King Dollaz (08-25-2020)
#65
09-30-2013, 07:42 AM
#66
09-30-2013, 12:27 PM
Veteran Member
#68
09-30-2013, 02:49 PM
Veteran Member
I guess I need to go reexamine this: I know I did not remove/raise the manifold, and it got changed out. Ever since ^^^^ing up a cam cover on a brand new BMW 1600 I have tried to use 1/4" drive sockets. I was able to loosen the bolt enough to back it off thread to the point the unit could be lifted out. Didn't find it that hard: what was hard was getting a buggered water pump bolt off . . . right up there with shearing off the belt tensioner . . .
#70
09-30-2013, 09:21 PM
Veteran Member
Wellllll....
It is always possible that someone put a longer bolt in your car, but many of us have changed our thermostat housing without removing the manifold. I did so with a crowsfoot I made from a wrench using a torch and grinder, then later helped a friend with the break the plastic method. Both work, the latter is easier.
It is always possible that someone put a longer bolt in your car, but many of us have changed our thermostat housing without removing the manifold. I did so with a crowsfoot I made from a wrench using a torch and grinder, then later helped a friend with the break the plastic method. Both work, the latter is easier.
#71
09-30-2013, 09:43 PM
I had a similar problem years ago in my 99' XJ8. It took a while for Jag to figure it out and after several hose and clamp changes, and finally a burned out water pump, it turned out to be a small crack on the underside of the black plastic coolant outlet pipe that everyone seemed to miss.
The following users liked this post:
keelak (09-07-2016)
#72
10-03-2013, 05:35 PM
I didn't mention this before, but when I took the crossover pipe off, it looked virtually new! I'll bet it was replaced within the last couple of years. The thermostat tower looks a lot older and much worse for the wear! You can see drips down the side of it and puddles of coolant at the base. I don't mind replacing both parts, at least then I know when they were last replaced.
BTW I'm expecting my mechanic to charge me a lot more the $150, still waiting for the bad news!
BTW I'm expecting my mechanic to charge me a lot more the $150, still waiting for the bad news!
Thanks.
#73
10-03-2013, 05:52 PM
I believe this is the same one I bought --> http://www.ebay.com/itm/THERMOSTAT-O...4c3334&vxp=mtr
Last edited by OldMike; 10-03-2013 at 05:58 PM.
#74
10-03-2013, 06:18 PM
Veteran Member
Join Date: Apr 2012
Location: Bairnsdale,Victoria Australia
Posts: 1,495
Received 219 Likes
on
181 Posts
Looks like the car diagnosed the problem for you Mike. I did replace the thermostat housing etc, and still had a leak.
The known Header Tank leak. That's a sneaky one as the coolant evaporates before you see where it's gone.
Replaced it and all is good for now.
The RealGuage is comforting to keep an eye on temperature.
4,000 miles is some trip,how was the fuel economy (or lack of it) on such a long drive?
The known Header Tank leak. That's a sneaky one as the coolant evaporates before you see where it's gone.
Replaced it and all is good for now.
The RealGuage is comforting to keep an eye on temperature.
4,000 miles is some trip,how was the fuel economy (or lack of it) on such a long drive?
#75
10-03-2013, 06:18 PM
Mike,
Sorry, I was using gasket and o-ring interchangeably.
Since I don't need a new crossover pipe, I just need new o-rings to re-install the crossover pipe. That was the information I was seeking.
ALSO, somewhere I read about what size and length bolts are recommended for replacement of the original, longer ones. Does anybody have that info handy? And can I go with 8 of these shorter bolt and just replace ALL of the original ones?
Thanks.
#76
10-03-2013, 06:52 PM
I don't normally take much notice of the fuel economy, but I did notice that I could cruise almost 400 miles on one full tank with a little to spare, making my MPG in the low 20s. I would typically go around 350-375 miles and then put about 16-17 gallons in the tank. I'm more aware of my average speed. I shoot for 70-75 MPH, including stops. That's hard to do in some states!
The following users liked this post:
Gippsland (10-04-2013)
#77
10-03-2013, 07:30 PM
I've read that you can use the 2 shorter 8mm bolts from the thermostat cover in place of the back bolts and use the back bolts on the t-stat. I don't know the sizes. Also, some say to cut slots in the top of the back bolts before putting them in so you can screw them in with a long screw driver.
#78
10-04-2013, 08:14 PM
I thought I would share some pictures and comments on how I removed the original plastic thermostat tower housing. I ordered the Welsh Enterprises upgrade kit of ebay for $ 47.50 and have been very satisfied with the fit and finish of this product:

Note: Some of the initial photos below were taken after the upgrade and are shown only for illustrative purposes to guide one thru the early removal stages.
The first step is to remove the coolant overflow tank cap and the cap on the existing tower.
Next the radiator must be drained so the coolant level at the tower will drop below the base. I drained the radiator completely. There is a plastic plug at the lower left of the radiator on the back side. Some sources say to remove the black fascia but his plug can be reached by hand and turned counter-clockwise with your fingers. Some penetrating oil may need to be applied to help remove the plug. The plug is fragile and can be broken if not careful. Collect the coolant in a clean vessel so the fluid can be filtered and reused later.
First remove the bleeder hose from the nipple that comes off the left side of the tower. This bleeder hose is the one that goes from the tower to the coolant overflow tank. This part (MNC4582AC) easily breaks so be carefull. Next remove the heater hose, the right side radiator hose and temperature sensing unit from the crossover pipe. The heater hose is the smaller hose. Factory clamps are of the spring-loaded tension type. A large pair of channel locks will need to be employed to remove these. Make note of all clamps removed so you can reinstall them on the same hoses AND in the same exact position to get a good seal. The temperature sensing unit is the gray plastic connector and extreme caution must be used in removing the connector so as not to damage the connector plastic or break the plastic of the crossover pipe.
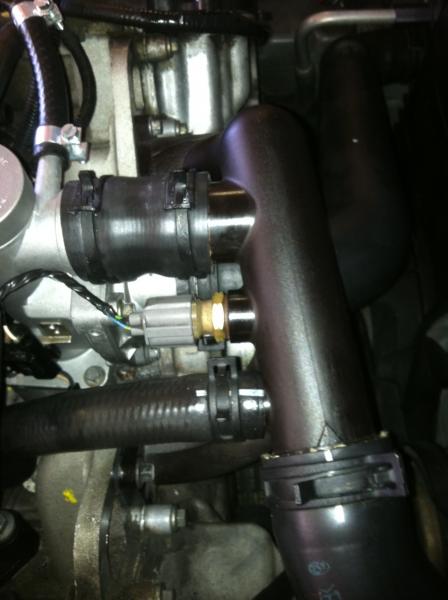
Move the crossover connecting hose back clamp to the middle of the crossover hose. By doing this clamp first you will avoid breaking the crossover pipe. I strongly suggest that this hose (NCA2213AC) be replaced. eBay replacement cost of this item was about $ 10.00 and included shipping.
Next remove the 4 bolts that hold the crossover pipe in place. Various socket extension will need to be used with an 8 mm socket to do this. Carefully pull the crossover pipe away from the block in the two places it bolted in place to break the o-ring seal. Now the only thing holding the crossover pipe in place is the crossover connecting hose. Carefully work the hose off of the existing tower. Once that is removed you can more carefully remove the crossover hose from the crossover pipe and thus avoid damaging the pipe.
With those items removed, you can now remove the left side radiator hose from the thermostat tower bell housing. Again, keep track of all clamps and positions.
Now remove the three bolts holding the thermostat bell housing to thermostat tower. The thermostat will come out when you do this.
Now the process of removing the thermostat housing can be attacked.
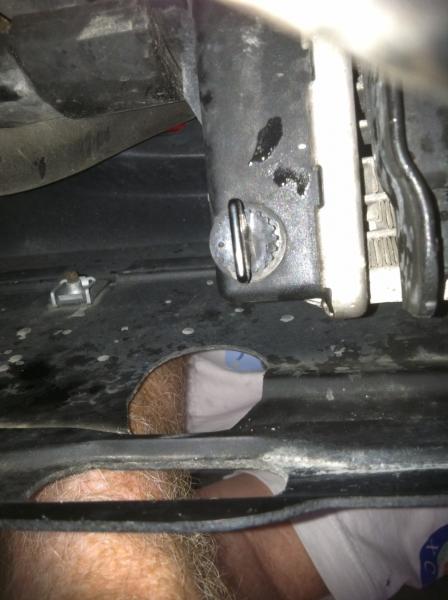
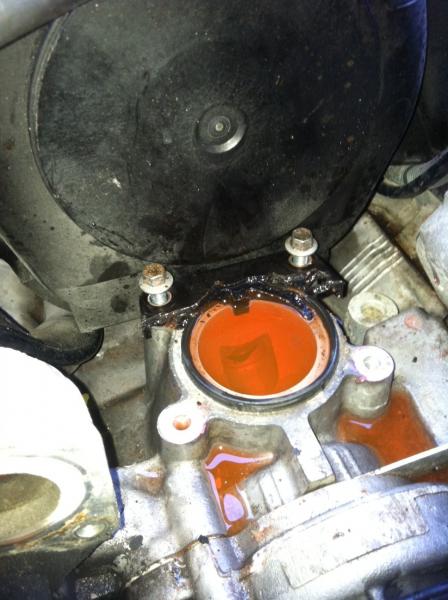
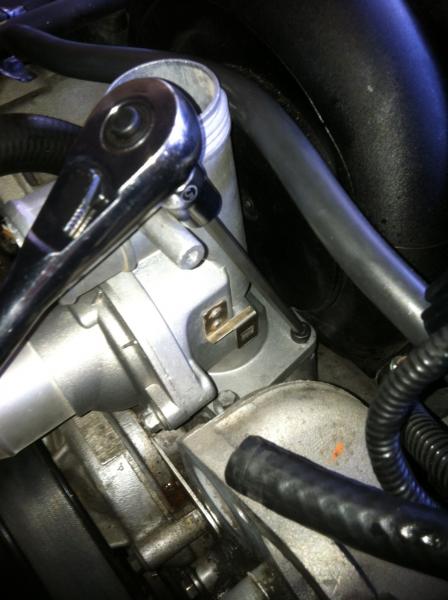
This first photo shows the back passenger's (right side) bolt of the housing base. The head of the bolt in question can be seen towards the top of the photo. You can observe that the black plastic of the intake manifold does seem to be directly above the bolt:
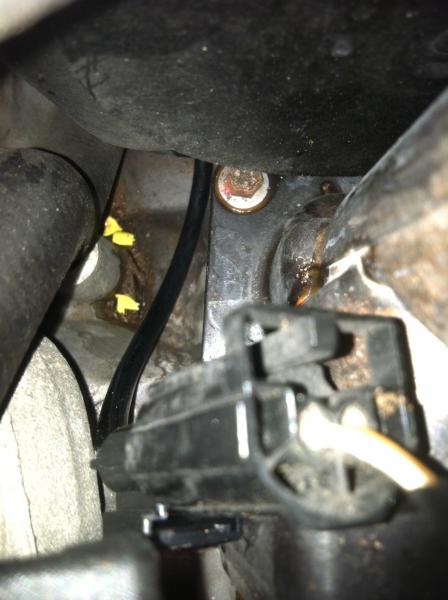
The same can be observed with the back driver's (left side) bolt:

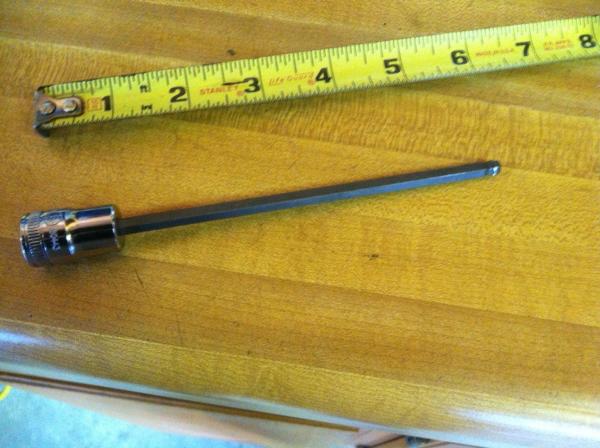
I first removed the front two base plate bolts with an 8 mm socket on a 1/4" socket drive.
Next, I found that instead of breaking apart the thermostat tower piece by piece with a pair of pliers, that a small chisel and a hammer could be employed and make the job easier in a few ways. This chisel method is not new but I did not see a detailed description in past posts.
I took a chisel that was about 1/2" width at the blade and placed it on the plastic base just forward to one of the back bolts. The chisel blade was thus running from one side of the car to the other. Or, parallel (not perpendicular) to the radiator.
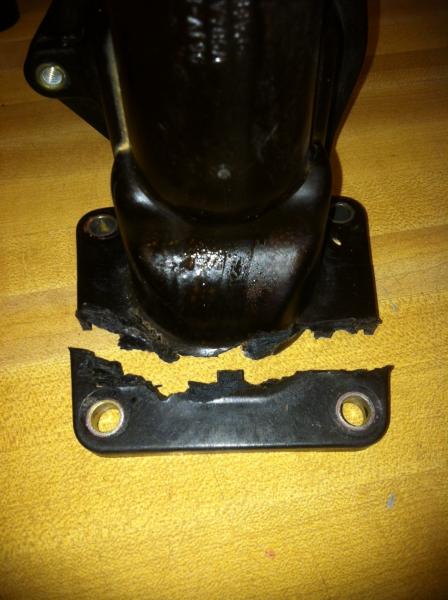
Next, I used the chisel to break about halfway thru the base, went to the other side, did the same, came back, bust the base all the way thru and then went once again to the other side to finish the job. Now the top of the tower could be used as leverage if the crack at the base was not already complete.
Notice how the thermostat tower base broke in a controlled fashion and thus allowed the tower to be easily removed:
Finally, the back bolts were addressed. I used a regular open end 8 mm wrench and had plenty of room. These back bolts DO top out on the edge of the intake manifold housing BEFORE the bolts completely clear the threads. They actually hit the big circular raised area observed in the photo.
I just keep backing them out with the top of the bolt pushing on the manifold "circle" until the threads cleared. It was not far but one can still get worried that the manifold may crack until one realizes that it only tops out slightly before the threads clear.
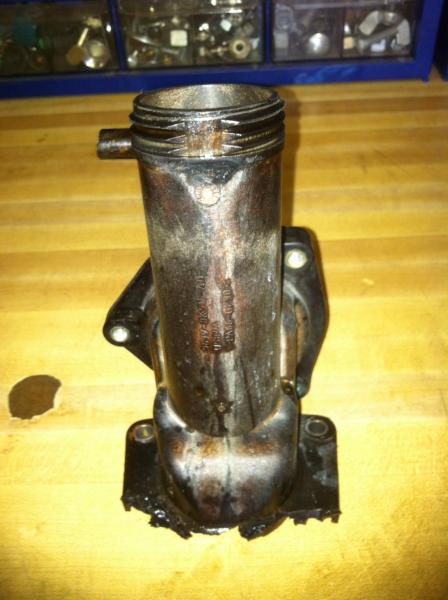
Then it was simple to remove the remaining piece of the base along with the screws.
And another photo showing the clean fracture:
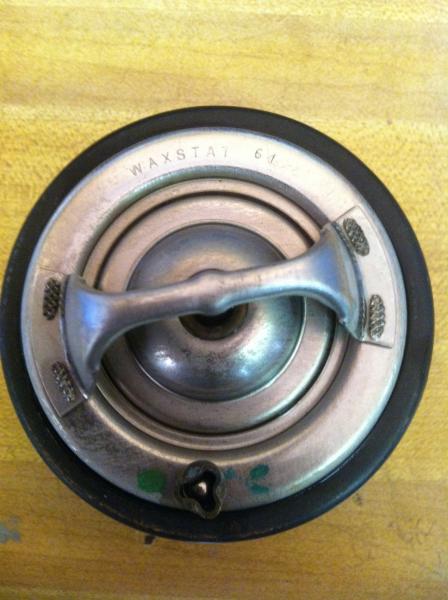
I installed the new thermostat into the bellhousing and bolted it together before installing the tower to the block.
The Stant thermostat is actually made by Waxhall in Great Britian which is the OEM supplier. The cost for this was about $12.00 at regular car parts store (Advance carries Stant). Both the kit and the thermostat came with a rubber gasket (as seen in picture). The one from Stant was a tad thicker but still easily fit in the housing. I went with it to get a better seal.

Remember that the spring points toward the engine and in this position the thermostat will only seat one way because of the pressure equalising valve on the unit will fit into a notch on the housing. You can see this one way ball valve in the photo.
For installation it is important to note that the sealing of the o-rings is what keeps the tower base to engine block and the crossover pipe to engine block from leaking. Thus these surfaces must be cleaned very carefully. The two o-rings on the crossover pipe must be removed and the channels cleaned thoroughly. These two o-rings do not come with the kit. I had to swing by the Jag dealer and pay about $ 7.00 each for these rings - part no. C2C11477010. These rings have nibs on them to keep them in the channel while replacing the pipe. I would not recommend regular o-rings.
I elected to go with the cap head bolt for the back two bolts on the base. The size is a M6-1.00 X 20. That 20 means 20 mm. The original bolts were 25 mm and that extra 5 mm cause the numerous problems with removal.
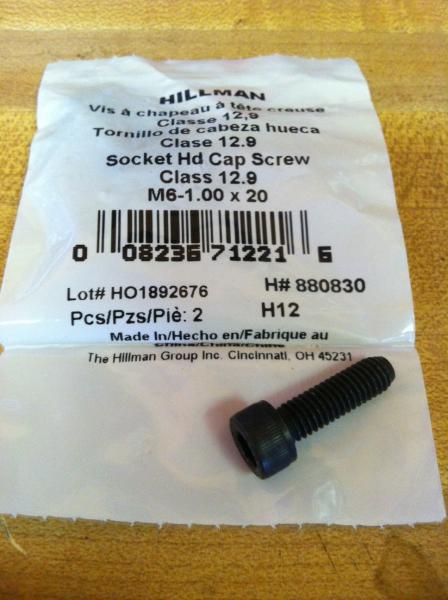
I used a 5 mm ball head drive that had a 6 inch extension to fasten the back bolts.
This next picture shows the angle in which you can drive the cap head bolts.
I secured these two cap head bolts down snug before putting the original bolts in the front. Some have suggested using 4 cap heads all around the base. I did not do this because the regular bolts can be driven at a harder force than the bolts with the cap head and the cap head driver. I felt that by securing the rear cap head snug and first that the two regular bolts in the front could "lever" the base down for a tight fit.
To be updated soon with final comments and photos.
Note: Some of the initial photos below were taken after the upgrade and are shown only for illustrative purposes to guide one thru the early removal stages.
The first step is to remove the coolant overflow tank cap and the cap on the existing tower.
Next the radiator must be drained so the coolant level at the tower will drop below the base. I drained the radiator completely. There is a plastic plug at the lower left of the radiator on the back side. Some sources say to remove the black fascia but his plug can be reached by hand and turned counter-clockwise with your fingers. Some penetrating oil may need to be applied to help remove the plug. The plug is fragile and can be broken if not careful. Collect the coolant in a clean vessel so the fluid can be filtered and reused later.
First remove the bleeder hose from the nipple that comes off the left side of the tower. This bleeder hose is the one that goes from the tower to the coolant overflow tank. This part (MNC4582AC) easily breaks so be carefull. Next remove the heater hose, the right side radiator hose and temperature sensing unit from the crossover pipe. The heater hose is the smaller hose. Factory clamps are of the spring-loaded tension type. A large pair of channel locks will need to be employed to remove these. Make note of all clamps removed so you can reinstall them on the same hoses AND in the same exact position to get a good seal. The temperature sensing unit is the gray plastic connector and extreme caution must be used in removing the connector so as not to damage the connector plastic or break the plastic of the crossover pipe.
Move the crossover connecting hose back clamp to the middle of the crossover hose. By doing this clamp first you will avoid breaking the crossover pipe. I strongly suggest that this hose (NCA2213AC) be replaced. eBay replacement cost of this item was about $ 10.00 and included shipping.
Next remove the 4 bolts that hold the crossover pipe in place. Various socket extension will need to be used with an 8 mm socket to do this. Carefully pull the crossover pipe away from the block in the two places it bolted in place to break the o-ring seal. Now the only thing holding the crossover pipe in place is the crossover connecting hose. Carefully work the hose off of the existing tower. Once that is removed you can more carefully remove the crossover hose from the crossover pipe and thus avoid damaging the pipe.
With those items removed, you can now remove the left side radiator hose from the thermostat tower bell housing. Again, keep track of all clamps and positions.
Now remove the three bolts holding the thermostat bell housing to thermostat tower. The thermostat will come out when you do this.
Now the process of removing the thermostat housing can be attacked.
This first photo shows the back passenger's (right side) bolt of the housing base. The head of the bolt in question can be seen towards the top of the photo. You can observe that the black plastic of the intake manifold does seem to be directly above the bolt:
The same can be observed with the back driver's (left side) bolt:
I first removed the front two base plate bolts with an 8 mm socket on a 1/4" socket drive.
Next, I found that instead of breaking apart the thermostat tower piece by piece with a pair of pliers, that a small chisel and a hammer could be employed and make the job easier in a few ways. This chisel method is not new but I did not see a detailed description in past posts.
I took a chisel that was about 1/2" width at the blade and placed it on the plastic base just forward to one of the back bolts. The chisel blade was thus running from one side of the car to the other. Or, parallel (not perpendicular) to the radiator.
Next, I used the chisel to break about halfway thru the base, went to the other side, did the same, came back, bust the base all the way thru and then went once again to the other side to finish the job. Now the top of the tower could be used as leverage if the crack at the base was not already complete.
Notice how the thermostat tower base broke in a controlled fashion and thus allowed the tower to be easily removed:
Finally, the back bolts were addressed. I used a regular open end 8 mm wrench and had plenty of room. These back bolts DO top out on the edge of the intake manifold housing BEFORE the bolts completely clear the threads. They actually hit the big circular raised area observed in the photo.
I just keep backing them out with the top of the bolt pushing on the manifold "circle" until the threads cleared. It was not far but one can still get worried that the manifold may crack until one realizes that it only tops out slightly before the threads clear.
Then it was simple to remove the remaining piece of the base along with the screws.
And another photo showing the clean fracture:
I installed the new thermostat into the bellhousing and bolted it together before installing the tower to the block.
The Stant thermostat is actually made by Waxhall in Great Britian which is the OEM supplier. The cost for this was about $12.00 at regular car parts store (Advance carries Stant). Both the kit and the thermostat came with a rubber gasket (as seen in picture). The one from Stant was a tad thicker but still easily fit in the housing. I went with it to get a better seal.
Remember that the spring points toward the engine and in this position the thermostat will only seat one way because of the pressure equalising valve on the unit will fit into a notch on the housing. You can see this one way ball valve in the photo.
For installation it is important to note that the sealing of the o-rings is what keeps the tower base to engine block and the crossover pipe to engine block from leaking. Thus these surfaces must be cleaned very carefully. The two o-rings on the crossover pipe must be removed and the channels cleaned thoroughly. These two o-rings do not come with the kit. I had to swing by the Jag dealer and pay about $ 7.00 each for these rings - part no. C2C11477010. These rings have nibs on them to keep them in the channel while replacing the pipe. I would not recommend regular o-rings.
I elected to go with the cap head bolt for the back two bolts on the base. The size is a M6-1.00 X 20. That 20 means 20 mm. The original bolts were 25 mm and that extra 5 mm cause the numerous problems with removal.
I used a 5 mm ball head drive that had a 6 inch extension to fasten the back bolts.
This next picture shows the angle in which you can drive the cap head bolts.
I secured these two cap head bolts down snug before putting the original bolts in the front. Some have suggested using 4 cap heads all around the base. I did not do this because the regular bolts can be driven at a harder force than the bolts with the cap head and the cap head driver. I felt that by securing the rear cap head snug and first that the two regular bolts in the front could "lever" the base down for a tight fit.
To be updated soon with final comments and photos.
Last edited by robertjag; 10-08-2013 at 12:13 AM.
The following 4 users liked this post by robertjag:
#80
10-05-2013, 01:58 AM

I did that last Saturday, it seems to be the best idea to refit easier the back bolts. First thought was to cut also 4-5 mm from the bolts as they were pressing in the inlet manifold when fully unbolted.