
How to change the transmission pan/filter and fluid on an X350
#1
 12-06-2013, 11:09 PM


I just finished doing this with help and input from a number of people. I won't get into what fluid I used or transmission pan/filter. This is just the steps I followed. I was apprehensive about getting under the car with it running. Ended up not being an issue (explained in the steps). Happy to provide a few photos, etc. if people are interested.
Gordon
========
X350 Transmission pan/filter/fluid change
PARTS, ETC.
Pan/Filter:
Fluid: Takes about 5.5 liters
Fluid pump to pump into transmission filler hole
Anti-seize
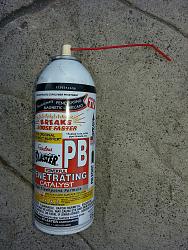
PB Blaster or other lubricant for loosening the transmission pan bolts
Print out of the pan bolt torque pattern (can be obtained from CTSC website
(ZF fluid, pan, bolt supplier)
Print out of the CTSC level check procedure (summary in body below)
Spray brake cleaning fluid (or carb cleaner in an aerosol)
Lots of paper towels
TOOLS:
Two ramps and two jack stands (or four jack stands)
Two hydraulic jacks (pump) to raise car evenly
10mm Hex for removing pan drain plug
8mm Hex stub for fill plug (must be short to fit in tight space)
8mm box wrench (one if 6 point, if 12 point, use two in parallel on hex stub)
Breaker pipe that will slide over both 8mm box wrenches.
T27 or T40 torx heads for pan bolts (if you have T27, replace them with T40)
Socket adapter for torx heads so you can use torque wrench
(if it is a drill bit torx head, a �� socket works well)
Torque wrench (inch/lbs)
Electric drill/driver
Level (to make sure car is level while checking fluid level
Thermometer (easiest is electronic non-contact)
Vice-grip pliers to turn and take out pan bolts who�s torx head gets stripped.
Anti-seize
Heat shields to wrap around exhaust pipes near filler plug (shields uses when sweating copper pipes with propane torches works perfectly). Two make you feel a little safer than one.
Tarp, etc. to catch splashing fluid
Plastic container/tray to catch the stream of fluid that comes out when you fill it and when you are testing the level at temperature
Procedure:
1. At least a few days before you start the project, drive the front onto ramps and use PB Blaster or similar to soak all of the transmission pan bolts. Most (except the front four or so) are open at the top, so if you bend the tube from the PB Blaster, you can soak from the top as well as the sides. I recommend doing this several times before the day you are going to change the pan.
2. When you are ready to start, raise car onto jack stands. Easiest is to back up onto ramps, then jack up front of car to make it level (use level under body frame). Make sure you jack up both sides at the same time so as to not put undue twisting torque on the frame
3. Remove the under engine cover
4. Locate the fill plug on the side of the transmission. It is just above the bottom of the transmission, on the right side, a little farther forward than where the drain plug in the pan is (pan drain plug is in the middle, the fill plug is on the right side of the tranny). Use a very short 8mm hex stub. There is little clearance between the plug head and the frame. I purchased one that barely fit (hard to even find that one), but it was difficult to use�almost too long. Ended up sawing an 8mm socket into a little stub that was short enough to put in the plug with just enough room (took two metal saw blades and about 45 minutes-hopefully you�ll have something you can fit). You can�t put a breaker bar or ratchet here. If you can locate an 8mm closed end box wrench with 6 point, that�s the best. However, if you don�t, then make sure you get two 8mm 12 point box wrenches and slide both of them over the hex stub in the fill plug. Use the breaker bar to make sure you can loosen the plug before you go forward (you won�t want to drain the transmission only to find you can�t loosen the fill plug to fill it back up). Once it�s loose, leave it and go to the next step.
5. Loosen all of the pan bolts. If you have the older T27, be very careful that you don�t strip the torx head (this is common and I had one that was starting to strip). Some people have used impact wrenches with success. I actually bought one but ended up just using a regular ratchet. Since I had soaked each bolt in PB Blaster three times over a week, all came out with no problem except one. That head started to strip. Luckily it was in an easy access location and I was able to get vice grips on it and easily turn it out.
6. Once you know you can remove all pan bolts (and the filler plug), use the 10mm hex to pull the pan drain plug. Let all the fluid drain out.
7. Remove all but the four pan bolts in the corners of the pan. If your torx bit will fit in a drill, you can use a drill to take the bolts out much faster. Loosen the remaining four. Remove the two near the drain plug hole and tilt the pan down to let it drain. Then hold the pan up with one hand (plastic so light), remove the last two bolts, and remove the pan.
8. Check the magnets to make sure they are fairly clean and no large pieces of metal on them.
9. Clean the gasket surface of the bottom of the transmission so the gasket in the pan will seal well.
10. Go to the CTSC website and get a copy of the torque pattern image. Print it out on a piece of paper, and tape it to the bottom of your new panel (I put it in a Word document, made it almost as large as a piece of paper). This makes it VERY easy to quickly torque the bolts.
11. Put anti-seize on all of the pan bolts. If you had T27, make sure you replace them with T40 so you�ll have less of a problem next time. Bolts can be purchased at CTSC as well as other places.
12. Lubricate the gasket on the pan, as well as the gasket o-ring on the tube that feeds into the transmission from the pan.
13. Carefully feed the tube into the transmission, and while holding the transmission pan in place, put the bolts in. Once the first four are in, it is very quick to use the drill to drive all of the bolts in. But don�t go so fast you are torqueing them since you need to torque them in a specific pattern with a torque wrench.
14. Once all bolts are snug, use your torque wrench (if using a drill/screw bit T40, use a �� socket as an adapter. Follow the torque pattern and torque to 10NM = 88 in/lb = 7.37 ft/lb
15. Pull out the fill plug.
16. Put a pan or tray underneath the fill plug to catch the fluid that will stream out. Pump in new fluid. I found that less than 4 liters (maybe 3.5?) went in before it started to trickle out. Put the fill plug back in loosely.
17. Start the engine and then take the fill plug back out. With the engine running, it has sucked up the fluid so the level has now dropped. Pump in fluid again while the engine is running until it starts to drip out (about 5.5 liters total including what was pumped in before starting and the rest after starting). Note: I was very apprehensive about getting under the car with the engine running and near exhaust pipes. I did two things: 1.) I got heat shields and wrapped them around the exhaust pipe near the filler plug. This is not as big of a problem as it is on an XK (absolutely mandatory on an XK because the pipe is right next to the fill plug), but gives piece of mind. And 2.), I used ear plugs. It probably would have been okay without them, but I felt much better and relaxed with them in. In addition, due to the very little clearance between where the fill plug goes and the frame, I was having a hard time getting the plug in when I went under the car head first from the right side. I found that if I went in from the left side head first, my hand was in a better position to screw the plug in. I did make an 8mm hex stub that I thought I�d put in the plug and use that to help me turn the plug, but I found it wasn�t necessary when I came in from the left side.
18. Put fill plug back in loosely again as soon as it has started dripping out again.
19. Get in car and shift into R, N, D, and back and forth a number of times. You are not only mixing the fluid with the old fluid, but you are helping to warm up the transmission. The transmission must be between 35 and 50C. As it warms up, the fluid expands. You want a slow stream at 40c.
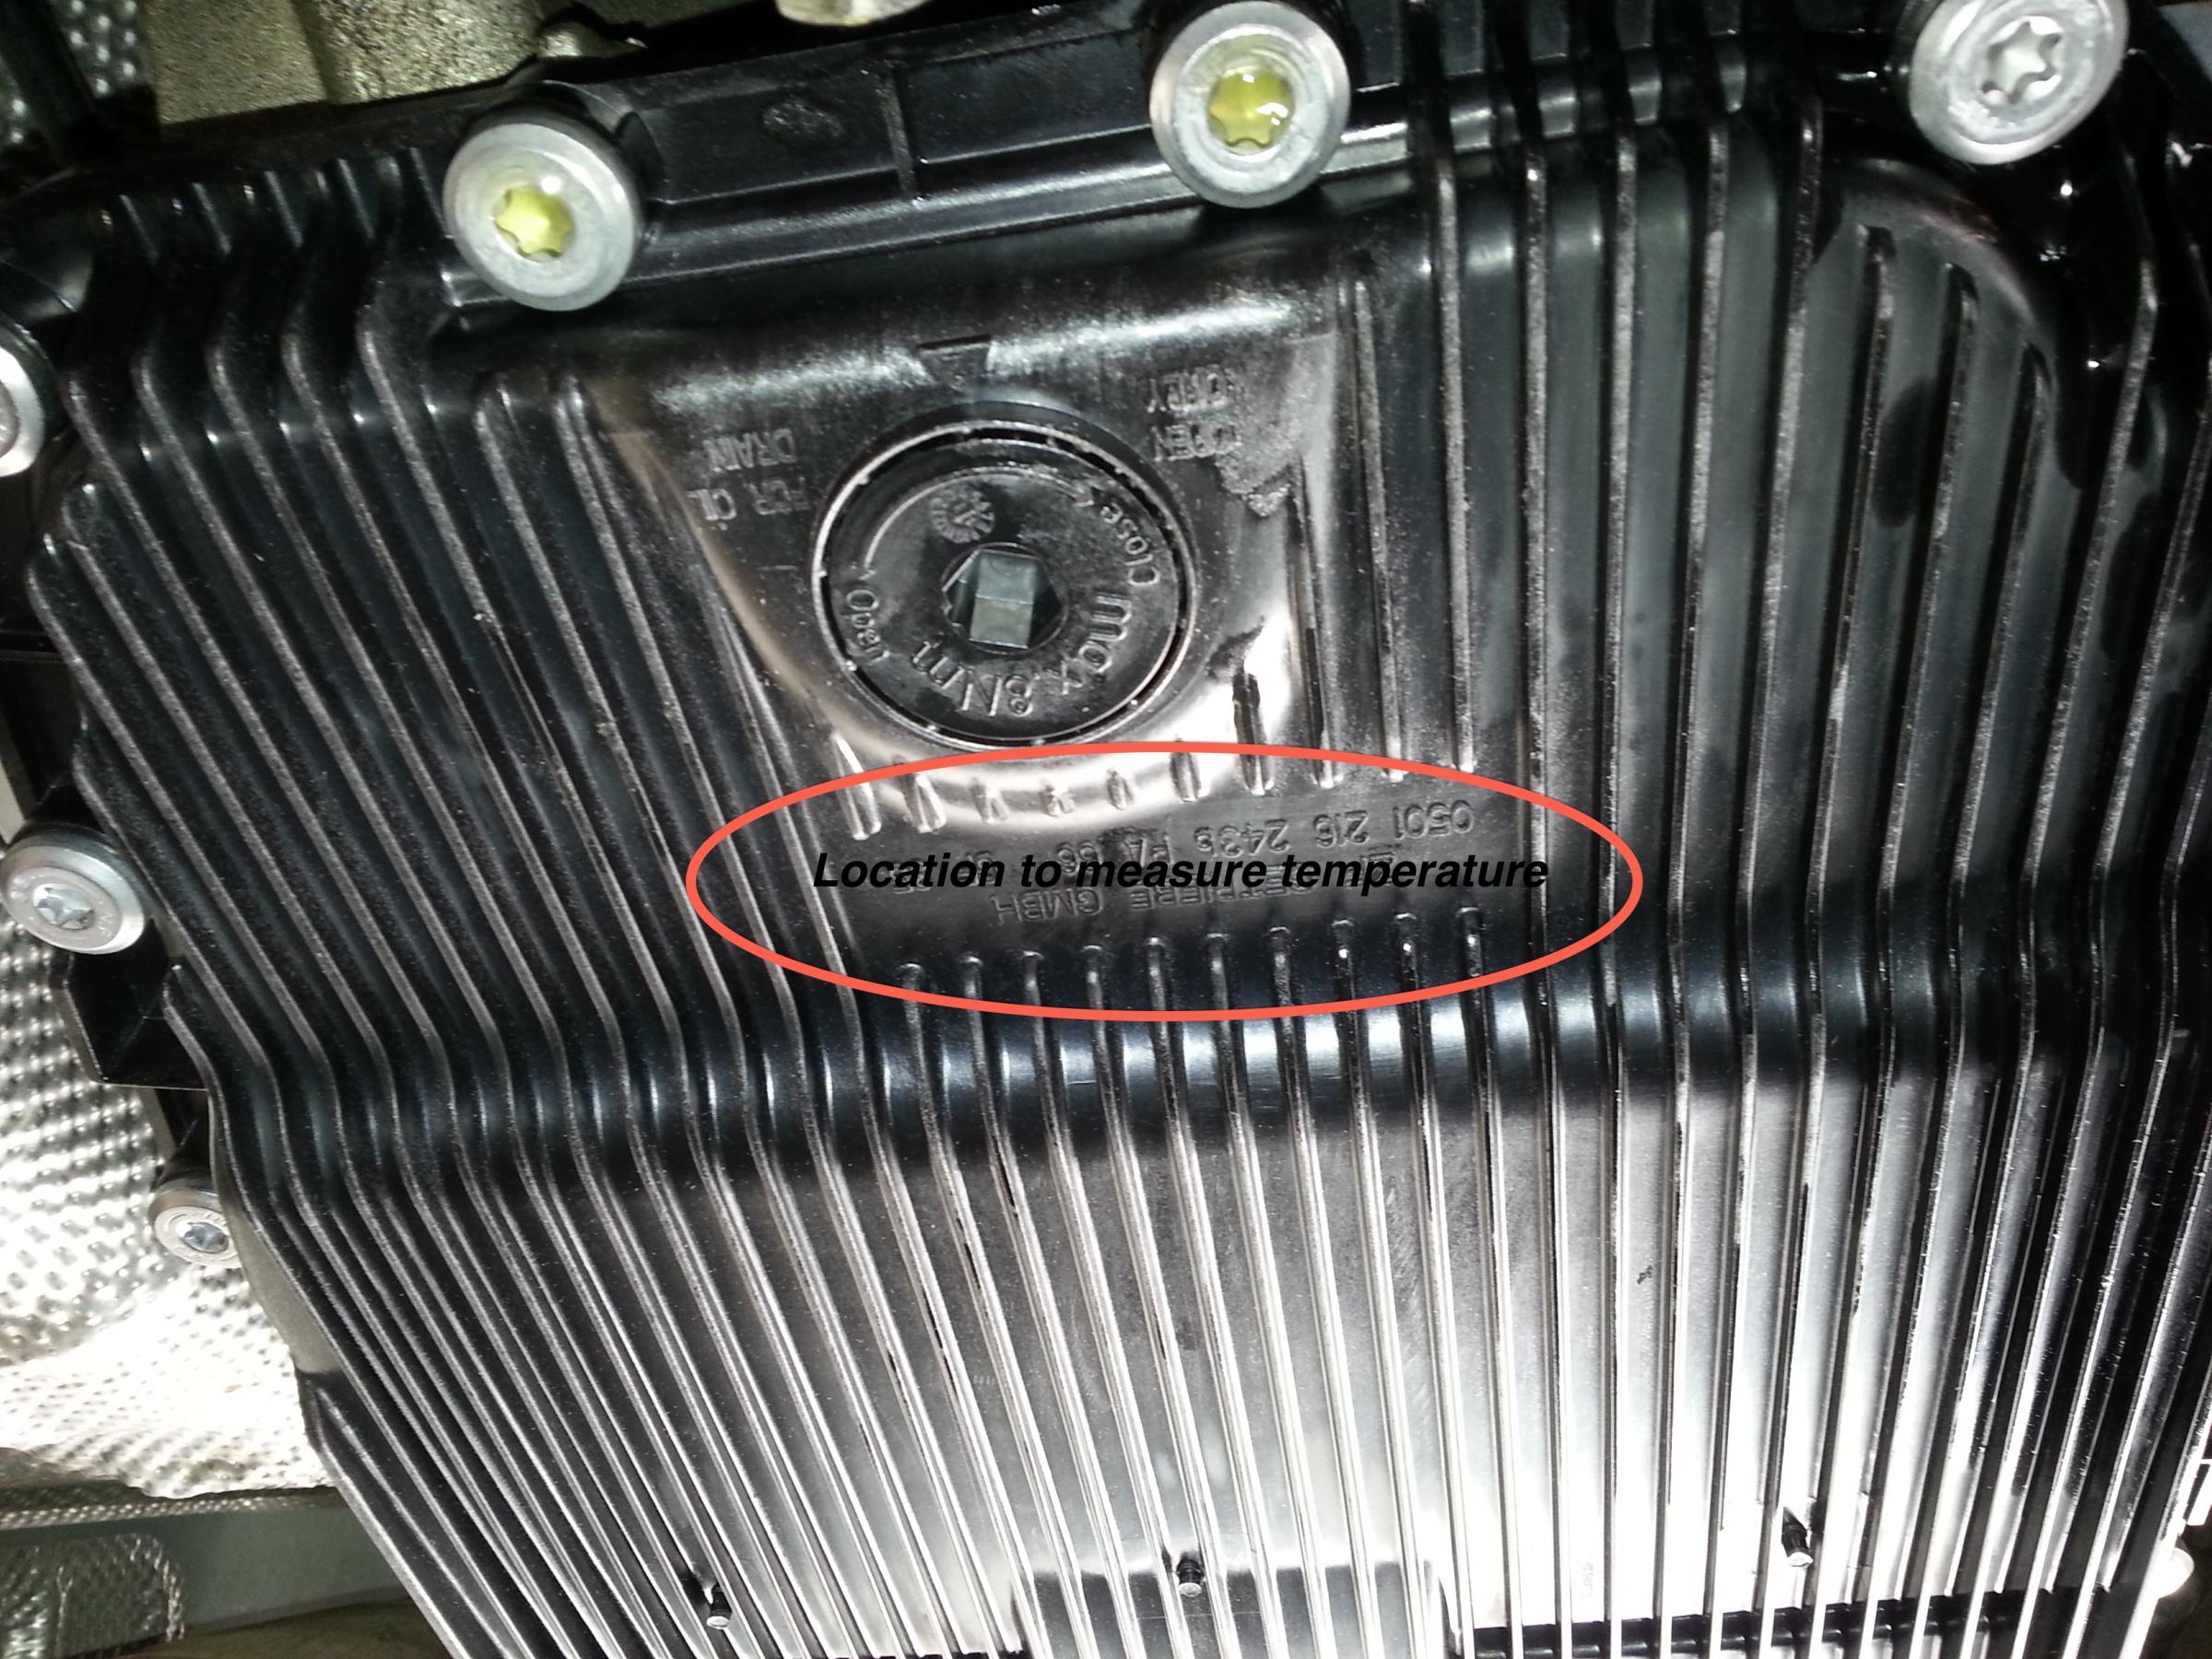
20. Measure the transmission fluid. The easiest way to do it is with a non-contact thermometer. The best place to aim it is at the flat spot with writing on it just forward from where the drain plug is. It is thinnest here with no cooling fins, so shows the most accurate temperature. The case temp may be 1-2 degrees lower than the fluid, so I aimed for 38c.
21. Keep checking it and then shifting back and forth until it gets over 35c. Then stay under the engine and monitor it until it hits about 38-39. Then pull the fill plug. In my case, it was just about right, I got a slow stream of fluid coming out; I didn�t have to add any. I put the fill plug back in just as it hit 40c. Note: If the temp gets to 50c you have to shut the engine off and let it cool and do it again). In warm climates, it will warm up quickly. I did it in the morning in early December where the outside temperature (Northern California) was in the low 50s f (12c) so it actually took about 20 minutes from cold (drained it the night before) to warm enough to check. Also, note that 50c is going to be very hot. 40c, on the other hand, is only 104f, so comfortable hot tub temperature. So there�s no real concern about getting burned with the fluid dripping out as long as you are doing it at the correct temperature. If it feels too hot to the touch, it is too hot.
22. Shut the engine off (hooray), then tighten the fill plug. Of course it is impossible to use a torque wrench, so I just got it tight with a fairly light tug on my breaker bar (with the two 8mm wrenches on the hex stub).
23. Use the brake cleaner or other spray to clean off the pan, fill plug, etc. from the fluid that dripped.
24. Lower the car (lower evenly so there is no undue stress to the frame), clean up the mess, and you�re done! Congratulations!!
Gordon
========
X350 Transmission pan/filter/fluid change
PARTS, ETC.
Pan/Filter:
Fluid: Takes about 5.5 liters
Fluid pump to pump into transmission filler hole
Anti-seize
PB Blaster or other lubricant for loosening the transmission pan bolts
Print out of the pan bolt torque pattern (can be obtained from CTSC website
(ZF fluid, pan, bolt supplier)
Print out of the CTSC level check procedure (summary in body below)
Spray brake cleaning fluid (or carb cleaner in an aerosol)
Lots of paper towels
TOOLS:
Two ramps and two jack stands (or four jack stands)
Two hydraulic jacks (pump) to raise car evenly
10mm Hex for removing pan drain plug
8mm Hex stub for fill plug (must be short to fit in tight space)
8mm box wrench (one if 6 point, if 12 point, use two in parallel on hex stub)
Breaker pipe that will slide over both 8mm box wrenches.
T27 or T40 torx heads for pan bolts (if you have T27, replace them with T40)
Socket adapter for torx heads so you can use torque wrench
(if it is a drill bit torx head, a �� socket works well)
Torque wrench (inch/lbs)
Electric drill/driver
Level (to make sure car is level while checking fluid level
Thermometer (easiest is electronic non-contact)
Vice-grip pliers to turn and take out pan bolts who�s torx head gets stripped.
Anti-seize
Heat shields to wrap around exhaust pipes near filler plug (shields uses when sweating copper pipes with propane torches works perfectly). Two make you feel a little safer than one.
Tarp, etc. to catch splashing fluid
Plastic container/tray to catch the stream of fluid that comes out when you fill it and when you are testing the level at temperature
Procedure:
1. At least a few days before you start the project, drive the front onto ramps and use PB Blaster or similar to soak all of the transmission pan bolts. Most (except the front four or so) are open at the top, so if you bend the tube from the PB Blaster, you can soak from the top as well as the sides. I recommend doing this several times before the day you are going to change the pan.
2. When you are ready to start, raise car onto jack stands. Easiest is to back up onto ramps, then jack up front of car to make it level (use level under body frame). Make sure you jack up both sides at the same time so as to not put undue twisting torque on the frame
3. Remove the under engine cover
4. Locate the fill plug on the side of the transmission. It is just above the bottom of the transmission, on the right side, a little farther forward than where the drain plug in the pan is (pan drain plug is in the middle, the fill plug is on the right side of the tranny). Use a very short 8mm hex stub. There is little clearance between the plug head and the frame. I purchased one that barely fit (hard to even find that one), but it was difficult to use�almost too long. Ended up sawing an 8mm socket into a little stub that was short enough to put in the plug with just enough room (took two metal saw blades and about 45 minutes-hopefully you�ll have something you can fit). You can�t put a breaker bar or ratchet here. If you can locate an 8mm closed end box wrench with 6 point, that�s the best. However, if you don�t, then make sure you get two 8mm 12 point box wrenches and slide both of them over the hex stub in the fill plug. Use the breaker bar to make sure you can loosen the plug before you go forward (you won�t want to drain the transmission only to find you can�t loosen the fill plug to fill it back up). Once it�s loose, leave it and go to the next step.
5. Loosen all of the pan bolts. If you have the older T27, be very careful that you don�t strip the torx head (this is common and I had one that was starting to strip). Some people have used impact wrenches with success. I actually bought one but ended up just using a regular ratchet. Since I had soaked each bolt in PB Blaster three times over a week, all came out with no problem except one. That head started to strip. Luckily it was in an easy access location and I was able to get vice grips on it and easily turn it out.
6. Once you know you can remove all pan bolts (and the filler plug), use the 10mm hex to pull the pan drain plug. Let all the fluid drain out.
7. Remove all but the four pan bolts in the corners of the pan. If your torx bit will fit in a drill, you can use a drill to take the bolts out much faster. Loosen the remaining four. Remove the two near the drain plug hole and tilt the pan down to let it drain. Then hold the pan up with one hand (plastic so light), remove the last two bolts, and remove the pan.
8. Check the magnets to make sure they are fairly clean and no large pieces of metal on them.
9. Clean the gasket surface of the bottom of the transmission so the gasket in the pan will seal well.
10. Go to the CTSC website and get a copy of the torque pattern image. Print it out on a piece of paper, and tape it to the bottom of your new panel (I put it in a Word document, made it almost as large as a piece of paper). This makes it VERY easy to quickly torque the bolts.
11. Put anti-seize on all of the pan bolts. If you had T27, make sure you replace them with T40 so you�ll have less of a problem next time. Bolts can be purchased at CTSC as well as other places.
12. Lubricate the gasket on the pan, as well as the gasket o-ring on the tube that feeds into the transmission from the pan.
13. Carefully feed the tube into the transmission, and while holding the transmission pan in place, put the bolts in. Once the first four are in, it is very quick to use the drill to drive all of the bolts in. But don�t go so fast you are torqueing them since you need to torque them in a specific pattern with a torque wrench.
14. Once all bolts are snug, use your torque wrench (if using a drill/screw bit T40, use a �� socket as an adapter. Follow the torque pattern and torque to 10NM = 88 in/lb = 7.37 ft/lb
15. Pull out the fill plug.
16. Put a pan or tray underneath the fill plug to catch the fluid that will stream out. Pump in new fluid. I found that less than 4 liters (maybe 3.5?) went in before it started to trickle out. Put the fill plug back in loosely.
17. Start the engine and then take the fill plug back out. With the engine running, it has sucked up the fluid so the level has now dropped. Pump in fluid again while the engine is running until it starts to drip out (about 5.5 liters total including what was pumped in before starting and the rest after starting). Note: I was very apprehensive about getting under the car with the engine running and near exhaust pipes. I did two things: 1.) I got heat shields and wrapped them around the exhaust pipe near the filler plug. This is not as big of a problem as it is on an XK (absolutely mandatory on an XK because the pipe is right next to the fill plug), but gives piece of mind. And 2.), I used ear plugs. It probably would have been okay without them, but I felt much better and relaxed with them in. In addition, due to the very little clearance between where the fill plug goes and the frame, I was having a hard time getting the plug in when I went under the car head first from the right side. I found that if I went in from the left side head first, my hand was in a better position to screw the plug in. I did make an 8mm hex stub that I thought I�d put in the plug and use that to help me turn the plug, but I found it wasn�t necessary when I came in from the left side.
18. Put fill plug back in loosely again as soon as it has started dripping out again.
19. Get in car and shift into R, N, D, and back and forth a number of times. You are not only mixing the fluid with the old fluid, but you are helping to warm up the transmission. The transmission must be between 35 and 50C. As it warms up, the fluid expands. You want a slow stream at 40c.
20. Measure the transmission fluid. The easiest way to do it is with a non-contact thermometer. The best place to aim it is at the flat spot with writing on it just forward from where the drain plug is. It is thinnest here with no cooling fins, so shows the most accurate temperature. The case temp may be 1-2 degrees lower than the fluid, so I aimed for 38c.
21. Keep checking it and then shifting back and forth until it gets over 35c. Then stay under the engine and monitor it until it hits about 38-39. Then pull the fill plug. In my case, it was just about right, I got a slow stream of fluid coming out; I didn�t have to add any. I put the fill plug back in just as it hit 40c. Note: If the temp gets to 50c you have to shut the engine off and let it cool and do it again). In warm climates, it will warm up quickly. I did it in the morning in early December where the outside temperature (Northern California) was in the low 50s f (12c) so it actually took about 20 minutes from cold (drained it the night before) to warm enough to check. Also, note that 50c is going to be very hot. 40c, on the other hand, is only 104f, so comfortable hot tub temperature. So there�s no real concern about getting burned with the fluid dripping out as long as you are doing it at the correct temperature. If it feels too hot to the touch, it is too hot.
22. Shut the engine off (hooray), then tighten the fill plug. Of course it is impossible to use a torque wrench, so I just got it tight with a fairly light tug on my breaker bar (with the two 8mm wrenches on the hex stub).
23. Use the brake cleaner or other spray to clean off the pan, fill plug, etc. from the fluid that dripped.
24. Lower the car (lower evenly so there is no undue stress to the frame), clean up the mess, and you�re done! Congratulations!!
The following 10 users liked this post by slmskrs:
2ManyCars (12-07-2013),
ChilledJames (12-07-2013),
JimC64 (02-06-2014),
jjd247247 (02-22-2015),
lcmjaguar (12-07-2013),
and 5 others liked this post.
#2
12-07-2013, 01:51 AM
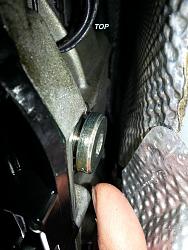
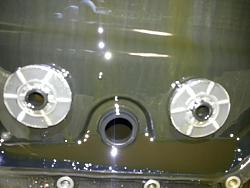
Filler plug clearance (very little). Picture taken on side, so top (up) is on the left side of the picture.

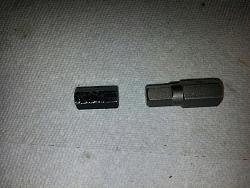
8mm hex stub I cut, as well as the shortest 8mm stub I could find (with 10mm on the other side--it will barely fit but short one works fine)
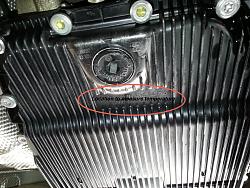
This is the spot that I measured the transmission temperature (red circle). The flat spot just north of the drain plug.

8mm hex stub I cut, as well as the shortest 8mm stub I could find (with 10mm on the other side--it will barely fit but short one works fine)

This is the spot that I measured the transmission temperature (red circle). The flat spot just north of the drain plug.
The following users liked this post:
magmedia (12-07-2013)
#3
12-07-2013, 02:13 PM
One other thing. I pulled the fuse for the load leveling so the car would stay put (since the back tires are on ramps, I didn't want them moving when I had jacked up the front and leveled it). It is in the trunk fuse box, 2nd row and I think the 3rd or 4th down (10amp). Check your manual.
#4
12-07-2013, 02:18 PM
#5
12-07-2013, 03:17 PM
Senior Member
#6
12-08-2013, 07:19 PM
#7
12-09-2013, 05:25 AM

Veteran Member
You probably don't need to, but it's OE-type OBD (well, diagnostic) tool such as IDS/SDD only. Effectively it can clear the stored timings ("adaptions" or adaptations) for the exact ways the solenoids/clutches work internally and then relearn. But it learns all the time so it's likely fine. (Unless a tech points out otherwise LOL)
Trending Topics
#8
12-13-2013, 12:51 AM
Veteran Member
I just finished doing this with help and input from a number of people. I won't get into what fluid I used or transmission pan/filter. This is just the steps I followed. I was apprehensive about getting under the car with it running. Ended up not being an issue (explained in the steps). Happy to provide a few photos, etc. if people are interested.
Gordon
...........>>>>>>>>>
Gordon
...........>>>>>>>>>
A picture they say is worth a thousand words so, don't be backward in forthcoming with the pics ;o))
#9
12-13-2013, 09:35 AM
#10
12-16-2013, 12:52 AM
First, I don�t know why the site is rotating all of my vertical pictures into horizontal, but I can�t figure out to change/fix that. So I�ve labeled �top� or �up� so if you download them and manually rotate them, you�ll see what angle I was looking from.
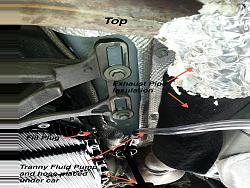
First, here�s the fill plug and limited clearance picture. There is little space between the plug and the shielding material that butts up to the frame, and it doesn�t move, so that�s all you have to work with.
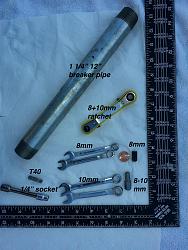
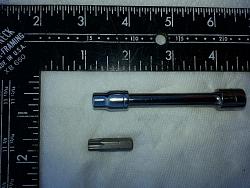
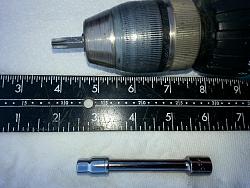
Next are the main tools for pulling the pan and refilling (I left out the 10mm hex drain plug socket). Note my two 8mm hex stubs. I was able to purchase one that is 8mm on one side and 10mm on the other (that�s the shortest I could find). It barely fit into the plug before I loosened it. I used the two 10mm 12pt wrenches on this plug along with the breaker pipe to break loose the plug. I was then able to turn it out by hand (I had to remove the 8-10mm stub before I could back the plug out). If you can�t turn the plug by hand, you will HAVE to have a shorter 8mm stub and the ratchet wrench pictured (which I didn�t need). The T40 torx bit is also there along with the �� socket adapter I used to connect the T40 to my torque wrench.
Next is the pump and container that the pump screws into. I had just done a transmission filter/fluid replacement on our Expedition so I had a clean empty container. Note: This one-gallon container is a bit tall when you have it under the car with the pump screwed it (see following picture). It works, but barely since it is so tall. But since it takes over 3.5 liters when you first fill it after replacing the pan, this is a good size.
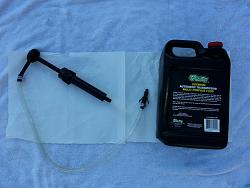
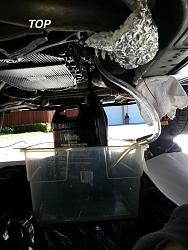
This is the pump and fluid container, sitting in a clear catch tray. I did not use the bucket I used to drain the transmission for two reasons: 1. I didn�t want the fill plug or the hex stub to fall into dirty fluid if I dropped them, 2. I didn�t want any splashing of the old fluid.
This is the exhaust pipe insulation and the fill plug. I used two types of pipe sweating insulation: An old fiberglass type, and a new one made out of some sort of fiber. Just make me feel more comfortable while under the car.
This is the 8-10mm hex stub with two 10mm 12pt wrenches in the breaker pipe.
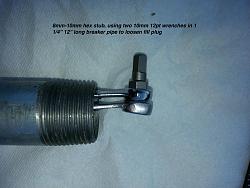
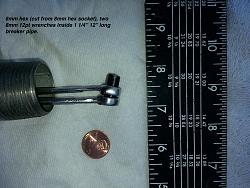
This is the 8mm hex stub I cut off a socket with two 8mm 12pt wrenches in the breaker pipe.
Here�s the fluid pump, fluid container, and drip pan. Note the top of the pump is hitting the car. It has to be maneuvered into this location and there is barely enough room to pump it.
This is a copy of the CTSC torque chart that I printed and taped to the bottom of the pan. I noted the torque numbers at the top.
torque pattern for pan print out.pdf
This is the T40 Torx bit with a �� socket adapter for use with a torque wrench.
This is the T40 Torx bit in a drill (every quick to remove and install the bolts (when installing, don�t torque them with the drill).
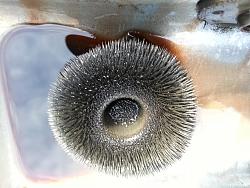
Here are the two magnets in the bottom of the old pan.
A close up of one of the magnets. Looks quite clean.

Here�s a picture of a magnet on another car. You don�t want to see this when you pull your X350 pan!!
Hope this helps!
First, here�s the fill plug and limited clearance picture. There is little space between the plug and the shielding material that butts up to the frame, and it doesn�t move, so that�s all you have to work with.

Next are the main tools for pulling the pan and refilling (I left out the 10mm hex drain plug socket). Note my two 8mm hex stubs. I was able to purchase one that is 8mm on one side and 10mm on the other (that�s the shortest I could find). It barely fit into the plug before I loosened it. I used the two 10mm 12pt wrenches on this plug along with the breaker pipe to break loose the plug. I was then able to turn it out by hand (I had to remove the 8-10mm stub before I could back the plug out). If you can�t turn the plug by hand, you will HAVE to have a shorter 8mm stub and the ratchet wrench pictured (which I didn�t need). The T40 torx bit is also there along with the �� socket adapter I used to connect the T40 to my torque wrench.

Next is the pump and container that the pump screws into. I had just done a transmission filter/fluid replacement on our Expedition so I had a clean empty container. Note: This one-gallon container is a bit tall when you have it under the car with the pump screwed it (see following picture). It works, but barely since it is so tall. But since it takes over 3.5 liters when you first fill it after replacing the pan, this is a good size.

This is the pump and fluid container, sitting in a clear catch tray. I did not use the bucket I used to drain the transmission for two reasons: 1. I didn�t want the fill plug or the hex stub to fall into dirty fluid if I dropped them, 2. I didn�t want any splashing of the old fluid.

This is the exhaust pipe insulation and the fill plug. I used two types of pipe sweating insulation: An old fiberglass type, and a new one made out of some sort of fiber. Just make me feel more comfortable while under the car.

This is the 8-10mm hex stub with two 10mm 12pt wrenches in the breaker pipe.

This is the 8mm hex stub I cut off a socket with two 8mm 12pt wrenches in the breaker pipe.

Here�s the fluid pump, fluid container, and drip pan. Note the top of the pump is hitting the car. It has to be maneuvered into this location and there is barely enough room to pump it.
This is a copy of the CTSC torque chart that I printed and taped to the bottom of the pan. I noted the torque numbers at the top.
torque pattern for pan print out.pdf
This is the T40 Torx bit with a �� socket adapter for use with a torque wrench.
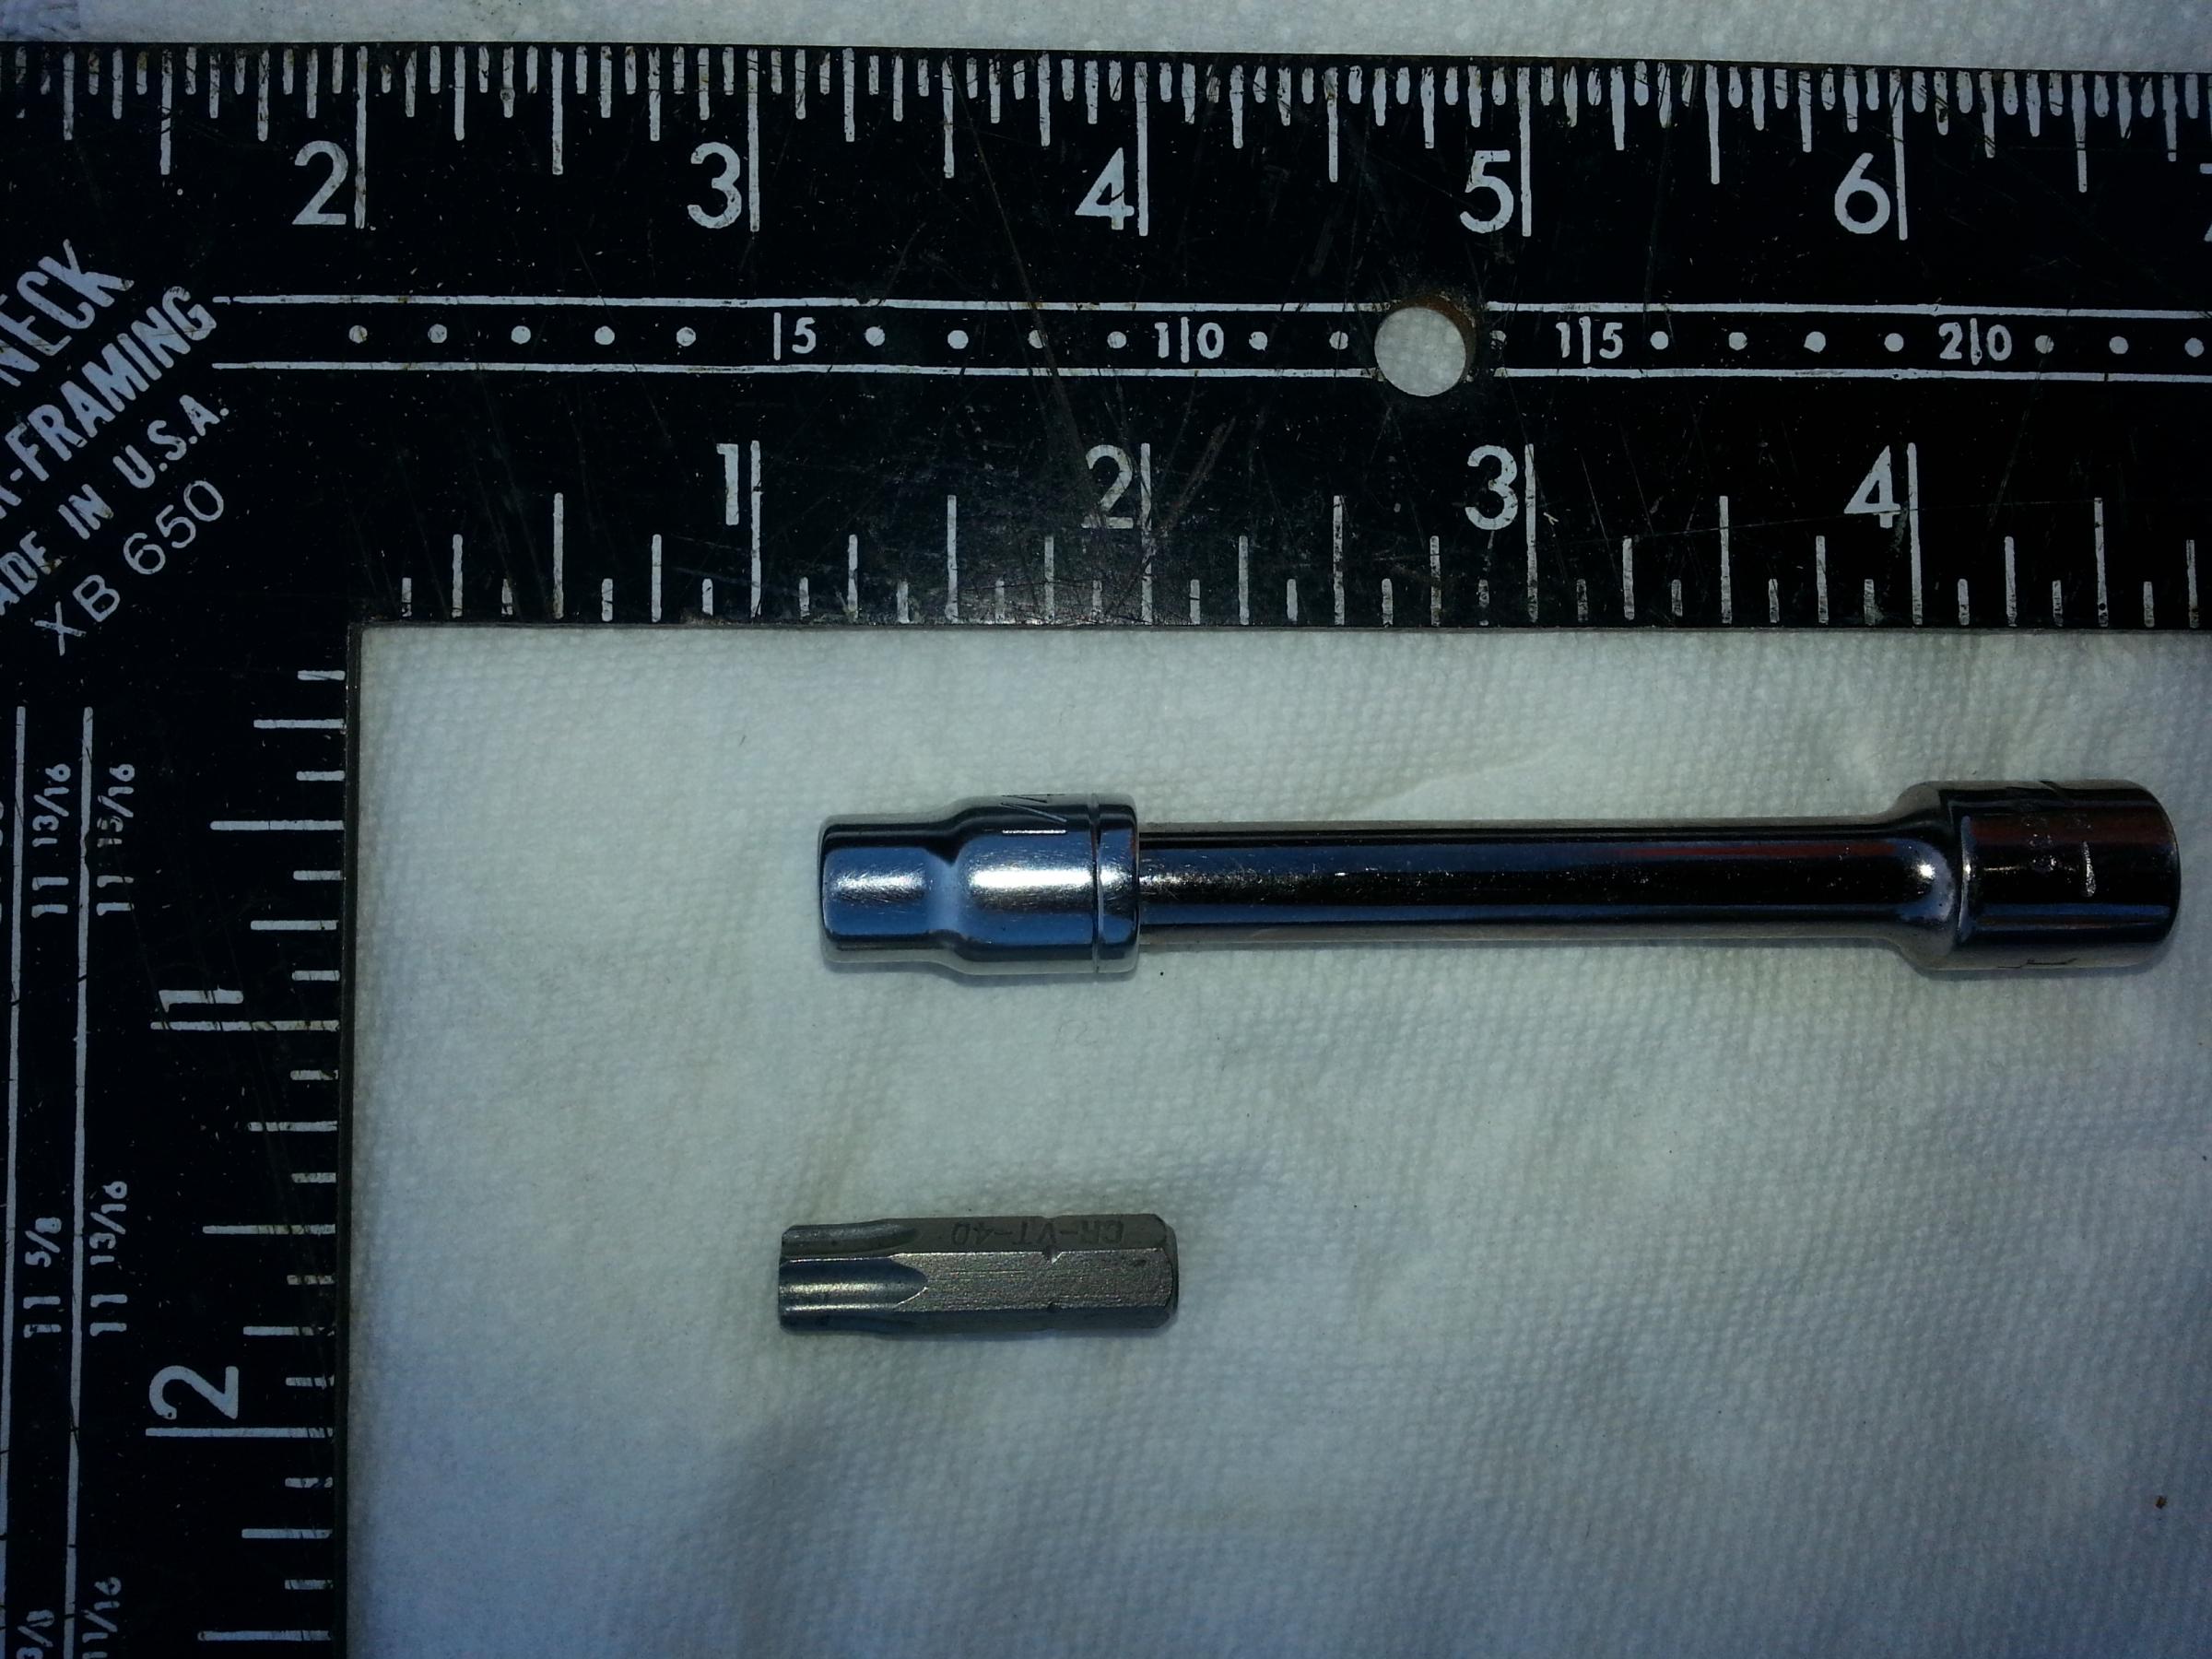
This is the T40 Torx bit in a drill (every quick to remove and install the bolts (when installing, don�t torque them with the drill).

Here are the two magnets in the bottom of the old pan.

A close up of one of the magnets. Looks quite clean.

Here�s a picture of a magnet on another car. You don�t want to see this when you pull your X350 pan!!

Hope this helps!
The following users liked this post:
lcmjaguar (04-12-2016)
#11
12-16-2013, 01:03 AM
Oh, and here's the PB Blaster with a bent tube (it was bent more but has since straightened out a bit). This is used so you can get BP Blaster or something similar to drip down through the top of each transmission pan bolt hole several times before you remove them to help them break free.

The following users liked this post:
Don B (04-14-2016)
#12
12-16-2013, 10:35 AM
Did you replace your connector sleeve while you had the pan off. Mine wasn't leaking when I serviced my trans but I'm glad I changed it cause it was original and the O-ring was starting to flatten out. They can be a little tricky to change too since the space to work is very limited under there. You need to make sure the lock ring of the connector is turned all the way counter clockwise when you plug it back in.
#13
12-16-2013, 12:57 PM
Did you replace your connector sleeve while you had the pan off. Mine wasn't leaking when I serviced my trans but I'm glad I changed it cause it was original and the O-ring was starting to flatten out. They can be a little tricky to change too since the space to work is very limited under there. You need to make sure the lock ring of the connector is turned all the way counter clockwise when you plug it back in.
#14
12-16-2013, 04:00 PM
Hate to say it, but I don't know what connector or connector o-ring you're referring to, so I didn't change it. I didn't hear anything about any connector until after I had completed the process, so not sure what I missed (but nothing is leaking). You have any pictures, etc. so I could add it into the procedure?
Mechatronic sealing sleeve
They also have a PDF of the procedure to change it.
#15
04-12-2016, 03:06 PM

Veteran Member
I found the perfect tool for removing the fill plug:
9 PC TEKTON Hex Star Key Chrome Vanadium Long Arm Wrench Set w Case T10 T50 | eBay
I believe it's either the T45 or T50 size, but it's the perfect size to fit in that small space. Just slip a cheater pipe or something over the end.
9 PC TEKTON Hex Star Key Chrome Vanadium Long Arm Wrench Set w Case T10 T50 | eBay
I believe it's either the T45 or T50 size, but it's the perfect size to fit in that small space. Just slip a cheater pipe or something over the end.
#16
04-12-2016, 03:53 PM


I found the perfect tool for removing the fill plug:
9 PC TEKTON Hex Star Key Chrome Vanadium Long Arm Wrench Set w Case T10 T50 | eBay
I believe it's either the T45 or T50 size, but it's the perfect size to fit in that small space. Just slip a cheater pipe or something over the end.
9 PC TEKTON Hex Star Key Chrome Vanadium Long Arm Wrench Set w Case T10 T50 | eBay
I believe it's either the T45 or T50 size, but it's the perfect size to fit in that small space. Just slip a cheater pipe or something over the end.
The following users liked this post:
Don B (04-12-2016)
#18
04-13-2016, 03:26 PM
Veteran Member
#19
04-13-2016, 05:16 PM