When you click on links to various merchants on this site and make a purchase, this can result in this site earning a commission. Affiliate programs and affiliations include, but are not limited to, the eBay Partner Network.
So�.. My reality about taillight condensation.
With pictures.
Took the left twilight off. Went in house to heat it with a heat gun to take the condensation out. After about 1 hour of heating front and back around�. I noticed some drops forming at the edge between red part and clear part on the lower side of the light. I turned it with the lens down to try to move the drops and�� surprise.�.. Drops gathered in the middle section of the taillight, where it bows. And�.. Another SURPRISE�� started dripping.
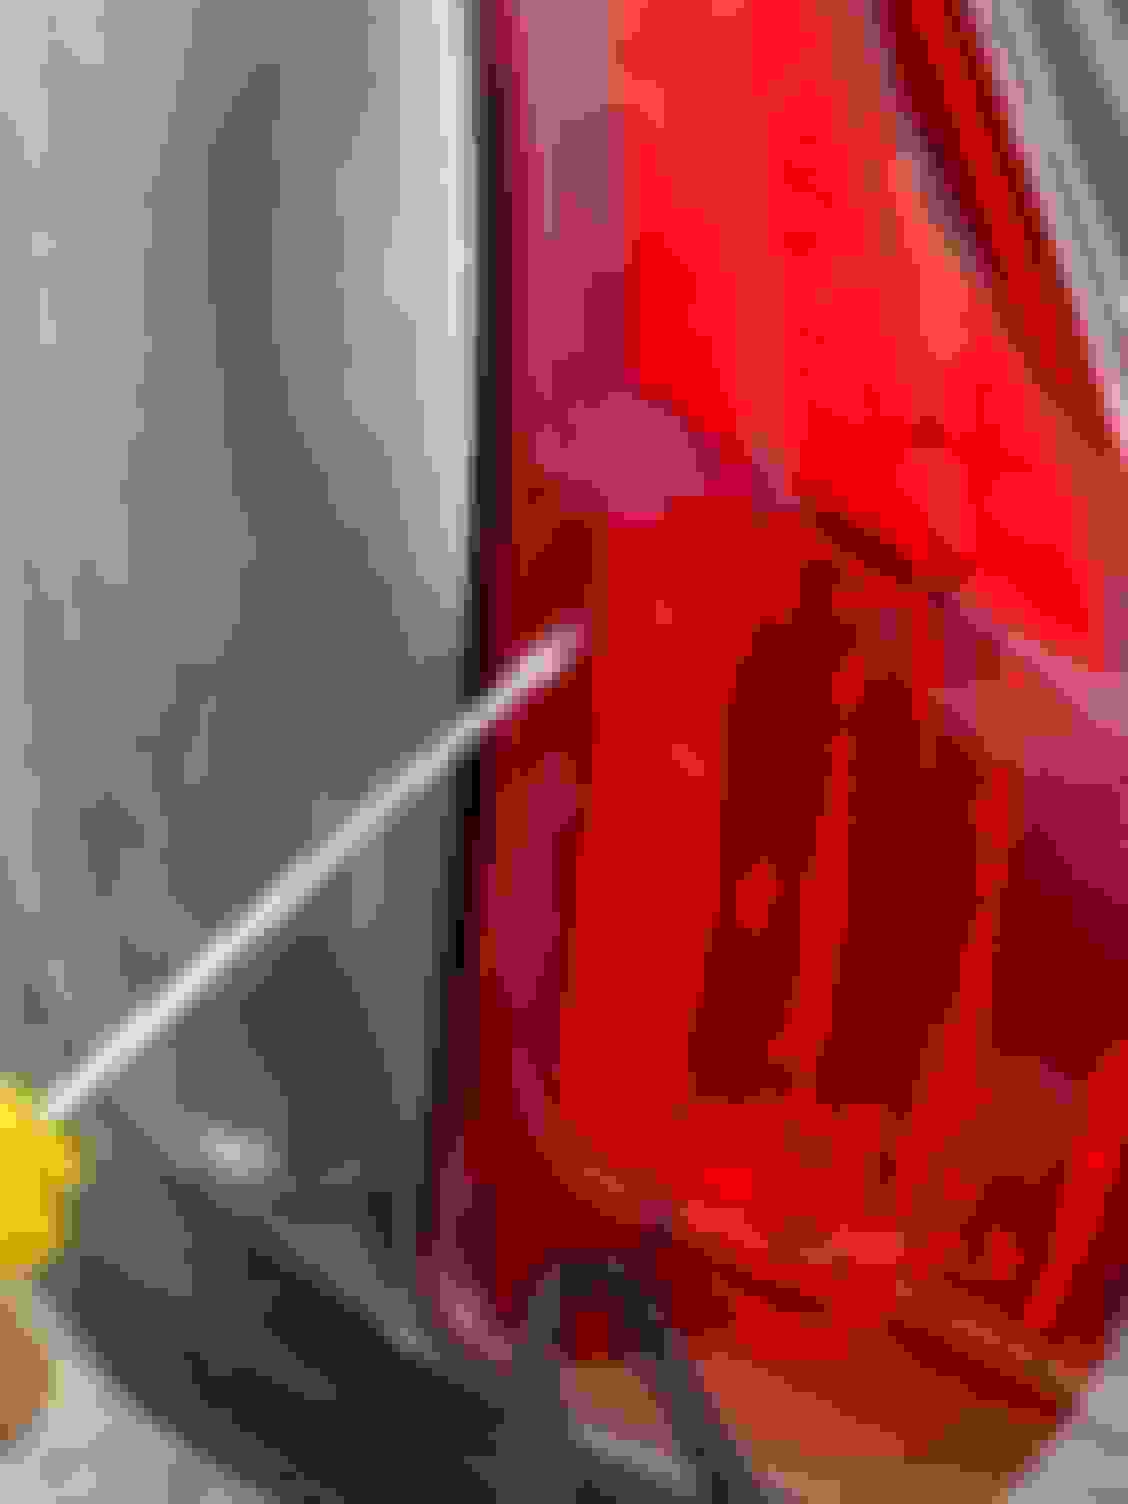
And it drips from here�. Next pic�. Showed by screwdriver
I hope it shows�. Split between red edge and the red light active light edge. I must admit.� it's not perfectly straight.� but having no signs of hit� I could insider it like a separation beetles layers of plastic. Caused by what? In my opinion, mechanical stress from the 3 bolts and /or heat from years in the sun.
So�. After taking out about one cap of bottle with water, by waiting to drip thru that crack�. Heating and reheating both sides of the tail light, with the wire plug from behind open, and even carrefouly blowing hot air from about30-50 cm distance even in the taillight hole�.. I got almost all the water out and reffited the taillight to the car.
I also� as seen I. Pictures�. Put some ppf on it�. Self healing, and with time and sun will adhere to the tail light better.
Will monitor the situation further. The crack is clearly the problem in my case. The layer do separate. So�. Mine tail light being a 2010.. It has upgraded led tail lights, and I was thinking the plug from the bach was nas protecting good enough, but it did. Only explanation it's the crack.
If you have further questions�. Please do.
Ps: the crack cought my nail�. So�. Silly me for not finding it earlier.
Where you see the lifted wrap it's the separating edge�.
In time... With heat from the sun�. And a little help and persuasion�. Will make it adhere better. If not�. Will wrap with another� better wrap, because this is ppf for the car and I think ppf for the head lights would be more malleable and stick better
I never recommend to drill drain holes on front (bright side), but you could benefit still to make hole on backside and cover it with GORE valve sticker. They are cheap and widely used in light assemblys by manufacturers.
I never recommend to drill drain holes on front (bright side), but you could benefit still to make hole on backside and cover it with GORE valve sticker. They are cheap and widely used in light assemblys by manufacturers.
O have seen the link and product. But�.. Exactly how someone fitted on the x351 taillights�.. Pics at least, would be great.
Never said you sir drilled�. And anyhow�. Everyone can do what they want with their car. I simply strongly disagree with drilling
O have seen the link and product. But�.. Exactly how someone fitted on the x351 taillights�.. Pics at least, would be great.
Never said you sir drilled�. And anyhow�. Everyone can do what they want with their car. I simply strongly disagree with drilling
Sorry, i havent done it in mine too, so i don�t have pics. Even its MY2010 the tail lights are still good and no water inside. Yes, after cold night when sun starts to warm up in early morning and dev poin happens, they occosional show some moist inside, but after 15min of drive i reach office parking lot they are bright clear, i havent dear to start drilling holes for nothing on them either. JLR also notes this is normal. (same kind of notification for possible moist on closed LED lights are found on MB owners handbook too)
I have seen GORE valve stickers used on many headlamp assemblys by manufacturers. With bulb or LED assemblys. (with a race car hobby an light assemblys get very familar...and bumbers.. Back and front )
Don�t know why some manufacturers make complete closed light assembly, some with an open breather nozzle and some with GORE valves? Its propably an engineer vision what would be best in their mind. (like on engine camshaft timing: Gears, dry belt, wet belt or chain?)
Also what i have seen the location of "breather" have not been same on different light assemblys, so can�t say is it wise to position it on upper part or lower part? Its propably how air will circulate inside by different factors depending what are the heat source? (i have mostly designed an passive cooled systems where the heat dissipates thru material(s) - air/water circulation or fans would not work by conditions, so can�t even recommend any by "best quess")
Would be try and error job. Could work well on any area or need to try low or high part. Backside (drill) holes are easy to cover by 3M foil tape if needed. (foil tape don�t breath thru, so clue will not ever dry)
FWIW - my 2011 XJL had only 14K miles on it when I got it 3 years ago.
It was always garaged and pampered by owner 1, and continues to enjoy a charmed life in my garage.
It has had a small amount of condensation in both tail lights sometimes, but usually goes away after out in the sun.
Car has about 37K on it now. I doubt the assemblies are compromised but I guess its possible.
I think maybe the change to "sealed" for LED integrity is the real culprit. Never happened on my prior Jaguars where the old bulb style did not need such a protective seal.
Correct, old bulb type light assemblys do not show moist inside (as long as not crack) as much as sealed LED ones. Many manufactures, like JLR, inform possible moist on LED light assemblys on their owners manual. At least Ford and Merc.
 05-14-2024, 07:26 AM