When you click on links to various merchants on this site and make a purchase, this can result in this site earning a commission. Affiliate programs and affiliations include, but are not limited to, the eBay Partner Network.
I've been looking on the various x300 forums, youtube videos etc for guidance on rebuilding my front end, (which I haven't even inspected yet). I've also emailed various suppliers to see if they have put together a kit but have had a couple of negative responses, although the individual parts are on their shelves.
My car is pretty clonky over potholes and wants to go right quicker than Richard Bolton unless you keep your hand on the wheel. I've got a 20 ton press and am assuming I'll have to support the engine from above and drop the subframe based on what I've read to get the various bushings and ball joints etc off.
I copied and pasted these Jag part numbers, many of which are listed as unavailable from the dealers:
MNA2102FA anti roll bar bush NLA x2
CAC9827 anti roll bar link x2
JLM1098 tie rod ends x2
MNA2370AA front cross beam assembly mounting bush x2
MMD2140BC front suspension damper x2
CAC75851 lower front damper bush x2
JLM11854 front spring NLA x2
MNA3540BD rear suspension damper x2
JLM12256 rear spring NLA x2
CCC6875 rear subframe bush x2
MNA3711AA bushed diff strut NLA x1
CAC77601 pendulum top bush x2
CAC4713 pendulum bottom bush NLA x2
MNA3750BA rear bumpstop x2
CCC2435 upper front left wishbone with bush NLA x1
CCC2434 upper front right wishbone with bush NLA x1
CBC5523 upper rear left/right wishbone bush x2
CAC9938 upper front ball joint x2
MMD1361AA lower front wishbone bush x2
CBC2301 lower rear wishbone fulcrum bush x2
JLM11860 lower front ball joint x2
This is a pretty comprehensive list, my goal when I inspect what is going on under there is to know what are the must have replacements, what are hard to get to and so on. Assuming it would be a good time to replace the motor mounts also? Any clues, links etc on this would be much appreciated!
The car is running so well mechanically (touch wood) i'm hesitant to do much mechanically at this point, but the ride definitely needs some TLC.
Last edited by olivermarks; 08-19-2019 at 08:44 PM.
I rebuilt my V12s front end years ago with OEM parts sourced from Coventry West.
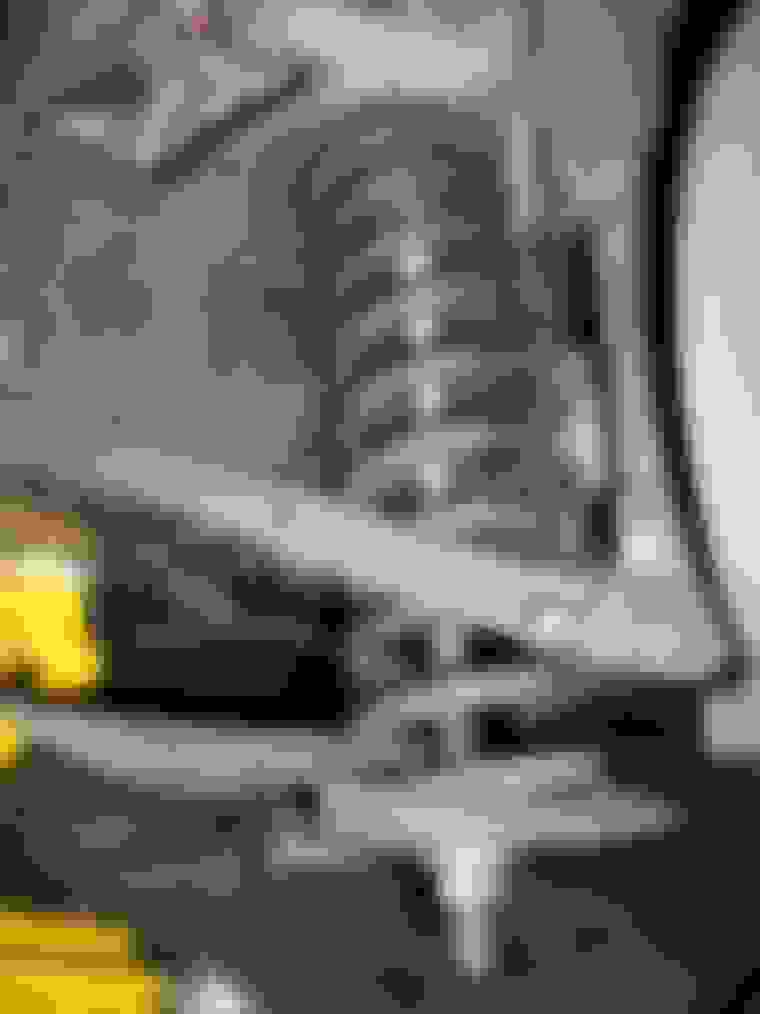
To support the engine, while I removed the entire front suspension, I fabricated a support from a large wooden beam. I measured across the engine compartment where the lifting fittings are and cut a piece of timber the required length and used narrow blocks at the ends to fit into the bonnet/hood side gutters.
I then drilled two large holes directly above the lifting eyes and used large threaded rods and shackles and nuts and washers to support the engine.
I jacked the car up and supported it on axle stands under the jacking points and then used my beam to support the engine while I undid the engine mounts a little and dropped the suspension unit a little. I left it like this for a couple of days to see whether it would settle at all, it didn't so I then felt confident to remove the front suspension unit and work underneath the car.
The pics will show you the beam I fabricated in position supporting the engine and the spring compressor I made and used.
thanks Jeff, pics are a great help! I was thinking of using a harborfreight engine support bar I share with a friend. Great idea to let it settle before diving further in. Your temporary shock replacement looks good, did that work ok? I'm pretty spooked by springs... did you put new shocks in too?
Here is an extract of a post I made to Jag Lovers when I did the work on my car. I didn't replace the springs on my car but you need to remove them before you remove the front suspension unit. It is the front shock absorbers that limit spring travel and stop the whole lot from coming apart.
"Now onto replacing the control arm bushes. On a V12 engined car the catalytic converters prevent the bottom fulcrum shaft being removed so I decided to drop the front subframe and work on it off the car. Easier said than done! The subframe supports the engine so I had to make an engine support beam to hold the engine up while I dropped the subframe.
Engine support beams are available from auto spare parts suppliers but they only have one support point and cost several hundred dollars. The V12 engine has a lifting bracket at the front of each head so after reading Bernie Emden’s website about his XJ-S I decided to make a support beam myself. I did this using a treated pine sleeper, two threaded rods and a couple of ‘D’ shackles. See the pix in the album. After I had made up the support beam I lifted the engine off it’s mounts and left it suspended for two days and it didn’t settle at all so I figured it would be safe to work underneath the car.
Firstly jack the car up and support it on solid jackstands. I also place the removed wheels under the car with some packing timber on top just in case.
I won’t detail every step in the process, there are two many, but I will outline the general procedure I used. The front shocks in these cars are also the limiting mechanism for the spring extension, therefore you have to remove the front springs before you remove the shocks or the whole lot will go twang. Not good.
For this you need a spring compressor. I made one out of a large threaded rod and several large washers and a nut and a short piece of hi-tensile bolt shaft (33mm long). The anchor point at the top of the spring turret has a notch aligned with the axis of the car. You can insert a threaded rod up through the spring pan and into the turret but it’s almost impossible to get a rod through the hole in the top of the threaded rod as the spring coils are in the way. There must be a way I thought and I ran it across the solution in a Jag World article and it is quite simple. The top end of the threaded rod needs to have a short piece of rod inserted into the hole in it before it is passed up through the spring pan and the turret, it is then turned 90 degs to fit into the aforementioned notch. Have a look at the pix it will be a little clearer.
Once the front springs are off I then removed the front brake callipers, the stabiliser bar and the steering rack from the subframe to make it lighter and easier to manoeuvre around. The rest is just a matter of supporting the subframe with a trolley jack and unbolting the engine mounts and the front and rear subframe mounts. The front subframe mounts in my car were well worn so I replaced them as well as the control arm bushes.
I have a small, 12ton, hydraulic press so removing and replacing the control arm bushes was quite straight forward.
Reassembly is the reverse of removal so they say, but we all know that life is never that simple. It took a bit of wrestling and a few magical incantations but it all went back together pretty easily. All bolts and nuts were lubed using copper grease before reassembly.
I had the long awaited wheel alignment done this morning and the car runs straight and doesn’t vibrate so I’m happy with my efforts.
Ref the recent discussion concerning camber adjustment, there isn’t any in the X300 cars unlike the Series I, II & III XJs, and the Jaguar procedure for adjusting camber or steering pull involves shimming one side of the front subframe to give a pseudo half a$$ed sort of adjustment. This will be of no use if the front subframe ‘V’ mounts are worn as mine were. So if you’re having trouble with you car pulling to one side it’s more than likely worn ‘V’ mounts causing the problem."
..... To support the engine, while I removed the entire front suspension, I fabricated a support from a large wooden beam. I measured across the engine compartment where the lifting fittings are and cut a piece of timber the required length and used narrow blocks at the ends to fit into the bonnet/hood side gutters.
Wish I'd thought of that when I did the same on my 6 cylinder X300.
Body supported on axle stands under the jacking points.
I do recall a metal engine support bracket was very expensive at the time but your neat solution just completely escaped me.
Here is an extract of a post I made to Jag Lovers when I did the work on my car. I didn't replace the springs on my car but you need to remove them before you remove the front suspension unit. It is the front shock absorbers that limit spring travel and stop the whole lot from coming apart.
"Now onto replacing the control arm bushes. On a V12 engined car the catalytic converters prevent the bottom fulcrum shaft being removed so I decided to drop the front subframe and work on it off the car. Easier said than done! The subframe supports the engine so I had to make an engine support beam to hold the engine up while I dropped the subframe.
Engine support beams are available from auto spare parts suppliers but they only have one support point and cost several hundred dollars. The V12 engine has a lifting bracket at the front of each head so after reading Bernie Emden�s website about his XJ-S I decided to make a support beam myself. I did this using a treated pine sleeper, two threaded rods and a couple of �D� shackles. See the pix in the album. After I had made up the support beam I lifted the engine off it�s mounts and left it suspended for two days and it didn�t settle at all so I figured it would be safe to work underneath the car.
Firstly jack the car up and support it on solid jackstands. I also place the removed wheels under the car with some packing timber on top just in case.
I won�t detail every step in the process, there are two many, but I will outline the general procedure I used. The front shocks in these cars are also the limiting mechanism for the spring extension, therefore you have to remove the front springs before you remove the shocks or the whole lot will go twang. Not good.
For this you need a spring compressor. I made one out of a large threaded rod and several large washers and a nut and a short piece of hi-tensile bolt shaft (33mm long). The anchor point at the top of the spring turret has a notch aligned with the axis of the car. You can insert a threaded rod up through the spring pan and into the turret but it�s almost impossible to get a rod through the hole in the top of the threaded rod as the spring coils are in the way. There must be a way I thought and I ran it across the solution in a Jag World article and it is quite simple. The top end of the threaded rod needs to have a short piece of rod inserted into the hole in it before it is passed up through the spring pan and the turret, it is then turned 90 degs to fit into the aforementioned notch. Have a look at the pix it will be a little clearer.
Once the front springs are off I then removed the front brake callipers, the stabiliser bar and the steering rack from the subframe to make it lighter and easier to manoeuvre around. The rest is just a matter of supporting the subframe with a trolley jack and unbolting the engine mounts and the front and rear subframe mounts. The front subframe mounts in my car were well worn so I replaced them as well as the control arm bushes.
I have a small, 12ton, hydraulic press so removing and replacing the control arm bushes was quite straight forward.
Reassembly is the reverse of removal so they say, but we all know that life is never that simple. It took a bit of wrestling and a few magical incantations but it all went back together pretty easily. All bolts and nuts were lubed using copper grease before reassembly.
I had the long awaited wheel alignment done this morning and the car runs straight and doesn�t vibrate so I�m happy with my efforts.
Ref the recent discussion concerning camber adjustment, there isn�t any in the X300 cars unlike the Series I, II & III XJs, and the Jaguar procedure for adjusting camber or steering pull involves shimming one side of the front subframe to give a pseudo half a$$ed sort of adjustment. This will be of no use if the front subframe �V� mounts are worn as mine were. So if you�re having trouble with you car pulling to one side it�s more than likely worn �V� mounts causing the problem."
Cheers,
Jeff.
Thanks Jeff! I'lll bet it's the front subframe V mounts that are moving my x305 to the right all the time...along with some other scary things I'll see soon...
 08-19-2019, 04:12 PM