When you click on links to various merchants on this site and make a purchase, this can result in this site earning a commission. Affiliate programs and affiliations include, but are not limited to, the eBay Partner Network.
I have failed an inspection and require a new lower front ball joint. I have purchased a ball joint ($NZ 163 shipped), but looking at pictures of the upright, the lower ball joint appears to be in a blind hole. I realise that originally the entire upright required replacement, but looking at the price for a ball joint, I hate to think of the price of an upright, even if they are available here.
Has anyone replaced one of these ball joints? Do you drill a hole through the bottom to drive it out? What about a slide hammer on the ball thread?
Can you chisel around it to lever up on the edge piece?
I am planning on removing the upright from the car so will be carrying out the replacement on the bench.
I think that preheating the upright around the joint socket will make removal and installation easier, so will use my heat gun for that.
I have worked out the dimensions of the tube I will need to press the ball joint in, once I have removed the faulty item.
Thanks in advance!
Pete M
Ball joint in blind hole? Very similar to what I have
It's doable but on the difficult side. I found 3 difficult areas with the replacement:
1. the lower control arm can fuse to the ball joint stud and not want to let go;
2. the ball joint can be accessed from below (the enclosure in the spindle is an open circle, so you can push on the bottom to get the ball joint out) but required a surprising amount of force to move; and
3. I had to cut pieces of steel in order to make the clamp / bearing puller fit
At the end of the day, I gave up and ordered a pair of new spindles from SNG Barratt for like $900. Definitely not an inexpensive solution, and of course you need to source new wheel bearings with this approach as well. Oh and they don't come with dust shields, and new dust shields are not available anymore, so you need to reuse your old ones, which require obtaining rivets and a rivet gun (cheap) because they affix with rivets, not bolts.
FYI, there's a video on Youtube of a guy using a press to press out the ball joints on an S-Type. Same spindle arrangement. Personally I would avoid using that method because of the stress placed on the top of the aluminum spindle, but it worked for him.
It's doable but on the difficult side. I found 3 difficult areas with the replacement:
1. the lower control arm can fuse to the ball joint stud and not want to let go;
2. the ball joint can be accessed from below (the enclosure in the spindle is an open circle, so you can push on the bottom to get the ball joint out) but required a surprising amount of force to move; and
3. I had to cut pieces of steel in order to make the clamp / bearing puller fit
you had the wrong tools for the job and you paid the ultimate price
$900 could�ve paid for a nice bj press with all the adapters and a 1/2 impact to beat it out or like 10 used knuckles
It's doable but on the difficult side. I found 3 difficult areas with the replacement:
1. the lower control arm can fuse to the ball joint stud and not want to let go;
2. the ball joint can be accessed from below (the enclosure in the spindle is an open circle, so you can push on the bottom to get the ball joint out) but required a surprising amount of force to move; and
3. I had to cut pieces of steel in order to make the clamp / bearing puller fit
snip
FYI, there's a video on Youtube of a guy using a press to press out the ball joints on an S-Type. Same spindle arrangement. Personally I would avoid using that method because of the stress placed on the top of the aluminum spindle, but it worked for him.
Conclusion, it's a frustrating but doable job.
Thanks for that information, it will be very useful. I had a look at the YT of the S-Type and it has the ball joint the other way round, with the ball at the top, not at the bottom. I did find another clip of an X350, and his upright looked like it had an open circle on the bottom as you say. I will have to wait till I get mine apart and then decide what to do.
Edit: I've had a look with a mirror at the bottom of the upright and it has a circular marking where the bottom of the ball joint would be. I hope that means I will be able to just press the joint out.
I'm interested in what you find, in your own assessment, Pete
It's well known amongst us kiwis that WOF's are getting pretty tough here. In my own case, I failed some front bushings, and sure they were cracked but that's all. Whimper
I recognised the guy from another WOF place years ago where he seemed tough. He also failed the 2 cars in front of me. I've been back several times with several cars and heart in mouth. He seems to have been moved on! Again.
The moral of the story is, don't worry about the computer systems in the car. Worry about the computer systems at Waka Kotahi (NZ Transport Agency) which record a Fail and make it near impossible to run down the road and try someone else. In my case, it's trying to know where best to go for a Warrant of Fitness, beforehand.
/rant over
Incidentally, I wouldn't spend $900 on a press for 1 or 2 jobs. I'd just be very upset if I broke the Hammer.
Last edited by ChrisMills; 06-27-2022 at 12:21 AM.
Hi PeterX358,
Thanks for the photos. I looked at one of those G-Clamp tools, but they were almost as expensive as my 12-ton press.
In the end, I used a hammer and big socket to remove the ball joint.
I did hope to use my press to fit the new ball joint, but found that lining up the upright at the correct angle to push it in was a problem.
I called my local independent Jaguar workshop, and they pressed in the ball joint very quickly for a small charge. I understand there is
a special jig that holds the upright at the correct angle for perfect alignment of the press. If I have to do this on the other side, I will just
get them on to it straight away.
Hi. This G-Clanmp is a typical Chinese from alix, it cost around $35, sometimes very handy if You are replacing something in a suspension. Exact angle does not matter, the pin sets itself and You press it quite smoothly into the knuckle.Big hammer? Well done, but I would rather not practice it with alu
The Jaguar's ball joint is just too large for any of the cups in most sets.
They also sell a set of larger attachments for bigger ball joints to work in the press.
Worked great on mine
Unfortunately in little old New Zealand, we don't have the range of cheap tools that are common in the USA. My 12 ton press was NZ$250 on special, while the clamp type tool was $200. The issue of adaptors was also relevant, with the only available set at close to $100.
I also read a number of reviews of the G-clamp tool that criticized the thread for a tendency to strip under load. The 12 ton press would also be useful for a wider range of tasks.
Having an independent Jaguar workshop nearby was a real bonus. They pressed in the ball joint in super quick time.
Shout out to Shane Clinch who owns Clinch Automotive in Christchurch, New Zealand:
Many thanks for the awesome friendly service and advice. Highly recommended.
It's doable but on the difficult side. I found 3 difficult areas with the replacement:
1. the lower control arm can fuse to the ball joint stud and not want to let go;
2. the ball joint can be accessed from below (the enclosure in the spindle is an open circle, so you can push on the bottom to get the ball joint out) but required a surprising amount of force to move; and
3. I had to cut pieces of steel in order to make the clamp / bearing puller fit
At the end of the day, I gave up and ordered a pair of new spindles from SNG Barratt for like $900. Definitely not an inexpensive solution, and of course you need to source new wheel bearings with this approach as well. Oh and they don't come with dust shields, and new dust shields are not available anymore, so you need to reuse your old ones, which require obtaining rivets and a rivet gun (cheap) because they affix with rivets, not bolts.
FYI, there's a video on Youtube of a guy using a press to press out the ball joints on an S-Type. Same spindle arrangement. Personally I would avoid using that method because of the stress placed on the top of the aluminum spindle, but it worked for him.
Conclusion, it's a frustrating but doable job.
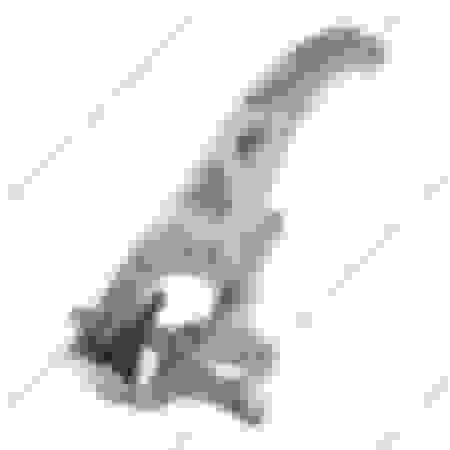
You can do it very easily with just a press and pull it and a ball joint clamp. See picture below of how i removed and installed mine in less than 5 minutes with zero effort.
You can do it very easily with just a press and pull it and a ball joint clamp. See picture below of how i removed and installed mine in less than 5 minutes with zero effort.
Thanks for the great photos, but they are not of the same part. The first photo shows the upright. The second shows a wishbone. The problem with pressing into the upright from the top is that the ball joint socket is made with angles to give correct camber and castor. There are no right angles or faces to press against. That was my problem, and I tried all sorts of jigs and sleeves to align it. The dealer had a proper jig that made it simple, but I gave up on designing one for myself.
Pete M
Last edited by Pete M; 02-27-2024 at 02:00 PM.
Reason: spelling

 06-25-2022, 03:32 AM