
How to lower your X350
#61
 03-31-2016, 04:35 PM

Senior Member
How about these 2 listings
30 Amp 12 Volt DC 13 8V Regulated Power Supply for Ham Radio CB US Seller | eBay
Regulated Switching Power Supply DC 12V 30A 360W LED Strip Light Cooling Fan | eBay
I haven't done any research on them so YMMV. You could also search locally for "12V DC RV Camper Power" which are suitable voltage maintainers. The JLR recommended units have specs of 13.4V ~50A or 12 V ~50A. I'm not sure 50A is always necessary but my guess is that 30A would cover most IDS/SDD uses. Search the whole Jag forum for IDS/SDD power supply as that's what I did to find other sources. Good luck.
#62
08-23-2017, 12:17 PM
Anyone ever build a simple controller to adjust ride height by intercepting and modifying the sensor outputs, and manual adjustment of the CATS damping system?
A dip in the road can cause my suspension to bottom/crash startling the passengers and a driveway can cause scraping. A three position knob with +15mm, auto, and -15mm for adjustment of ride height, with a second pole on the knob's rotary switch to change CATS to firm when in the + or - ride height positions, would allow for a quick adjustment in ride height and firmness when approaching a large dip in the road or a driveway.
A related issue I didn't see discussed in the thread is how long from when the controller gets an input for a ride height change to it being implemented? The controller may be in a mode where it is not using input from the height sensors and hence may not adjust the height until the speed drops to zero etc.
Last edited by XJPurr; 08-23-2017 at 12:19 PM.
#63
08-23-2017, 08:10 PM

#64
04-25-2018, 11:52 AM

Hi, I have read and reread your instructions and will be having a try at my friends garage tomorrow who has the correct computer tools to go into special functions and redo calibration.. I had a try today but wasn't completely succesful as since we changed the shocks the car is having problems deciding which height it should be at...
That leads me to another question...After the new shocks went in, the compressor wouldn't start when we turned on the engine, even took the car for a little spin (on very flat roads as car light" vehicle too low" was on and car was very low.
So today we tested "deflation and inflation" on the computer and the air compressor kicked in and did the job perfectly (ish) once the front was up wouldn't go back down?
I know I am babbling here a tad and need to clarify what I hope someone can help with.
1) Why would the compressor not start? Was the car thinking its in Transportation mode?
2) Once I calibrate, @ 386 and 371mm (which is fine for me) will this take the car out of any other "mode"
3) Can anyone suggest the method to change the front sensor(s) as I think this may be an issue too? Where can I source these? (apart from Jag!)
Hope someone can help...this entire saga is taking forever!
Thanks
#65
04-25-2018, 01:06 PM


Hi, I have read and reread your instructions and will be having a try at my friends garage tomorrow who has the correct computer tools to go into special functions and redo calibration.. I had a try today but wasn't completely succesful as since we changed the shocks the car is having problems deciding which height it should be at...
That leads me to another question...After the new shocks went in, the compressor wouldn't start when we turned on the engine, even took the car for a little spin (on very flat roads as car light" vehicle too low" was on and car was very low.
So today we tested "deflation and inflation" on the computer and the air compressor kicked in and did the job perfectly (ish) once the front was up wouldn't go back down?
I know I am babbling here a tad and need to clarify what I hope someone can help with.
1) Why would the compressor not start? Was the car thinking its in Transportation mode?
2) Once I calibrate, @ 386 and 371mm (which is fine for me) will this take the car out of any other "mode"
3) Can anyone suggest the method to change the front sensor(s) as I think this may be an issue too? Where can I source these? (apart from Jag!)
Hope someone can help...this entire saga is taking forever!
Thanks
That leads me to another question...After the new shocks went in, the compressor wouldn't start when we turned on the engine, even took the car for a little spin (on very flat roads as car light" vehicle too low" was on and car was very low.
So today we tested "deflation and inflation" on the computer and the air compressor kicked in and did the job perfectly (ish) once the front was up wouldn't go back down?
I know I am babbling here a tad and need to clarify what I hope someone can help with.
1) Why would the compressor not start? Was the car thinking its in Transportation mode?
2) Once I calibrate, @ 386 and 371mm (which is fine for me) will this take the car out of any other "mode"
3) Can anyone suggest the method to change the front sensor(s) as I think this may be an issue too? Where can I source these? (apart from Jag!)
Hope someone can help...this entire saga is taking forever!
Thanks
Which strut was replaced? The side w/ or without the height sensor?
Sounds like a height sensor calibration issue to me.
#66
05-06-2018, 01:13 AM

Senior Member
Can the suspension be calibrated or reset without a computer?
I just replaced my compressor, forgetting to disconnect the battery. Now the front end sits about 1/2 inch from bottoming out. I tried everything I could find on the forum over the last few days but to no avail. It's not a leak.
Is there someone around the Chicago Western suburbs with a JLR SDD setup who could kindly assist? I set up SDD a few years ago but the Windows 10 "upgrade" rendered it useless and after endless wasted months I gave up on it.
#67
05-06-2018, 05:31 AM
Just jack up your car from any side as you change the wheel and let it stay for some time (5-10mins). Put it back on the ground, ASU will drop the car on bottom afterwards and recalibrate all corners. And keep patience everything goes slowly)
#68
03-04-2019, 10:19 PM

Member
#69
04-06-2020, 12:53 PM

Member
Having read this thread and currently have a load of time spare i have had a go at shimming the sensors, no sensors were disconnected in this attempt,
Car was level and readings taken,
Put 3mm of washers in front and its down 10mm ish all good,
Put 3mm in rear and car seems higher,
Made shorter sensor brackets by 3mm and car still seems higher.
Definitely do i need to move the sensor from the chassis rail with shims or go other way,moving the sensor up.
My drive is a slope so i have to drive 300 yds to a flat area for measures, is this enough?
#70
04-06-2020, 03:10 PM

Senior Member
I just bent the brackets and I lowered the car about 13 mm all the way around in about a half an hour I believe if you bend them up it will lower it and vice versa I can't quite remember super easy to do you can bend them with your hands or screwdriver
Last edited by viper1996; 04-06-2020 at 03:13 PM.
#71
04-06-2020, 03:20 PM
Member
#73
04-18-2020, 11:58 AM

Veteran Member
The following 2 users liked this post by Wingrider:
Jakes XJR (04-19-2020),
MCFastybloke (04-22-2020)
#74
07-25-2021, 07:51 PM

Junior Member
Join Date: Jul 2021
Location: Ohio
Posts: 2
Likes: 0
Received 0 Likes
on
0 Posts
How do you add shims to the ride height sensor. I unclipped the electronic sensor and by looking down the tube I see the male connector, also it looks like it is designed to fit a Allen wrench for a adjustment. I loosened the 17mm fitting and don" know what to remove to add shims.
#75
07-25-2021, 11:49 PM
Member
How do you add shims to the ride height sensor. I unclipped the electronic sensor and by looking down the tube I see the male connector, also it looks like it is designed to fit a Allen wrench for a adjustment. I loosened the 17mm fitting and don" know what to remove to add shims.
Which end of the car?
#76
07-26-2021, 08:22 AM
Junior Member
Join Date: Jul 2021
Location: Ohio
Posts: 2
Likes: 0
Received 0 Likes
on
0 Posts
The sensors are in the front end under the hood Does the housing of the 17mm nut screw out and then add shims? Would like to find a detailed picture of a height censor unit. I inherited the 04 XJ8 from my Uncle a month ago and know very little about foreign cars. I have researched 04 Jaguar comments and realize the air suspension is fragile and expensive to repair along with many other repairs. For me to keep the car I want it to look lower in the front by approximately 25mm. Thank you for your quick response, this is the first time I have been on a Forum.
Up date, just had the oil changed and while the 04 Jag was on the lift I had a chance to study the components and now understand how to adjust the lift sensors with shims or by bending or changing the rod height. I still wonder what the sensors do on top of the struts that look as thou they can be adjusted.
Up date, just had the oil changed and while the 04 Jag was on the lift I had a chance to study the components and now understand how to adjust the lift sensors with shims or by bending or changing the rod height. I still wonder what the sensors do on top of the struts that look as thou they can be adjusted.
Last edited by Fourwinns454; 07-26-2021 at 01:48 PM. Reason: added information
#77
07-26-2021, 11:16 AM
Member
For the front
Remove the complete bracket,no need to detach sensor carefully and slide a shim in, 1mm of shim will lower the car approx 3mm. Do not break the bolts or you will be in a load of trouble.
Access is decent, wheel off and you can see the bolt heads
For the rears,
You need to raise the sensor, i made some shorter brackets (8mm) from laser cut and folded stainless which i sell here in the uk. This will give you approx 24mm lowering, this is the max this way. For less insert a shim between the bracket and the chassis.
Treat your sensors like you love them,
Treat the rubber ends on the arms like you love them
Treat the little torx that hold your sensors on like you really love them
Dont snap any bolts.
My car is lowered about 15mm. SDD is the best way but unless you have it and are confident which i dont and and am not this is relatively simple.
The following users liked this post:
FastEddie02043 (11-12-2022)
#78
12-10-2022, 05:48 AM

Veteran Member
Cambo, your post is such a popular post that I became exhausted trying to find any references to my following questions:
Do you need to change the Camber when lowering? in my minds eye I see a 'shortening' of the upper wishbone, increasing the negative Camber? If (and I mean if) this is so, does it matter to inside tread wear?
Do you need to change the Camber when lowering? in my minds eye I see a 'shortening' of the upper wishbone, increasing the negative Camber? If (and I mean if) this is so, does it matter to inside tread wear?
#79
09-19-2024, 07:50 AM
Senior Member
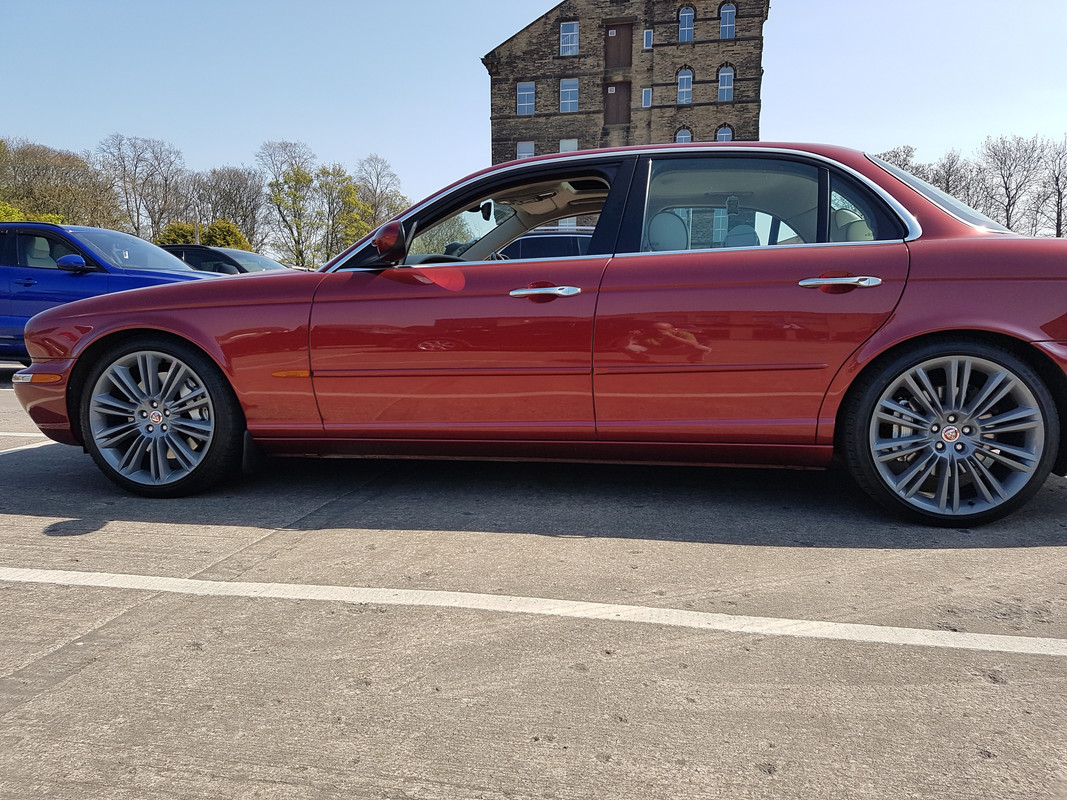
OK so here is my take on how you can lower your X350 or X358.
I see three different possibilities;
1. Fit some longer rods to the height sensors (nothing available in aftermarket)
2. Fit some shims under the mounting brackets of the height sensors (this looks like it should work on the front, hard to say for the rear...)
3. Re-calibrate with a WDS, IDS or SDD diagnostic kit
First lets have a closer look at the air suspension system.
The ride height is fixed in the ASM, at the standard values from the specs;

Note:
Ride height is measured from the center of the wheel to the apex of the wheel arch, through the wheel center line
Note:
Ride heights quoted are as attained after the vehicle has been leveled using the Pre-Geometry function in Jaguar Approved Diagnostic Equipment. Once leveled, the figures quoted assume +/- 15mm anticipated build variance and condition
Note:
Ride height calibration can only be performed using Jaguar Approved Diagnostic Equipment
Note:
Due to diagnostic equipment calibration, metric figures are quoted only.
I don't know about you, but +/-15mm is a lot of tolerance!
I see three different possibilities;
1. Fit some longer rods to the height sensors (nothing available in aftermarket)
2. Fit some shims under the mounting brackets of the height sensors (this looks like it should work on the front, hard to say for the rear...)
3. Re-calibrate with a WDS, IDS or SDD diagnostic kit
First lets have a closer look at the air suspension system.
The ride height is fixed in the ASM, at the standard values from the specs;
Note:
Ride height is measured from the center of the wheel to the apex of the wheel arch, through the wheel center line
Note:
Ride heights quoted are as attained after the vehicle has been leveled using the Pre-Geometry function in Jaguar Approved Diagnostic Equipment. Once leveled, the figures quoted assume +/- 15mm anticipated build variance and condition
Note:
Ride height calibration can only be performed using Jaguar Approved Diagnostic Equipment
Note:
Due to diagnostic equipment calibration, metric figures are quoted only.
I don't know about you, but +/-15mm is a lot of tolerance!
There are several modes to the suspension; Sleep Mode, Preliminary Mode, Post Mode, Stance Mode, Drive Mode, Speed Lowering Mode, Towing Mode, Rough Road Detection, Leveling Inhibits, Jacking Mode, Inclination Mode, phew!
When it comes to lowering the car, the most important consideration is the Speed Lowering Mode;
- When the vehicle maintains a speed of 160 km/h (100 mile/h) or above, and 10 seconds elapse, the suspension lowers 15mm below the standard ride height.
- The suspension returns to a standard ride height when the vehicle speed decreases below 140 km/h (88 mile/h) and 5 seconds elapse.
So what this means is, you need to allow for this extra 15mm of height reduction when lowering the car. OK not everyone can legally drive at >160km/h, but nevertheless it should be safe if you ever get the chance, keep this in mind.
OK lets look at the height sensors;
On the very early X350's there is a sensor at each corner, after VIN G26872 there was only the one sensor at the front, with the two at the rear, as we discovered HERE
I'm still not convinced that this is the best setup, I would like to see a sensor at each corner, but anyway that's not the point of this thread...
The front sensors look like this;

The rear sensors look like this;

They are bolted to the body of the car, and as you can see they have connecting rods, which attach to the suspension arms. As the suspension moves up/down the rods move levers, which rotate a rotary sensor.
The signals go back to the ASM, which tries to keep the front at 386mm, and the rear at 371mm (+/-15mm of course!) unless you trigger one of the other modes mentioned above.
Right so that's the background, let's have a look at the possibilities!
1. Extended/Adjustable Links on the Height Sensors
This is a popular mod on Range Rovers and Mercedes with air suspension.
The longer rods trick the sensor into thinking that the car is actually higher than it is, and so it lowers itself accordingly. Here is an example of a lowering link kit from a Range Rover Sport;

The beauty of these is they are adjustable so you can fine-tune the height at each corner (yes RR's have a sensor at each corner, cause that makes sense!)
BUT sadly, nobody makes these rods to suit the X350...I looked into making them myself but I couldn't find the pieces off-the-shelf and I don't have the time/money/patience to start up a cottage industry here...
So, until someone comes up with the product, this idea doesn't help us...
2. Shims under the mounting brackets of the height sensors
Another trick from the Mercedes crowd, usually they just put washers under the brackets, apparently a 5mm washer = 25mm drop, or something like that. It kind of works the same way as the adjustable/extended links, you are just tricking the sensor into measuring with an offset.
I looked into this as an option, being nice and cheap, however I decided against it, because;
a. I can't get under the car easily at home
b. I'm not convinced that this would work very well with only one sensor at the front
You are all welcome to try it, but I decided to pass and go for option 3..
3. Re-calibrate with a WDS, IDS or SDD diagnostic kit
The WDS, IDS or SDD as it's called these days is the dealer-level diagnostic system for Jaguar's and Land Rovers. You can't buy them at Autozone and they ain't cheap either.
I'm not going to elaborate too much more on the IDS, just how to use it to lower your car. Let's make another thread to discuss the machine itself.
It's basically, a laptop, with software and a special USB to OBDII interface;

You connect it up to the car;

And you can diagnose faults, change settings, and re-program the electronic stuff in the car. You can also calibrate the ride height.
So once you are connected up....

The car is scanned & identified, and eventually you can go into the Service Functions...

....where you have the option of Calibrating the air suspension.
You then have to follow the instructions; ignition off, on, start engine, wait, the system levels out and adjusts the suspension, you hear the compressor run and the shocks fill & bleed, eventually it levels out at what it thinks is the correct ride height.

Which is...front at 386mm, and the rear at 373mm, remember these numbers, they are important. If the car isn't sitting at this height, then it needs calibrating to the factory settings, then once it's right, you can go back in & start to lower it.

OK here is where you are meant to have the special tool to measure the ride height, looks like this;

I don't have this tool, so I had to go for the tape measure.

Not as accurate, but so long as you always measure the same way, it does work. Here's a tip, remove the center caps from your wheels, the growler (on mine at least) has a line exactly in the middle if you turn it 90�, helped a lot. Also look at the picture of the tool, it measures from the inside edge of the wheel arch, this is not the same as the outside edge!
Whatever you do, just be sure that you measure the same way each time.
Right, now the trick is, to add the amount that you want to lower the car compared to the factory ride height, to the value you enter in the IDS.

Example, if you want to lower the front by 15mm, to 371mm, and the front is actually at the factory height of 386mm, then enter 401mm into the IDS. Measure the other side and add the same amount. Maybe you don't want to lower the same amount front & rear? Then just add the amount you want to lower to the value.
After you've done all four corners, the car will go through a leveling cycle and adjust to the new height.

You then have to go and measure all four corners again.

Now here the car is thinking that it's actually at the standard factory ride height. If all's gone well, your measurements should equal factory ride height minus the lowered amount.
Once again you have to enter values into the IDS, by adding the amount you want to lower the car. Continuing the example from above, you should now be measuring 371mm, add 15mm to it & enter 386mm. The factory value!
If all goes well....

You should get a happy message!
When I first did this I dropped the front by 20mm and the rear by 10mm.
After a few days I realised that it was too low at the front, so I re-did it with a 15mm drop and it's much better now.

Still got room for the further 15mm drop on the Autobahn.
Sooo...that's that. I seriously doubt that a Jaguar Dealer would do this for you, best bet would be an independant workshop...
When it comes to lowering the car, the most important consideration is the Speed Lowering Mode;
- When the vehicle maintains a speed of 160 km/h (100 mile/h) or above, and 10 seconds elapse, the suspension lowers 15mm below the standard ride height.
- The suspension returns to a standard ride height when the vehicle speed decreases below 140 km/h (88 mile/h) and 5 seconds elapse.
So what this means is, you need to allow for this extra 15mm of height reduction when lowering the car. OK not everyone can legally drive at >160km/h, but nevertheless it should be safe if you ever get the chance, keep this in mind.
OK lets look at the height sensors;
On the very early X350's there is a sensor at each corner, after VIN G26872 there was only the one sensor at the front, with the two at the rear, as we discovered HERE
I'm still not convinced that this is the best setup, I would like to see a sensor at each corner, but anyway that's not the point of this thread...
The front sensors look like this;
The rear sensors look like this;
They are bolted to the body of the car, and as you can see they have connecting rods, which attach to the suspension arms. As the suspension moves up/down the rods move levers, which rotate a rotary sensor.
The signals go back to the ASM, which tries to keep the front at 386mm, and the rear at 371mm (+/-15mm of course!) unless you trigger one of the other modes mentioned above.
Right so that's the background, let's have a look at the possibilities!
1. Extended/Adjustable Links on the Height Sensors
This is a popular mod on Range Rovers and Mercedes with air suspension.
The longer rods trick the sensor into thinking that the car is actually higher than it is, and so it lowers itself accordingly. Here is an example of a lowering link kit from a Range Rover Sport;
The beauty of these is they are adjustable so you can fine-tune the height at each corner (yes RR's have a sensor at each corner, cause that makes sense!)
BUT sadly, nobody makes these rods to suit the X350...I looked into making them myself but I couldn't find the pieces off-the-shelf and I don't have the time/money/patience to start up a cottage industry here...
So, until someone comes up with the product, this idea doesn't help us...
2. Shims under the mounting brackets of the height sensors
Another trick from the Mercedes crowd, usually they just put washers under the brackets, apparently a 5mm washer = 25mm drop, or something like that. It kind of works the same way as the adjustable/extended links, you are just tricking the sensor into measuring with an offset.
I looked into this as an option, being nice and cheap, however I decided against it, because;
a. I can't get under the car easily at home
b. I'm not convinced that this would work very well with only one sensor at the front
You are all welcome to try it, but I decided to pass and go for option 3..
3. Re-calibrate with a WDS, IDS or SDD diagnostic kit
The WDS, IDS or SDD as it's called these days is the dealer-level diagnostic system for Jaguar's and Land Rovers. You can't buy them at Autozone and they ain't cheap either.
I'm not going to elaborate too much more on the IDS, just how to use it to lower your car. Let's make another thread to discuss the machine itself.
It's basically, a laptop, with software and a special USB to OBDII interface;
You connect it up to the car;
And you can diagnose faults, change settings, and re-program the electronic stuff in the car. You can also calibrate the ride height.
So once you are connected up....
The car is scanned & identified, and eventually you can go into the Service Functions...
....where you have the option of Calibrating the air suspension.
You then have to follow the instructions; ignition off, on, start engine, wait, the system levels out and adjusts the suspension, you hear the compressor run and the shocks fill & bleed, eventually it levels out at what it thinks is the correct ride height.
Which is...front at 386mm, and the rear at 373mm, remember these numbers, they are important. If the car isn't sitting at this height, then it needs calibrating to the factory settings, then once it's right, you can go back in & start to lower it.
OK here is where you are meant to have the special tool to measure the ride height, looks like this;
I don't have this tool, so I had to go for the tape measure.
Not as accurate, but so long as you always measure the same way, it does work. Here's a tip, remove the center caps from your wheels, the growler (on mine at least) has a line exactly in the middle if you turn it 90�, helped a lot. Also look at the picture of the tool, it measures from the inside edge of the wheel arch, this is not the same as the outside edge!
Whatever you do, just be sure that you measure the same way each time.
Right, now the trick is, to add the amount that you want to lower the car compared to the factory ride height, to the value you enter in the IDS.
Example, if you want to lower the front by 15mm, to 371mm, and the front is actually at the factory height of 386mm, then enter 401mm into the IDS. Measure the other side and add the same amount. Maybe you don't want to lower the same amount front & rear? Then just add the amount you want to lower to the value.
After you've done all four corners, the car will go through a leveling cycle and adjust to the new height.
You then have to go and measure all four corners again.
Now here the car is thinking that it's actually at the standard factory ride height. If all's gone well, your measurements should equal factory ride height minus the lowered amount.
Once again you have to enter values into the IDS, by adding the amount you want to lower the car. Continuing the example from above, you should now be measuring 371mm, add 15mm to it & enter 386mm. The factory value!
If all goes well....
You should get a happy message!
When I first did this I dropped the front by 20mm and the rear by 10mm.
After a few days I realised that it was too low at the front, so I re-did it with a 15mm drop and it's much better now.
Still got room for the further 15mm drop on the Autobahn.
Sooo...that's that. I seriously doubt that a Jaguar Dealer would do this for you, best bet would be an independant workshop...
i was messing around with sdd and ending up dropping it to love
low. Very low. I can�t seem to get it back to either factory height. I was trying to raise the rear up at first. More I�m stuck with it sitting practically on the tires. Help! Thanks

Thread
Thread Starter
Forum
Replies
Last Post
Currently Active Users Viewing This Thread: 1 (0 members and 1 guests)