I'm trying 05 XJR lowering via washer mod.
#1
 09-11-2012, 10:26 PM


#2
09-13-2012, 09:25 AM
Veteran Member
I would... reason being the suspension is still going to try to fight you I think with the battery connected.
Let us know how it goes, and please take pics.
Thanks,
George
#3
09-13-2012, 10:02 AM

The car has a jacking mode which automatically kicks in when you jack the car up.
The issue here is that the jacking mode is only released when the car is driven.
How exactly this affects what you are trying to do is unclear to me. But with the battery disconnected it certainly won't go into jacking mode....
The issue here is that the jacking mode is only released when the car is driven.
Jacking Mode
The ASM detects when the vehicle is being raised using jacking equipment by monitoring height changes at the individual wheels. The ASM will initially attempt to adjust the suspension, but will recognise that the vehicle height is not responding as normal and inhibit suspension leveling. A suspension inhibit will also be initiated when the vehicle is suspended on a lift, and all four wheels are being lowered. In this condition, when the suspension travel exceeds a predetermined value, air exhausting will be inhibited.
The inhibit function will remain initiated until the vehicle height returns to normal, or a wheel speed signal of 3 km/h (2 mile/h) is detected.
#4
09-16-2012, 07:24 PM
So tried the front today with good and bad news.
Good news is the procedure is really easy and no fault codes.
Bad news is I ran out of washer and the car only drop 6-8 milimeter instead of the 15 milimeter that I've plan and I need to get more washer.
Will redo again this coming weekend after I get more washer.
Good news is the procedure is really easy and no fault codes.
Bad news is I ran out of washer and the car only drop 6-8 milimeter instead of the 15 milimeter that I've plan and I need to get more washer.
Will redo again this coming weekend after I get more washer.
#5
09-16-2012, 08:46 PM
Veteran Member
#6
09-17-2012, 01:05 AM
#7
09-17-2012, 01:12 AM
Trending Topics
#8
09-17-2012, 01:31 AM

#9
09-17-2012, 01:55 AM
The washer thickness is about I think 3-4mm. Since I'm not using precision washer both washer stack group is not perfect and it will skew the reading with uneven stack inner and outer.
First think I did is park the car in the driveway and unbolt the positive battery wire out.
After that with no power to the car I proceed to jack up the car and removed the wheel.
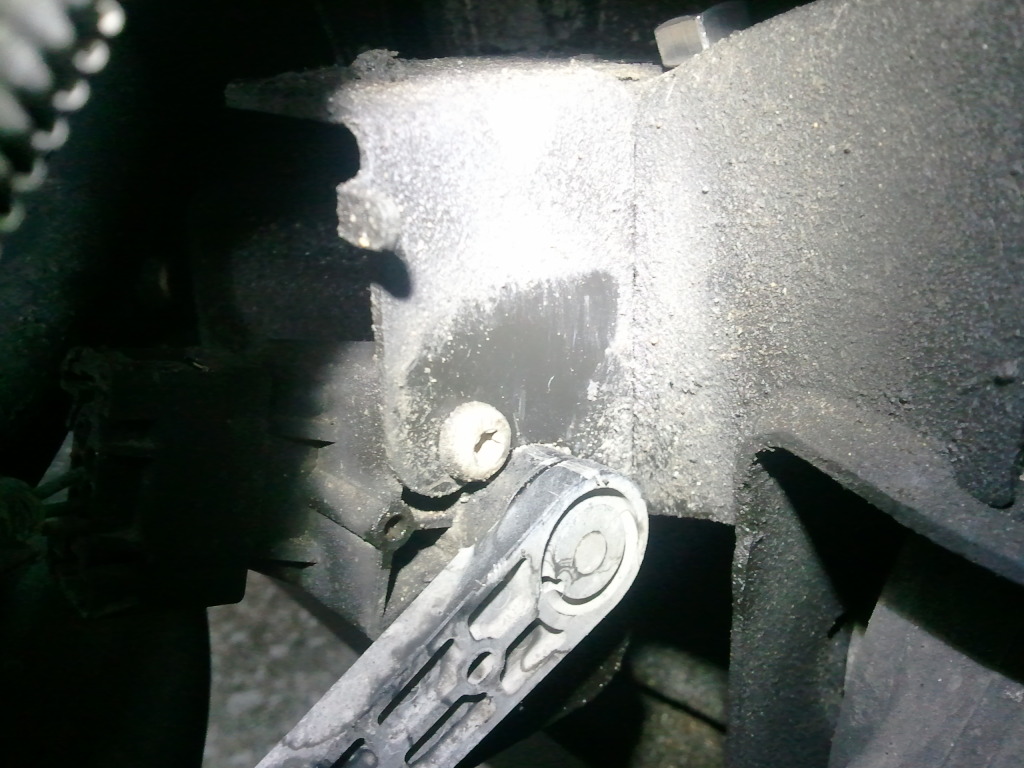
This is the very dirty pic of the bracket. The nut that I put there is to show the hole of missing bolt that I unscrewed it out. You can see the other intact dirty bolt a little bit further in.

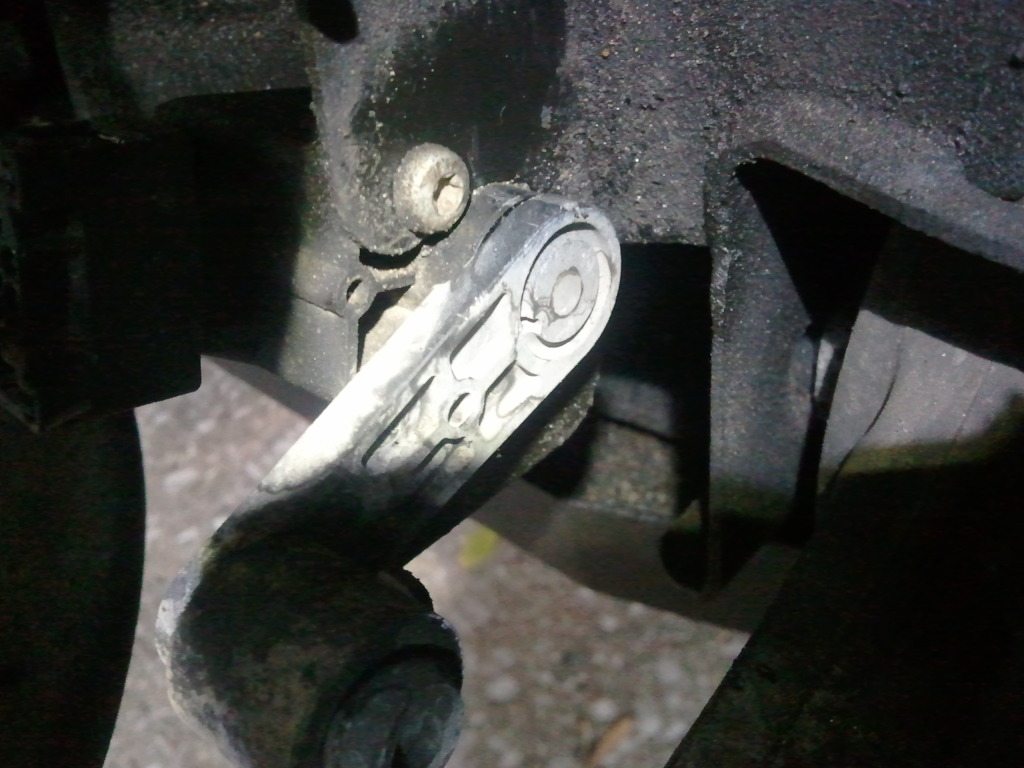
This is the picture of the control arm fully extended which mean the sensor is at it's max out position. I cleaned a spot and marked it with a line with silver paint marker as a reference point.
Next I plave a jack at the rotor to ready to jack up the rotor upwards for desire height measurement that I want to lower to to see where the sensor marking will be.

I marked the upper fender for uniform and consistent placement for the measuring tape for repeatable standard location point of reference.

Marked the rotor for the same reason as above.
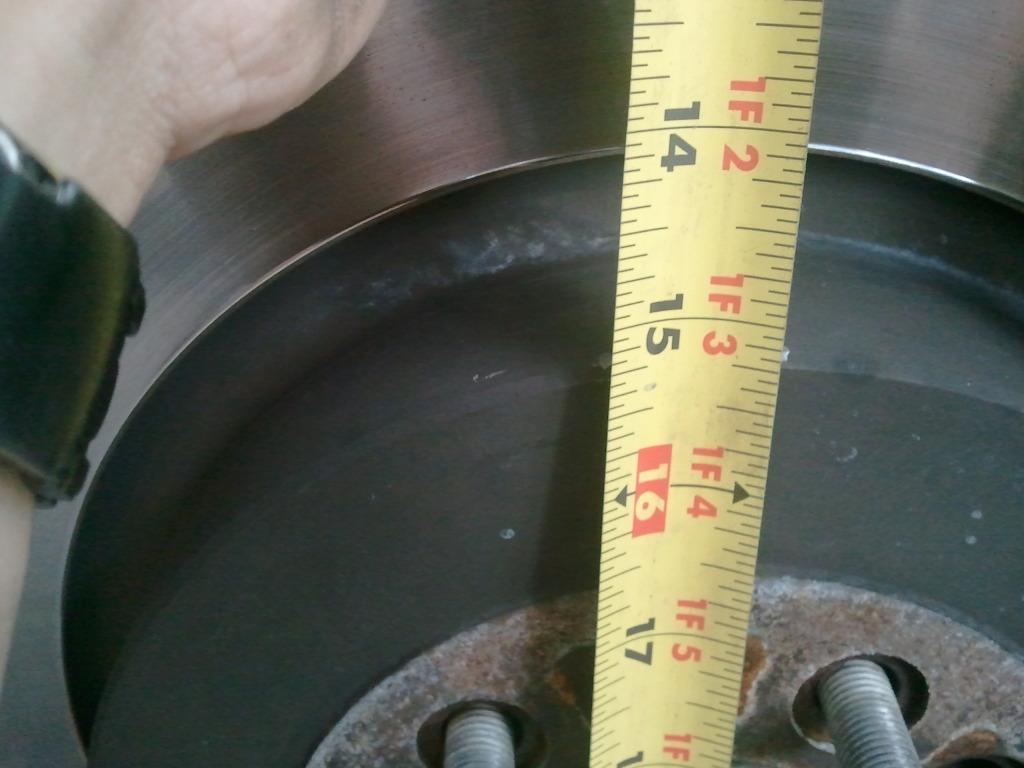
Then I proceed to jack up the rotor by about 15mm upwards(The lowering amount I want at the front) and the take reference at the marked sensor which in this picture the marked move inwards about 4-5mm with the rotor jacked up 15mm.
Then I lowered the rotor from the jack again to it's fully extended motion again and the line will be the same again as the first picture. From now on I didn't take anymore pictures because my hand is too dirty up to using the phone again.
Then I proceed to unbolt the bracket completely and stake the washer underneath the bracket to make the line on the arm move out about 4-5mm outwards on the opposite side compared to the last picture, but in reality I think my washer measurement fall short and in reality it might of just 3-3.5mm worth of washer stack down there can't confirmed yet.
After these step I proceed to bolt the wheel back and lowered the car back on the ground and torque down the lugnut. After that reconnect the battery and the vehicle and the suspension is letting out air and adjusting accordingly. I restart the car and go on for a test drive to let the car even out.
I will redo this again in 2 more weeks and be better prepared next time around now that I have a feeling of the washer stacking depth versusin relative how much drop the car gave after.
Stay tune.
First think I did is park the car in the driveway and unbolt the positive battery wire out.
After that with no power to the car I proceed to jack up the car and removed the wheel.
This is the very dirty pic of the bracket. The nut that I put there is to show the hole of missing bolt that I unscrewed it out. You can see the other intact dirty bolt a little bit further in.
This is the picture of the control arm fully extended which mean the sensor is at it's max out position. I cleaned a spot and marked it with a line with silver paint marker as a reference point.
Next I plave a jack at the rotor to ready to jack up the rotor upwards for desire height measurement that I want to lower to to see where the sensor marking will be.
I marked the upper fender for uniform and consistent placement for the measuring tape for repeatable standard location point of reference.
Marked the rotor for the same reason as above.
Then I proceed to jack up the rotor by about 15mm upwards(The lowering amount I want at the front) and the take reference at the marked sensor which in this picture the marked move inwards about 4-5mm with the rotor jacked up 15mm.
Then I lowered the rotor from the jack again to it's fully extended motion again and the line will be the same again as the first picture. From now on I didn't take anymore pictures because my hand is too dirty up to using the phone again.
Then I proceed to unbolt the bracket completely and stake the washer underneath the bracket to make the line on the arm move out about 4-5mm outwards on the opposite side compared to the last picture, but in reality I think my washer measurement fall short and in reality it might of just 3-3.5mm worth of washer stack down there can't confirmed yet.
After these step I proceed to bolt the wheel back and lowered the car back on the ground and torque down the lugnut. After that reconnect the battery and the vehicle and the suspension is letting out air and adjusting accordingly. I restart the car and go on for a test drive to let the car even out.
I will redo this again in 2 more weeks and be better prepared next time around now that I have a feeling of the washer stacking depth versusin relative how much drop the car gave after.
Stay tune.
The following users liked this post:
Cambo (09-17-2012)
#10
09-17-2012, 10:07 AM
Veteran member
You could have just waited till more of us got a mongoose cable and IDS/SDD disc, and perhaps borrow it. I've got my software, just waiting on my cable. Doing this once on the big WDS machine at motorcarman's independent shop, its very easy, takes maybe 5 minutes to do the whole adjustment process. Best part, you don't get dirty, and can make as many adjustments as you wish till you're happy with the result.
I've shipped my autoenginuity scanner all over the US, including Hawaii to members in good standing without asking anything other than reimbursement of the shipping cost.
I've shipped my autoenginuity scanner all over the US, including Hawaii to members in good standing without asking anything other than reimbursement of the shipping cost.
#11
09-17-2012, 10:08 PM
You could have just waited till more of us got a mongoose cable and IDS/SDD disc, and perhaps borrow it. I've got my software, just waiting on my cable. Doing this once on the big WDS machine at motorcarman's independent shop, its very easy, takes maybe 5 minutes to do the whole adjustment process. Best part, you don't get dirty, and can make as many adjustments as you wish till you're happy with the result.
I've shipped my autoenginuity scanner all over the US, including Hawaii to members in good standing without asking anything other than reimbursement of the shipping cost.
I've shipped my autoenginuity scanner all over the US, including Hawaii to members in good standing without asking anything other than reimbursement of the shipping cost.
However some good news today. I redid the front and rear and after couple trial and error I manage to kinda perfect the method. Now just waiting for tommorrow to park it at work on a level surface and let it settle and take final measurement.
The final setting configuration literally took me 30 minutes on the 3 sensor shimming with about 20 minutes being jacking up and remove the tires.
During the whole trial and error process I got the taste of those funny car look, front too low and rear too high type rack etc. After few experimental washer stacking process I kinda nail it down. For the front I went from stacking 10 washer per bolt(20 total) to 5 washer per bolt. Rear in the final configuration is only using a single washer on the inner bolt to tilt the bracket. The rear is more sensitive than the front for washer height.
I went and get some nicer washer from a fastener specialty place. Not really precision shim type washer but pretty close to it. 5 piece stack net me 5.5-6mm thick and 10 piece stack is about 11-11.2/11.4mm thick.
Front with the 10 piece stack the front end drops a massive 40-45mm. Good thing is with so much washer to play with you're able to fine tune to the height that you like.
Rear is total different story.
I'm kinda rambling right now and don't know what else to say.
#12
09-18-2012, 02:58 AM


Veteran Member
Join Date: Apr 2008
Location: Ottawa, Ontario, Canada
Posts: 2,778
Received 1,104 Likes
on
777 Posts
You could have just waited till more of us got a mongoose cable and IDS/SDD disc, and perhaps borrow it. I've got my software, just waiting on my cable. Doing this once on the big WDS machine at motorcarman's independent shop, its very easy, takes maybe 5 minutes to do the whole adjustment process. Best part, you don't get dirty, and can make as many adjustments as you wish till you're happy with the result.
I've shipped my autoenginuity scanner all over the US, including Hawaii to members in good standing without asking anything other than reimbursement of the shipping cost.
I've shipped my autoenginuity scanner all over the US, including Hawaii to members in good standing without asking anything other than reimbursement of the shipping cost.

#14
09-19-2012, 12:37 AM


#16
10-16-2012, 11:58 PM
Some update.
Trying to get alignment done yesterday at the usual shop and their machine can't read it. Their machine is the older type with the sensor arm that is hanging at the side that get the reading from left and right type. This is due to the lower front I guess it block the signal left and right from the bumper.
They recommend me to find those place with the sensor that is hanging on the wall type that is using reflection type I guess. So the hunt begin.


#19
10-17-2012, 03:23 PM
Senior Member
#20
10-17-2012, 03:24 PM
Senior Member