Respray to Black Cherry
#1
 10-19-2015, 11:56 AM


Well, I know it's been a while, but the respray is finally done! It ended up taking way longer that I thought it would (as does everything) but only because real life got in the way and I lost a lot of days i was planning on using for finishing up the car. Anyway, this all started with some hail damage which turned into my insurance allowing for a self repair that they would pay me for. The result, a free respray of the entire car (all this talked about in my other thread on the matter). So the process began. (Warning, lots of pics!)
First I washed the car to get it nice and clean so I could see all the dents I would have to fix.


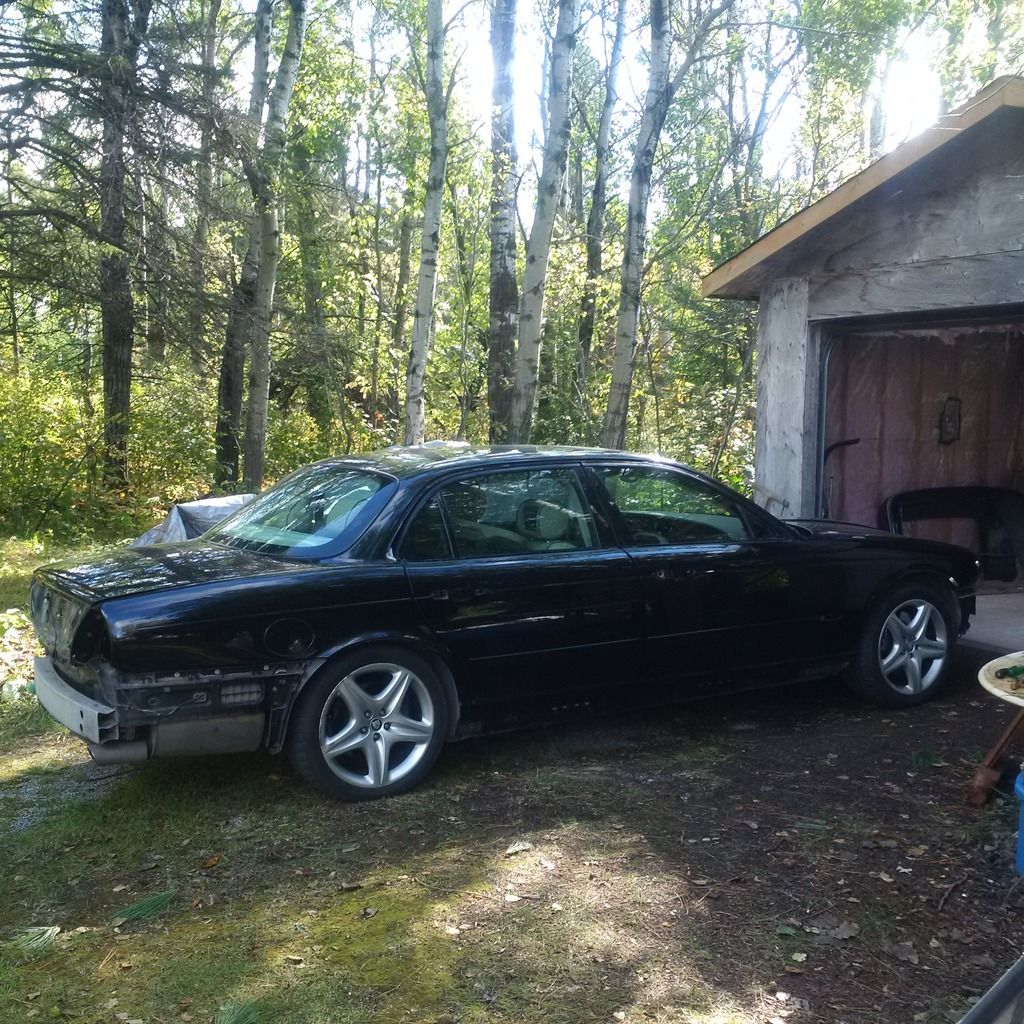
Alright, nice and clean. The paint was actually in pretty rough shape to begin with. It wasn't terrible, but showing its age for a 10 year old car that obviously had prior paint work done that wasn't exactly at a high standard.
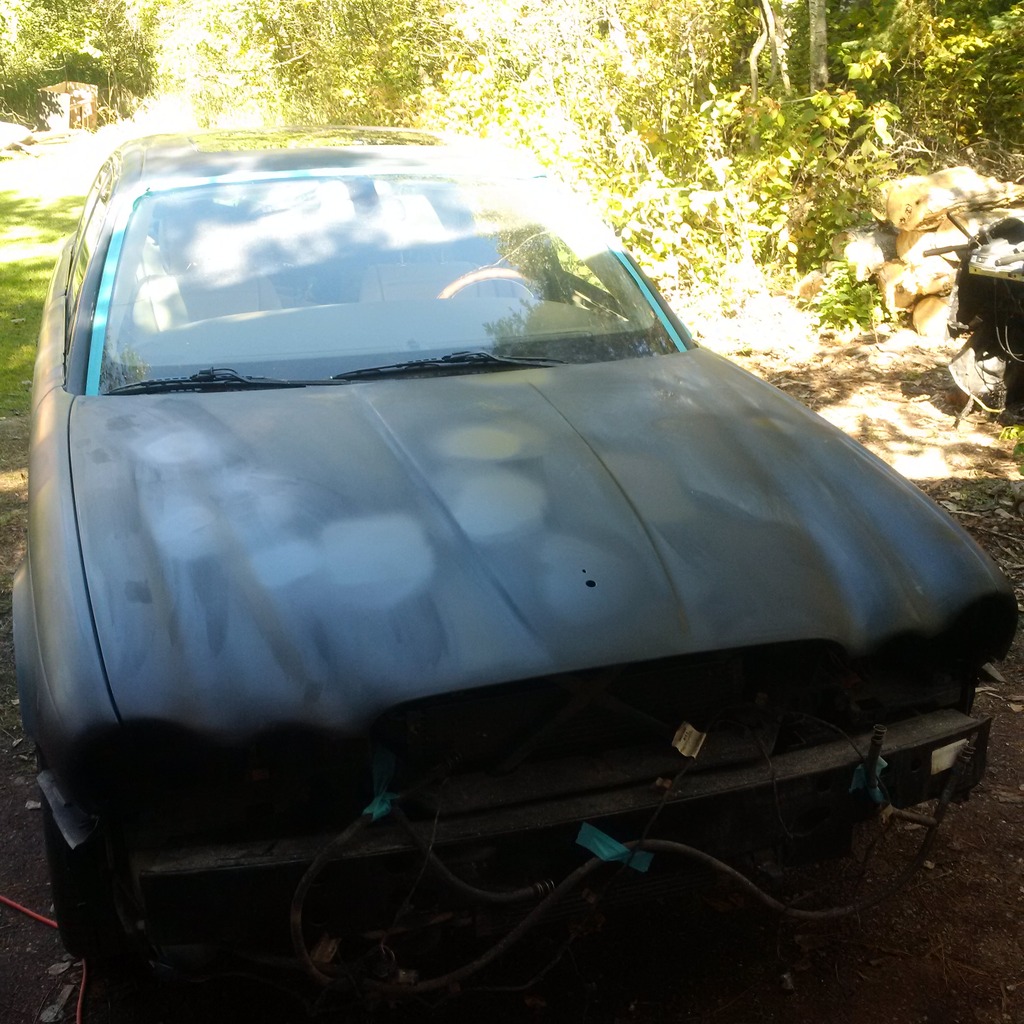
Then the tear down began. Starting with the rear. Then all the trim and front end.

Next was to fix all those nasty dents all over the car.

All fixed, primed and ready for paint.
Now, since I was doing the whole car I had to sand it all down. I prepped the whole car with 600 grit, some say that's too coarse, others not coarse enough, but I found it worked perfectly.

Next came the base coat of that lovely black cherry.

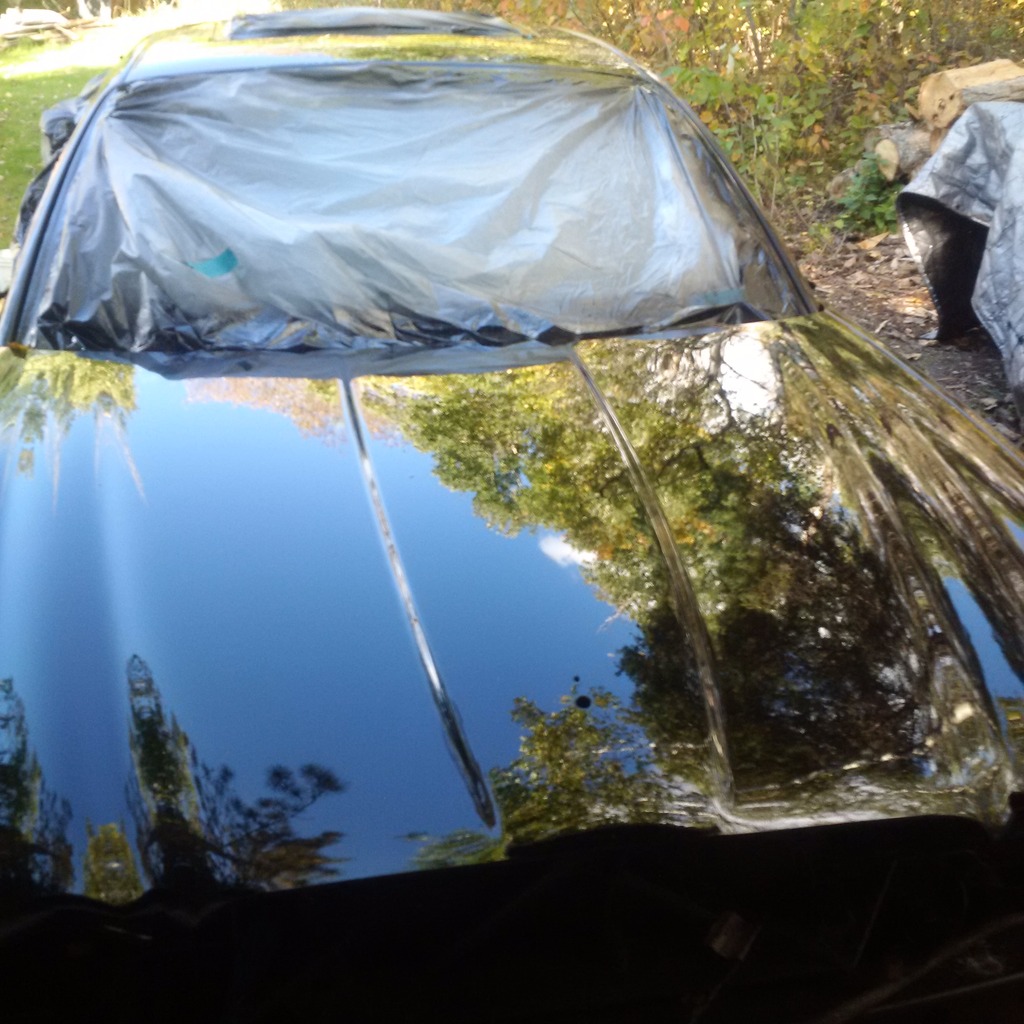
Followed up by the clear.

Hard to tell in that pic but the clear is on. Here is one of the hood which shows it much better.
So, overall, this was about a 10-15 foot paint job. It looked great until you got up closer. So now I had to cut and polish the car. I ended up wet sanding the entire thing again with 1000, then 1500, 2000, then 3000 grit. This got rid of any orange peel, nibs, sags, kamekaze bugs and the like for a nice smooth finish.

Next was to polish it out to a nice clean shiny finish like it should be. You can guess what side has been done and what hasn't!

So, all the parts were done and ready to go back together. Starting to look like a car again!

Now, I don't have any more pics at the moment. I'll get some when it is actually all done since I still have to go over the car with the final polish and fix a few little imperfections here and there.
Now for those that may say "Hey, that's still the same color!", trust me, it isn't. These are the best shots I could get of the red when the sun hits it just right.
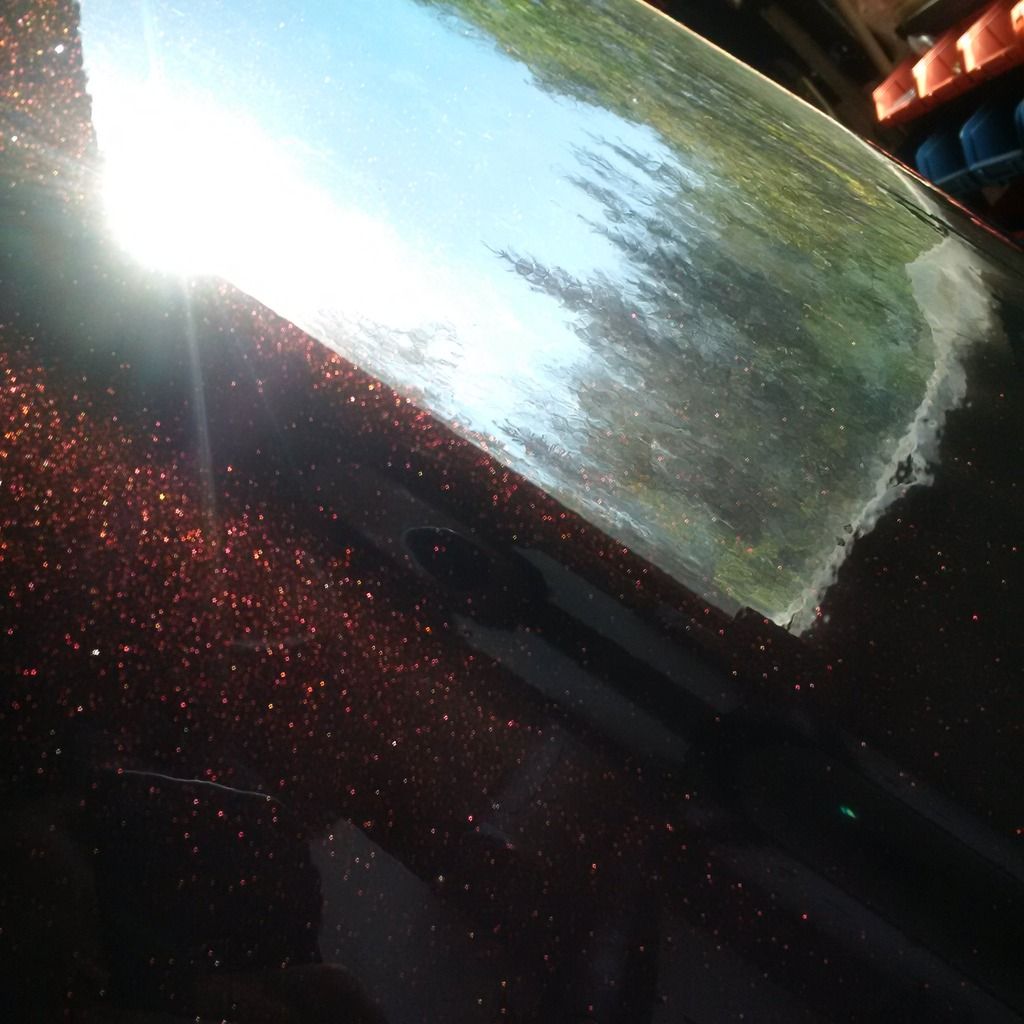
It is true that 95% of the time the car looks black, but in the right light, wow, it's stunning.
More to come as I finally complete the transformation!
First I washed the car to get it nice and clean so I could see all the dents I would have to fix.


Alright, nice and clean. The paint was actually in pretty rough shape to begin with. It wasn't terrible, but showing its age for a 10 year old car that obviously had prior paint work done that wasn't exactly at a high standard.
Then the tear down began. Starting with the rear. Then all the trim and front end.


Next was to fix all those nasty dents all over the car.

All fixed, primed and ready for paint.

Now, since I was doing the whole car I had to sand it all down. I prepped the whole car with 600 grit, some say that's too coarse, others not coarse enough, but I found it worked perfectly.

Next came the base coat of that lovely black cherry.

Followed up by the clear.

Hard to tell in that pic but the clear is on. Here is one of the hood which shows it much better.

So, overall, this was about a 10-15 foot paint job. It looked great until you got up closer. So now I had to cut and polish the car. I ended up wet sanding the entire thing again with 1000, then 1500, 2000, then 3000 grit. This got rid of any orange peel, nibs, sags, kamekaze bugs and the like for a nice smooth finish.

Next was to polish it out to a nice clean shiny finish like it should be. You can guess what side has been done and what hasn't!

So, all the parts were done and ready to go back together. Starting to look like a car again!

Now, I don't have any more pics at the moment. I'll get some when it is actually all done since I still have to go over the car with the final polish and fix a few little imperfections here and there.
Now for those that may say "Hey, that's still the same color!", trust me, it isn't. These are the best shots I could get of the red when the sun hits it just right.


It is true that 95% of the time the car looks black, but in the right light, wow, it's stunning.
More to come as I finally complete the transformation!
The following 2 users liked this post by WinterJag:
alecescolme (10-19-2015),
Panthro (02-17-2016)
#2
10-19-2015, 12:52 PM
Senior Member

#3
10-19-2015, 02:15 PM
alecescolme - Thanks. I think there are lots of imperfections, but I guess having your nose 2 inches from the car for weeks, you notice things! I have already had a few people, and body guys, say its better than most of the stuff they see come out of shops nowadays. As for products, I used 2k . The basecoat was Matrix and the clear was EuroClear. I would say I'm quite happy with them. If you do respray, pay attention to the prep work. Painting is 99% prep. Almost anything can be cut and polished out in the end! I actually had a few leaves and bugs fall into my final clear coat. I thought that was it, I'd have to redo it, but I let them be, let the clear harden up for a few days, came back to it and guess what, all the damage was polished out. Trust me, it looked bad at the time, but I'm a heavy painter so I had a thick clear to work with so sanding things out is no problem.
Unfortunately I just noticed something today while walking away from the car in the sun after parking, not all panels have equal red in them. I gave it a good look over and here is what I found. The body and hood were painted with one batch of paint, the bumpers and trunk with another. Guess what, the bumpers and trunk have a beautiful red to them in the light, the rest only a little bit. I have a feeling that someone mixed up the batches different. Even though I was going of the factory paint code, which they just put into their machines, I think there was more flake (actually powdered pearl) in the second batch. So, I am going to go back to them with the can from the second batch and see what's what! I'm pretty sure I'm going to have to redo all that was done using that first batch. It sucks, but its not that bad actually since the color is already changed all I need to do is give those panels a light coat of correctly mixed base, then re-clear. Since I already have clear, it'll only cost about another $80 CDN to get enough paint, after that it's just my time, and doing it a panel at a time means the car is only down for a day or two each time I redo one, not a month straight! This also gives me a chance to fix the door ding I already got (of course this would happen the day after driving a newly painted car) and a few little spots that are bugging me that aren't exactly perfect. I also accidentally dinged the edge of the trunk while refitting the infill panel (right down to aluminum) so I can fix that too. Since it's getting colder here, I'm going to respray piece by piece instead of the whole thing at once. I usually spray outside, but it'll have to move inside to the heated garage and I can only do a panel or two at a time in there. All in all, even with this extra work, it will still be a free paint job, so no complaints!
Unfortunately I just noticed something today while walking away from the car in the sun after parking, not all panels have equal red in them. I gave it a good look over and here is what I found. The body and hood were painted with one batch of paint, the bumpers and trunk with another. Guess what, the bumpers and trunk have a beautiful red to them in the light, the rest only a little bit. I have a feeling that someone mixed up the batches different. Even though I was going of the factory paint code, which they just put into their machines, I think there was more flake (actually powdered pearl) in the second batch. So, I am going to go back to them with the can from the second batch and see what's what! I'm pretty sure I'm going to have to redo all that was done using that first batch. It sucks, but its not that bad actually since the color is already changed all I need to do is give those panels a light coat of correctly mixed base, then re-clear. Since I already have clear, it'll only cost about another $80 CDN to get enough paint, after that it's just my time, and doing it a panel at a time means the car is only down for a day or two each time I redo one, not a month straight! This also gives me a chance to fix the door ding I already got (of course this would happen the day after driving a newly painted car) and a few little spots that are bugging me that aren't exactly perfect. I also accidentally dinged the edge of the trunk while refitting the infill panel (right down to aluminum) so I can fix that too. Since it's getting colder here, I'm going to respray piece by piece instead of the whole thing at once. I usually spray outside, but it'll have to move inside to the heated garage and I can only do a panel or two at a time in there. All in all, even with this extra work, it will still be a free paint job, so no complaints!
The following 2 users liked this post by WinterJag:
alecescolme (10-20-2015),
Lagonia (01-09-2016)
#6
01-09-2016, 04:41 PM
Ya, old school for sure! It is possible to get a good job done without a booth. I found that out when about 3-4 years ago I paid for a full respray of our STR. Then about a month after shelling out over $5K, the paint started to chip off the fenders and surface rust was showing on the rear quarters (all the bad spots were pointed out prior to painting and they were told to fix them). When I went back to them (this shop has one of the best reputations for great work) and showed them, I was basically told to take a hike as it wasn't their problem since I drove the car and driving leads to chips. They wouldn't even offer an excuse for the rust showing through. After that, I decided to keep my money and do things myself. This was my 5th full car. Just before Christmas I went to my insurance for the re-inspection of repairs and all went well. They said it was a great job, just as good as the shop work they see so that felt good to hear.

Thread
Thread Starter
Forum
Replies
Last Post
FS[Central US]: 2000 XJR 117,000 miles mechanic owned turn key car, $5000
tylerh860
PRIVATE For Sale / Trade or Buy Classifieds
5
11-17-2015 10:14 AM
talashek
XJ XJ6 / XJ8 / XJR ( X350 & X358 )
9
11-07-2015 10:40 AM
Currently Active Users Viewing This Thread: 1 (0 members and 1 guests)