
Trans pull
#1
 03-15-2018, 03:58 PM

#2
03-15-2018, 06:19 PM
These are relatively easy.
Drain fluid
Remove catalytic converters
Disconnect torque converter bolts
Remove trans mount
Disconnect shifter cable
Disconnect wiring
Disconnect cooler pipes
Make sure you have long extension, some of the bolts at the very top can be a pain if you're doing this on the floor.
CAUTION:
Under no circumstances must the flexible coupling (or its fixings) be loosened or removed from the driveshaft.
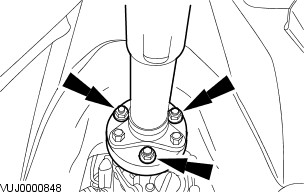
Detach the driveshaft from the transmission flange.
Make sure the front of the driveshaft does not put an excessive load on the center bearing. Failure to follow this instruction may result in damage to the vehicle.
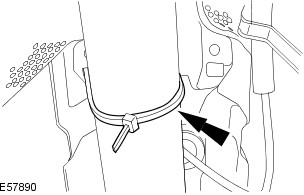
Using a suitable securing strap, reposition and support the driveshaft to the vehicle body.
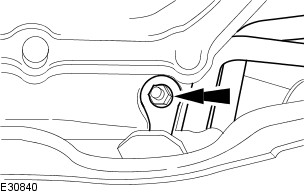
Detach the transmission fluid cooler tubes from the oil pan.
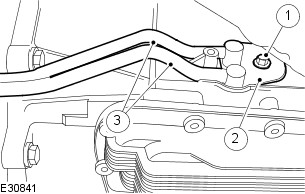
Detach the transmission fluid cooler tubes.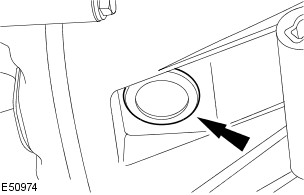
Remove the torque converter rubber inspection cover.
CAUTION:
Make sure the automatic transmission weight is evenly supported on the special tool. Failure to follow this instruction may result in damage to the vehicle.
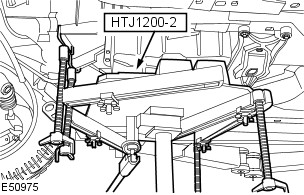
Install the special tool.
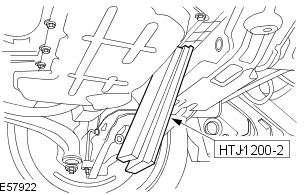
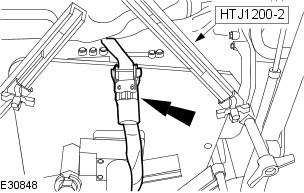
Install the rubber blocks supplied with special tool HTJ1200-2, between the front subframe and the oil pan.
Lower the rear of the transmission.
Secure the automatic transmission to the special tool using the tie down straps. Failure to follow this instruction may result in personal injury.
Install the tie down strap.
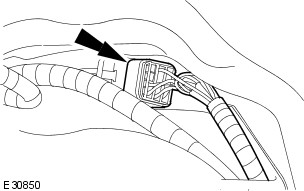
Detach the selector lever cable.
Reposition the selector lever cable.
Make sure the transmission control module (TCM) and main control valve body is protected against electrostatic discharge. Failure to follow this instruction may result in component damage.
Disconnect the automatic transmission electrical connector.
Remove the rubber access cover.
Remove the torque converter retaining bolts.
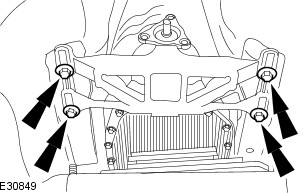
Remove the automatic transmission retaining bolts.
WARNING:
Do not let the torque converter drop out of the automatic transmission. Failure to follow this instruction may result in personal injury.
NOTE:
Special tool shown removed for clarity.
Remove the automatic transmission from the vehicle.
Drain fluid
Remove catalytic converters
Disconnect torque converter bolts
Remove trans mount
Disconnect shifter cable
Disconnect wiring
Disconnect cooler pipes
Make sure you have long extension, some of the bolts at the very top can be a pain if you're doing this on the floor.
CAUTION:
Under no circumstances must the flexible coupling (or its fixings) be loosened or removed from the driveshaft.
Detach the driveshaft from the transmission flange.
-
- Mark the position of the driveshaft in relation to the transmission flange.
- Mark the position of each nut and bolt in relation to the transmission flexible joint.
Make sure the front of the driveshaft does not put an excessive load on the center bearing. Failure to follow this instruction may result in damage to the vehicle.
Using a suitable securing strap, reposition and support the driveshaft to the vehicle body.
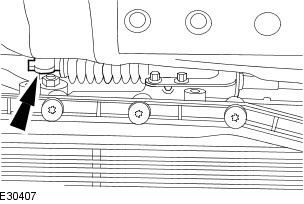
Detach the transmission fluid cooler tubes from the oil pan.
Detach the transmission fluid cooler tubes.
- Remove the retaining bolt.
- Remove the retaining plate.
- CAUTION:
Make sure the transmission fluid cooler tubes are not removed from the automatic transmission by using a pry bar. Failure to follow this instruction may result in damage to the vehicle.
Detach the transmission fluid cooler tubes.- Allow the transmission fluid to drain into a suitable container.
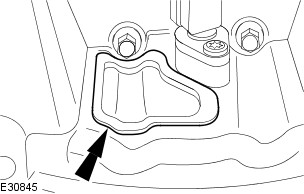
Remove the torque converter rubber inspection cover.
CAUTION:
Make sure the automatic transmission weight is evenly supported on the special tool. Failure to follow this instruction may result in damage to the vehicle.
Install the special tool.
Install the rubber blocks supplied with special tool HTJ1200-2, between the front subframe and the oil pan.
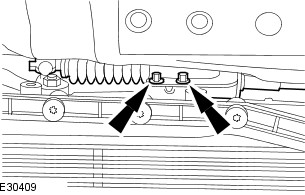
Lower the rear of the transmission.
-
- Remove the automatic transmission support retaining bolts.
Secure the automatic transmission to the special tool using the tie down straps. Failure to follow this instruction may result in personal injury.
Install the tie down strap.
Detach the selector lever cable.
Reposition the selector lever cable.
-
- Remove the retaining bolts.
Make sure the transmission control module (TCM) and main control valve body is protected against electrostatic discharge. Failure to follow this instruction may result in component damage.
Disconnect the automatic transmission electrical connector.
Remove the rubber access cover.
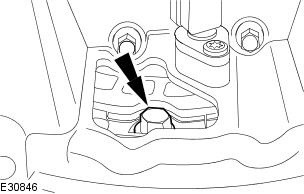
Remove the torque converter retaining bolts.
-
- Rotate the torque converter to gain access to the remaining bolts.
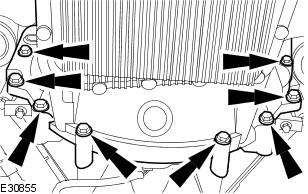
Remove the automatic transmission retaining bolts.
WARNING:
Do not let the torque converter drop out of the automatic transmission. Failure to follow this instruction may result in personal injury.
NOTE:
Special tool shown removed for clarity.
Remove the automatic transmission from the vehicle.
-
- Remove the retaining bolts.
- Lower the automatic transmission from the vehicle.
The following users liked this post:
Don B (03-15-2018)
#3
03-15-2018, 10:29 PM


Join Date: Feb 2014
Location: Crossroads of America
Posts: 19,626
Received 13,347 Likes
on
6,587 Posts
Just curious, but why are you removing the transmission?
If you don't have the X350 Workshop Manual that JBzXJ40 referenced, you can download it in six sections here:
Table Of Contents
General Information
Chassis
Powertrain
Electrical
Body
Cheers,
Don
Last edited by Don B; 03-15-2018 at 10:33 PM.
#4
03-16-2018, 11:54 AM
I apologize. I found this site because I was given a 2004 XJ8 with only 55,655 miles. The vehicle belonged to a very dear friend. I knew the cars transmission had a problem after her son put it in park without coming to a complete stop.
from that day forward the car seemed to be stuck a gear. I know this because , When you get in and tired the key, the car would go through it's normal system check, and driver warnings. The doors would lock and sensors warning would
sound. After Further investigation I found that the J gate shifter had broken pieces from the shift lock.
Last edited by Don B; 03-16-2018 at 07:14 PM. Reason: repaired quotation
#5
03-16-2018, 12:31 PM
I’m sorry. I sent my reply to you unfinished. I hit the submit key accidentally.
But anyway,
I pullout the shifter and did a quick bandaid hop on it and then tried to start the car again with the key. (I forgot to mention that when I started the the car the first time I had to tap the start to start it) and she came alive . The shifter gear indicator lights came on when switching gear to gear. However wouldn’t go forward or reverse.
So as I looked for possible reasons why it wouldn’t go.
So I went to my computer and did a search on the web but really wasn’t finding anything on my particular vehicle year and model. But I kept seeing Jaguar forum .
So I went ahead and posted my situation with the transmission. I received quite a few suggestions.
One member suggested that I drain the fluid and pull the pan to see what it looked like inside. It wasn’t pretty.
the fluid smelled burnt and the oil pan filter had fine shavings inside.
So that’s why I decided to just get the transmission out of the car rebuilt or replace which ever will be easier and cheaper.
i have access to two Jaguars. One is a XJ8 ,same year and model as mine. The other it a 2009 XF SUPERCHARGE.
The body of that car is pretty banged up. A victim of a very upset wife. But motor and transmission are intact and running.
Today I will be opening up the transmission to see what is going on inside.
Well Don I hope that I didn’t bore you with the reason why I am pulling out my transmission.
Oh yeah,
yes I do have the service manual I downloaded it earlier this week.
Well til next time
Aloha
Two Dubes.
Last edited by Don B; 03-16-2018 at 07:14 PM. Reason: repaired quotation
#6
03-16-2018, 12:37 PM

#7
03-16-2018, 02:02 PM


Trending Topics
#9
10-24-2023, 05:44 PM

#10
10-24-2023, 05:46 PM

Senior Member
#11
10-24-2023, 08:31 PM
Join Date: Feb 2014
Location: Crossroads of America
Posts: 19,626
Received 13,347 Likes
on
6,587 Posts
Hi LePucco,
Welcome to the Jaguar Forums. It's great to have you with us.
You have posted the same question in two different forums, one for the X308, and this one for the X350. These models have completely different transmissions, and since you haven't told us the year and model of your Jaguar, we don't know how to respond.
The first thing for you to do is to visit the New Member Area - Intro a MUST, and post a required introduction so we can learn something about you and your Jaguar and give you a proper welcome. Then, read this thread:
*New Members - a MUST read if you have just signed up*
Once you have done those things, please start your own new thread in the correct forum for your model, tell us the year and model of your Jaguar, and describe the symptoms or malfunctions it is exhibiting. It is quite possible that your transmission does not need to be removed at all. But we can't help you without more details. X308 is the Jaguar factory project code for the XJ8 from 1997 to 2003. X350 and X358 are the codes for the XJ8 from 2004 to 2009.
Cheers,
Don

Thread
Thread Starter
Forum
Replies
Last Post
WhiskyTangoFoxtrot
S-Type / S type R Supercharged V8 ( X200 )
6
06-16-2011 08:48 AM
Currently Active Users Viewing This Thread: 1 (0 members and 1 guests)