
Update on my X358
#41
 04-04-2015, 07:34 PM


#42
04-04-2015, 07:41 PM
Join Date: Nov 2006
Location: Glasgow, Scotland UK
Posts: 47,302
Received 9,011 Likes
on
4,114 Posts
Thanks Cameron, yes I've seen it before, probably on my old X type amongst others too.
I'm hoping it helps as the squeaking is driving me nuts, especially going around roundabouts, right turns etc.
It may also help if I lose a few lbs I guess....lol
Just ordered some new centre caps from Ebay too, look good, decent price etc, now just hope they're good when they turn up and fit.
Also hoping to get the time to.....
claybar then T cut or similar the sills and around the waistline of her to freshen things up, prior to a good coat of Poorboys Balckhole / Nattys blue paste wax if time allows.
When the wheels are off next Sunday for caliper / hub painting it'll also be a good chance to re clean the wheels thouroughly and also wash / blacken the wheel well liners
#43
04-04-2015, 08:36 PM


Join Date: Feb 2014
Location: Crossroads of America
Posts: 19,675
Received 13,427 Likes
on
6,625 Posts
Jim,
I agree that Beavis' car is stunning, and I confess that I really like red calipers. But I keep resisting the temptation to paint our XJR's calipers red because I suspect it would completely undermine the car's stealth persona and make it impossible for me to ever again convince a police officer that I was not intentionally exceeding the posted limit...
Regardless of the caliper color you choose, my personal preference for the dust shields would be black so the focus will remain on the rotors.
I've got a squeak in our drivers seat on the left side that is driving me crazy too. I think it's some of the plastic coverings rubbing against one another but I haven't had a chance to take a close look.
I'll be anxious to see what you decide on the calipers and shields and will look forward to the pix.
Cheers,
Don
Last edited by Don B; 04-04-2015 at 08:40 PM.
The following users liked this post:
JimC64 (04-06-2015)
#44
04-06-2015, 07:33 PM
Join Date: Nov 2006
Location: Glasgow, Scotland UK
Posts: 47,302
Received 9,011 Likes
on
4,114 Posts
Hi Don, yes Beavis' car is a beauty for sure, really nice example.
Still back n forth on caliper colour, no doubt decide on the day!
Looking forward to it as the dust shield will be done, either silver or black ( still undecided ) the hubs redone stock silver as well as the calipers ( colour to be determined )
With the wheels cleaned inside n out, new centre caps AND the wheel well liners cleaned and blackened at least that area of the car should be in good shape.
Also removed the rear light cluster chrome trims today too ( just not my style - so I now have front and rear for anyone that wants them )
Ordered another bottle of Poorboys Blackhole and hope to give her the once over topped off with Natty's Blue paste wax afterwards, nearer the day, time permitting.
#45
04-11-2015, 11:15 AM
Join Date: Nov 2006
Location: Glasgow, Scotland UK
Posts: 47,302
Received 9,011 Likes
on
4,114 Posts
Ok so I have all the bits n pieces ready for tomorrow and the plan is....
Wheels off and fully detailed inside n out, removing the sticky residue left behind by previous wheel balancing weights, see pic below.
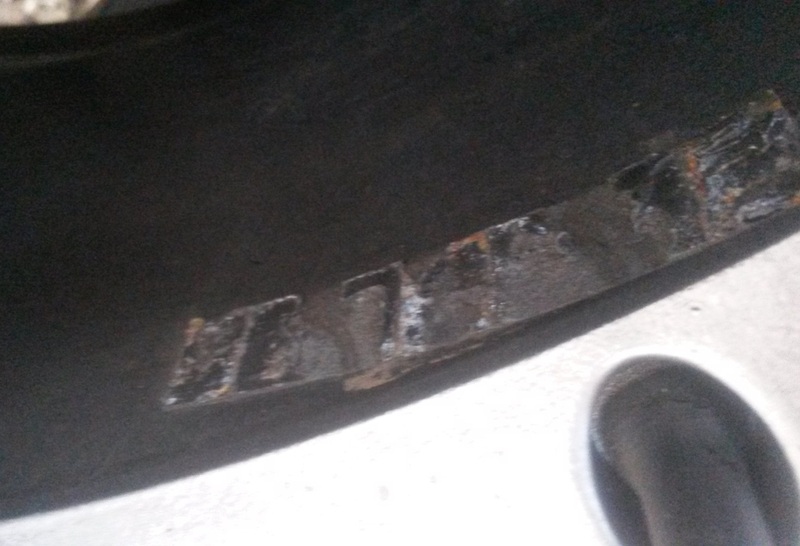
I bought some Evostick adhesive removed so hopefully that'll do the job without compromising the paint finish on the alloys
Once the wheels are off, I hope to be able to thoroughly clean the wheel well liners and then treat them with some "Wet n Black" for a nice finish.
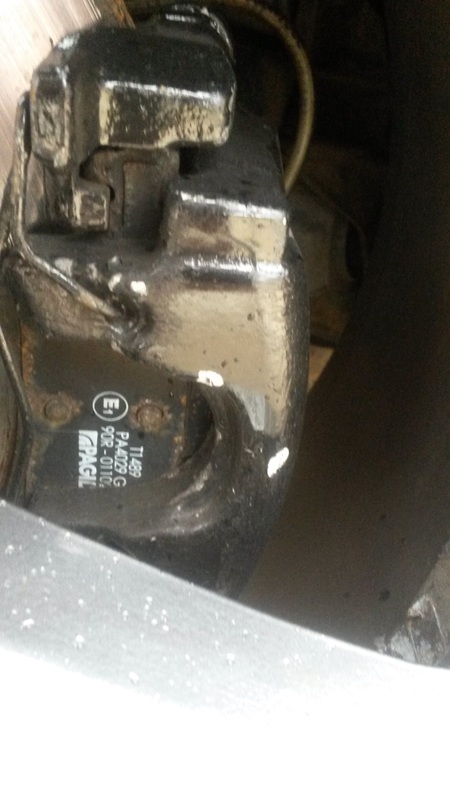
See pic below of the front wheel hub. As the brake pads and discs were replaced around a month ago, these are untreated and slightly rusting already, very unsightly.
I intend to get them all repainted using Hammerite smooth silver for a nice clean stock look finish.
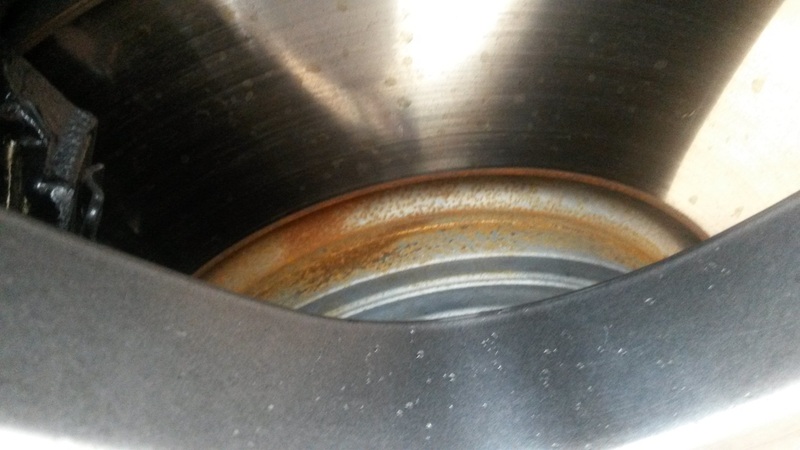
Actually looks worse than it is but it's been annoying me and needs dealt with.
Here's the wheel centre caps, they're actually not too bad, but I've bought some new ones and hope they look a little better and add to the overall finished look
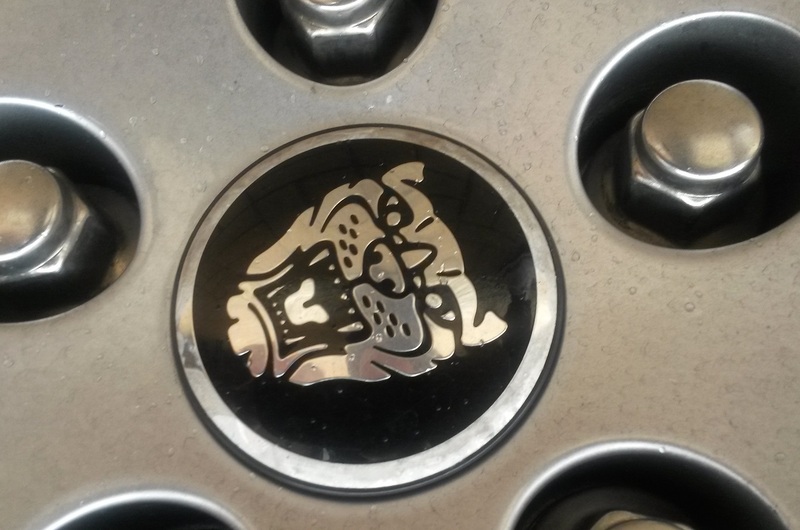
Here's what I'm looking to replace them with...

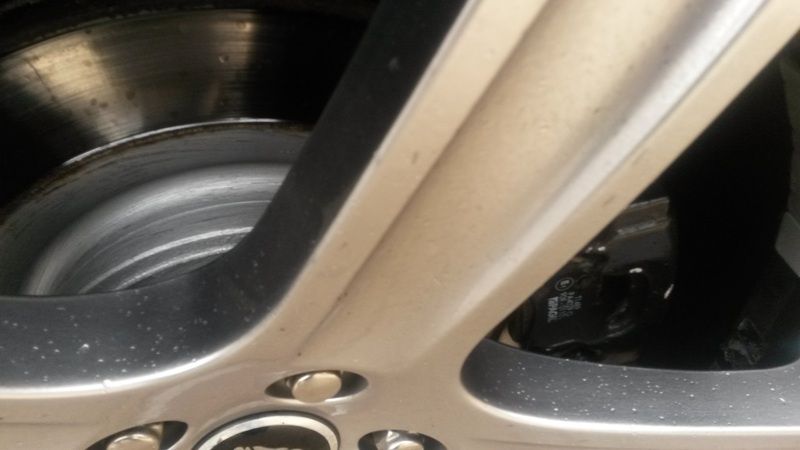
Here's a pic of the rear hub I did over a year ago, showing signs of a little wear but still 100% better than the fronts at the moment. These will be refinished as well
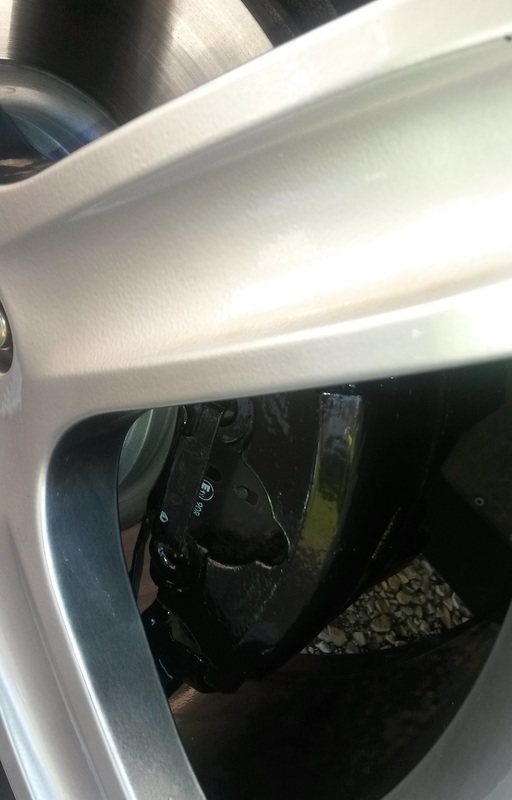
Here's the rear caliper finished in Black, has a few stone ships etc but still much better than rust coloured....
I think I'm going to stick with the black and these will all be refinished too, hopefully should lift the car a little when all done
Must try and remember to paint the dust shields ( black or silver ) to help with the general overall finish, they're looking a little the worse for wear too.
Waiting on the Poorboys Blackhole arriving and the car will be washed, clay barred and then treat withBlackhole before topping off with Nattys blue paste wax, hopefully the Saturday before the meet event on the 7th June
Wheels off and fully detailed inside n out, removing the sticky residue left behind by previous wheel balancing weights, see pic below.
I bought some Evostick adhesive removed so hopefully that'll do the job without compromising the paint finish on the alloys
Once the wheels are off, I hope to be able to thoroughly clean the wheel well liners and then treat them with some "Wet n Black" for a nice finish.
See pic below of the front wheel hub. As the brake pads and discs were replaced around a month ago, these are untreated and slightly rusting already, very unsightly.
I intend to get them all repainted using Hammerite smooth silver for a nice clean stock look finish.

Actually looks worse than it is but it's been annoying me and needs dealt with.
Here's the wheel centre caps, they're actually not too bad, but I've bought some new ones and hope they look a little better and add to the overall finished look

Here's what I'm looking to replace them with...
Here's a pic of the rear hub I did over a year ago, showing signs of a little wear but still 100% better than the fronts at the moment. These will be refinished as well

Here's the rear caliper finished in Black, has a few stone ships etc but still much better than rust coloured....

I think I'm going to stick with the black and these will all be refinished too, hopefully should lift the car a little when all done
Must try and remember to paint the dust shields ( black or silver ) to help with the general overall finish, they're looking a little the worse for wear too.
Waiting on the Poorboys Blackhole arriving and the car will be washed, clay barred and then treat withBlackhole before topping off with Nattys blue paste wax, hopefully the Saturday before the meet event on the 7th June
#46
04-12-2015, 12:21 PM
Join Date: Nov 2006
Location: Glasgow, Scotland UK
Posts: 47,302
Received 9,011 Likes
on
4,114 Posts
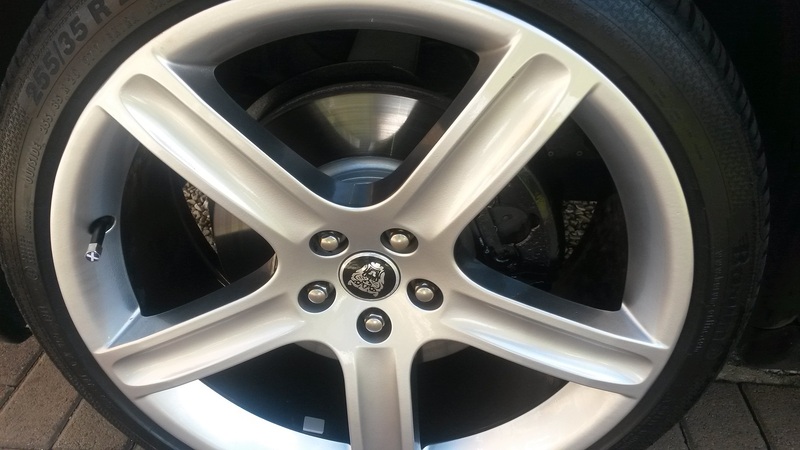
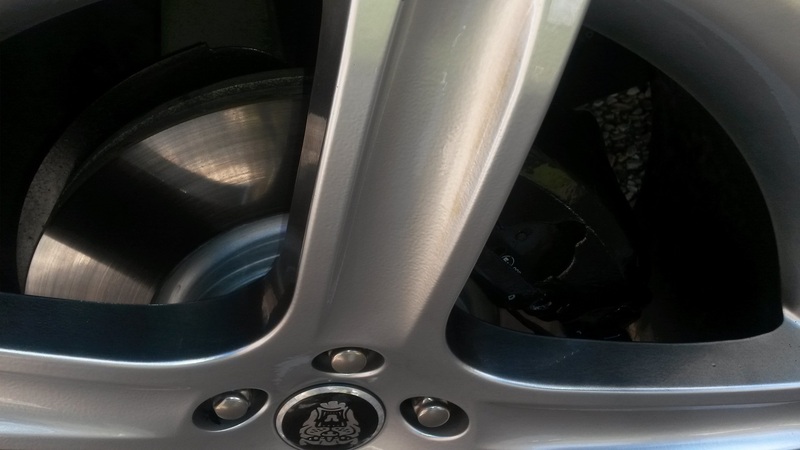
Well managed to get the wheels off today and thoroughly cleaned inside n out, removing sticky "stick on weight" adhesive residue
Also got the hubs and calipers repainted, hubs in stock silver, calipers in black as before and got the dust shields also tidied up in black.
Looks much better.....
The downside?
Replacement centre caps were slightly too big, fitted ok but jutted out when the wheel was replaced, so removed them and put the old stock ones back on
Didn't have time either to do the wheel wells, but they'll get sorted prior to the meet
Also got the hubs and calipers repainted, hubs in stock silver, calipers in black as before and got the dust shields also tidied up in black.
Looks much better.....


The downside?
Replacement centre caps were slightly too big, fitted ok but jutted out when the wheel was replaced, so removed them and put the old stock ones back on
Didn't have time either to do the wheel wells, but they'll get sorted prior to the meet
The following users liked this post:
Don B (04-12-2015)
#48
04-12-2015, 02:36 PM
Join Date: Nov 2006
Location: Glasgow, Scotland UK
Posts: 47,302
Received 9,011 Likes
on
4,114 Posts
thanks, for the kind comments
It really does make a huge difference, unfortunately you can't see the dust shield which was a stone blasted dirty grey, now a nice black too.
I didn't mask it up, just done carefully freehand using Hammerite smooth silver and black ( smallish tins around �8 each and a specific set of 1/2" pure bristle brushes )
The finish as seen on the before rear pic in a previous post is from a year ago and lasted well. I like to do them every year to keep them clean, fresh and looking good. All 4 wheels only took around 4 hours
Ideally I'd like the car off the road for 3 or 4 days, then I'd still use Hammerite, but in the tin spray form, mask up and do around 3 or 4 coats
#49
04-12-2015, 02:46 PM
#50
04-12-2015, 02:55 PM
Join Date: Nov 2006
Location: Glasgow, Scotland UK
Posts: 47,302
Received 9,011 Likes
on
4,114 Posts
Hi L80ous, thanks again for the comments
Its such an easy job to DIY, especially so if you have a trolley jack and a pair of axle stands ( to be on the safe side )
It's also a great chance to get the wheels off and really clean them inside as well as out. I really wish I'd had the time as I wanted to clean down my wheel well liners too, easily done at the same time.
If you do tackle this, you might also consider painting the dust shields ( silver or black - I went with black )
I have in actual fact literally just posted this onto jaguarforum.co.uk as I do visit there from time to time.
As Admin running the site here, I spend the bulk of my time here and call it my forum home
Thanks
#51
04-12-2015, 05:19 PM
Join Date: Feb 2014
Location: Crossroads of America
Posts: 19,675
Received 13,427 Likes
on
6,625 Posts
#52
04-12-2015, 06:14 PM
Join Date: Nov 2006
Location: Glasgow, Scotland UK
Posts: 47,302
Received 9,011 Likes
on
4,114 Posts
Thanks for the really overly kind comments Don, hardly an inspiration, that would be the likes of yourself and others with great tech / diy skills.
Just trying to make things a little cleaner looking, a little better
Definitely a good call on the black for the dust shields though Don, Thanks
Last edited by Don B; 04-12-2015 at 11:21 PM.
#53
05-02-2015, 06:24 PM
Join Date: Nov 2006
Location: Glasgow, Scotland UK
Posts: 47,302
Received 9,011 Likes
on
4,114 Posts
Update for today on my X358
Can't remember if I said or not, but I've also removed the rear light cluster chrome trim and much happier. I'm selling it 2nd hand to another owner who wants to add it to his car, so its going to a good home.
Spent some hours on the car today and washed her, then claybarred the entire car ( she's a big sucker ) from top to bottom. To be fair she was really clean, just a little here n there on the lower surfaces as you'd expect.
Then washed n dried.
Afterwards I spend to time cutting the paintwork as there were some swirls and the paint wasn't in as good shape as I'd like, unfortunately no pic, but did a similar test / pic as on Connor's X type below....
The swirls were greatly improved and the greyness was lessened too, really shiny and BLACK.....Sorry no pics as yet.
I'm hoping to get the Poorboys Blackhole applied tomorrow ( depends on Mayweather / Pacquiao fight )
Purists ( Cambo ), look away now.....
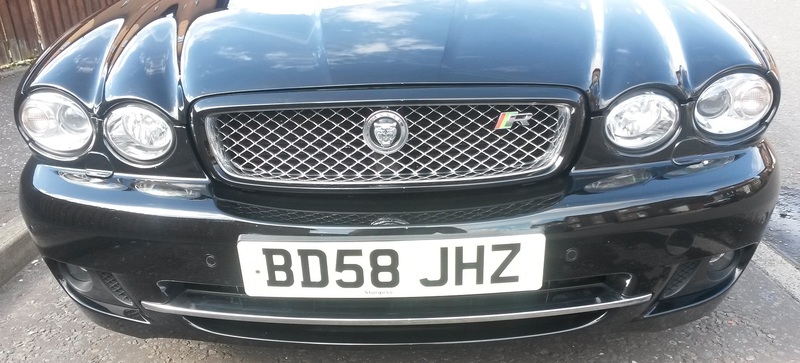
I'm also going to add the R badge to the front grill, absolutely love it on Connor's, It really adds a splash of colour and grabs the attention......
Having just redone my hubs n calipers stock silver and black, I've finally decided to go for red....lol
So I've ordered some Ferarri Rosso Red and will be making the change shortly, I'll post pics once completed.
Probably add some nice new Red centre caps to compliment the look too.
On this theme, and something I've been wrestling with too, is tinting the rear windows, a dark smoke just like Connor's....I reckon I'll get this done too shortly.
Can't remember if I said or not, but I've also removed the rear light cluster chrome trim and much happier. I'm selling it 2nd hand to another owner who wants to add it to his car, so its going to a good home.
Spent some hours on the car today and washed her, then claybarred the entire car ( she's a big sucker ) from top to bottom. To be fair she was really clean, just a little here n there on the lower surfaces as you'd expect.
Then washed n dried.
Afterwards I spend to time cutting the paintwork as there were some swirls and the paint wasn't in as good shape as I'd like, unfortunately no pic, but did a similar test / pic as on Connor's X type below....

The swirls were greatly improved and the greyness was lessened too, really shiny and BLACK.....Sorry no pics as yet.
I'm hoping to get the Poorboys Blackhole applied tomorrow ( depends on Mayweather / Pacquiao fight )
Purists ( Cambo ), look away now.....
I'm also going to add the R badge to the front grill, absolutely love it on Connor's, It really adds a splash of colour and grabs the attention......

Having just redone my hubs n calipers stock silver and black, I've finally decided to go for red....lol
So I've ordered some Ferarri Rosso Red and will be making the change shortly, I'll post pics once completed.
Probably add some nice new Red centre caps to compliment the look too.
On this theme, and something I've been wrestling with too, is tinting the rear windows, a dark smoke just like Connor's....I reckon I'll get this done too shortly.
The following users liked this post:
Don B (05-02-2015)
#54
05-04-2015, 07:25 PM
Join Date: Nov 2006
Location: Glasgow, Scotland UK
Posts: 47,302
Received 9,011 Likes
on
4,114 Posts
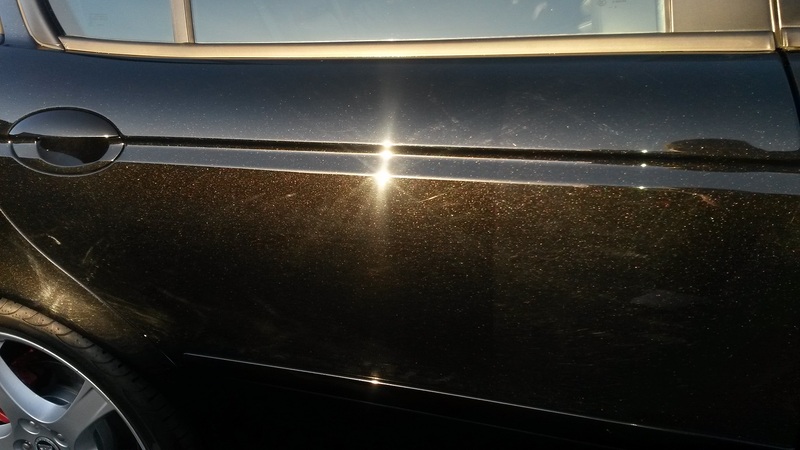
Poorboys Blackhole applied today over a few hours, I really need to get a smaller car....lol
Really brought out the shine, well worth the effort
Hoping to get the calipers given a couple of coats of red, windows tinted, red centre caps and headrest decals applied in the next week or so, then add a few pics....
Arms are aching / falling off, ( note to self - must buy a polishing machine )
Really brought out the shine, well worth the effort
Hoping to get the calipers given a couple of coats of red, windows tinted, red centre caps and headrest decals applied in the next week or so, then add a few pics....
Arms are aching / falling off, ( note to self - must buy a polishing machine )
#55
05-06-2015, 06:40 PM
Join Date: Nov 2006
Location: Glasgow, Scotland UK
Posts: 47,302
Received 9,011 Likes
on
4,114 Posts

The following users liked this post:
Don B (05-06-2015)
#56
05-06-2015, 07:08 PM
#57
05-06-2015, 10:15 PM
Join Date: Feb 2014
Location: Crossroads of America
Posts: 19,675
Received 13,427 Likes
on
6,625 Posts
#58
05-07-2015, 02:13 AM
Join Date: Nov 2006
Location: Glasgow, Scotland UK
Posts: 47,302
Received 9,011 Likes
on
4,114 Posts
Hi Cameron, it really is a great product, try it, I promise you won't regret it.
Try a little test area first, perhaps tape an area off, you WILL see a BLACK circle / line etc within the black paint.
I use the 500ml (16 oz ) bottle and can get it for around �13 and 1 bottle will do my car probably twice, maybe 3 times at a push
Plus - it smells amazing, really nice aroma as you use it.
Thanks Don, it was gleaming, now dirty again...lol
The reflections are superb and it's fairly easy on easy off too so all good
#59
05-09-2015, 10:20 AM

Junior Member
#60
05-09-2015, 01:28 PM
Join Date: Nov 2006
Location: Glasgow, Scotland UK
Posts: 47,302
Received 9,011 Likes
on
4,114 Posts
Ok so today, wheels off again and repainted my hubs n calipers AGAIN...lol
Hubs redone stock silver, 2nd coat looks much better
Calipers - opted for Ferarri Rosso red, this was the 2nd coat and a massive improvement, also added the red wheel centre caps, lovin it!
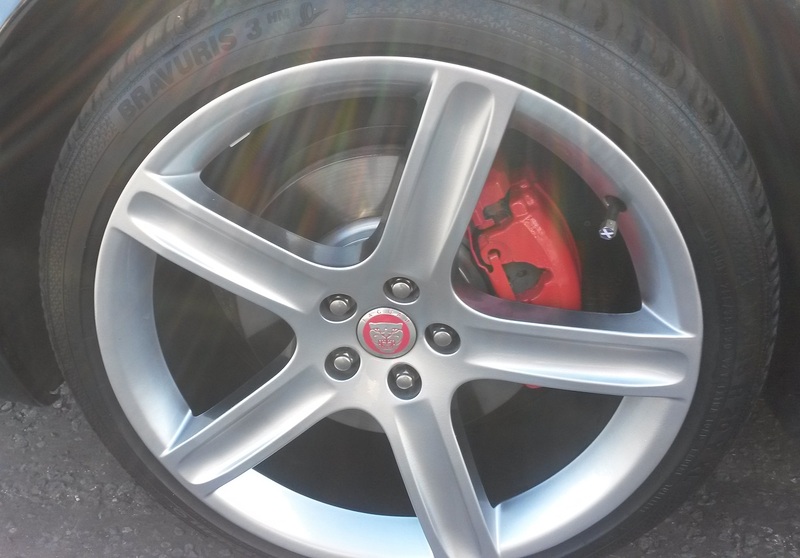
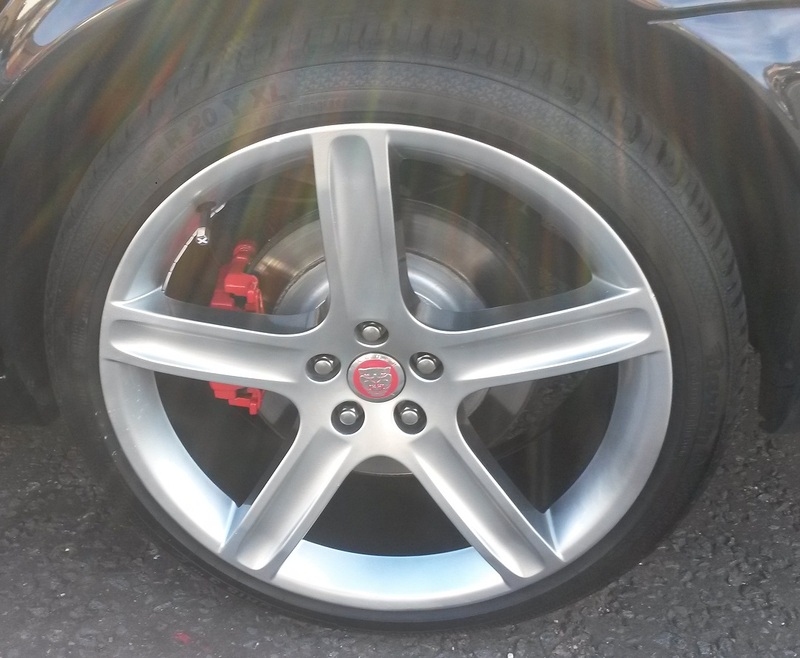
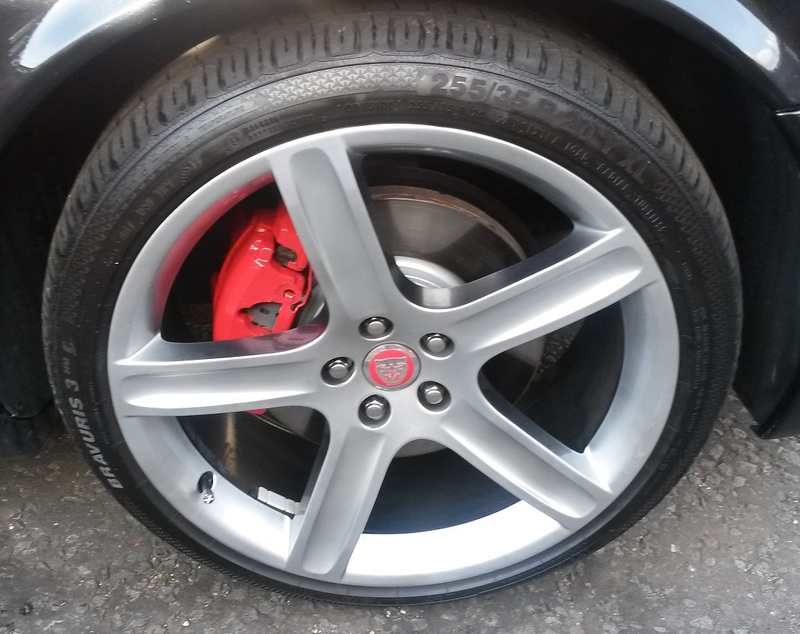
Contacting Prestige on Tuesday when Dougies back, looking to go in for a 4 wheel alignment, Red growler badge, R badge fitted and then tinted windows on Friday.....
Really pleased I had the guts to go for the red in the end as I really love the look.
Thanks
Hubs redone stock silver, 2nd coat looks much better
Calipers - opted for Ferarri Rosso red, this was the 2nd coat and a massive improvement, also added the red wheel centre caps, lovin it!


Contacting Prestige on Tuesday when Dougies back, looking to go in for a 4 wheel alignment, Red growler badge, R badge fitted and then tinted windows on Friday.....
Really pleased I had the guts to go for the red in the end as I really love the look.
Thanks
The following users liked this post:
Don B (05-09-2015)