The Birthday Jag!
#61
 10-30-2013, 08:20 PM


Bernie, this thread addresses your heat pump problem, an alternative pump and detailed instructions on brush replacement on stock pump.
https://www.jaguarforums.com/forum/x...ot-heat-84596/
https://www.jaguarforums.com/forum/x...ot-heat-84596/
Thanks a bunch!
UPDATE - Just dug up a brand new set of brushes that I had laying around from an old tool I got at Harbor Freight! I know what I am going to tear apart tomorrow

Last edited by razorboy; 10-30-2013 at 08:52 PM.
#62
10-30-2013, 08:24 PM
I found the heater switch in the engine bay and tested it by putting 12V directly to it and it does work. I then tested its electrical socket and an old friend showed up. With car running and heater turned off, I am getting 12V to one side of the pin and nothing on the other. With the heater turned on to full, that pin produces only 6V. Sounds like maybe a ground issue but when I test the negative side of the electrical connector to body ground, I am not seeing any resistance.
Could this lead to a grounding issue with the HVAC controller in the car or to the AC module? Does anyone know where those items are specifically grounded to? I am researching through the electrical manual but maybe someone can point it out quickly for me.
Hi Bernie
The ground for the pump and solenoid valve are on the LH bulkhead beside the ABS module. The one in the second picture in my previous post.
The ground for the HVAC control unit is in the cabin on the gearbox tunnel. See attached. It could be either or both of those ground studs.
One other thing to consider with that 6V reading is that it could be a PWM (Pulse Width Modulated) signal. I doubt it given the age of the car, but it is common for that type of signal on a solenoid in later cars. If your Multimeter has a Duty Cycle option have a look at what reading that gives.
Also, I noticed from your picture that you have the white connector unplugged. Ideally your should keep this plugged in and take readings by 'back probing' (stop sniggering!) the connector.
I have a Fluke meter so maybe it does? Will have to check.
I have cleaned most of those grounds already. The ones on the firewall, LH fender obviously and the ones in the trunk. Still need to get to the ones behind the headlights, there are ones at the heelboards in the rear IIRC?
So how much teardown until you can get to those ground points?
It doesn't matter much as a lot of the interior is coming out anyway but I want to get the mechanical and electrical sorted before tearing too much of the interior out.
Guys I want to thank all of you for jumping in with the pearls of wisdom. This project is getting fun now because the car runs and all of the info on fixing items is flowing so easily. I hope many people get use from this thread.
Cheers
Bernie
Last edited by razorboy; 10-30-2013 at 08:30 PM.
#63
10-31-2013, 11:55 AM
Hey Lads,
In my ongoing pursuit to get the Jag up to snuff, I have noticed that there is a lot of negative camber on the driverside rear wheel. Now given that I have heard a lot of clunking from the rear as I drive this car around, I am wondering if the notes I have received about issues with the upper shock mounts would contribute to this negative camber. Since getting to this mount is going to require a bit of effort, I thought I would bounce this issue off you guys to get your experience.
The passenger side appears normal but of course I will update both sides once I have confirmed the problem.
Cheers
Bernie
#64
10-31-2013, 04:37 PM

Veteran Member
I found the heater switch in the engine bay and tested it by putting 12V directly to it and it does work. I then tested its electrical socket and an old friend showed up. With car running and heater turned off, I am getting 12V to one side of the pin and nothing on the other. With the heater turned on to full, that pin produces only 6V. Sounds like maybe a ground issue but when I test the negative side of the electrical connector to body ground, I am not seeing any resistance.
I was intrigued by this so I did some testing on my car. Are you sure you were seeing 6v or was it 6mv with heater on?
It would appear that the solenoid may be open by default and is activated when heat is not required. This is what I see on mine - voltage across blue and black wire to Solenoid.
Ign Off - 0.1mv
Engine running, Heater off at control panel - 13.8v
Engine Running, Heater on Hi - 7.8mv
Engine Running, Heater on Lo - 13.7v
I ran the Hi setting and got the interior nice and hot, then set heater to 21C. The voltage was constant 7.8mv when on Hi.
When then setting to 21C the Solenoid then operated showing 13.7v, but continuously cycled dropping momentarily to 0 and back to 13.7. It did this until the interior stabilised at target temperature.
So your solenoid valve may be fine. I learn something new everyday
The following users liked this post:
razorboy (10-31-2013)
#65
10-31-2013, 08:43 PM
I found the heater switch in the engine bay and tested it by putting 12V directly to it and it does work. I then tested its electrical socket and an old friend showed up. With car running and heater turned off, I am getting 12V to one side of the pin and nothing on the other. With the heater turned on to full, that pin produces only 6V. Sounds like maybe a ground issue but when I test the negative side of the electrical connector to body ground, I am not seeing any resistance.
I was intrigued by this so I did some testing on my car. Are you sure you were seeing 6v or was it 6mv with heater on?
It would appear that the solenoid may be open by default and is activated when heat is not required. This is what I see on mine - voltage across blue and black wire to Solenoid.
Ign Off - 0.1mv
Engine running, Heater off at control panel - 13.8v
Engine Running, Heater on Hi - 7.8mv
Engine Running, Heater on Lo - 13.7v
I ran the Hi setting and got the interior nice and hot, then set heater to 21C. The voltage was constant 7.8mv when on Hi.
When then setting to 21C the Solenoid then operated showing 13.7v, but continuously cycled dropping momentarily to 0 and back to 13.7. It did this until the interior stabilised at target temperature.
So your solenoid valve may be fine. I learn something new everyday
I was intrigued by this so I did some testing on my car. Are you sure you were seeing 6v or was it 6mv with heater on?
It would appear that the solenoid may be open by default and is activated when heat is not required. This is what I see on mine - voltage across blue and black wire to Solenoid.
Ign Off - 0.1mv
Engine running, Heater off at control panel - 13.8v
Engine Running, Heater on Hi - 7.8mv
Engine Running, Heater on Lo - 13.7v
I ran the Hi setting and got the interior nice and hot, then set heater to 21C. The voltage was constant 7.8mv when on Hi.
When then setting to 21C the Solenoid then operated showing 13.7v, but continuously cycled dropping momentarily to 0 and back to 13.7. It did this until the interior stabilised at target temperature.
So your solenoid valve may be fine. I learn something new everyday
I rebuilt the pump today with new brushes following the link to the rebuild I was given. Dropped it back in the car and I now have a heater!!
What I was thinking after that was that maybe the computer wasn't allowing the solenoid to open because it wasn't detecting pump operation but from everything you have said, it all makes more sense now.
It was an awesome little project to rebuild the pump. The brushes were completely gone so there was no chance of it working. Now it works perfectly!
I did notice it took a while for the car to get to normal operating temperature so I think I will replace the thermostat while I am on this roll!
Thanks to all for helping me with the pump and heater. This is turning out to be a helluva lot of fun as I manage to resurrect one system after another with the expert advice from this forum.
Cheers and thanks again to everyone.
We are going to make that Feb 7 deadline for sure!!
Bernie
#66
10-31-2013, 09:05 PM
Veteran Member
Join Date: Nov 2006
Location: Glasgow, Scotland UK
Posts: 47,302
Received 9,007 Likes
on
4,113 Posts
The following users liked this post:
razorboy (10-31-2013)
#67
10-31-2013, 10:39 PM
I had to find some rubber grommets today to remount the power steering reservoir. It was flopping all over the place...lol. The original ones were completely falling off. So that gets done first thing.
Also going to tackle the windshield washer pump as it is not doing anything either.
I just ordered the rubber bushings to support the radiator and also will be buying the passenger doorlock mechanism from a forum member.
Once I get a few more amenities working and feel comfortable that the car is getting solid again, I will be basically taking out the entire interior to redo it. I have a replacement glass sunroof sitting here waiting to go in, the headliner gets send off to be recovered by a local upholsterer that I know and trust, the rear bench seat I think can be saved with a good cleaning and conditioning but the front seats - that's another story. The carpets will get a good deep cleaning and then I tackle some cosmetics with the dash and center console.
All this doesn't include the things I haven't discovered
yet................
Everyday an item or two gets resolved. Its actually moving along faster than I had thought so I am feeling really good about the project.
In the end, I will be putting a very nice set of rims and tires on it and then taking it to my friend for a Vegas style window tint. I thought those things were a ways off but not as far as I thought.
Cheers
Bernie
The following users liked this post:
JimC64 (11-01-2013)
#68
10-31-2013, 11:59 PM
Just checking out some wheels.
What do you think of these and does anyone know if they fit the XJ6?
2013 jaguar xjl oem 19inch wheels with tires like new
Bernie
UPDATE - Nevermind, I jut saw they have a different bolt spacing. Bummer.......
What do you think of these and does anyone know if they fit the XJ6?
2013 jaguar xjl oem 19inch wheels with tires like new
Bernie
UPDATE - Nevermind, I jut saw they have a different bolt spacing. Bummer.......
#69
11-01-2013, 11:41 AM
Hey Guys,
Found the power steering reservoir flopping all over the place as the grommets that hold it in place were all disintegrated. Quick run to my local Lowe's with what remained of one of the grommets helped me to find a couple of replacements. They only had two of these so I had to makeshift the third or top one using other grommets I had in the shop.
The spacers are a wee bit smaller than the opening in the grommet that allows some play so I took some heatshrink and used that to enlarge the spacer to get a snug fit. Putting it back in today and hopefully, they last.
Picture to show you what I picked up including the bag for PN reference.
Total cost was $3.00
Cheers
Bernie

#70
11-01-2013, 12:03 PM
#71
11-02-2013, 08:17 PM
Hey Guys,
Worked a little on amenities today since I am waiting on some parts to arrive.
Got under the passenger front fender and found the washer pump wiring torn apart. Looks like a new connector is in order.
So I checked the pump with my trusty 12V battery and she went whirring away. Then washer fluid poured out onto the driveway...........lol
Pulled the cowling off the washers and voila. A couple of broken washer nozzles allowing water to dump under the cowling and out the drains under the car.
Adding to my list of parts for later.

#72
11-03-2013, 07:37 PM
Guys I feel like a moron but,
How the heck do you open the center console?
I have the version with the flip out beverage holder but for the life of me, I can't find a release button and it feels like I am about to break it when I try to pull up on it. I saw a version that has a magnetic lid but that seriously can't be what mine has.
Since I don't have an owners manual yet, any help would be appreciated.
Bernie
#75
11-04-2013, 04:21 AM
This guy's ad shows the bottom, I guess it's not so much a release as a place to pull up on. I'll look at the Mrs's today.
New Cream Coffee Leather Cupholder Console Lid 1994 97 Jaguar XJ12 XJ6 VDP | eBay
New Cream Coffee Leather Cupholder Console Lid 1994 97 Jaguar XJ12 XJ6 VDP | eBay
The following users liked this post:
razorboy (11-04-2013)
#76
11-04-2013, 06:40 AM
Bernie,
I'm really enjoying following your exploits in this thread and can completely understand the joys and frustrations you experience as I have just bought a 1995 VDP that needs a lot of mechanical and electrical attention.
Keep up the good work, it inspires me with all the little projects I have to do this winter on the old boy
I'm really enjoying following your exploits in this thread
and can completely understand the joys and frustrations you experience as I have just bought a 1995 VDP that needs a lot of mechanical and electrical attention.Keep up the good work, it inspires me with all the little projects I have to do this winter on the old boy
#77
11-04-2013, 08:30 AM
This guy's ad shows the bottom, I guess it's not so much a release as a place to pull up on. I'll look at the Mrs's today.
New Cream Coffee Leather Cupholder Console Lid 1994 97 Jaguar XJ12 XJ6 VDP | eBay
New Cream Coffee Leather Cupholder Console Lid 1994 97 Jaguar XJ12 XJ6 VDP | eBay
Thanks for following along Allan.
I must say I haven't encountered any frustration yet. I have been working on a lot of things that I never thought I was going to have to work on like windshield washers as an example but at the end of the day, it's all relatively simple things to repair or replace. I do want the missus to have a nice car when I am finished with most of the amenities working the way they should.
I do have to stop myself right now because I have a lot of things taken apart. I don't want to get to the point where it becomes a jigsaw puzzle to put everything back together so I am going to finish all the doors / locks, washers and the radiator / ac condenser mounts and thermostat before proceeding onto other items. I do have parts on the way for these things so by weeks end they should all be finished unless I run into any other issues.
Also just discovered that I have to do the timing belt on my little Kia Sportage gas sipper. That will have to take priority so I keep our other rigs on the road too.
Cheers and thanks for following along.
Bernie
#80
11-04-2013, 02:03 PM
Bernie, heres two pix, one thumbing the latch open and catch bar out of view ie, open and the other latch released catch bar in view ie, closed. On the first pic I'm pushing up on the tab and on the second I'm letting it loose. Hope this helps
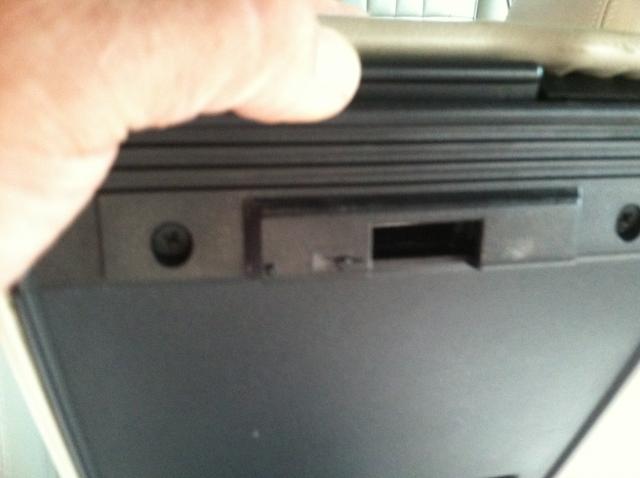


Last edited by JTsmks; 11-04-2013 at 02:06 PM.
The following users liked this post:
razorboy (11-04-2013)