The Birthday Jag!
#101
 01-09-2014, 08:12 PM


Very helpful, thank you!
Also nice to know that its a job without dropping the diff - I hope!!!
I am not sure yet where the play is coming from.
It almost seems that the whole shaft is free to slide in and out from inside the diff so I am assuming that whatever is supposed to hold it tight to the diff has ceased doing so. I will take another look at it tomorrow.
In the meantime, what is the total list of parts to do both sides. I might as well once I get into it.
I see 2 x bearings, 2 x collars, 2 x seals
Ebay shows o-rings?
Thanks!
Bernie
#102
01-09-2014, 08:59 PM
Very helpful, thank you!
Also nice to know that its a job without dropping the diff - I hope!!!
I am not sure yet where the play is coming from.
It almost seems that the whole shaft is free to slide in and out from inside the diff so I am assuming that whatever is supposed to hold it tight to the diff has ceased doing so. I will take another look at it tomorrow.
In the meantime, what is the total list of parts to do both sides. I might as well once I get into it.
I see 2 x bearings, 2 x collars, 2 x seals
Ebay shows o-rings?
I just finished this job yesterday. Quite straightforward if you have a press. If not, getting the collar on will be difficult as it is a very tight fit. I put the stub axle in the freezer for an hour or so and the bearing and collar in a 170F oven for 30 mins. I have a 20 ton shop press but this helps fitting them without any drama.
You do need to drill/cut the collar and hit it with a chisel to weaken it before pressing it off. If you don't you stand the chance of bending the ears of the cover plate and perhaps snapping them off.
The following users liked this post:
razorboy (01-09-2014)
#103
01-09-2014, 10:03 PM
I don't have a press but can bring it somewhere to have it done. Never had enough use for one to buy it.
I am curious.
From the pics I can see the assembly all together but what retains the assembly inside the differential? Does anyone have a diagram?
It looks like if I take the half shaft off the unit, it can slide right out?
I am curious.
From the pics I can see the assembly all together but what retains the assembly inside the differential? Does anyone have a diagram?
It looks like if I take the half shaft off the unit, it can slide right out?
#104
01-09-2014, 11:00 PM
I don't have a press but can bring it somewhere to have it done. Never had enough use for one to buy it.
I am curious.
From the pics I can see the assembly all together but what retains the assembly inside the differential? Does anyone have a diagram?
It looks like if I take the half shaft off the unit, it can slide right out?
I am curious.
From the pics I can see the assembly all together but what retains the assembly inside the differential? Does anyone have a diagram?
It looks like if I take the half shaft off the unit, it can slide right out?
#105
01-09-2014, 11:43 PM
Ok,
Well the car was jacked up with the wheel removed. Is it possible that this play is normal with the hub hanging? Maybe the play is being caused from some other suspension issue? I haven't tackled this particular issue before so I am scratching my head here a bit.
If the stub axle will just slide out once the half shaft is uncoupled, then it's reasonable that there is some inward outward play when attached?
Bernie
#106
01-10-2014, 12:07 AM
I see where you are coming from but no. If the stub axle is moving in and out of the differential housing, that is a problem. The end float maximum specified is 0.15mm anything in excess of that generally means the bearing needs to be changed. When properly installed the bearing (and hence the shaft) are sandwiched tightly between the retaining plate and the shims.
Either you have a bearing failure or possibly if someone had removed the stub axle at some point (perhaps to change the oil seal) and forgot to put the shims back in during reassembly then you would get a significant amount of end float. Probably 2-3mm or so.
Also just re-reading your last post, the stub axle will not come out if you merely uncouple the halfshafts. You must remove the 5 torx head bolts that hold the retaining cover to the differential. With those bolts removed the stub axle can slide out of the differential.
Last edited by AllanG; 01-10-2014 at 12:09 AM.
The following users liked this post:
razorboy (01-10-2014)
#108
01-10-2014, 12:59 AM
On another note,
I am removing the headliner to recover.
Trying to get the caps off the grab handles and one of the plastic covers cracked.
Are these supposed to be hard plastic?
Mine are hard and I am wondering because I live in Vegas where everything dries out.
If not, what is the proper way to remove the metal caps without breaking the plastic surrounds.
Cheers
Bernie
#110
01-10-2014, 06:50 AM
Just so we are on the same page and because I know you are on a tight time schedule  just want to be sure you know that you don't have to drop the diff to get at the output shafts.
Just uncouple the halfshafts and remove the retaining plate bolts and pull it out. You'll need to keep rotating the halfshaft to get at each of the nuts.
I too am enjoying the thread and rooting for you!!
just want to be sure you know that you don't have to drop the diff to get at the output shafts.Just uncouple the halfshafts and remove the retaining plate bolts and pull it out. You'll need to keep rotating the halfshaft to get at each of the nuts.
I too am enjoying the thread and rooting for you!!
#111
01-10-2014, 11:00 AM
Just so we are on the same page and because I know you are on a tight time schedule just want to be sure you know that you don't have to drop the diff to get at the output shafts.
Just uncouple the halfshafts and remove the retaining plate bolts and pull it out. You'll need to keep rotating the halfshaft to get at each of the nuts.
I too am enjoying the thread and rooting for you!!
just want to be sure you know that you don't have to drop the diff to get at the output shafts.Just uncouple the halfshafts and remove the retaining plate bolts and pull it out. You'll need to keep rotating the halfshaft to get at each of the nuts.
I too am enjoying the thread and rooting for you!!
Thanks for following the restore!
I may not have all the amenities back up and running by Feb 7.
Its a dollars a cents thing. The more pressure I am under to get things fixed, the less I can look for good deals. Today I am dropping 300 for a set of front door panels which I consider a good deal. That will finish off the doors for now as they were in rough shape. Only one lock working on the key, etc. Thats all been fixed and the new panels will transform the look and feel of the car up front.
The headliner will get done because that is just nasty and I have recovered one in a Volvo by myself before which turned out great. From now till Feb 7, I need to remain focused on the running of the vehicle. Get this diff issue dealt with, change all filters and fluids, new plugs and wires, etc. Then I will circle back piece by piece to finish off fixing any amenities that need addressing.
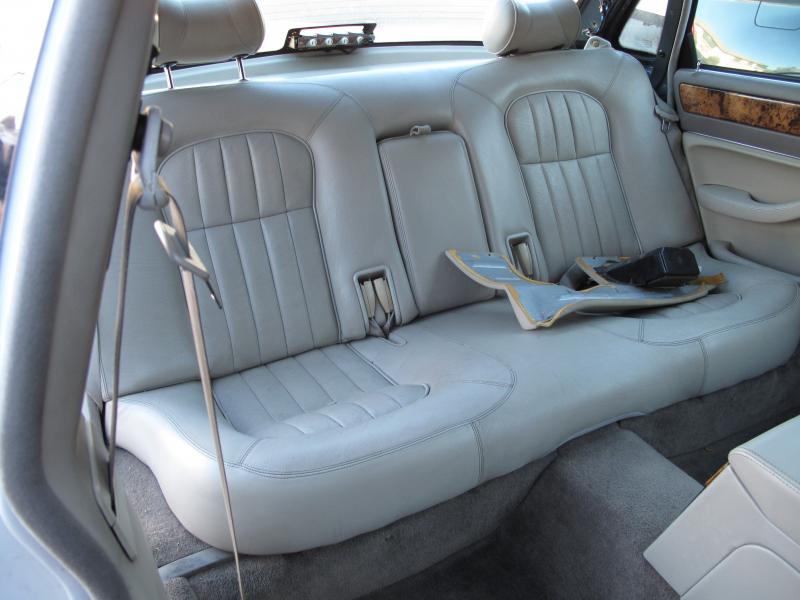
The front seats are the biggest challenge as the driver seat is absolutely toast. The metalwork is actually broken and the leather, foam, controls are all trashed. That seat is going in the dumpster. The passenger seat is not much better in the leather, foam department but mechanically its sound. The rear seat back cushion is perfect but the bottom is weathered. It will still be fine for now. Carpets need a major cleaning.
Here is what the car looks like today.
So many things still left to do but knocking them out one by one
The last picture is the one doorpanel I restored. Hopefully the rest turn out as good!


The following users liked this post:
Stuart Beattie (04-14-2014)
#112
01-12-2014, 01:43 AM
Update from today.
Headliner is out. Unfortunately, most of the buttons holding on the driver side roof trim have broken so it need to source replacements. The opera light on that side also broke, bummer.
Carpets have been through thorough cleaning one. I will give them another cleaning and scotch guard before I finish.
Reinstalled the rear seats and fuse panel covers which have also been cleaned and the leather conditioned.
Tomorrow the headliner gets cleaned and I will reinstall the center console pieces which I have managed to salvage. The ashtray clip was broken and it won't stay closed but small stuff as far as I am concerned. Will eventually find replacement.
Next week, my new front door panels arrive and so do my washer nozzles for the windshield. I have to fix the door stay on the drivers side before putting that panel back on. Found an on line resource for a fix to that.
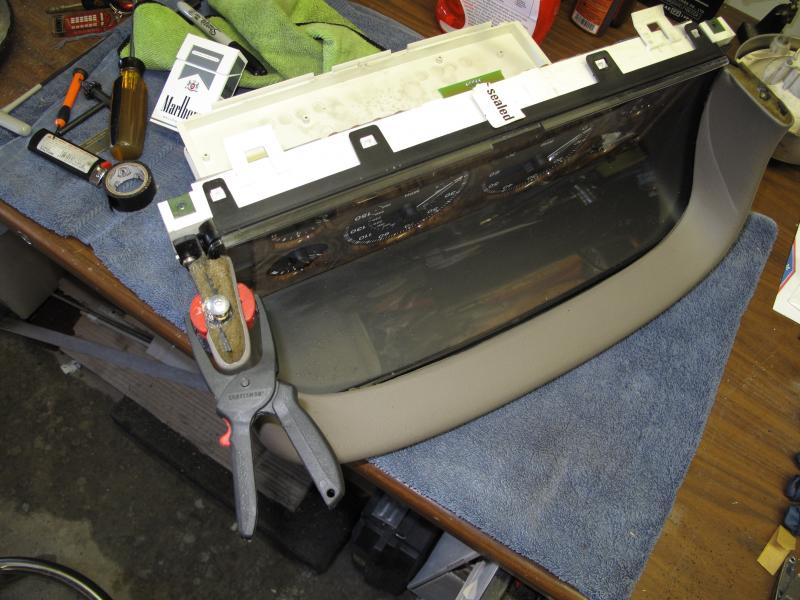
Will also be pulling the dash out to replace bulbs and sort it all out. Someone had done a bad job of putting it back in at some point.
Just going to plow through what I can tomorrow without access to too many parts. Still need to clean up the trunk and panels. Car came with a replacement sunroof that I need to go through tomorrow as well. The one on the car is most horribly trashed. Found out how messed up when I removed the headliner.
About the door stay.
Can't get the slotted head bolt out of the side that attaches to the car? The bracket that it goes through makes it impossible to get the stay through the door. Any tips on getting this out? Seems as though it's threaded through the other side of the bracket but it won't budge.
Cheers
Bernie
Headliner is out. Unfortunately, most of the buttons holding on the driver side roof trim have broken so it need to source replacements. The opera light on that side also broke, bummer.
Carpets have been through thorough cleaning one. I will give them another cleaning and scotch guard before I finish.
Reinstalled the rear seats and fuse panel covers which have also been cleaned and the leather conditioned.
Tomorrow the headliner gets cleaned and I will reinstall the center console pieces which I have managed to salvage. The ashtray clip was broken and it won't stay closed but small stuff as far as I am concerned. Will eventually find replacement.
Next week, my new front door panels arrive and so do my washer nozzles for the windshield. I have to fix the door stay on the drivers side before putting that panel back on. Found an on line resource for a fix to that.
Will also be pulling the dash out to replace bulbs and sort it all out. Someone had done a bad job of putting it back in at some point.
Just going to plow through what I can tomorrow without access to too many parts. Still need to clean up the trunk and panels. Car came with a replacement sunroof that I need to go through tomorrow as well. The one on the car is most horribly trashed. Found out how messed up when I removed the headliner.
About the door stay.
Can't get the slotted head bolt out of the side that attaches to the car? The bracket that it goes through makes it impossible to get the stay through the door. Any tips on getting this out? Seems as though it's threaded through the other side of the bracket but it won't budge.
Cheers
Bernie
#113
01-12-2014, 07:28 PM
My Lord!
Whoever worked on this car was an idiot!
While checking into why the dash had some play in it, I finally hauled the entire assembly out. Did this person have a clue on how to put things back together? I don't need to keep track of the screws because they are mostly missing and whatever was there were all mismatched anyway.
I have everything on the bench now going through it all, fixing broken pieces and generally getting the dash and the switch assemblies all back together properly. Now I need to source these little bulbs. Want to replace them all if they don't cost too much. Anyone have a resource?
Bernie
#116
01-13-2014, 11:53 AM
Also,
Pretty sure the only tool the previous owner or his mechanic had to work on this car was a spoon........lol.
So quick note,
One of the inserts for the dash pad to attach to the switches was completely busted up and torn out and missing.
I cut apart a well-nut which are those rubber expanding plugs and I took the insert out of it which is a brass threaded piece. I needed to enlarge the already smashed up hole on the dashpad somewhat with my dremel and then put a screw in the threaded insert, filled the hole and pushed Gorilla glue around all the broken plastic there. I then used a small plastic clamp to compress the whole area including the new insert. It is drying now.
Once it does dry, I should be able to remove the screw for clean threads and then have an insert back in place to put a screw through to hold that side of the dashpad down. If you do this, don't put any more pressure on that screw than is absolutely necessary. Not sure how strong it will be but hopefully, enough to keep the pad tight on that side.
Also, if you need to do any carpet cleaning and I certainly did, go to Home Depot and look for a plain white bottle of stain remover called Folex. My carpet extractor and concentrated fluid could not even come close to Folex and a rag. Took up coffee, oil and God knows what else. One bottle of it for about 6 bucks was enough to do a thorough first pass on the carpets. I went and bought another bottle to clean it one more time before I put the seats back in. Also going to Scotch Guard the rugs before final car assembly. If you look at my pics above, you can make out just how bad the carpets were. Much more in the rear than front strangely enough but I did find a opened bottle of transmission fluid under the drivers seat if that's a clue?
B
The following users liked this post:
AllanG (01-13-2014)
#117
01-13-2014, 12:10 PM
Totally agree on Folex, best carpet cleaner/stain remover I have ever used!
Bernie, quick question, was getting the headliner out with all the seats removed pretty easy? I'm getting ready to replace mine but getting the headliner out looks like a bit of a faff. The manual says remove the door but i'd rather not if at all possible. As I need to give the seats a good clean and some TLC anyway, if it helps with headliner I may as well remove them from the car.
Bernie, quick question, was getting the headliner out with all the seats removed pretty easy? I'm getting ready to replace mine but getting the headliner out looks like a bit of a faff. The manual says remove the door but i'd rather not if at all possible. As I need to give the seats a good clean and some TLC anyway, if it helps with headliner I may as well remove them from the car.
#118
01-13-2014, 12:18 PM
Totally agree on Folex, best carpet cleaner/stain remover I have ever used!
Bernie, quick question, was getting the headliner out with all the seats removed pretty easy? I'm getting ready to replace mine but getting the headliner out looks like a bit of a faff. The manual says remove the door but i'd rather not if at all possible. As I need to give the seats a good clean and some TLC anyway, if it helps with headliner I may as well remove them from the car.
Bernie, quick question, was getting the headliner out with all the seats removed pretty easy? I'm getting ready to replace mine but getting the headliner out looks like a bit of a faff. The manual says remove the door but i'd rather not if at all possible. As I need to give the seats a good clean and some TLC anyway, if it helps with headliner I may as well remove them from the car.
The seats are only a Phillips screwdriver to remove the bolt covers, four torx bolts, a 17mm bolt for the seatbelt and 2 electrical connectors and the seat is free to come out. There is no way it is as easy to do with the seats in and taking them out is really easy so I wouldn't hesitate. Plus, you can give the carpets a seriously good and uniform cleaning.
HTH?
Bernie.
Last edited by razorboy; 01-13-2014 at 01:05 PM.
The following 2 users liked this post by razorboy:
AllanG (01-13-2014),
BigBossRadio (04-15-2014)
#119
01-14-2014, 05:33 PM
Just some update pics to make me feel better....lol
The center console section basically had everything that a user touched broken. The glovebox lid, cup holder, rear vents, S/N switch surround, even the wood cover on the ski slope was detaching. All better now and I got most everything to work again except for the ashtray lid which has no clasp anymore. No biggie, I will pick up a replacement for it later.
Notice that the vents on the rear do not look right anymore? They were all broken with bits of plastic all crumbling. I could buy a replacement for 50.00 but decided to save the cash and took the assembly apart and glued the vents in place. So it doesn't adjust anymore but it still opens and closes.
Headliner and dash are in the works now and I will be receiving parts to repair the output shafts on the diff soon. I think its starting to come together?


The following users liked this post:
Stuart Beattie (04-14-2014)
#120
01-14-2014, 06:06 PM

Veteran Member