When you click on links to various merchants on this site and make a purchase, this can result in this site earning a commission. Affiliate programs and affiliations include, but are not limited to, the eBay Partner Network.
Engine Oil Leak? Oil Cooler Bypass O-ring Renewal with Pics
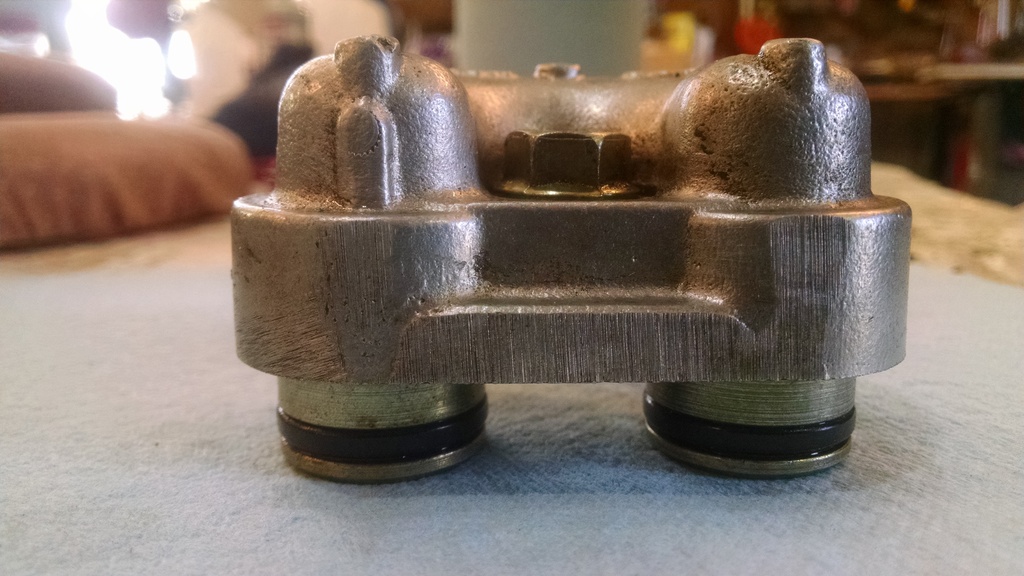
One of the common leak points on the AJ-16 is the oil-cooler-bypass, a horseshoe-shaped casting on the lower left side of the engine near the oil filter(which has been removed for (renewal, access, clarity - pick one or more) in the picture):
Perhaps I should mention, I completed this task as part of an oil change, front of car up on ramps, oil drained and filter removed - you will still spill some oil out of the bypass housing during removal. I'm not sure how much more (if any) you may lose if you attempt it on a full crankcase.
For removal, I used a 13mm short socket, a universal, 3" + 10" extensions, and a ratchet.
You will need four (4) O-rings, CAC5118:
After you remove the sole fixing nut, pull the horseshoe housing downward until it clears the stud for removal. I found it easiest to accomplish this from the top, though it could be done from underneath as well.
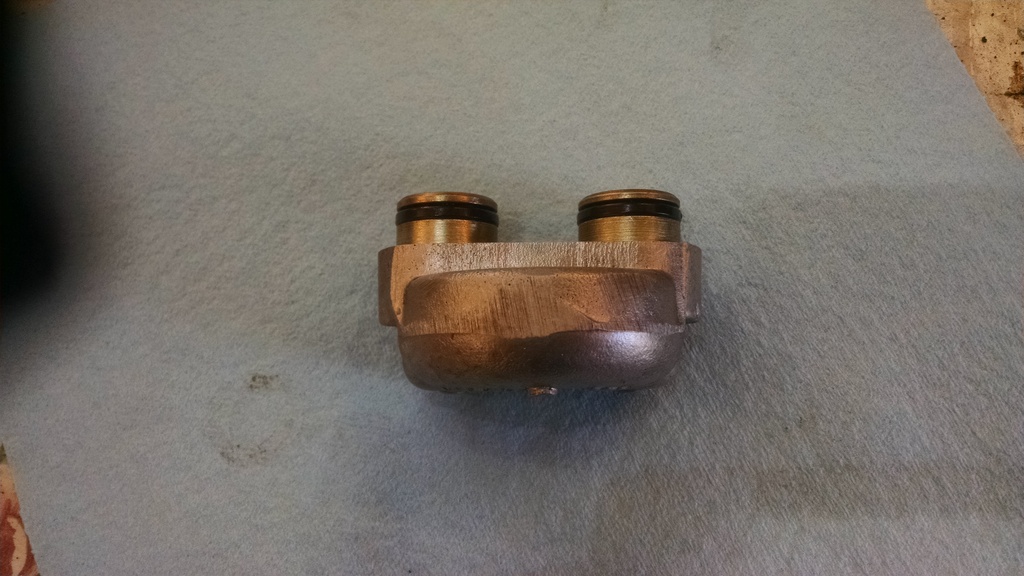
In my case, one of the two barrels came out with the housing, while the other one remained in the engine. No problem, stick a finger in it and jiggle a bit to break it loose and it comes right out.
I found the old O-rings to be hard and brittle, such that none of the four would come off the barrels without breaking. I used a small hook-pick to get under each and attempt to pull them off, and in the very end, each just broke, and consequently, slipped off easily.
Dip the new ones in fresh motor oil prior to application. Then stick the barrels back in the bypass housing - you can feel them "click" into place as the seals seat. Align the barrels with the holes in the block, making sure the hole in the housing is centered over the stud, and click it into place. I didn't bother looking up the torque spec. for the nut as I didn't expect much accuracy from my Torque-Ratchet with the Rube-Goldberg collection of universals and extensions attached. I went for well-snug. Here are a few more pics of what you are dealing with:
This particular car is leaking; I'm not entirely sure if it was from this point, and quite probably even if so this is not the only leak point, but as I had the cam-cover off for refurbishment and the oil drained, AND had the O-rings on hand, why not?
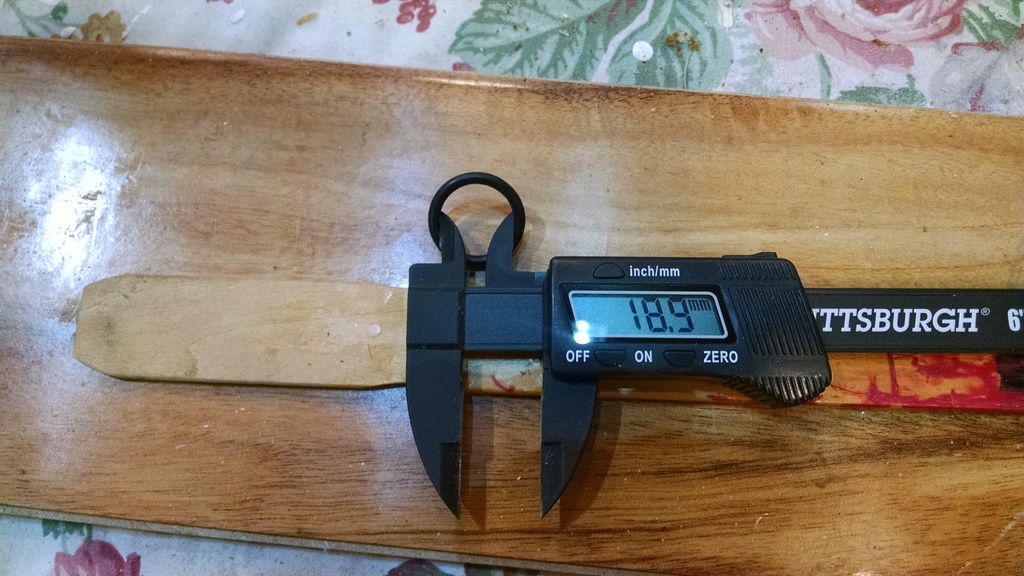
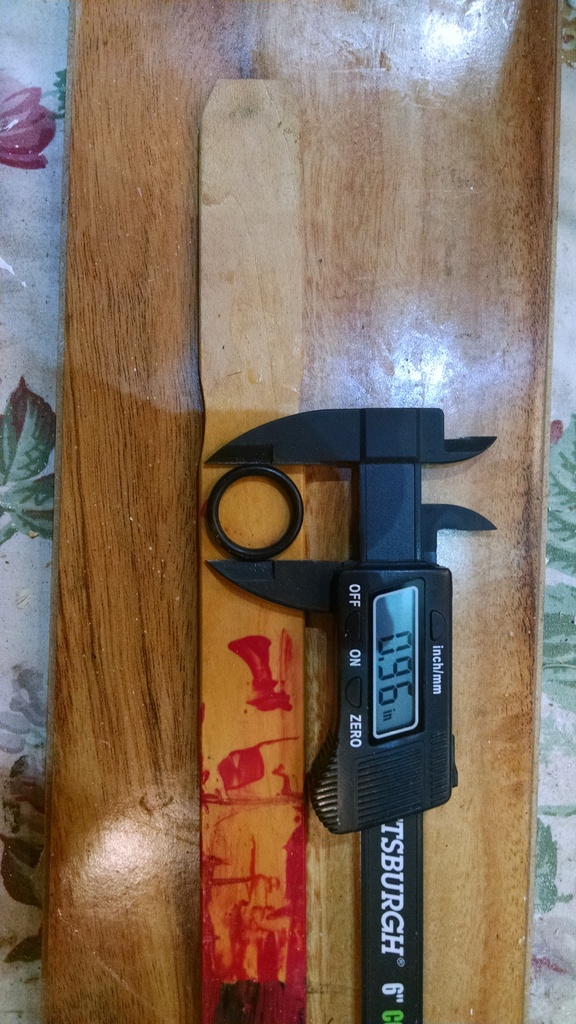
Here you go, Al (no beveled edge that I can see,
and I took great care not to crush nor compress the ring with the calipers...still, it is flexible and the calipers are not, but values should be within a few mm of actual:
Metric
______________
English
(Sorry about the orientation; I turned them all right-side-up in photobucket before copying the links, but apparently it didn't "take.")
Excellent! Thanks so much for the write-up and photos to address this common problem.
Isn't it interesting that one small non-locking nut is all that stands between dumping all the oil in the engine on the ground in seconds! Must not be a significant risk though as I've never heard of it failing Even if the hoses to the oil cooler are fitted, they too are held on by the same single nut.
On a related note, I wonder if a different type of o-ring might last longer such at viiton? Did you notice if there were anything special about the o-rings used such as having a flat/beveled side?
Good description. Funnily enough I did this job last week also and if I had written it up it would be identical to yours (although I used wobbler extensions and not UJ).
We have it a little bit easier over here as that steering column in the bottom of you first picture isn't there to get in the way.
Sounds like checking that the nut is still tight should be part of the oil change.
^This^
In retrospect, I should've probably sloshed a bit of thread-locker on it, at least. Ahh well, I have two more to do....maybe the next one. My sense is that if/when the nut starts to back off, and the bypass housing dislodges, you will get an extremely noticeable, yet not quite catastrophic oil leak, and have opportunity to address the problem.
In other words, there are quite a few threads to unwind before the nut actually falls off. Sealing is not accomplished by the nut applying a pre-load to the housing, rather it is the four O-rings that you hear/feel snap into place during assembly. So as the nut loosens, as soon as there is enough space for one or more of the seals to depart it's space, what will likely be considered a massive leak will occur, but not like if someone crawled under, removed the nut, then you fired up and took off, blowing the whole assembly apart. Just speculation, but I suspect even if you'd just topped-up and begun a long motorway trip when it started to back off, you'd get enough oil-smell and billowing smoke in the rear-view that you'd know it's time to stop and sort things before you saw anything on the gauges, or did any damage.
I Hope this helps some of You I used Harbor Freight Nitrile O ring N15
I don't know if any one has used the harbor freight Nitrile O ring (SAE J200) I used the N15 as in picture with pencil and it works no leak seams to fit tight ... Only time will tell but for now happy go lucky.. A penny saved is a penny earned
After running for a half hour .. No leak
Before using harbor O-rings a drop every 10 seconds or so
I�m getting ready to install this bypass on my XJS as the hoses seem to be shot and although I could definitely have new ones made, this just seems like a cheaper, cleaner alternative.
The v12 might have a need for a cooler, but it seems the 6 does not.
I bought Viton o-rings. I bought two sizes, 3x19 and 3x20. I bought the 20 because I believe someone used that size on this forum, but I also bought the 19 because it most closely matched the dimensions of the old o-rings on this thread.
They both work. I�m going to go with the 20 because the slightly larger diameter gives a slightly snugger fit, but I would have had no issues using the 19s if that�s all I had on hand.
The cross-section of the old o-rings looked like they were squared off, or flat, instead of being round, but I suppose that�s what happens after 20 years?
I have extra Viton o-rings if anyone is interested...
I�m getting ready to install this bypass on my XJS as the hoses seem to be shot and although I could definitely have new ones made, this just seems like a cheaper, cleaner alternative.
The v12 might have a need for a cooler, but it seems the 6 does not.
(...)
For a v12 its probably a very good idea to keep the cooler, considering how hot it gets and how easy to overheat it. For 6, its a bit pointless unless you drive in red zone all the time.
By the way, the whole block where the bypass goes in can be removed entirely and you can mount the oil filter with its mount directly to the block using just shorter bolts. Saves all the hassle with the o-rings and its cheaper than getting the bypass.
Has anyone done the reverse and put the oil cooler assembly on in place of the U-shaped by-pass thing-a-ma-bob?
Doubtful. The idea is to eliminate oil leaks, not introduce more! I picked up a spare horseshoe during my last pick-n-pull visit at Motorcarman's suggestion because the oil coolers are no longer available, yet they fail and the only viable alternative is to fit the bypass fitting.
(I might have some of the details wrong on that...but IIRC the trend is replacing the oil coolers with the bypass, not t'other way 'round)
Ah, but I have lots of oil coolers in my shop. When I lived in the Phoenix AZ area and found an early XJ40 in a junkyard with an oil cooler, I would grab the whole cooler assembly with hoses. So I think I have at least three of these hose and cooler assemblies laying around in my shop.
I simply removed the oil cooler section of the filter housing and used shorter bolts removing the problem completely, just make sure the bolts are tight!
I've done the same on my XJS, XJ40 and X300, just ditch the oil cooler section entirely and use shorter bolts. If there was a gasket there(I cant remember now tbh) then I've used the same one. If there wasn't one then I've used instant gasket. Access to filter is exactly the same, its just slightly closer to the engine block.
 03-27-2016, 11:50 AM


 Even if the hoses to the oil cooler are fitted, they too are held on by the same single nut.