
fr$§1&$ů$ing cup holder door latch fixed
#1
 05-29-2012, 08:19 AM


Tuesday morning May 29
Hi everyone,
A large number of XJ owners have been "svreaming" at that fregging cup holder door that would not stay dow due to a lajor flaw in desingn of that little plastic latch (that flaw has not been corrected for several years)
This was drining me absolutely crazy, nuts, banana. this open cup hok=lder open at all times is ennoying.
So I dismantle the whole thing in order to get a hold of the latch itself. there is no adjustment possibme nor any direct fix.
I cut a tiny piece of plastic and glued it to the "tooth" of the latch that goes into the top part of the arm rest.
I let it dry overnite and THAT'S IT IT LOCKS. Champagne everyone ! ! !
Important:
1 - DO NOT TRY SUPER GLUE that plastic refuses the supoerglue. YOU MUST use Elmer's Model + Hobby Cement (or similar) as this is the only kind of glue that will partially melt the pastic for perfect bond.
2 - Do try first the plastic you are going to use for this repair. Cut a piece and glue it with above glue. If it sticks then uou can use that plastic.
This is a fast and easy fix
See pics
Kind regards
Claude
1995 XJ6 VDP
P.S. I am posting this fix on the more recent XJ's forum as well
The following users liked this post:
Righteousnova (02-18-2013)
#3
05-29-2012, 02:39 PM
#4
05-29-2012, 05:08 PM
Veteran Member
#5
05-29-2012, 09:37 PM


#6
05-30-2012, 06:35 AM
#7
05-31-2012, 04:13 PM

I personally love my cupholder. Sometimes while driving I will accidently touch the open button. It shoots open like a rocket with all its cheap plastic bits making a racket in an attempt to thinking it could even hold a beverage. To this day it still makes me laugh uncontrollably at what a POS it is.
It is truly in-car entertainment. Thinking about it make my laugh.
It is truly in-car entertainment. Thinking about it make my laugh.
Trending Topics
#8
06-07-2012, 08:29 PM

I fixed my broken cup holder too. The round female "rings" part of the hinge sockets were broken off when I bought the car - the lid wouldn't stay closed. I removed the center console and proceeded to repair it thus:
1) Retrieved an old guitar string (#3 - "G") from my bone box. Cut two pieces about 6" long.
2) Used a needle-nose plier to create a 'hoop' in the string just the right size to squeeze onto the male hinge posts that are part of the lid piece.
3) Using my smallest drill bit (1/16"), I drilled two holes in line with the new wires just behind the posts in the body of the center console (the intention is to 'pull' in the male hinge posts into what's remaining of the female sockets and anchor the wire ends to keep tension on the posts).
4) There are a pair of plastic braces (for lack of a better word) that I was able to wrap the wire ends around - carefully maintaining tension on the wires, keeping the male hinge posts tight against the female sockets. I made several wraps of the wire around the braces and then twisted the ends tight to increase the tension slightly.
Works great! Not only does the lid stay shut but the cup holder "works" (albeit by opening it very carefully!). Sorry, no photos... :-(
Thanks to the originator of this repair idea - I read it in the Jagforums somewhere (no photos there either, lol!). It's not rocket science...but it works :-)
The following users liked this post:
mgb4tim (06-08-2012)
#9
06-08-2012, 08:50 AM
Senior Member
I fixed my broken cup holder too. The round female "rings" part of the hinge sockets were broken off when I bought the car - the lid wouldn't stay closed. I removed the center console and proceeded to repair it thus:
1) Retrieved an old guitar string (#3 - "G") from my bone box. Cut two pieces about 6" long.
2) Used a needle-nose plier to create a 'hoop' in the string just the right size to squeeze onto the male hinge posts that are part of the lid piece.
3) Using my smallest drill bit (1/16"), I drilled two holes in line with the new wires just behind the posts in the body of the center console (the intention is to 'pull' in the male hinge posts into what's remaining of the female sockets and anchor the wire ends to keep tension on the posts).
4) There are a pair of plastic braces (for lack of a better word) that I was able to wrap the wire ends around - carefully maintaining tension on the wires, keeping the male hinge posts tight against the female sockets. I made several wraps of the wire around the braces and then twisted the ends tight to increase the tension slightly.
Works great! Not only does the lid stay shut but the cup holder "works" (albeit by opening it very carefully!). Sorry, no photos... :-(
Thanks to the originator of this repair idea - I read it in the Jagforums somewhere (no photos there either, lol!). It's not rocket science...but it works :-)
1) Retrieved an old guitar string (#3 - "G") from my bone box. Cut two pieces about 6" long.
2) Used a needle-nose plier to create a 'hoop' in the string just the right size to squeeze onto the male hinge posts that are part of the lid piece.
3) Using my smallest drill bit (1/16"), I drilled two holes in line with the new wires just behind the posts in the body of the center console (the intention is to 'pull' in the male hinge posts into what's remaining of the female sockets and anchor the wire ends to keep tension on the posts).
4) There are a pair of plastic braces (for lack of a better word) that I was able to wrap the wire ends around - carefully maintaining tension on the wires, keeping the male hinge posts tight against the female sockets. I made several wraps of the wire around the braces and then twisted the ends tight to increase the tension slightly.
Works great! Not only does the lid stay shut but the cup holder "works" (albeit by opening it very carefully!). Sorry, no photos... :-(
Thanks to the originator of this repair idea - I read it in the Jagforums somewhere (no photos there either, lol!). It's not rocket science...but it works :-)
Last edited by mgb4tim; 06-08-2012 at 09:09 AM.
#10
06-08-2012, 10:40 PM
I used the largest UNWOUND string I had in my box - the 'G' string I used was likely a .017 of an inch (thereabouts). Using a wound string would just add unnecessary thickness to the rig without adding any 'tensional strength' in my humble opinion. Good luck with your progress - it wasn't that hard to figure out and as I said, works like a charm. The two secrets I guess would be drilling the holes in the correct spot and achieving sufficient tension on the string when you are tightening it. You have to fight against the springs which are trying to hold the cover open (and hence the hinges apart) but I manage to hold the lid tight with one hand and twist the string pieces with needlenose in the other hand.
Let us know of your success! Excellent...
#11
06-15-2012, 10:22 AM
Senior Member
#12
06-15-2012, 09:01 PM
Senior Member
After 25 minutes, I have a smoothly functioning cup holder that stays shut. 1/16" drill bit, and a guitar string.
Here's a before image of the point that needs wrapped with a guitar string and where I drill a pair of 16" holes on each side. The holes were drilled as close the the broken saddle as I could, practically in the corner.
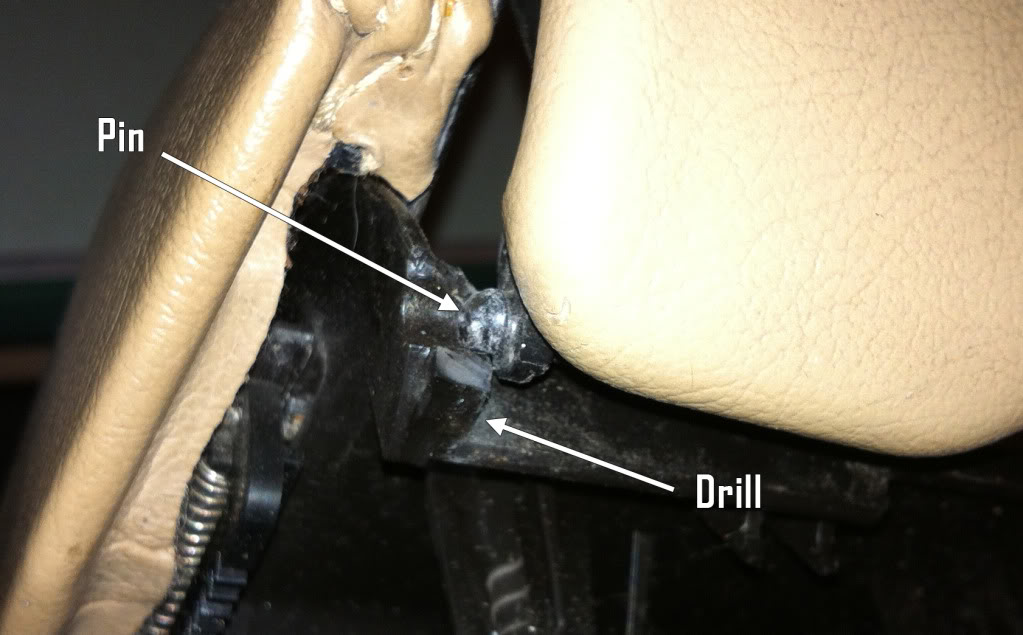
I pulled the wire tight with needle-nose pliers, and twisted the ends together 5-6 times.
Here's the after image.
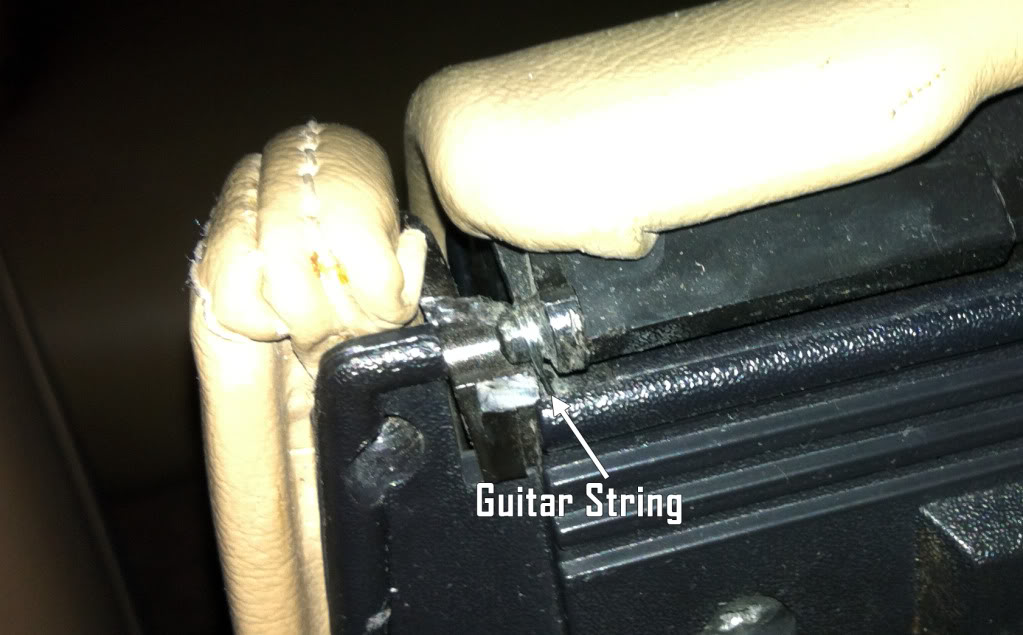
Thanks for the great idea ALF!!
Here's a before image of the point that needs wrapped with a guitar string and where I drill a pair of 16" holes on each side. The holes were drilled as close the the broken saddle as I could, practically in the corner.
I pulled the wire tight with needle-nose pliers, and twisted the ends together 5-6 times.
Here's the after image.
Thanks for the great idea ALF!!
The following users liked this post:
Righteousnova (02-18-2013)
#14
06-16-2012, 09:52 PM
Senior Member

Thread
Thread Starter
Forum
Replies
Last Post
99xk8guy
XK8 / XKR ( X100 )
11
06-05-2023 06:28 AM
Currently Active Users Viewing This Thread: 1 (0 members and 1 guests)