
How to change Ignition Coil ?
#1
 03-31-2014, 05:40 PM


Hi Everyone
I need to change out "ignition coils" on my "X300 97 XJ6 4.0L NA" . Can any of you throw any light on what the procedure is to do this? A little quick step by step outline would really help me. I noticed some of you have posted on this before. I would really appreciate any help you can give me.
Thanks
BigBossRadio in Dallas TX
#2
03-31-2014, 07:53 PM
Luckily it's an extremely simple process.
1. Remove the 3 Torx screws atop the coil cover (The cover emboldened with the letters JAGUAR down the center of the valve cover.)
2. Unplug each of the connectors from the coils (Simply depress the tabs)
3. Remove the 2 bolts securing each coil.
4. Lift out the coils for inspection.
1. Remove the 3 Torx screws atop the coil cover (The cover emboldened with the letters JAGUAR down the center of the valve cover.)
2. Unplug each of the connectors from the coils (Simply depress the tabs)
3. Remove the 2 bolts securing each coil.
4. Lift out the coils for inspection.
The following users liked this post:
BigBossRadio (04-01-2014)
#3
03-31-2014, 07:56 PM

Senior Member
The following users liked this post:
BigBossRadio (04-01-2014)
#4
03-31-2014, 10:35 PM

Veteran Member
#5
04-01-2014, 04:59 AM
The following users liked this post:
BigBossRadio (04-01-2014)
#6
04-01-2014, 08:48 AM
Luckily it's an extremely simple process.
1. Remove the 3 Torx screws atop the coil cover (The cover emboldened with the letters JAGUAR down the center of the valve cover.)
2. Unplug each of the connectors from the coils (Simply depress the tabs)
3. Remove the 2 bolts securing each coil.
4. Lift out the coils for inspection.
1. Remove the 3 Torx screws atop the coil cover (The cover emboldened with the letters JAGUAR down the center of the valve cover.)
2. Unplug each of the connectors from the coils (Simply depress the tabs)
3. Remove the 2 bolts securing each coil.
4. Lift out the coils for inspection.
Thanks for the quick response.... and detailed directions. I will do that today
BigBoss in Dallas TX
#7
04-01-2014, 10:10 AM

Funny you mention the Champion thing. I called a parts warehouse for plugs and they wanted the application. 96 XJ6, no problem. I asked for Champions and they wondered out loud, "why?", 'Cause it's the only plug that runs right in those cars. Turns out they don't carry Champions. Too bad for them........
The following users liked this post:
BigBossRadio (04-01-2014)
Trending Topics
#8
04-01-2014, 11:55 AM
Luckily it's an extremely simple process.
1. Remove the 3 Torx screws atop the coil cover (The cover emboldened with the letters JAGUAR down the center of the valve cover.)
2. Unplug each of the connectors from the coils (Simply depress the tabs)
3. Remove the 2 bolts securing each coil.
4. Lift out the coils for inspection.
1. Remove the 3 Torx screws atop the coil cover (The cover emboldened with the letters JAGUAR down the center of the valve cover.)
2. Unplug each of the connectors from the coils (Simply depress the tabs)
3. Remove the 2 bolts securing each coil.
4. Lift out the coils for inspection.
I followed your method and it went perfectly. My reason for wanting to know how to do it was because I got an ECL the other day and checked with my scanner and it came up with P0305 indicating a firing problem in Cyl #5.
I removed that coil and discovered it was filled with engine oil. It look's like oil got in there because the top cover gasket was incorrectly mounted beside the oil filler cap area... plus there was no gasket on #5 IG Coil.
I pulled IG coil #4 and found a gasket, no oil and the coil was labeled "Lucas" unlike coil#5 which just said "Made in Japan".
I cleaned everything up, Pulled the #5 spark plug it was labeled "Champion RC12YCC". It looks OK. I put everything back together fired the engine up and noticed a big improvement, running smooth..... I will replace all spark plugs this weekend
So Thanks again.
BigBossRadio in Dallas Tx
#9
04-01-2014, 03:52 PM
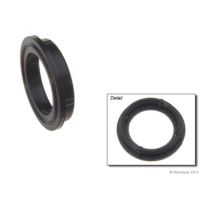
The spark plug "wells", you know, the bore where each spark plug lives and the coil slides down into ... each well has a rubber gasket (about half-way down in the bore - outer circumference). There is one round rubber gasket for each cylinder. Finally, there is the rubber gasket running the perimeter of the valve-cover (cam cover to some).
If you remove the valve cover and flip it over, you will see the perimeter rubber gasket and then a circular rubber gasket on the bottom of each plug well.
It's not uncommon for these rubber gaskets to get old and brittle and allow oil to seep into and fill up around the spark plug. It's a simple matter of removing the valve-cover and replacing the gaskets.
I've also experienced the "not often, but does happen" issue where the base of a spark plug well's metal has been "eaten away" through electrolysis. The only fix for that is valve-cover replacement.
Here's a link to my thread on that subject:
https://www.jaguarforums.com/forum/x...ain%2A-109247/
.
The following 2 users liked this post by caldercay:
BigBossRadio (04-02-2014),
sparkenzap (04-01-2014)
#10
04-01-2014, 06:51 PM
MTC W0133-1643195 Spark Plug Seal | Auto Parts Warehouse
$1.95 each
The following users liked this post:
BigBossRadio (04-02-2014)
#11
04-02-2014, 08:31 AM
Hi Caldercay
Thanks so much for taking the time and bringing this to my attention. I was shocked when I saw all that oil in Cyl #5 but could not figure out how it got there. Now I know where to look for the cause.
As it happens I do have a new Cam cover gasket that I was planning to replace soon. I need to get the screw isolator rubber seals before tackling the job.
Now it looks like I will also need to replace the rubber gasket for plug wells too. Is there any thing else I need to be mindful of?
Since I have not done this before am I right in thinking the process to replace the Cam Cover gasket is as follows:
1: Remove spark plug cover
2: Remove IG coils and spark plugs
3: Remove all cam cover Torx screws
4: Remove Cam Cover and flip over to check plug seals and replace
5: Remove and replace old Cam cover gasket
6: Return Cam cover and screw down with torx screws. (torque down)
7: Refit spark plugs and IG coils
8: Refit spark and coil cover
Does that cover everything? or is there something I'm missing here? Should I replace the Spark plugs at this time? (RC12YCC)
Anything you can add would be great.
I will take pictures while doing all this.
Thanks again
BigBossRadio in Dallas TX
#12
04-02-2014, 08:43 AM

Do the plugs have to come out to change the cover? I can't remember! Either way, a plug change at this point can't be a bad idea - they're cheap and the cars are very sensitive to plug condition.
Check you have the correct cam cover gasket! I got supplied with an AJ6 part, and didn't notice until it was all apart. It can be a proper fiddle to get the cover/gasket back on - it's really annoying to have to refit one that's in need of replacement.
Check you have the correct cam cover gasket! I got supplied with an AJ6 part, and didn't notice until it was all apart. It can be a proper fiddle to get the cover/gasket back on - it's really annoying to have to refit one that's in need of replacement.
The following users liked this post:
BigBossRadio (04-02-2014)
#13
04-02-2014, 10:52 AM
#14
04-02-2014, 10:59 AM
Thanks for that. I plan on replacing the spark plugs with (RC12YCC) Champion. Do I need to replace the Torx screw seals when I do the cam cover gasket or can I use the existing seals?
BigBossRadio in Dallas TX
#15
04-02-2014, 12:10 PM
Irelands' climate hardly compares to Texas, so that figures. As for the Torx head seals, I don't see why not replace them if possible, while you're in there. It's nice to do things entirely and mark them off the list. I have lovely clean, dry wells with no corrosion on the cover, so, if it ain't broke......
#16
04-02-2014, 01:23 PM
I would leave the plugs in until you've re-fitted the cover with the new gaskets and have torqued everything down.
Otherwise, with the plugs out, *something* could fall down into the cylinders.
Then we'd have another project to deal with
Otherwise, with the plugs out, *something* could fall down into the cylinders.
Then we'd have another project to deal with
Last edited by caldercay; 04-02-2014 at 01:32 PM.
#17
04-02-2014, 01:27 PM
The following users liked this post:
BigBossRadio (04-03-2014)
#18
04-03-2014, 05:32 AM
The following users liked this post:
BigBossRadio (04-03-2014)
#19
04-03-2014, 11:38 AM
Just replaced my Crapions with NGK iridium's, night and day differeance between the two. Do NOT buy into "our" cars only run right with Champions....says who???? I'm running NGK iridium in my TR-6, Son's Firebird, wife's Z4 and my XJS and as of two days ago my XJ6L. The difference between the NGK's and the Champions was more of a change then the Andy's Bracket I put on. My Champions were put in 15K ago by the P.O's mechanic. In another thread I tell how I used to convince British bike owners to get the "modern" version of Champions out of their bikes by putting NEW Champions in my warmed up Bonneville and taking 3 kicks to start it and watching it have a lopey idle, then I'd shut it down and put in standard NGK B6ES's and it'd start first kick and idle smoothly. Champions of the past 10 years are nothing like Champions of the past...they are IMHO glorified fishing weights. If you want to run them and are convincied it's the only thing that runs well in "our" cars then have a blast running them just don't tell "my" car because it's convinced it runs WAY better on the NGK's. 
Last edited by JTsmks; 04-03-2014 at 12:50 PM.
The following users liked this post:
BigBossRadio (04-04-2014)
#20
04-03-2014, 05:37 PM