
How To Change Stabilzer Bar Links And Bushing 1996 Vanden Plas FAQ
#1
 01-08-2014, 02:26 PM

First We Will Need To Gather Tools/Parts


1. You will need ; Hammer,Ratchet,6inch extension,13mm Socket
16mm Socket,18mm DEEP socket,18mm wrench.13mm wrench,
Pry bar,Breaker bar,15/16 socket ,7/8 tire iron,screw driver,gloves,
Jack and Jack stand,White Lithium Grease, Stabilizer Link & bushing

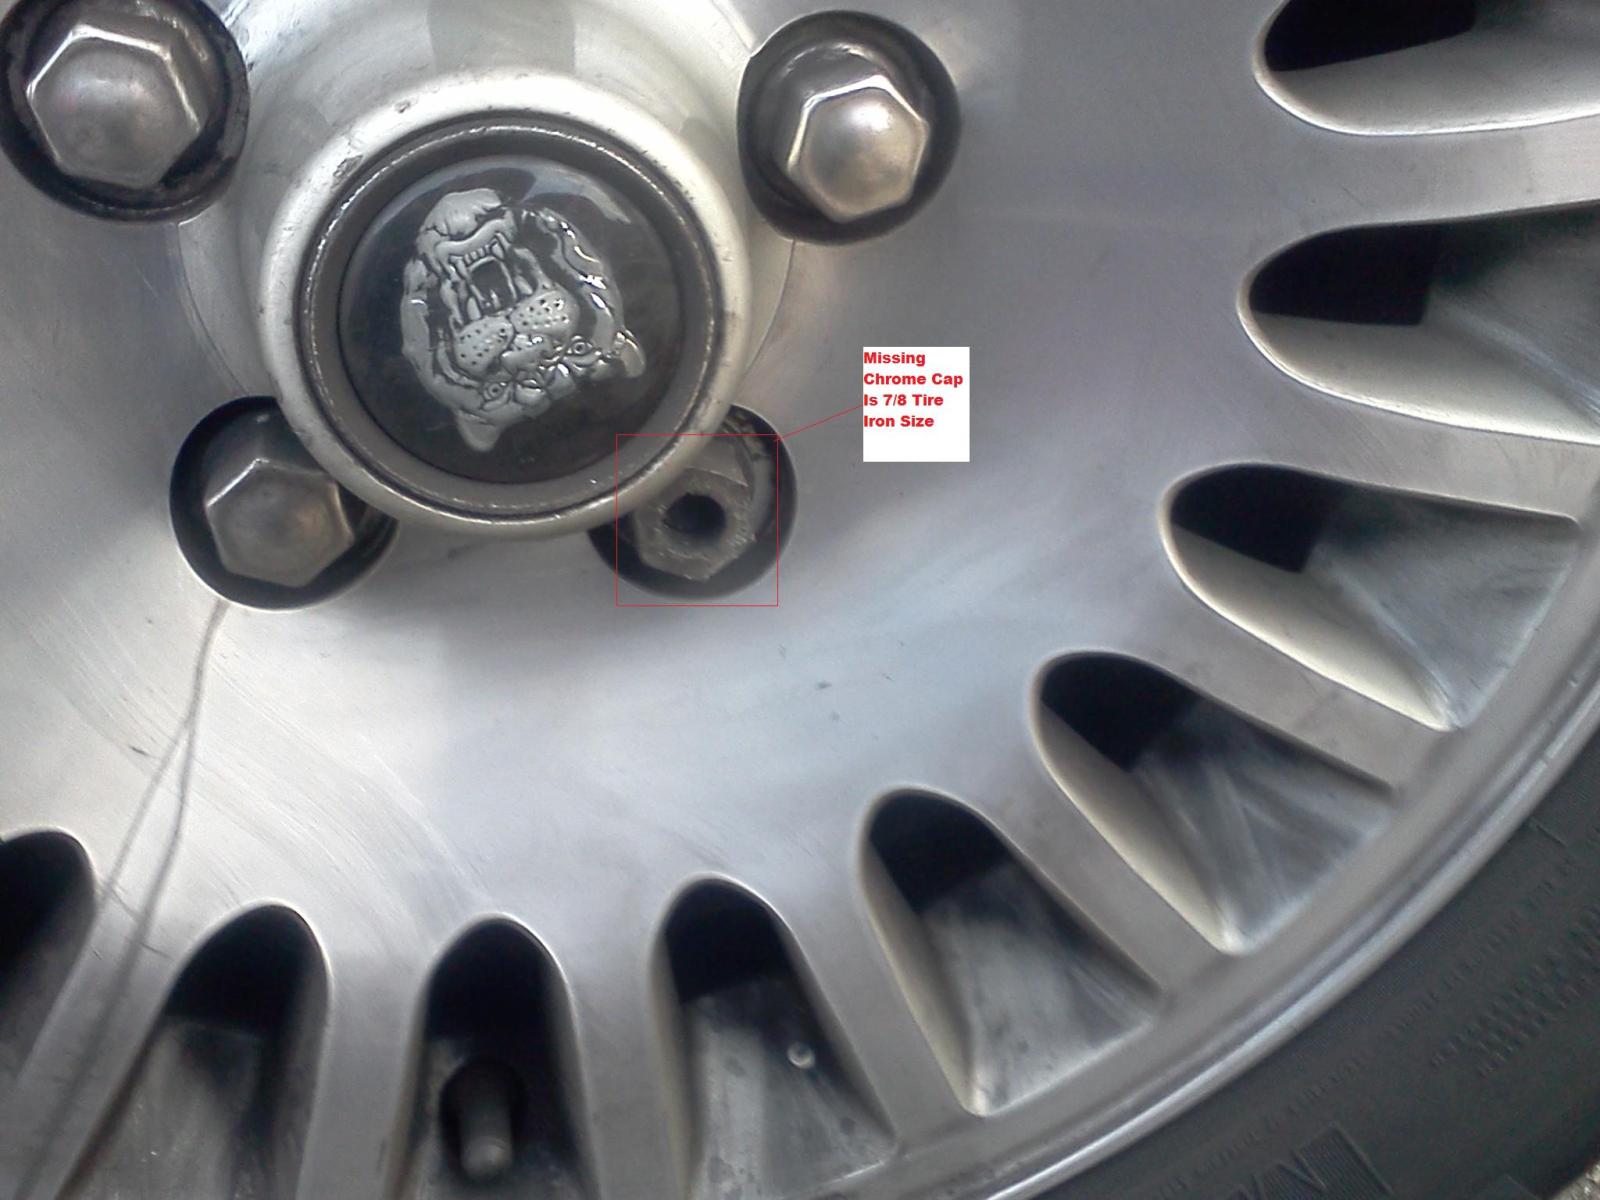
Now We Loosen the Lug Nuts
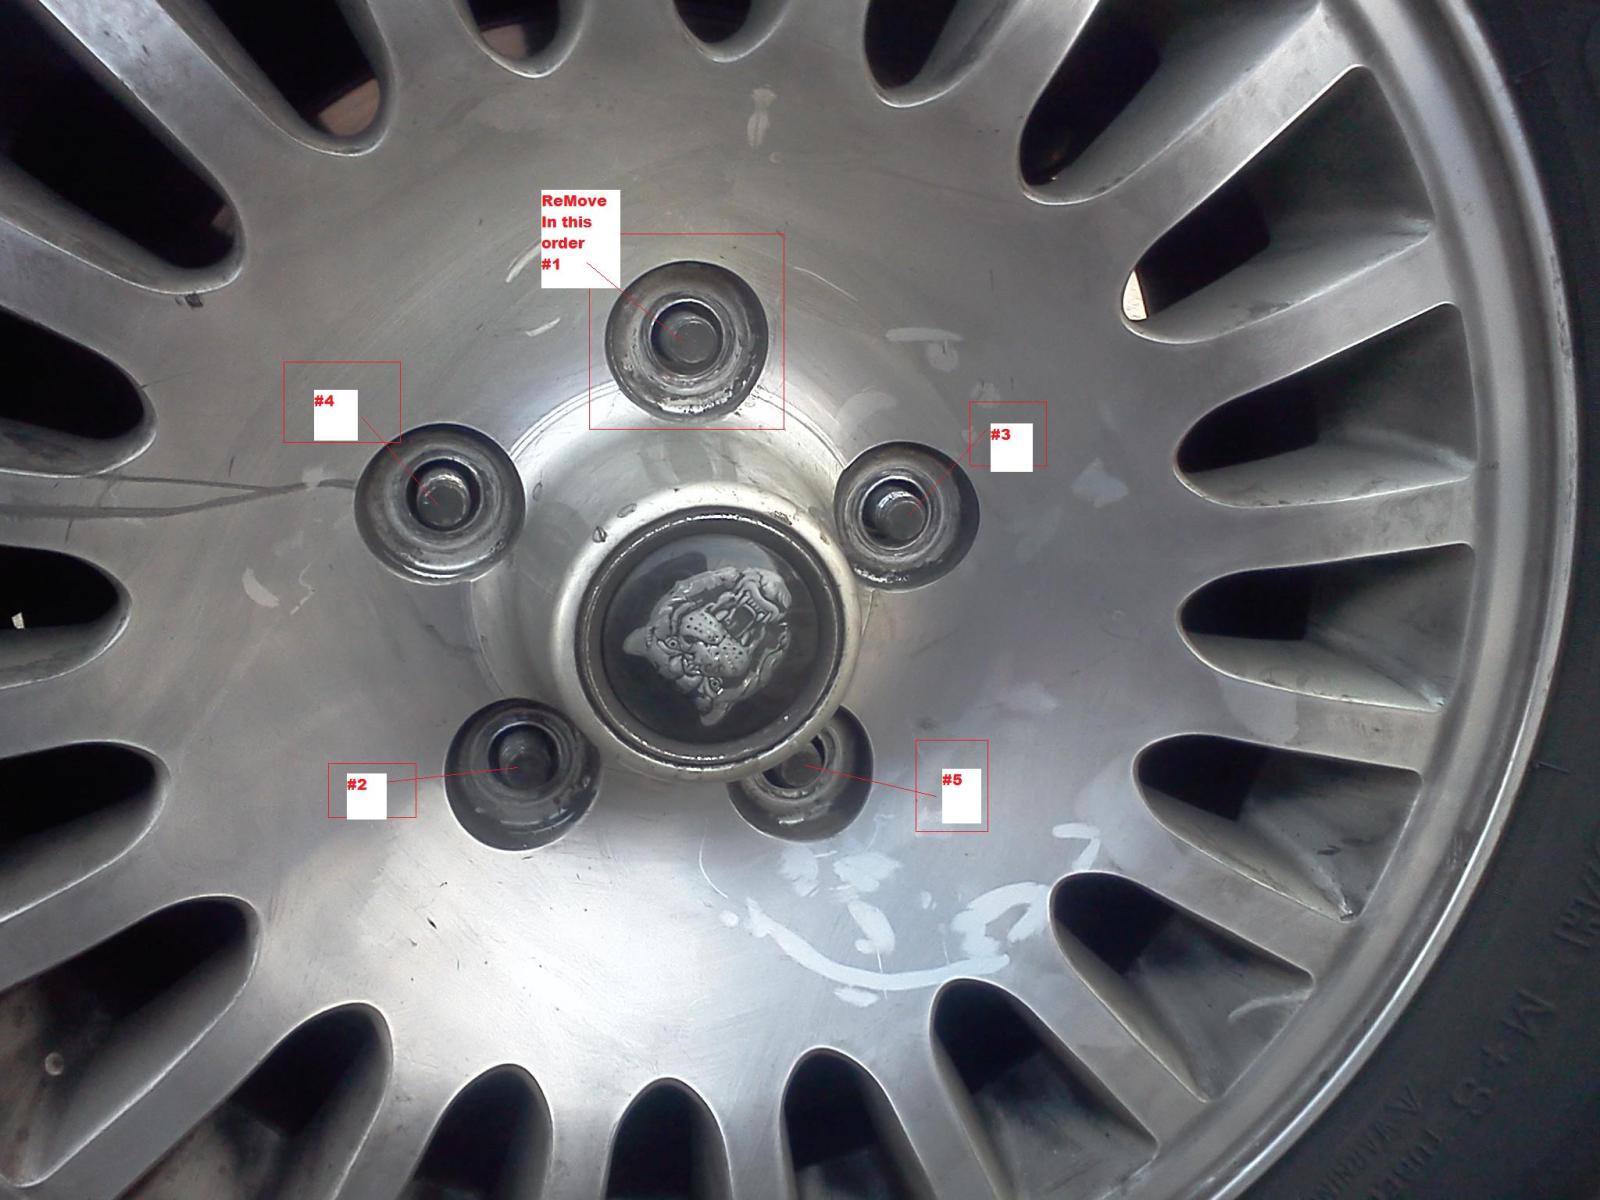
1.Use a 15/16 Socket with breaker bar To loosen lug nuts
if the cap to the lug nut has come off . Its 7/8 Tire Iron
2.Remember DO NOT REMOVE NUTS JUST LOOSEN FOR NOW
If there on there tight step on the breaker bar for more leverage
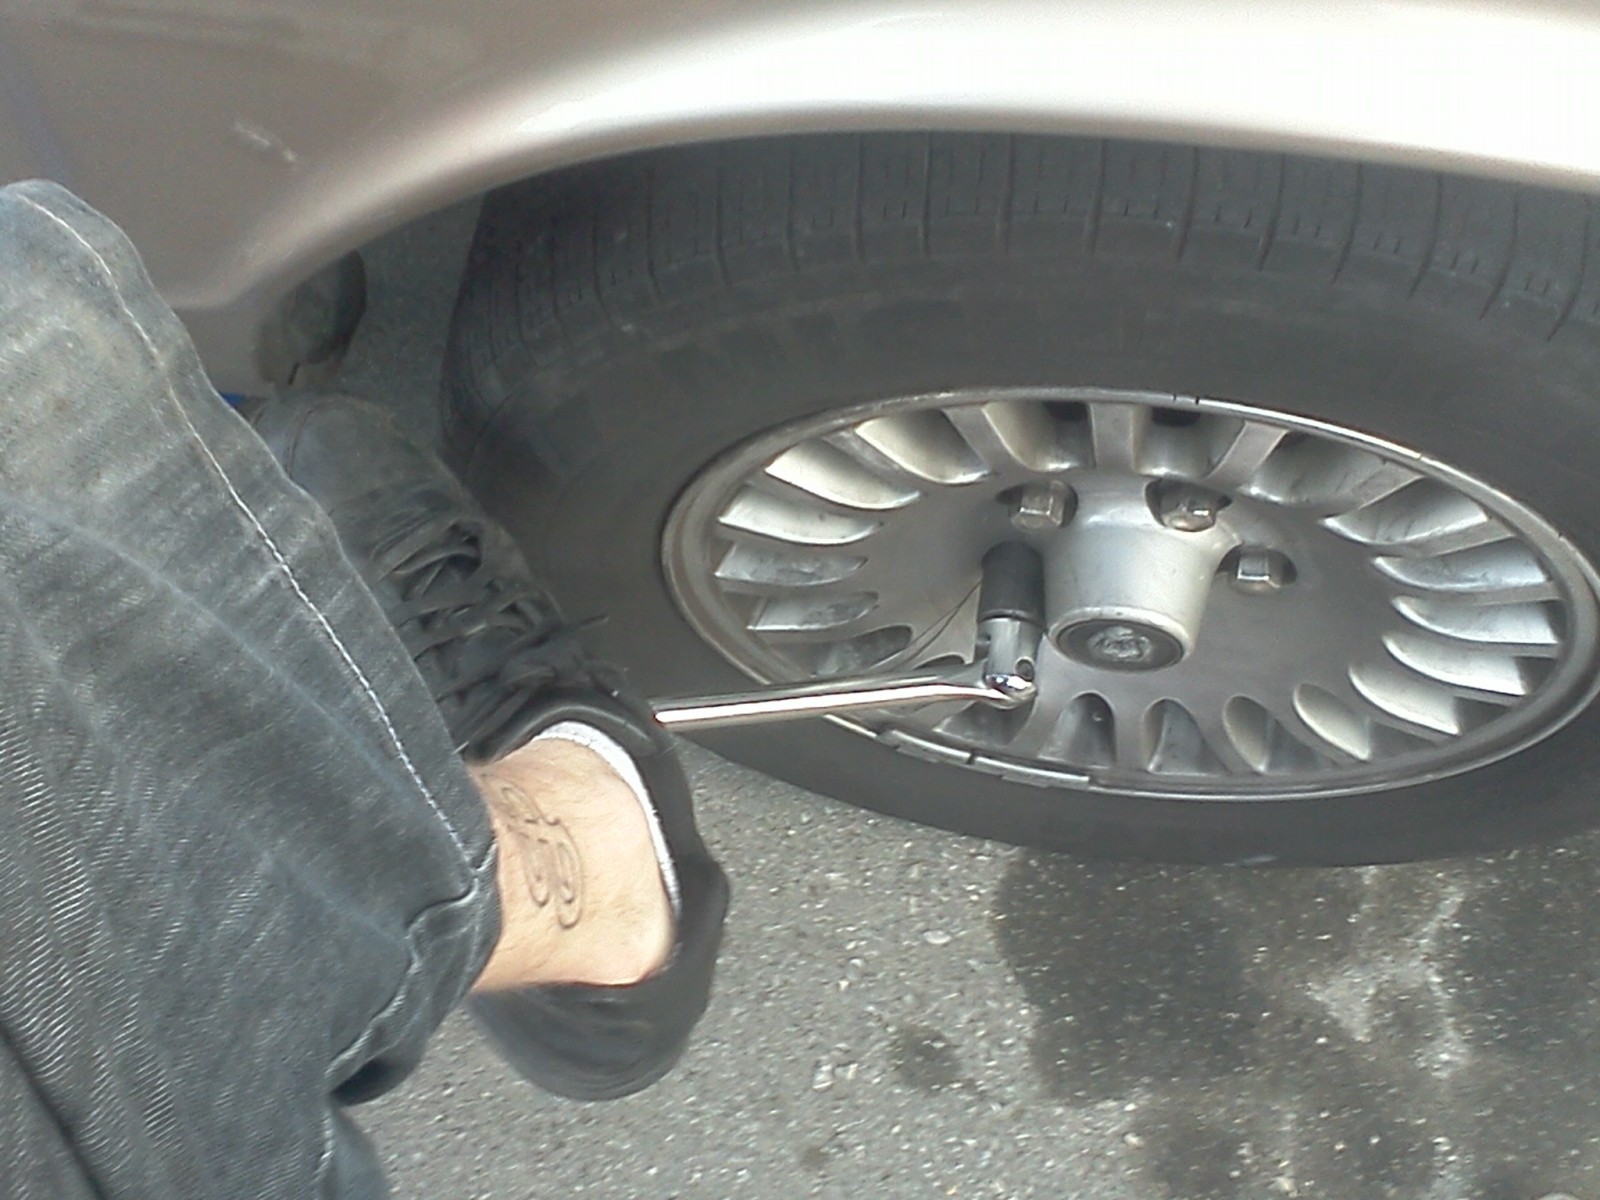
Jack The Car Up and Remove Lug Nuts/Wheel


1. Make sure to jack up on the spot you see above!
2.Make sure you have enough room for your whole
hand to fit under the tire when jacked up!
3.Set lug nuts/wheel safely to the side
4. set a jack STAND under this spot BUT DO NOT LET IT SUPPORT THE WHOLE CAR THIS IS JUST TO HELP THE JACK!!!


Locate And Remove Stabilizer Bar Link Bottom Bolt


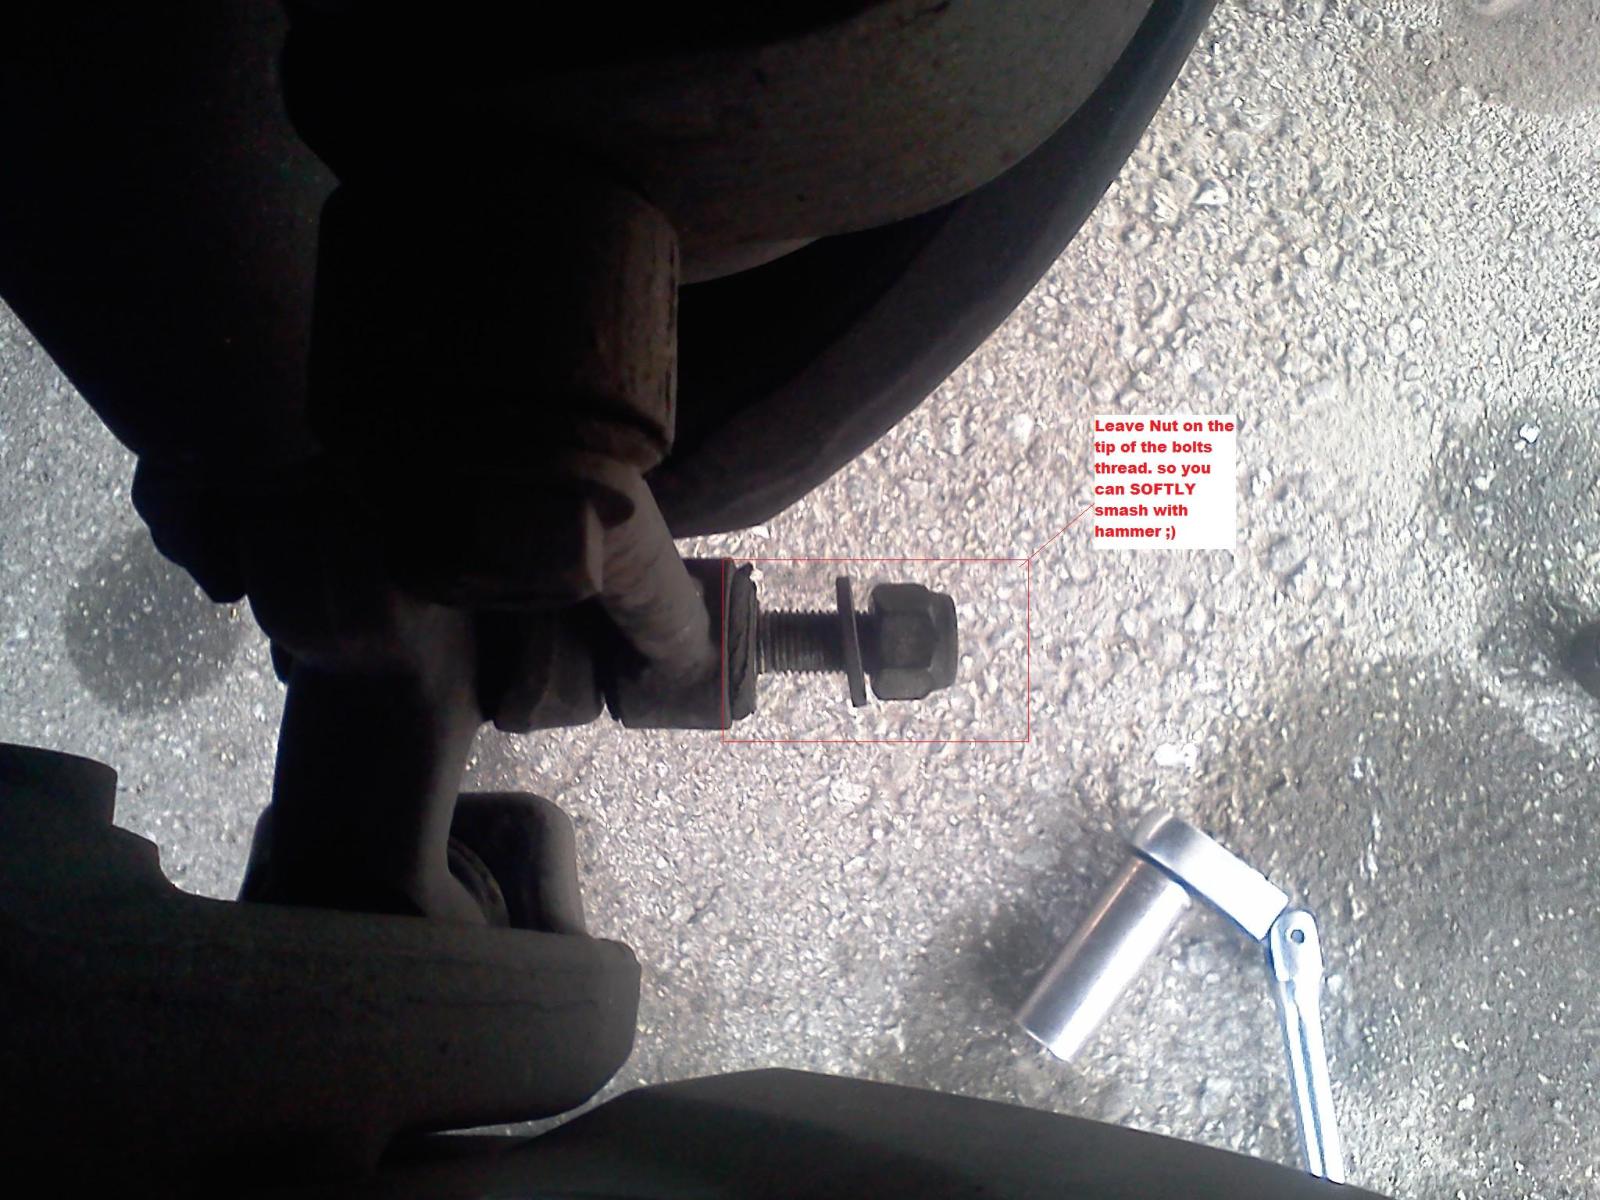


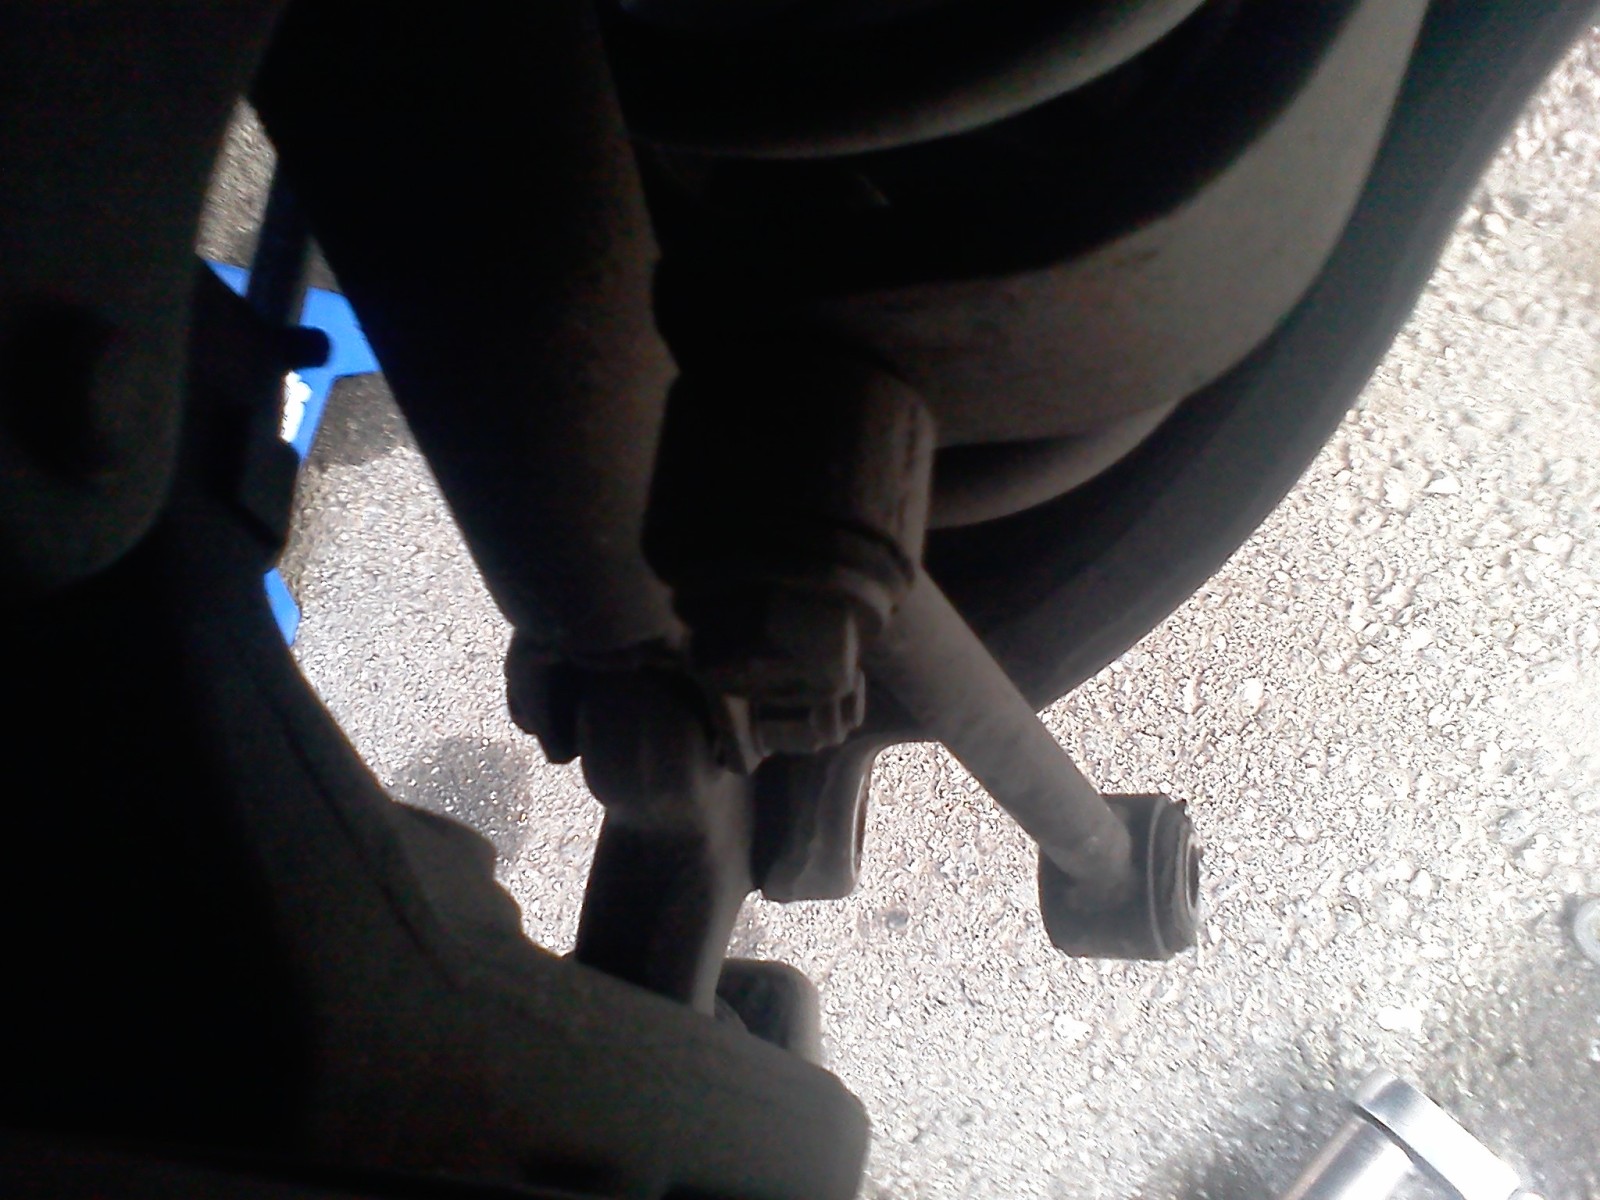
1.DO NOT HIT TO HARD AND DESTROY YOUR BOLT / NUT
2. Never take top bolt out first or it will destroy the top bolt
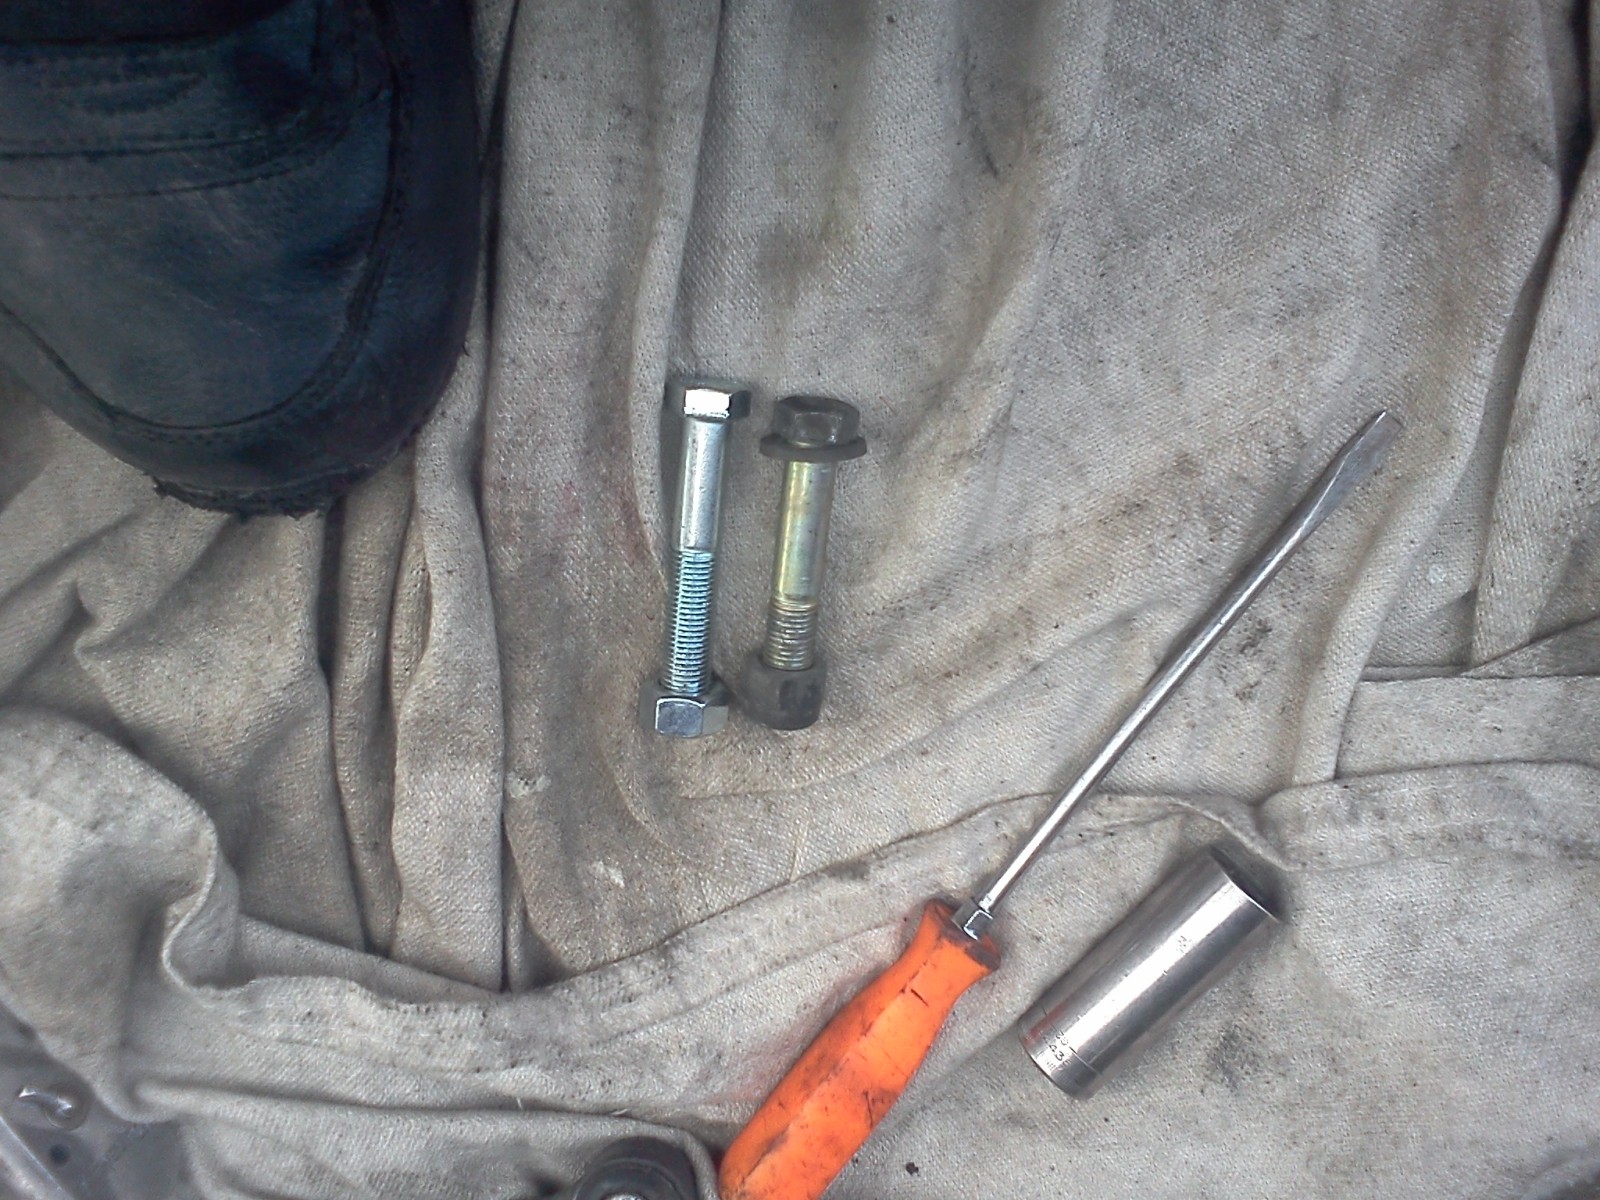
Remove Stabilizer bar Link Top Bolt

1. I did destroy my top bolt so i got a replacement
the size is 7/16"-20 x 2 3/16th
they did not have that so i got
7/16"-20 x 2 1/2 ... little longer but works
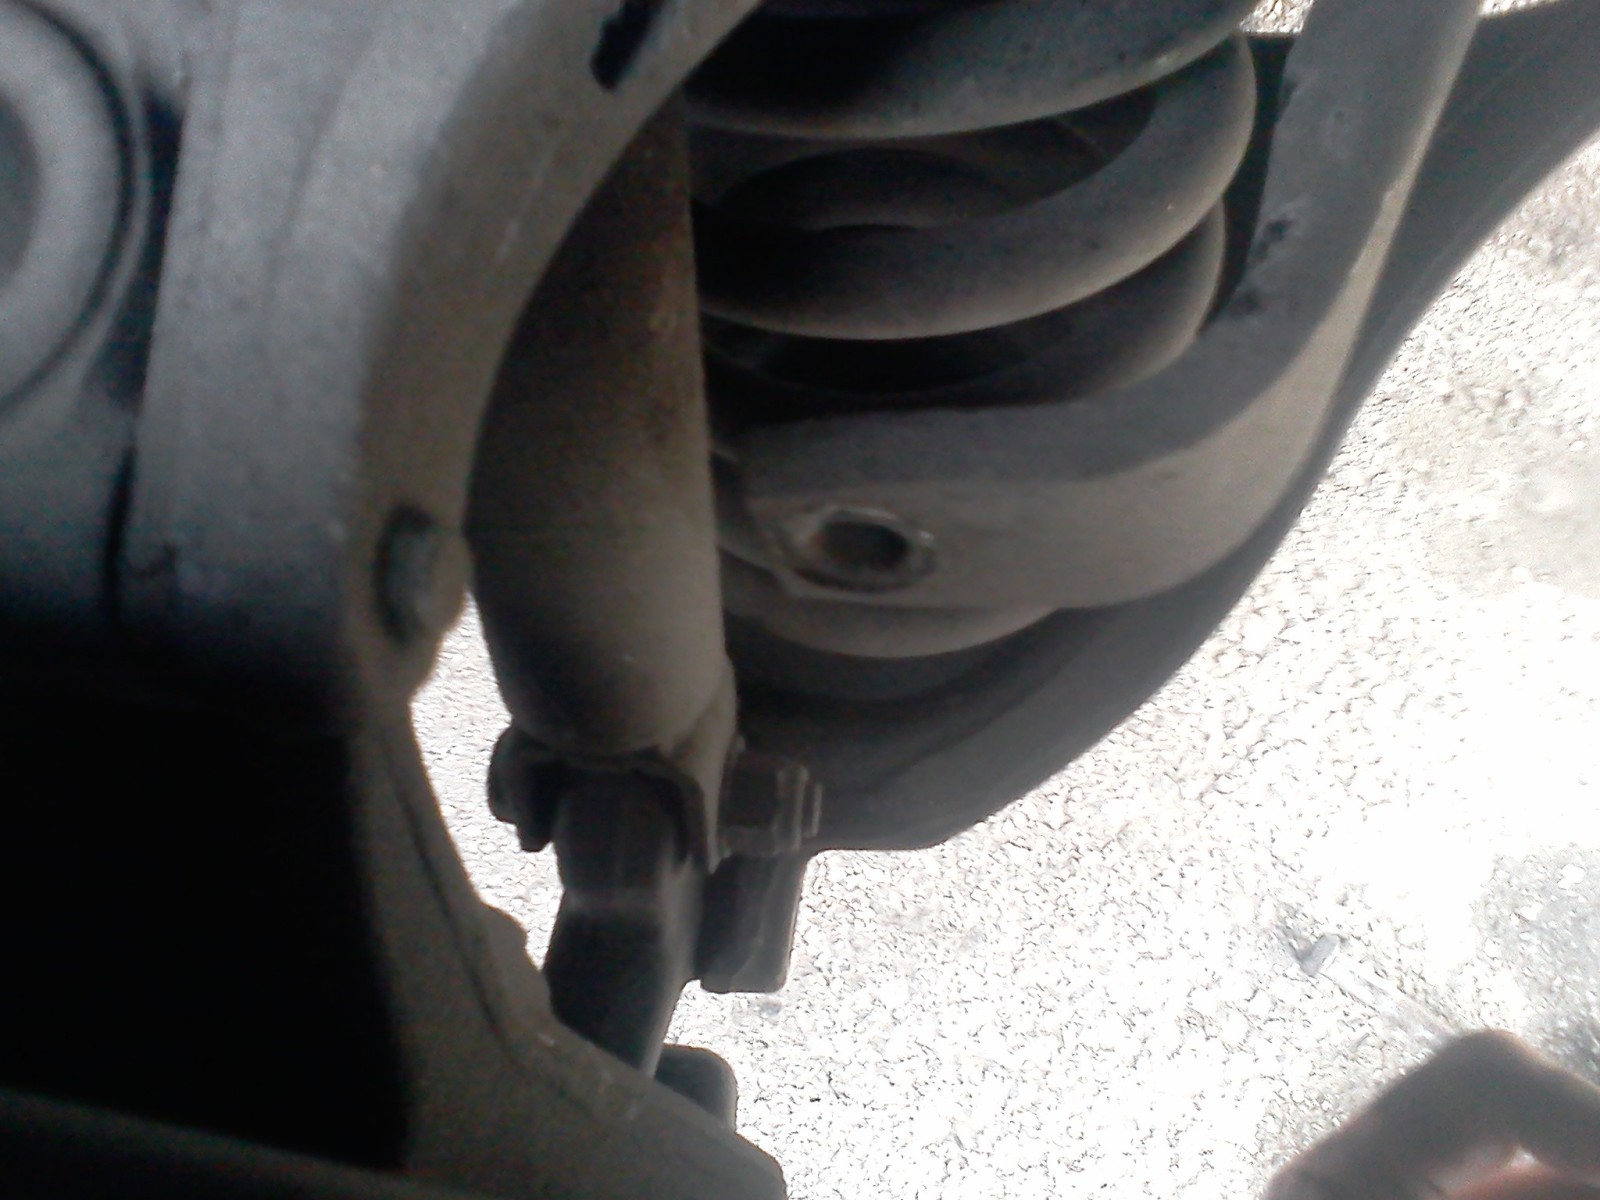
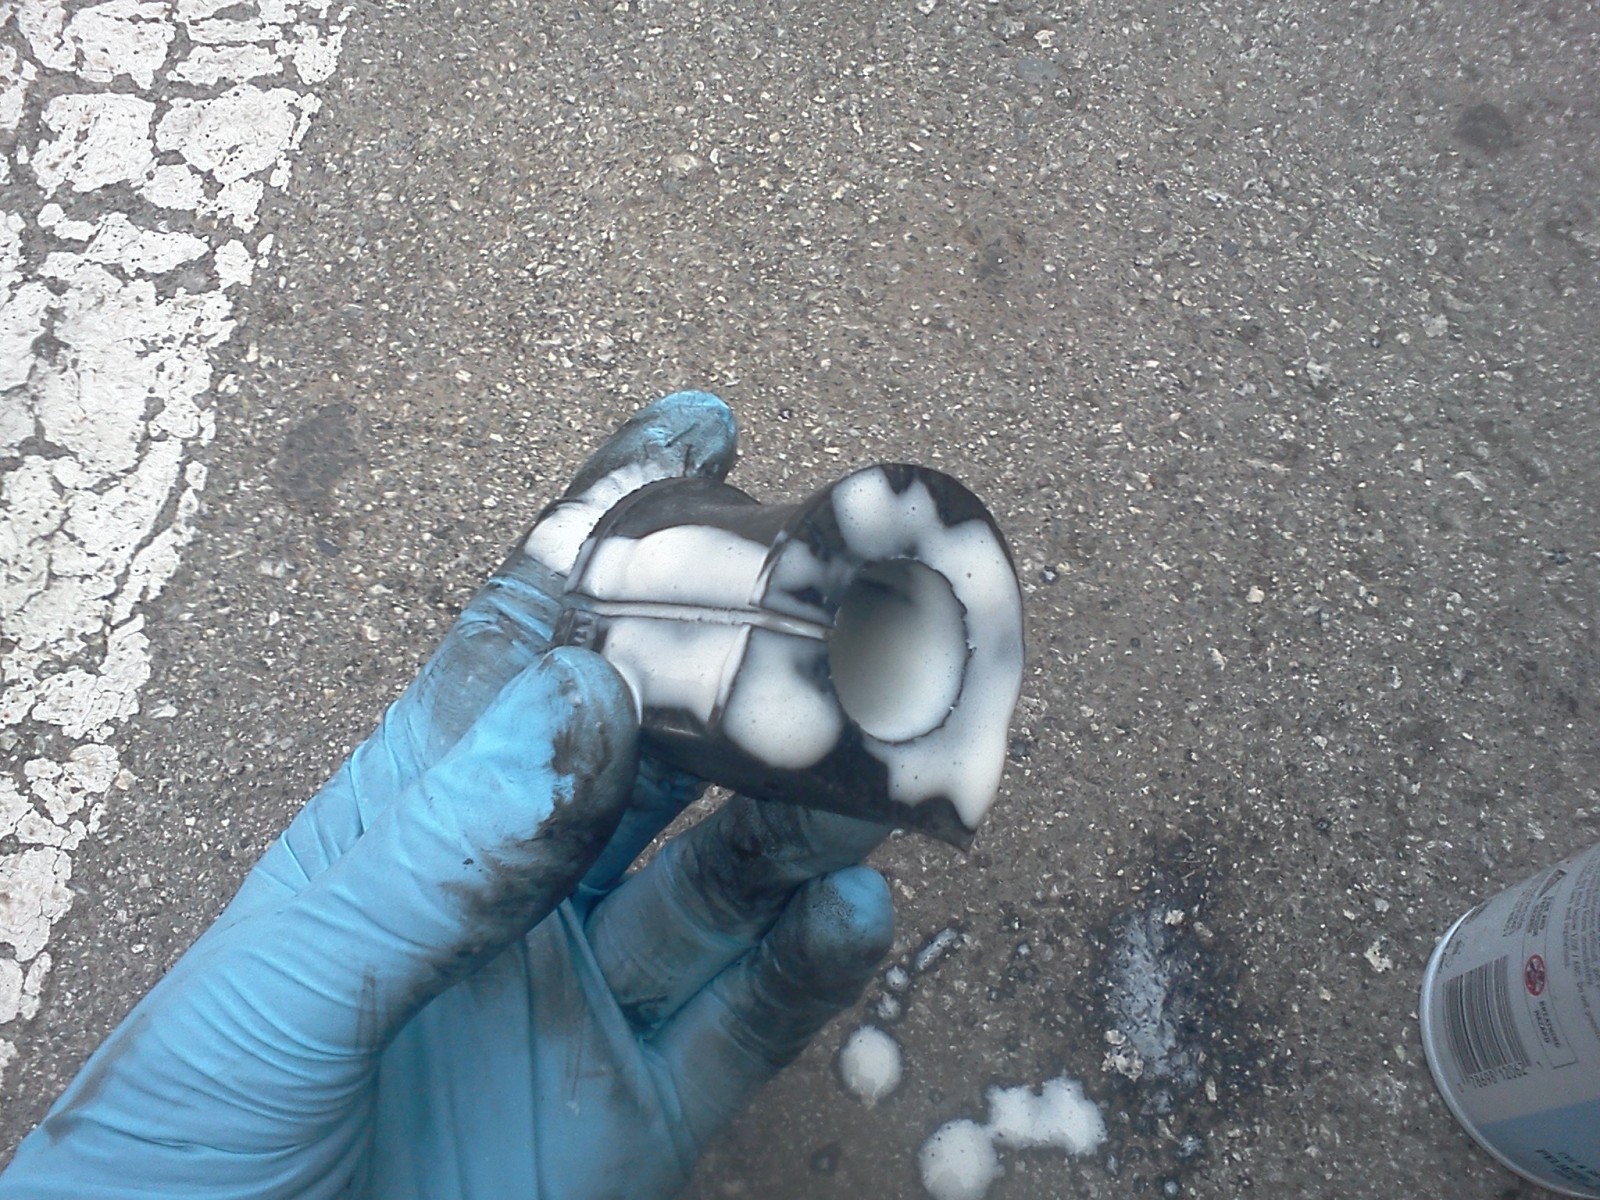
Locate And Remove Stabilizer Bar Bushing


1.Remove the bolts at the same time. take turns un screwing them!
do not just remove one bolt then the other
2.The Bracket Should have a X making the top of the bracket If not Use White Out or nail polish And always screw the nut back onto bottom bolt that way you know that is the bottom bolt and other is top
3. pull old bushing out and clean the area were it was with a towel.
make sure nothing dirty is there. or old plastic from old bushing
Confirm Bushing Is Bad And Replace

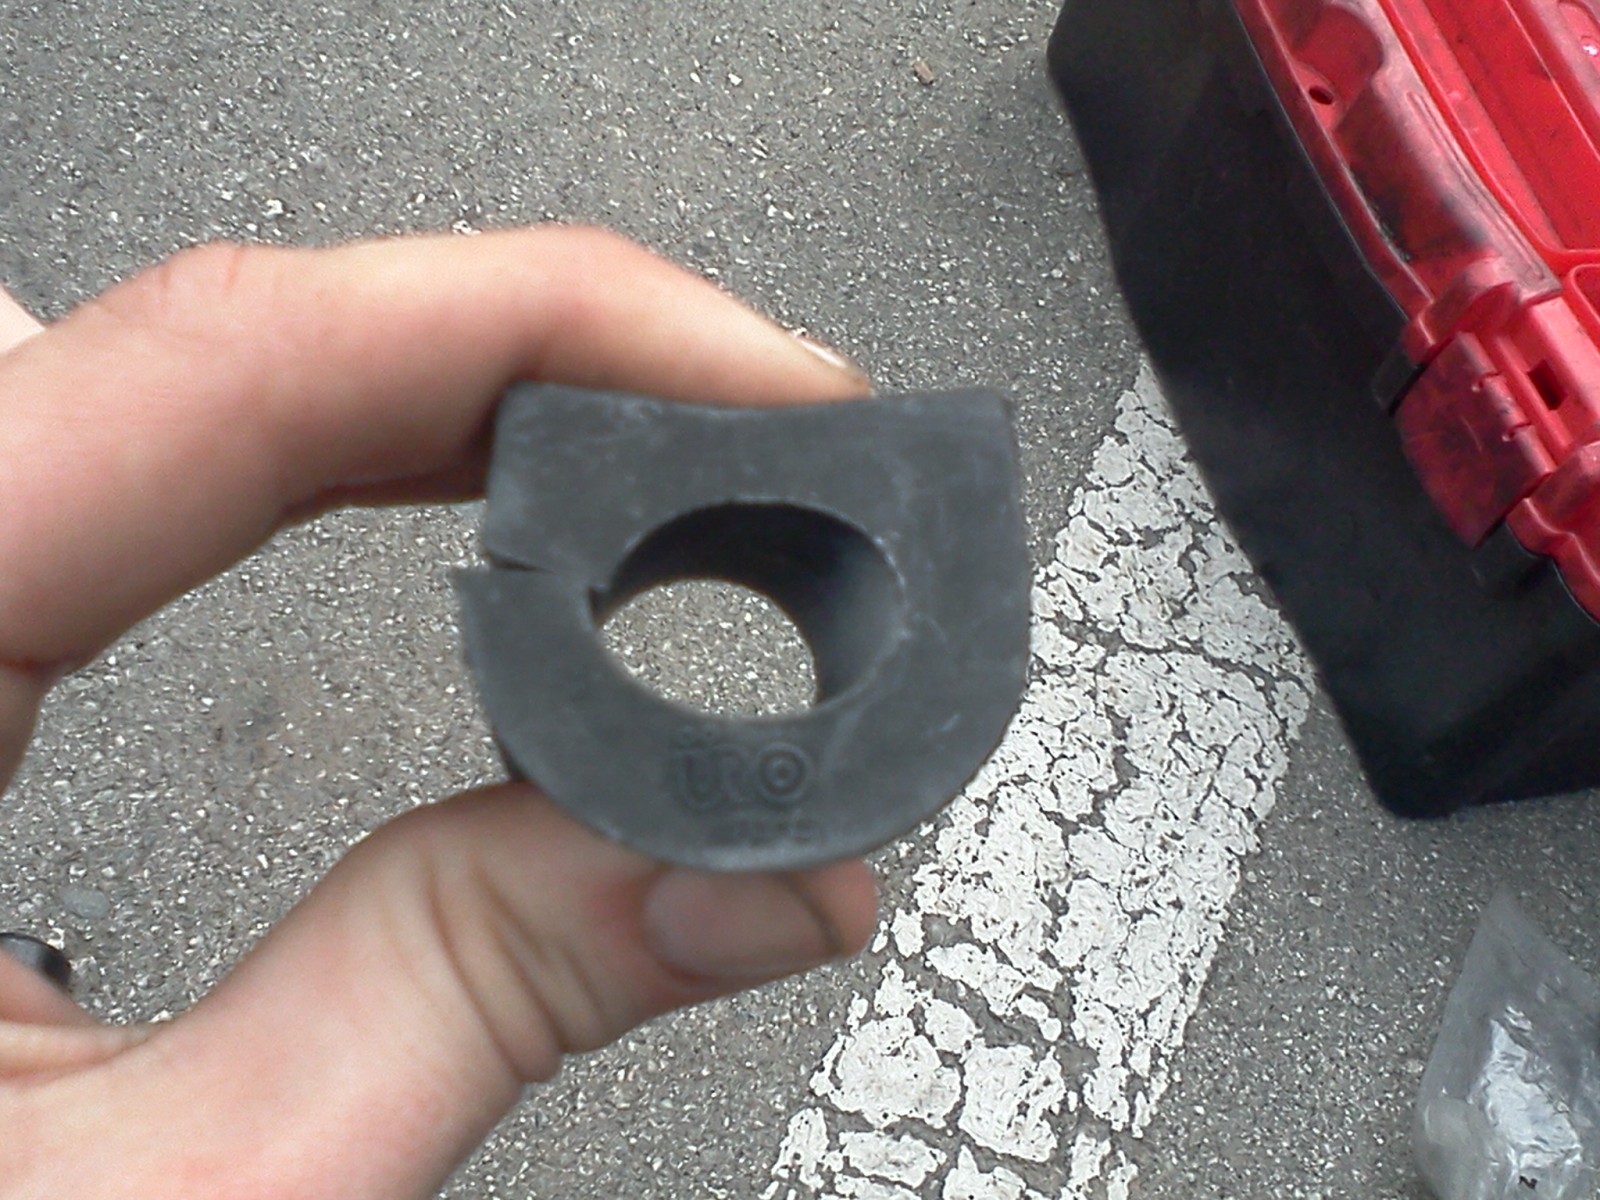


1.Bad ones will crunch down with little effort.
2. a good one has a lot of Resistance
3. if your old one has a good resistance just grease and apply old one
but i got my new ones fore $3 each so why be cheap
4. spray the inside of bushing with the grease
5. Use your thumb to hold the bar up so you can thread bolts in
6. Just get both bolts thread in a little and take turns screwing in
so the bushing does not go in crooked.
7. make sure the bushing is exactly where it was before and nice and tight when all done
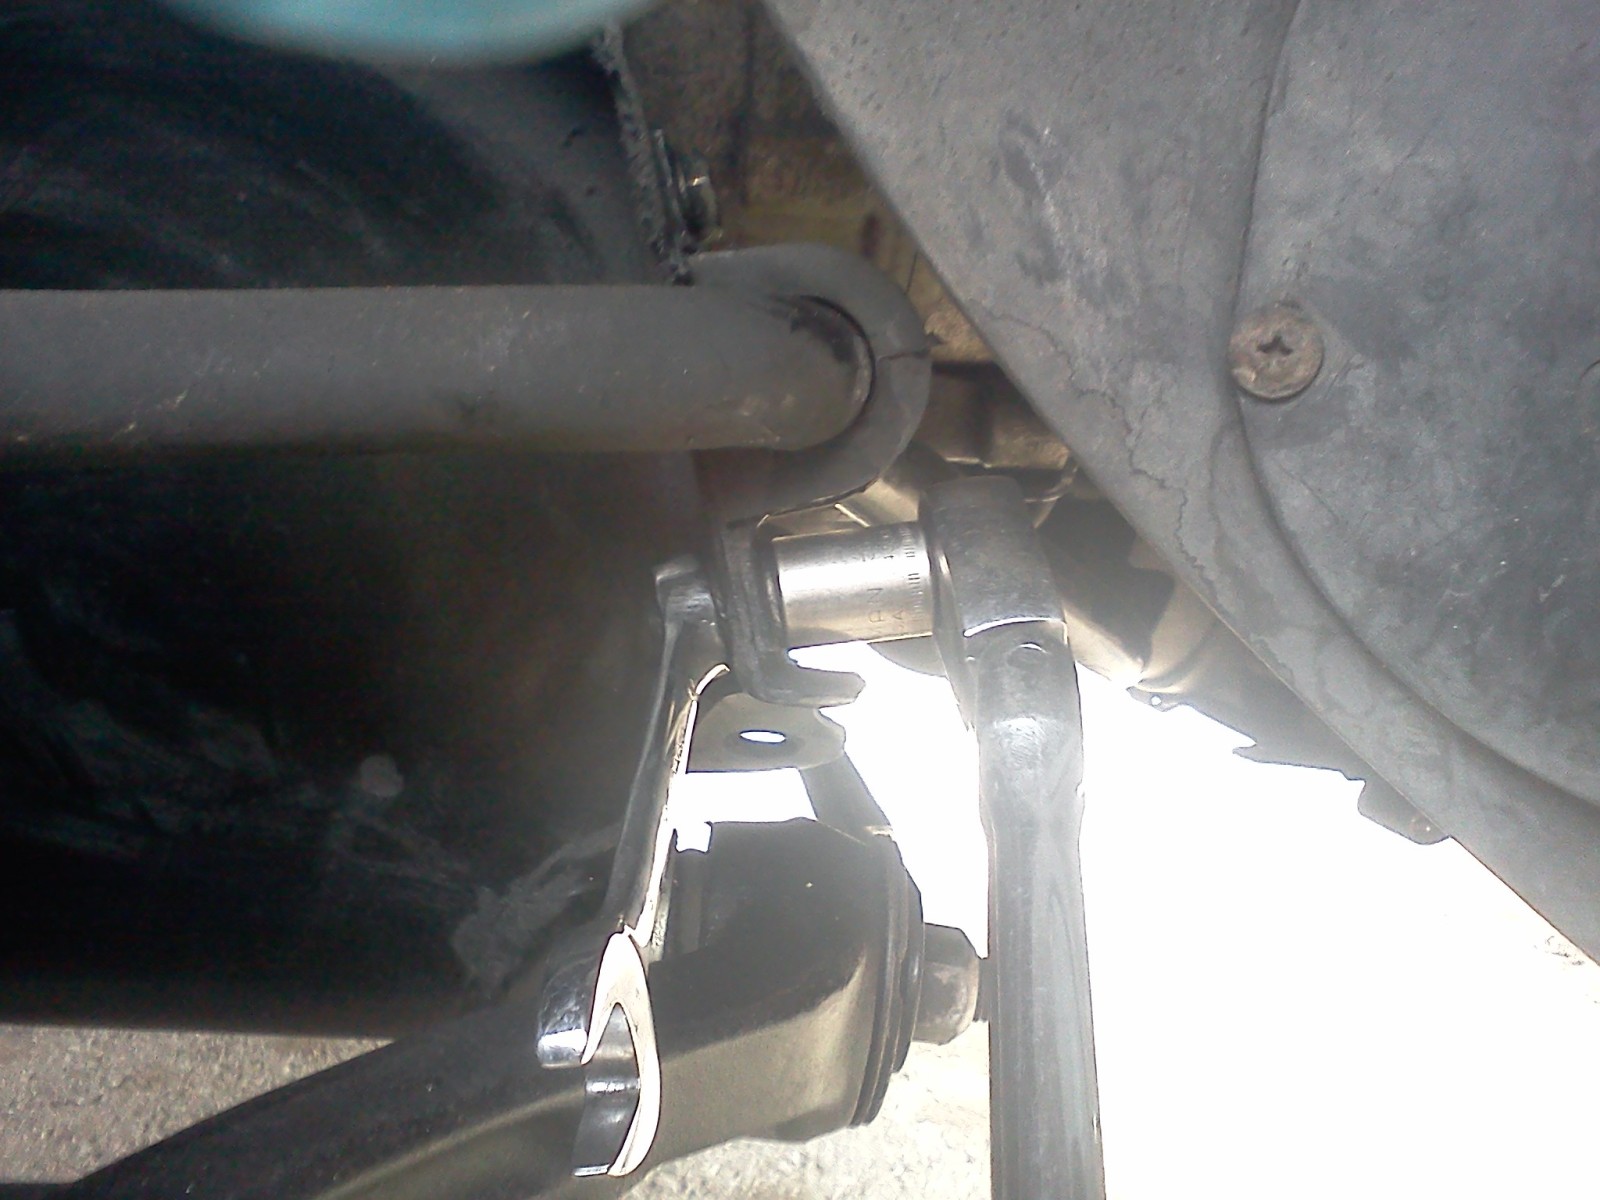
Install Stabilizer Bar Link


1. Get the Top Bolt In First. And do not tighten all the way just snug
2.Then Pry The Bar Down So Bottom Bolt Can Fit into Link
3. hit the bottom bolt in with a hammer its a tight fit so how ever u can
4. hit the stabilizer bar link SOFT on to the bottom bolt as it is coming out
5. Tighten the top and bottom bolts and nuts to torque setting now
Place the Wheel On And Test Drive


1.Take the Jack stand away from the car
2. make sure nothing is under the car or tires path
3. set tire on and HAND TIGHTEN THE LUGS as tight as u can
4.Use breaker bar to tighten more while still jacked up. if the tire spins place foot under or on side to stop the wheel from spinning
5. set car on the ground and tighten the lug nuts rest of the way
6. enjoy the ride
I LOVE TO BE THANKED <3
1. You will need ; Hammer,Ratchet,6inch extension,13mm Socket
16mm Socket,18mm DEEP socket,18mm wrench.13mm wrench,
Pry bar,Breaker bar,15/16 socket ,7/8 tire iron,screw driver,gloves,
Jack and Jack stand,White Lithium Grease, Stabilizer Link & bushing
Now We Loosen the Lug Nuts
1.Use a 15/16 Socket with breaker bar To loosen lug nuts
if the cap to the lug nut has come off . Its 7/8 Tire Iron
2.Remember DO NOT REMOVE NUTS JUST LOOSEN FOR NOW
If there on there tight step on the breaker bar for more leverage
Jack The Car Up and Remove Lug Nuts/Wheel
1. Make sure to jack up on the spot you see above!
2.Make sure you have enough room for your whole
hand to fit under the tire when jacked up!
3.Set lug nuts/wheel safely to the side
4. set a jack STAND under this spot BUT DO NOT LET IT SUPPORT THE WHOLE CAR THIS IS JUST TO HELP THE JACK!!!
Locate And Remove Stabilizer Bar Link Bottom Bolt
1.DO NOT HIT TO HARD AND DESTROY YOUR BOLT / NUT
2. Never take top bolt out first or it will destroy the top bolt
Remove Stabilizer bar Link Top Bolt
1. I did destroy my top bolt so i got a replacement
the size is 7/16"-20 x 2 3/16th
they did not have that so i got
7/16"-20 x 2 1/2 ... little longer but works
Locate And Remove Stabilizer Bar Bushing
1.Remove the bolts at the same time. take turns un screwing them!
do not just remove one bolt then the other
2.The Bracket Should have a X making the top of the bracket If not Use White Out or nail polish And always screw the nut back onto bottom bolt that way you know that is the bottom bolt and other is top
3. pull old bushing out and clean the area were it was with a towel.
make sure nothing dirty is there. or old plastic from old bushing
Confirm Bushing Is Bad And Replace
1.Bad ones will crunch down with little effort.
2. a good one has a lot of Resistance
3. if your old one has a good resistance just grease and apply old one
but i got my new ones fore $3 each so why be cheap
4. spray the inside of bushing with the grease
5. Use your thumb to hold the bar up so you can thread bolts in
6. Just get both bolts thread in a little and take turns screwing in
so the bushing does not go in crooked.
7. make sure the bushing is exactly where it was before and nice and tight when all done
Install Stabilizer Bar Link
1. Get the Top Bolt In First. And do not tighten all the way just snug
2.Then Pry The Bar Down So Bottom Bolt Can Fit into Link
3. hit the bottom bolt in with a hammer its a tight fit so how ever u can
4. hit the stabilizer bar link SOFT on to the bottom bolt as it is coming out
5. Tighten the top and bottom bolts and nuts to torque setting now
Place the Wheel On And Test Drive
1.Take the Jack stand away from the car
2. make sure nothing is under the car or tires path
3. set tire on and HAND TIGHTEN THE LUGS as tight as u can
4.Use breaker bar to tighten more while still jacked up. if the tire spins place foot under or on side to stop the wheel from spinning
5. set car on the ground and tighten the lug nuts rest of the way
6. enjoy the ride
I LOVE TO BE THANKED <3
The following 12 users liked this post by vandenplas408:
4litre (01-14-2014),
al_roethlisberger (11-09-2014),
BigBossRadio (03-10-2014),
Craighead (12-02-2014),
JimC64 (01-09-2014),
and 7 others liked this post.
#2
01-08-2014, 02:39 PM
The following users liked this post:
al_roethlisberger (11-09-2014)
#4
01-08-2014, 06:15 PM
I hope every one enjoys my pics
i always search for info on jaguars and there is hardly anything out there
this is the best source of info OUT THERE! so i hope to make a contribution
if my Pic DIY's can get stickyd would be great
p.s MANY MORE DIY"S ON THE WAY
#5
01-09-2014, 07:19 AM
Vandenplas408,
First I want to commend you for taking the time and all the excellent photos for this thread
There are of course lots of ways to 'skin this cat' If I may, I'd like to make some suggestions that I think would make this job easier and safer.
Changing the sway bar links and bushings is one of the easiest maintenance jobs to do on the XJ6 and well within the scope of any owner with a few basic tools.
1. Safety is critical when working under a car, especially a heavy one like the Jag. Using the jack at the side jacking point is fine but I would be very concerned about placing the jack stand under the bracket in the wheel well. If the jack fails, I would not want to bet my well being on that bracket holding up the car! A safer, easier and the correct way to do this is as follows. Place your jack with a block of wood on top under the center of the front suspension cross member and jack up the front end of the car. Then place your jack stands under the the jacking points on either side of the car. Lower the jack so that the car rests on the stands and remove the jack.
2. The reason that you had difficulty with the sway bar bolts is because you did not relieve pressure on the link. To do that, position the jack under the spring pan and jack up the pan a bit to compress the spring. Now you can easily remove both the bottom and top sway bar bolts as indicated in your photos. You will find that the bolts come out rather easily but if they are rusty you may have to tap them with a drift. Once you have replaced the link, repeat on the other side of the car. Easy as it's already jacked up
3. You mention that you used a 15/16" socket for your lug nuts. I'm surprised yours are that size as the standard nuts are 22mm so for other owners, make sure you use the right size for your car to avoid damaging the nuts. Also you do not mention torquing the lug nuts after lowering the car. This is important and something many service shops get wrong. The specified torque is only 65-75 ft-lbs. Many garages tighten to at least 100-120 ft-lbs or more which can cause damage.
Again excellent job, it is great when owners contribute to the collective knowledge of the forum
First I want to commend you for taking the time and all the excellent photos for this thread
There are of course lots of ways to 'skin this cat'
If I may, I'd like to make some suggestions that I think would make this job easier and safer.Changing the sway bar links and bushings is one of the easiest maintenance jobs to do on the XJ6 and well within the scope of any owner with a few basic tools.
1. Safety is critical when working under a car, especially a heavy one like the Jag. Using the jack at the side jacking point is fine but I would be very concerned about placing the jack stand under the bracket in the wheel well. If the jack fails, I would not want to bet my well being on that bracket holding up the car! A safer, easier and the correct way to do this is as follows. Place your jack with a block of wood on top under the center of the front suspension cross member and jack up the front end of the car. Then place your jack stands under the the jacking points on either side of the car. Lower the jack so that the car rests on the stands and remove the jack.
2. The reason that you had difficulty with the sway bar bolts is because you did not relieve pressure on the link. To do that, position the jack under the spring pan and jack up the pan a bit to compress the spring. Now you can easily remove both the bottom and top sway bar bolts as indicated in your photos. You will find that the bolts come out rather easily but if they are rusty you may have to tap them with a drift. Once you have replaced the link, repeat on the other side of the car. Easy as it's already jacked up
3. You mention that you used a 15/16" socket for your lug nuts. I'm surprised yours are that size as the standard nuts are 22mm so for other owners, make sure you use the right size for your car to avoid damaging the nuts. Also you do not mention torquing the lug nuts after lowering the car. This is important and something many service shops get wrong. The specified torque is only 65-75 ft-lbs. Many garages tighten to at least 100-120 ft-lbs or more which can cause damage.
Again excellent job, it is great when owners contribute to the collective knowledge of the forum
Last edited by AllanG; 01-09-2014 at 07:41 AM.
The following 8 users liked this post by AllanG:
aholbro1 (11-15-2014),
al_roethlisberger (11-09-2014),
BigBossRadio (05-09-2014),
JimC64 (01-09-2014),
Ken X300 (07-07-2021),
and 3 others liked this post.
#6
01-09-2014, 07:32 AM
Veteran Member
Join Date: Nov 2006
Location: Glasgow, Scotland UK
Posts: 47,302
Received 9,011 Likes
on
4,114 Posts
#7
01-14-2014, 12:28 PM
Trending Topics
#10
11-14-2014, 01:33 PM

Senior Member
This is exactly the job that owners will need to do if they want to fit my uprated drop links.
Thanks to the member who created this thread with all the photos. My only suggestion is if replacing the std nut on the fixings to the anti-roll bar, is to use one with a locking feature. The nut in the photo appears to be a plain nut.

Thanks to the member who created this thread with all the photos. My only suggestion is if replacing the std nut on the fixings to the anti-roll bar, is to use one with a locking feature. The nut in the photo appears to be a plain nut.
The following 2 users liked this post by XJRengineer:
al_roethlisberger (11-14-2014),
MikeyB10 (02-02-2019)
#11
11-14-2014, 01:53 PM
Senior Member

The following 2 users liked this post by XJRengineer:
al_roethlisberger (11-14-2014),
MikeyB10 (02-02-2019)
#12
11-14-2014, 05:54 PM
Veteran Member
#13
11-15-2014, 03:20 AM
Senior Member
#15
11-16-2014, 10:56 PM
Senior Member
Just an added little tip that I discovered after replacing my alternator today...
since my stabilizer link lower bolts seem to be frozen in place.
I just removed the lower nut holding the stabilizer links in place and the 4 bolts that hold the bar bushings in place and the whole sway bar actually just literally pulls off. Maybe easier for some people instead of removing each link and installing the new one at a time.
Just my little suggestion
#17
12-10-2014, 11:16 AM

I just performed this upgrade and the benefits are HUGE (depending on condition of your bushings). The car takes bumps smoother and steering response, most notably, turn-in are greatly improved. Ride quality and overall driver enjoyment are significantly increased. I bought the same parts as this original poster. They were cheap (in price) and shipping to West Coast from the East Coast was faster than advertised.
#18
12-10-2014, 03:51 PM
Veteran Member
I just performed this upgrade and the benefits are HUGE (depending on condition of your bushings). The car takes bumps smoother and steering response, most notably, turn-in are greatly improved. Ride quality and overall driver enjoyment are significantly increased. I bought the same parts as this original poster. They were cheap (in price) and shipping to West Coast from the East Coast was faster than advertised.
Which upgrade? Replaced worn bushings with OEM, poly or Andy's drop links?
.
#19
12-11-2014, 10:59 AM

Thread
Thread Starter
Forum
Replies
Last Post
rusty37
XJ6 & XJ12 Series I, II & III
6
04-05-2020 07:40 PM
Currently Active Users Viewing This Thread: 1 (0 members and 1 guests)