Potential Solution: Aftermarket Headunit with Stock Premium Audio Amplifier
#1
Hello,
I've had nothing but issues with my factory Alpine headunit since I've gotten my '96 XJ12. First the CD changer wasn't recognized. Re-soldered that. Now I've got no backlight, and my volume knob only works when the radio is cold.
I installed a JVC Arsenal headunit in my '92 and I love it. I ran the USB wire under the ski slope and into the center console which stores my iPod. There's also a second USB on the front for a Bluetooth adapter, and the button and display colors are infinitely variable, and can be set to perfectly match the existing illumination.
So I want the same type of setup in my '96. But I have premium audio... Well after doing some digging on DIN to RCA adapters, in order to convert the amplifier cable to RCA phono-plugs, I think I've found a solution.
Many Volvo factory radios are manufactured by Alpine as well. They also have a DIN socket on the back with the same pin arrangement for an external power amplifier. Well, it turns out at least one company makes a suitable adapter. So seeing as it's an Alpine setup for the Volvo, I'm wagering that the Jaguar Alpine DIN socket would have the same (or similar) pinout.
Enter the Volvo Amplifier Adapter:
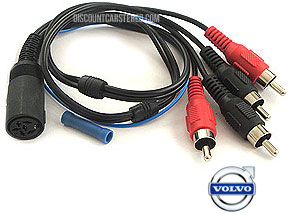
It sends the remote power trigger (blue wire) and low-level output (RCA phono plugs) from the aftermarket radio to the stock amplifier in the trunk using the existing DIN6 cable.
Now, instead of hacking up the original harness like I stupidly did on my '92, I want to have a clean system of wiring that can be reverted back if necessary. Enter the Jaguar harness adapter:

Now this adapter is meant for non-amplified vehicles, however, the only wires we're really concerned about are the battery & accessory power, ground, illumination and power antenna trigger. The wires/pin location we're concerned about are the same for either the base or the premium system, so this adapter will work for this application.
Now, because the JVC Arsenal KDAHD75BT doesn't have an ISO connector, but a proprietary miniature connector, the only real wiring work I'll need to do is soldering the wires we're concerned with above to the JVC adapter included with the radio. After that, everything should be plug-and-play, and it will be completely reversible.
I did forgo the Jaguar radio trim kit, as I like having the radio recessed a bit (as it is in my '92) because it gives me a nice shelf, and cuts down on glare on the headunit, making it a bit more visible.
The success of this endeavor is hinging on my expectation that the Volvo Alpine AMP adapter is the same pinout as the Jaguar AMP connector. Because I highly doubt Alpine would go through the trouble of switching up pinouts for a physically-identical connector that has the exact same practical function for either vehicle. If I am completely wrong, I can revert back just by unplugging things, use my 60-day money-back guarantee from Crutchfield, and I'll be out the cost of the two adapters. Not too bad in my book...
So, you'll be hearing back from me in a week or so...

-Nick
I've had nothing but issues with my factory Alpine headunit since I've gotten my '96 XJ12. First the CD changer wasn't recognized. Re-soldered that. Now I've got no backlight, and my volume knob only works when the radio is cold.
I installed a JVC Arsenal headunit in my '92 and I love it. I ran the USB wire under the ski slope and into the center console which stores my iPod. There's also a second USB on the front for a Bluetooth adapter, and the button and display colors are infinitely variable, and can be set to perfectly match the existing illumination.
So I want the same type of setup in my '96. But I have premium audio... Well after doing some digging on DIN to RCA adapters, in order to convert the amplifier cable to RCA phono-plugs, I think I've found a solution.
Many Volvo factory radios are manufactured by Alpine as well. They also have a DIN socket on the back with the same pin arrangement for an external power amplifier. Well, it turns out at least one company makes a suitable adapter. So seeing as it's an Alpine setup for the Volvo, I'm wagering that the Jaguar Alpine DIN socket would have the same (or similar) pinout.
Enter the Volvo Amplifier Adapter:

It sends the remote power trigger (blue wire) and low-level output (RCA phono plugs) from the aftermarket radio to the stock amplifier in the trunk using the existing DIN6 cable.
Now, instead of hacking up the original harness like I stupidly did on my '92, I want to have a clean system of wiring that can be reverted back if necessary. Enter the Jaguar harness adapter:

Now this adapter is meant for non-amplified vehicles, however, the only wires we're really concerned about are the battery & accessory power, ground, illumination and power antenna trigger. The wires/pin location we're concerned about are the same for either the base or the premium system, so this adapter will work for this application.
Now, because the JVC Arsenal KDAHD75BT doesn't have an ISO connector, but a proprietary miniature connector, the only real wiring work I'll need to do is soldering the wires we're concerned with above to the JVC adapter included with the radio. After that, everything should be plug-and-play, and it will be completely reversible.
I did forgo the Jaguar radio trim kit, as I like having the radio recessed a bit (as it is in my '92) because it gives me a nice shelf, and cuts down on glare on the headunit, making it a bit more visible.
The success of this endeavor is hinging on my expectation that the Volvo Alpine AMP adapter is the same pinout as the Jaguar AMP connector. Because I highly doubt Alpine would go through the trouble of switching up pinouts for a physically-identical connector that has the exact same practical function for either vehicle. If I am completely wrong, I can revert back just by unplugging things, use my 60-day money-back guarantee from Crutchfield, and I'll be out the cost of the two adapters. Not too bad in my book...
So, you'll be hearing back from me in a week or so...

-Nick
Last edited by NTL1991; 10-20-2014 at 02:14 AM.
The following users liked this post:
al_roethlisberger (10-20-2014)
#2
Will be very interested to hear how the pinouts/wiring discovery process works out.
I had read on one of many threads last night that some of the later AiNet connectors had some of the pins reversed for the Jaguar. Hopefully that isn't the case for the DIN connector you are working with.
.
I had read on one of many threads last night that some of the later AiNet connectors had some of the pins reversed for the Jaguar. Hopefully that isn't the case for the DIN connector you are working with.
.
#3
Thanks, Al.
I figured if some of the pins are reversed, at least I have the adapter in the first place to modify instead of the factory wiring. That's my main concern, not hacking things up like I did on my '92.
I've heard of the same type of pin-swapping, but with Honda Alpine M-Bus CD Changers. The pins for the left and right channels were swapped, which just reversed the audio output. Wasn't a huge deal. Hopefully if the Alpine AMP connect has the same swap, it'll be easy to trace it down and make any necessary changes.
Thanks,
Nick
#4
So, I got the radio and the Volvo amplifier adapter in the mail, and I wanted to give everything a test run, so I temporarily connected the head unit and gave the adapter a go.
The pinout for the adapter was wrong, but everything but one wire was there. It was just a matter of slipping back the boot on the DIN plug and re-soldering the wires to the right pins. Also, the blue remote-turn on lead can be removed completely, as it is not used in the Jaguar setup. The antenna trigger is supplied to the amplifier as well, eliminating the need for the blue trigger wire in the DIN adapter.
I just have to wait for the Jaguar to ISO adapter, and then I'll be able to do a complete install.
-Nick
The following users liked this post:
97x306 (10-25-2014)
#6
So I got the radio installed tonight, everything is wired up and working well. After the small modification to the AMP cable adapter, I now have all the speakers working, and the fader and balance controls on the new headunit function perfectly.
I ran the USB wire under the ski slope into the center console for iPod storage and charging.
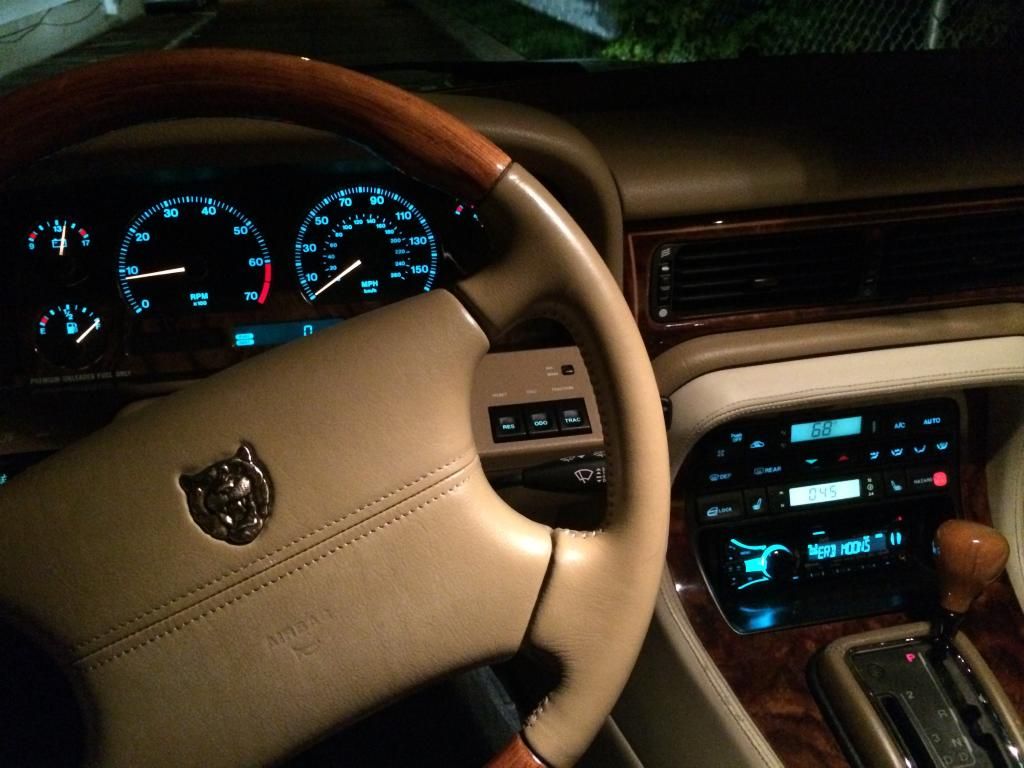
The radio has a dimmer switch input which automatically dims the display when the parking lamps/headlamps are turned on. The power antenna and amplifier are signaled on when the headunit is turned on, and the display colors can be custom-matched to that of the rest of the car.
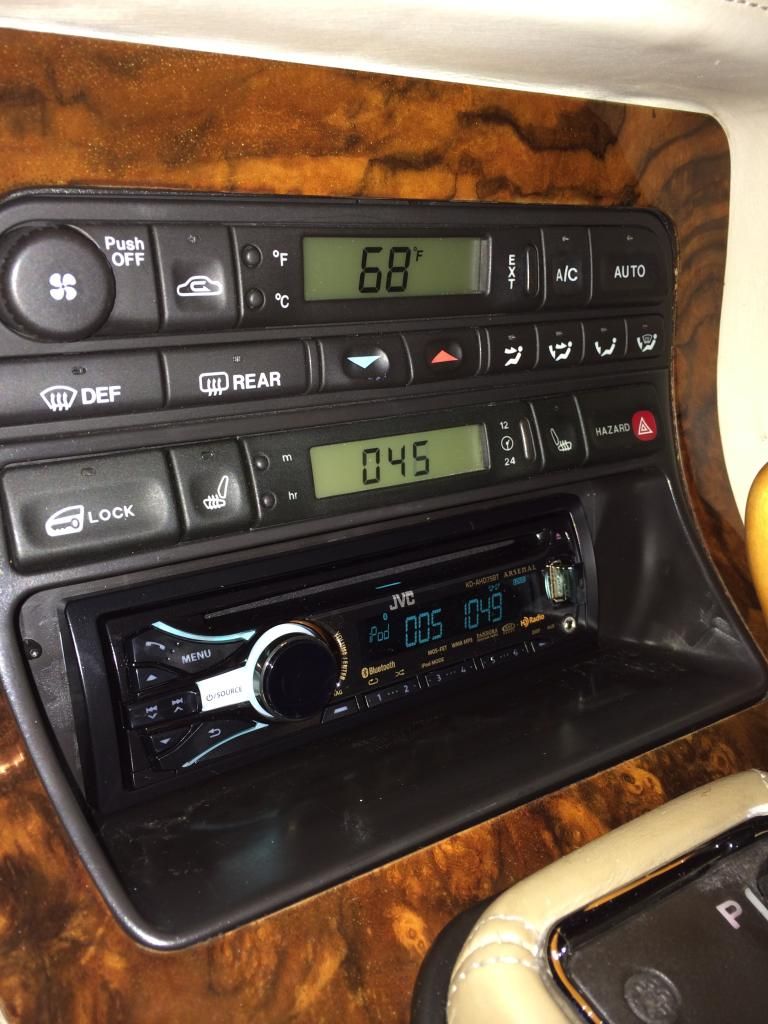
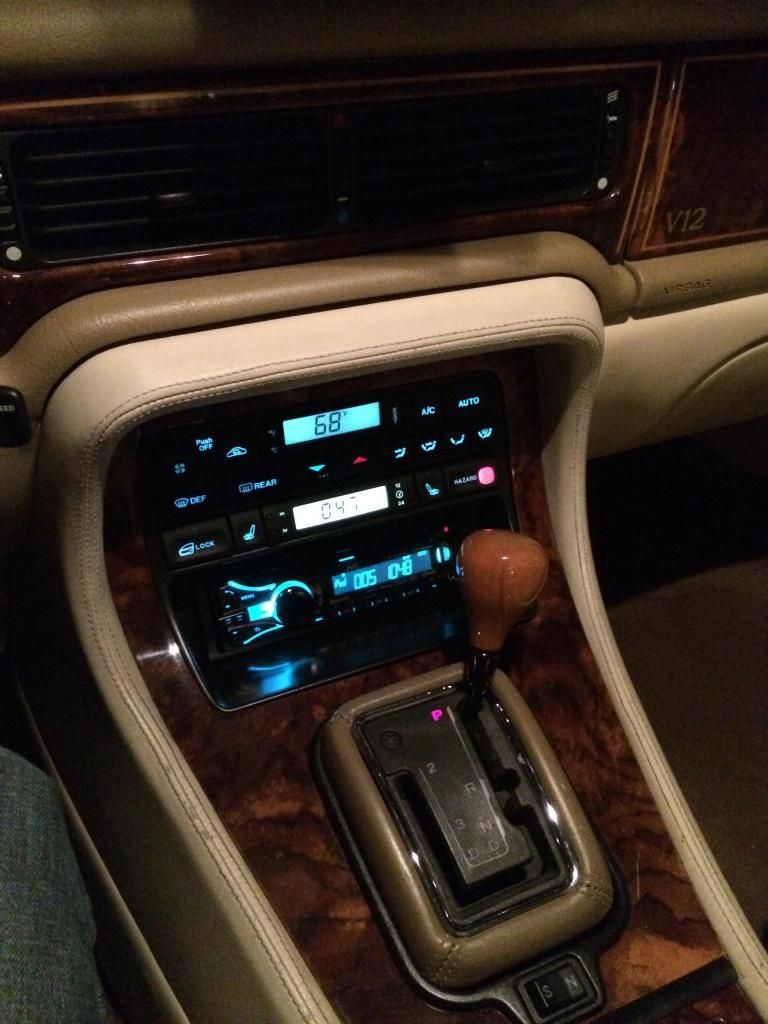
Here are some pictures of it installed. I didn't use the fascia trim kit, I think it'll be fine without it.
This JVC has an excellent equalizer, allowing for individual frequency adjustment of Bass, Midrange, and Treble levels. The sounds can be tailored much better than the original radio's simple base and treble controls.
Hope this helps anyone with a Premium Audio System. It can be done!
-Nick
I ran the USB wire under the ski slope into the center console for iPod storage and charging.
The radio has a dimmer switch input which automatically dims the display when the parking lamps/headlamps are turned on. The power antenna and amplifier are signaled on when the headunit is turned on, and the display colors can be custom-matched to that of the rest of the car.
Here are some pictures of it installed. I didn't use the fascia trim kit, I think it'll be fine without it.


This JVC has an excellent equalizer, allowing for individual frequency adjustment of Bass, Midrange, and Treble levels. The sounds can be tailored much better than the original radio's simple base and treble controls.
Hope this helps anyone with a Premium Audio System. It can be done!
-Nick
The following users liked this post:
Doug (10-26-2014)
#7
this is great, thanks
can you let me know which wires on the first adapter need to be switched around/resoldered?
the 2nd adapter is the Jag specific one ... it's only used for power/ground, and what else? Is it also used for the antennae and dimmer?
can you let me know which wires on the first adapter need to be switched around/resoldered?
the 2nd adapter is the Jag specific one ... it's only used for power/ground, and what else? Is it also used for the antennae and dimmer?
Last edited by 97x306; 10-26-2014 at 01:14 AM.
Trending Topics
#9
For Premium Audio cars, the only wires that need to be connected to the Jaguar-Specific adapter is Accessory (switched) 12V+, Battery (unswitched) 12V+, Ground, Power Antenna (also doubles as Amplifier Trigger) Trigger, and Illumination. If I remember correctly, the adapter harness connected to my JVC unit Yellow to Yellow (battery), Red to Red (ignition), Blue to Blue/White stripe (antenna), Yellow/Blue stripe to Orange (dimmer), Red/Black stripe to Black (ground).
The rest of the wires in the Jaguar-specific harness are only used in Non-Premium cars, meaning the speakers are powered directly from the headunit, as well as a few wires for the Jaguar Factory telephone, which most will not have installed. I just cut and isolated the wires from the Jaguar-Specific harness as they aren't needed, and will never be needed in my car.
If you purchase an Alpine headunit, you may be able to find an adapter to connect the older M-Bus changer to the newer Ai-NET that Alpine headunits use. If so, it would control the factory changer just the same as the original Alpine headunit.
I'll be posting a diagram up of the wires that had to be changed in the Volvo amplifier adapter.
Hope this helps,
Nick
Last edited by NTL1991; 10-26-2014 at 07:03 PM.
The following 2 users liked this post by NTL1991:
97x306 (10-27-2014),
al_roethlisberger (10-27-2014)
#10
Okay, here's the pinout for the amplifier cable. When you're modifying the Volvo AMP cable, be sure to remove the blue lead from pin 6, as it's not used in the Jaguar setup.
Also, the shields coming from each channel should already be combined into one pin. You'll need to move this to Pin 3.
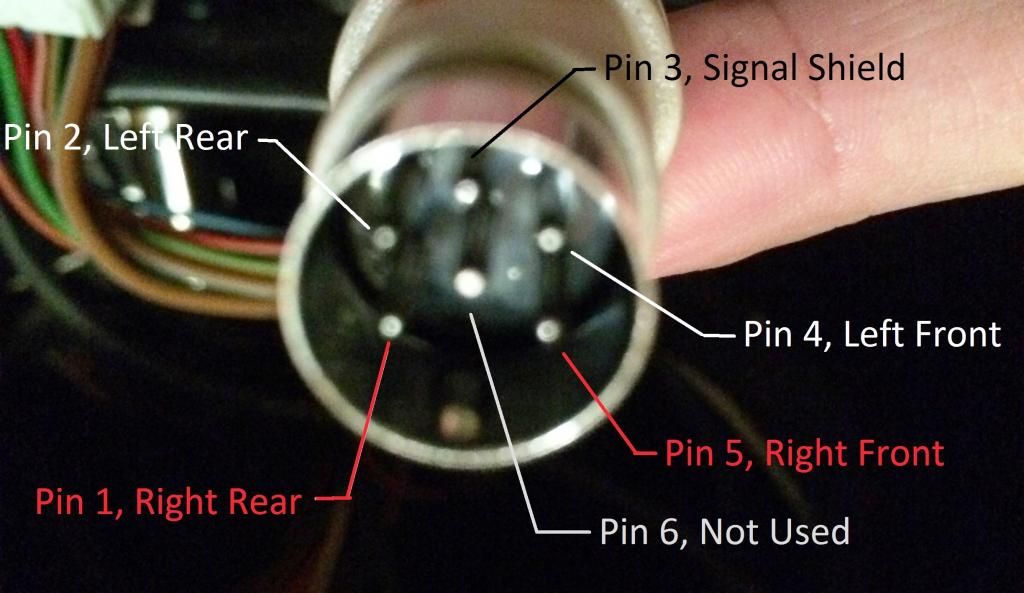
When soldering, be sure to remember that you're looking from the rear of the connector (the soldered side) when referencing the picture above.
I removed all the leads then did them one at a time, so I dont recall the original setup of the Volvo wiring. I don't recall even one being in the right position. It's just a matter of about 10 minutes to do the modification.
Thanks,
Nick
Also, the shields coming from each channel should already be combined into one pin. You'll need to move this to Pin 3.

When soldering, be sure to remember that you're looking from the rear of the connector (the soldered side) when referencing the picture above.
I removed all the leads then did them one at a time, so I dont recall the original setup of the Volvo wiring. I don't recall even one being in the right position. It's just a matter of about 10 minutes to do the modification.
Thanks,
Nick
The following 3 users liked this post by NTL1991:
#13
This is awesome info, I was looking for it for days, but for some reason it did not work for me. I have found the power wires and radio powers up great, but I am connecting speaker wires from the new radio (also JVC) to the DIN 6 pin connector as you have shown and there is no sound. Did you connect speaker wires directly to the DIN wires or was they speaker wires that would go to the speakers or some other amplifier wires that your radio had? Any help is greatly appreciated.
#14
We probably have different systems that is why it did not work out. BUT what I am going to do instead of running wires through the car to the speakers I will use existing DIN cables wires that already going back to the amplifier in the trunk and connect my new radio on one side to the DIN cable by the radio and connect out to speakers wires from amplifier on the other side, this way I will have my radio connected to the speakers directly, no extra wires needed.
#15
Done! Both DIN (round plug) cables black and beig had 5 colored wires each - total of 10 wires going from the radio compartment to the trunk. I've got piggyback connectors from Walmart and clipped those wires on one side together with speaker wires from the new radio (right through the wire, without destroying original Jag wiring) and on the other side (in the trunk where they come out to CD changer and amplifier) to the corresponding speaker wires that go out from amplifier plug. They are color coded and color can be found in audio diagram for jaguar 1997, that is somewhere here on this website.
#16
Done! Both DIN (round plug) cables black and beig had 5 colored wires each - total of 10 wires going from the radio compartment to the trunk. I've got piggyback connectors from Walmart and clipped those wires on one side together with speaker wires from the new radio (right through the wire, without destroying original Jag wiring) and on the other side (in the trunk where they come out to CD changer and amplifier) to the corresponding speaker wires that go out from amplifier plug. They are color coded and color can be found in audio diagram for jaguar 1997, that is somewhere here on this website.
The JVC head unit will have speaker wire outputs (positive and ground for each channel, totaling 8 wires) that should not be used in this case. The modified DIN connector should be connected to the line-level RCA Phono Outputs on the back of your JVC headunit.
What I did with this project is send the new headunit's low-level un-amplified signal through the factory cable (using the modified DIN adapter) to the factory amplifier, where the factory wires run to the speakers. Basically leaving everything identical with the exception of the newer headunit.
Correct me if I'm wrong, but if sounds like you've used the factory amplifier DIN cable as a means to send the high-level amplified output of the headunit to the trunk, where you've tied into the speaker wires there, thus powering the original speakers from the headunit, and bypassing the factory amplifier. I suppose that method would work, and it's a clever way to do it, but I have a concern with the power ratings of the speakers (especially the subwoofer) and if the aftermarket headunit's 4 channels are powerful enough to supply all nine speakers. I believe the factory amplifier has 8 channels of output to supply sufficient power to each speaker in the car (the rear tweeters are tied into the rear door speaker channel).
Hope this helps clarify some confusion others may have.
Nick
Last edited by NTL1991; 11-18-2014 at 02:48 AM.
The following users liked this post:
vasey (11-18-2014)
#17
Thanks, Nick. I have tried RCA output and it did not produce sound, so yes, I did bypassed the amplifier simply using DIN wires to reach to the speaker wires from amplifier in the trunk. I might have had a bad connection when I tried the RCA. The sound is louder then from Jaguar amplifier from the 6 speakers (2 fronts and 4 backs - there were only 10 wires available in DIN cables) The subwoofer however is silent, because on the back of my unit I have RCA output for subwoofer and it was obviously not enough to get it to work by itself. When I will get more time I will try to use your approach and hook it up to the original amplifier, since all my wiring is intact. Thanks again for the response,
#18
I've been researching this as repairing the distortion in my Apline and adding bluetooth is £160 and I've a perfectly good Pioneer single din on the shelf with all the bells and whistles.
I'm awaiting an email back, but Incartec have an item listed for the X300 with premium sound - Once they confirm it fits, I'll buy it and leave a review if it was successful or not.
https://incartec.co.uk/product/JAGUA...fier-interface
I'm awaiting an email back, but Incartec have an item listed for the X300 with premium sound - Once they confirm it fits, I'll buy it and leave a review if it was successful or not.
https://incartec.co.uk/product/JAGUA...fier-interface
#19
They replied.
I'm going to place an order here and give it a shot.
With that being said, based on the information provided we would recommend upgrading the original stereo to aftermarket with the following:
Amplifier interface
https://incartec.co.uk/product/JAGUA...fier-interface
On delivery, the adjustment dials on the amplifier interface are set to zero, this needs to be correctly set during installation. With the new stereo connected and working, set the volume to 75-80% level. Then turn each channel up one at a time until you start to hear distortion, when you hear distortion turn the dial back slightly. This will be set at an optimum level. The levels can be set lower to give more fade and balance control.
I'm going to place an order here and give it a shot.


