When you click on links to various merchants on this site and make a purchase, this can result in this site earning a commission. Affiliate programs and affiliations include, but are not limited to, the eBay Partner Network.
I'm going through a list of overdue maintenance jobs, including adjusting the handbrake, just to give it more bite before it gets fully up to the end of it's travel. As it stands, the car can pull forward in Drive, unless I give the handbrake that last strong heave. Is there a right way/wrong way to adjust the handbrake? Any tips or advice most welcome.
Another brake related job I want to do is to renew the brake fluid. I've gotten away without doing so for far too long and it's overdue. Likewise, is there a proper bleeding procedure, sequence as to which wheel to start at etc.
FWIW any replies should consider that my car is RHD. Thanks in advance and a Happy Christmas to all.
The handbrake/parking brake is, essentially, and old fashioned drum brake residing within the 'top hat' section of the rear brake discs and has the typical (for drum brakes) star-wheel adjuster.
As I recall the star wheel is accessible through a hole in the brake discs, easily accessible by removing the rear wheels.
If your parking brake pads are still ok, just tighten up the adjuster under the car(right in the middle in front of the rear subframe), if the pads are gone, then replace them. Its a very fiddly job, but fairly straight forward and you can flush the fluid at the same time as the rear calipers will have to come out.
The only problem might be with the locating plates behind the rear brakes. They corrode and the pins that hold the parking brake pads to them might not even be there and if the holes are too big, just replace the pins with locking nuts and bolts(New back plates are not available anymore or very expensive)
That's what left of mine:
and here's what left of my parking brake pads
If you decide to flush the brakes, make sure to use impact socket on the bleed nipples, otherwise there is a good chance you'll strip the head. I think you start with passenger side rear wheel, followed by the driver side rear wheel, then the passenger side front, and finally the driver side front(RHD).
Katar83, can you confirm if/if not the star wheel adjuster for the rear shoes is accessible by simply removing the rear wheels?
Cheers
DD
They are accessible, but first the main adjuster under the car need to be checked because in most cases its just the main cable that stretched over time and needs tightening(its also a 2 minute job with a 13mm spanner). The star adjusters behind the wheels(hole through brake disc at 12o'clock) should only be used when you actually replace the pads or the whole thing is completely messed up(eg pads were no longer attached to the backing plates and there was some uneven wear) or when the main adjuster no longer works at all, otherwise I wouldn't touch them.
When replacing the parking brake pads - the left wheel adjuster is up to extend, and the right wheel is opposite, down to extend.
It can be very tricky to get them adjusted correctly, rear of the car needs to be on axle stands and running, then both wheels adjusted to lock them completely, then turn each star adjuster back one turn until the wheels are turning, then adjust main adjuster under car, then start the car and try the parking brake.
@katar83 - I don't agree with you on the adjustment process. The star wheel in the drum should always be used first to adjust for shoe/mechanism wear, and get the shoes as close to the drum as possible without binding. When that is done then the cable adjuster under the car should be used to make the handbrake lever feel right (2 or 3 clicks to on). I've always found with the rear of the car on stands or 2 post ramp, the rear wheels should be able to be turned comfortably by hand and the shoes adjusted in that way until bind and then slacken off the adjuster wheel. Then repeat with the cable adjuster.
I agree that the star wheel adjustment should come first...and I think the ROM mentions the same....as that alone may give the desired result and, after all, that's why the adjustment exists. Then adjust the cable.
These parking brakes never seem to get much attention. Often they go unused for ages....which itself can make them inoperative or partially inoperative. Then someone comes along who *does* apply the handbrake and either nothing happens or the darn things get stuck in the 'applied' position. It's all downhill from there.
Then, among those who are aware that the parking brakes need love from time to time, there's finding the motivation....as it's not a 10 minute thing to remove the discs so as to lube the backing plates, pivots, and such.
You guys are writing this under the assumption that there is something wrong with the rear adjusters and these are almost always fine as both pads should wear in the same way so like I said unless the pads and/or adjustment is completely messed up(eg uneven wear or pins came out) I'd go straight to main adjuster first, especially since its much much easier and quicker to check this and unless the pad wear is different on both sides(unbalanced parking brake) the main adjuster will provide the same adjustment type at a much bigger scale
I'm aware that its a good idea to start with star adjusters but after doing the damn thing multiple times this year(up to a point where I almost lost the will to live) I strongly advise anyone with this problem to not torment themselves with these little buggers unless its necessary!
Since @sogood suggests he's parking brake actually works when engaged fully up, I'd say its just a stretched main cable and hopefully few turns on the main adjuster should sort it out.
No harm in going right to the cable, I reckon. If it's visibly/obviously loose it obviously needs to be tightened.
And in reality there's no reason for the parking brake shoes (not 'pads') to wear thin and require regular adjustment. The only way they'd wear, near as I can tell, if the car is driven with the parking brake applied.
If you use the handbrake regularly I guess some wear could develop in the actuating mechanism which necessitates nipping-up the adjustment from time-to-time.
My thought process has been a bit muddled in this thread; my fault. In my mind I was thinking in terms of giving a neglected system a good servicing (as I say, a bit labor intensive), the last two steps being adjusting the shoes properly with the star wheel and then moving forward to the cable, if needed. It dawns on me that the OP might not want to go that route....and adjusting the cable might restore operation with no other work being done.
Many thanks for the helpful responses. I do remember reading somewhere about the PITA that fiddling with the star adjusters can be etc. and hoped that a simple tightening up of the cable would cure my little issue. I will be back under the car by the weekend and will look at the cable adjustment and report back. As mentioned, it works fine, but just a tad slack.
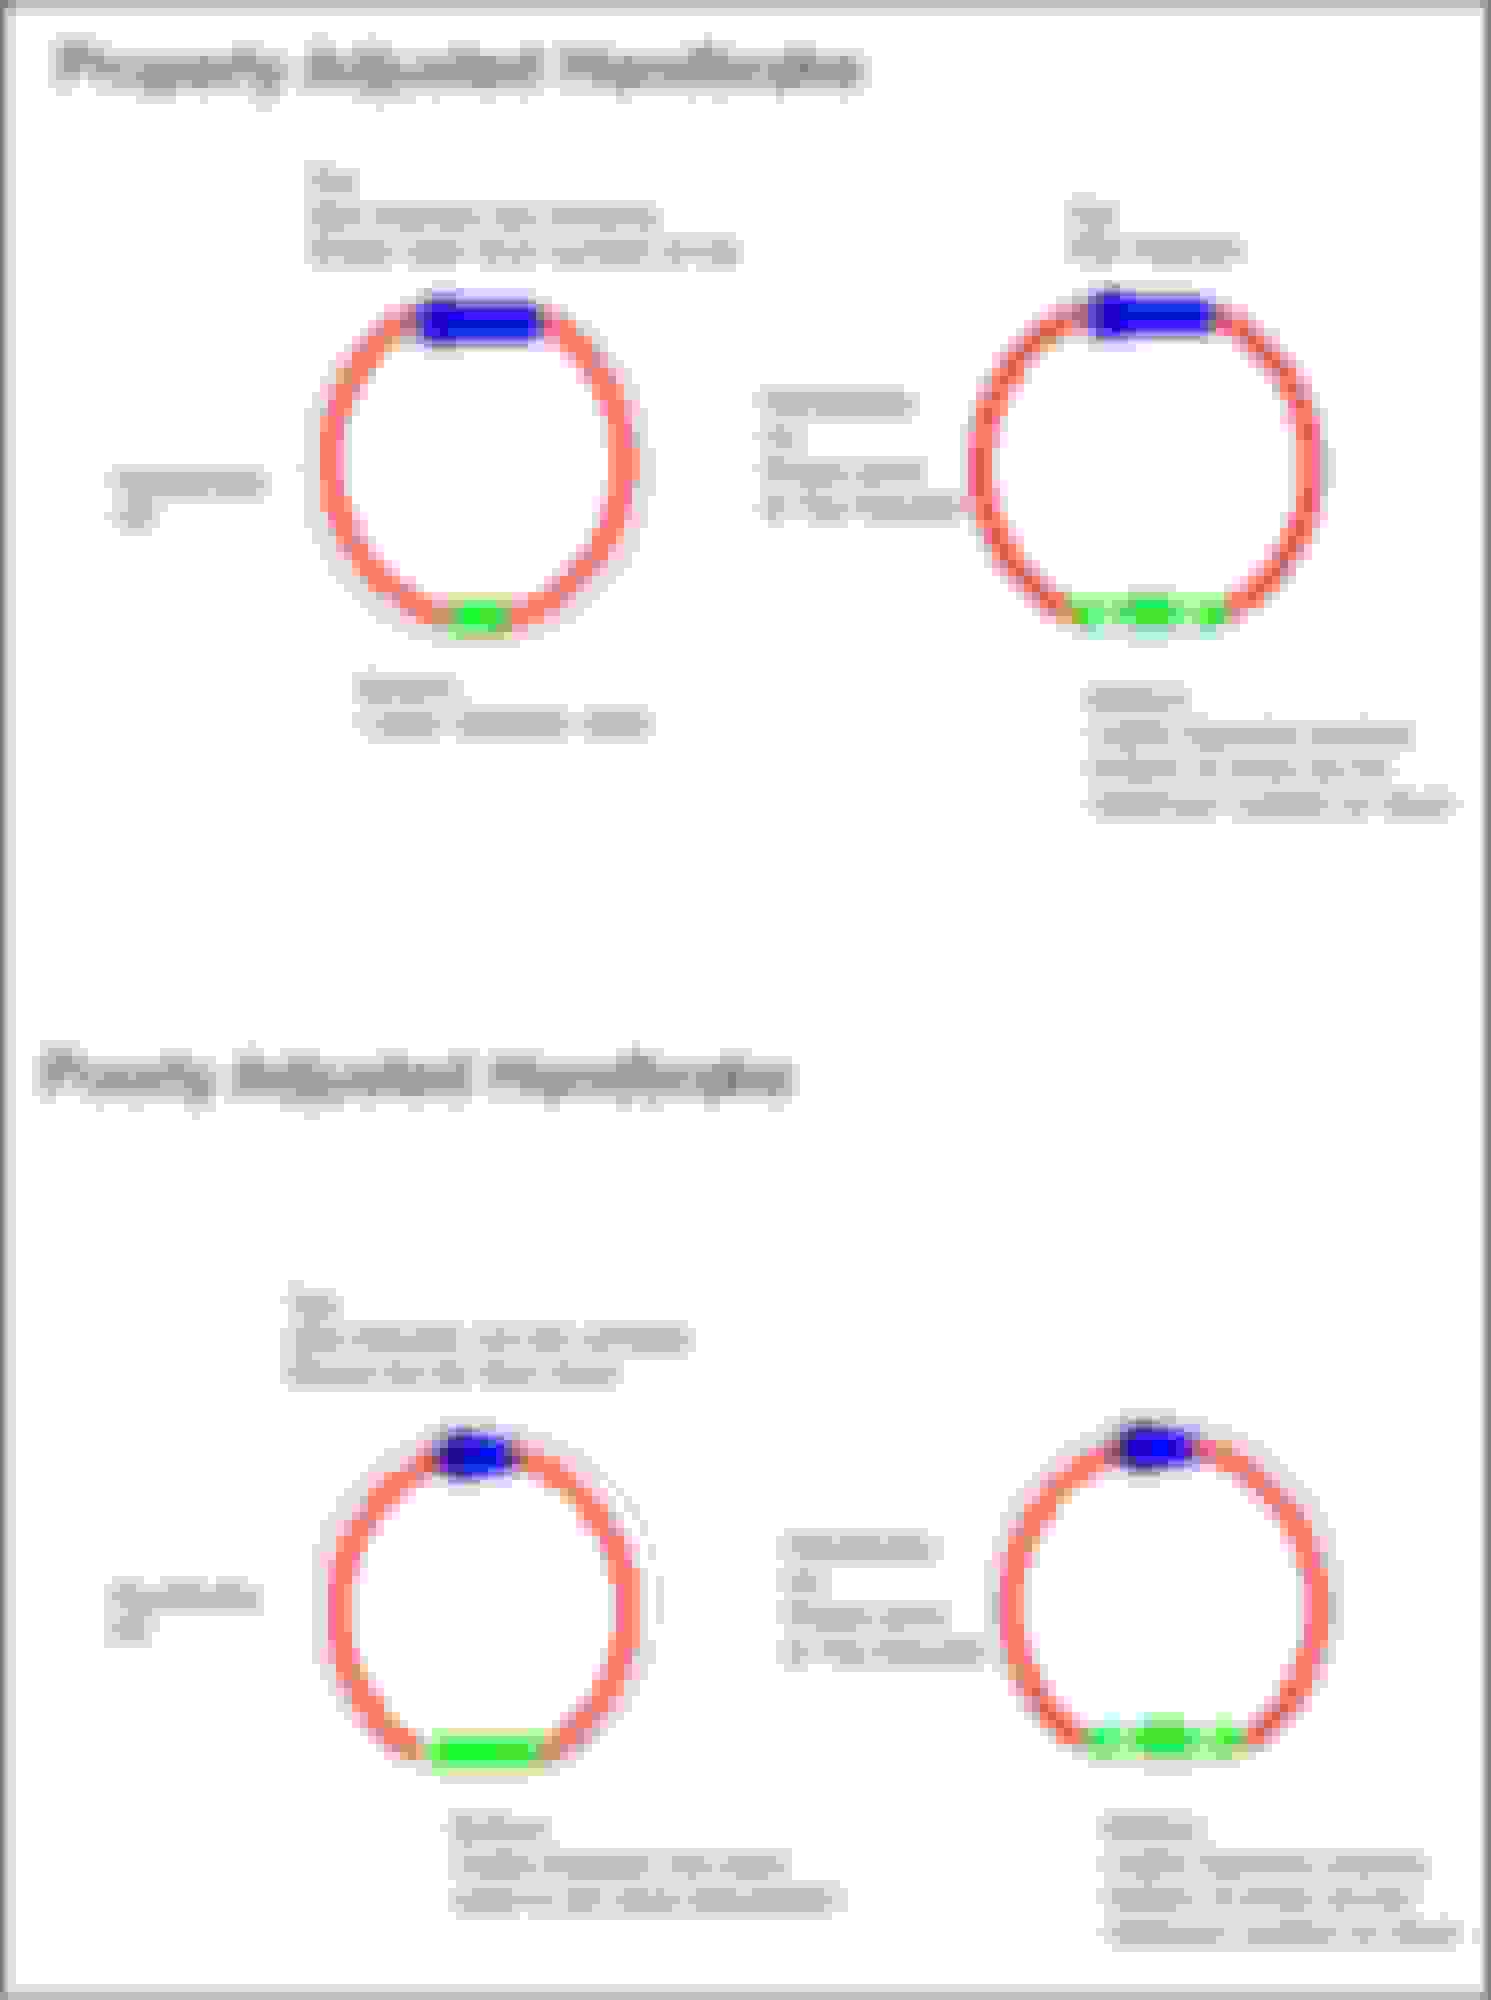
Here's a few more words of explanation of correct adjustment.
There is no "main adjuster" and other adjuster. There is a shoe adjuster (the star wheel in the drum) and a cable adjuster under the car.
To be clear, they are not the same nor do they produce the same adjustment.
The star adjuster in the drum (accessible just by removing the wheel) moves the shoes at the TOP of the drum.
The cable that operates the handbrake moves the shoes at the BOTTOM of the drum. Therefore adjusting only the cable adjuster under the car moves only the BOTTOM of the shoes and does not take adequate account of any wear in the shoes.
I hope the following diagram will illustrate the difference between the adjusters and the effect. Beyond that, as long as you understand what you are doing and the effect that it has, then take your own choice on what you do. I know what I do.
Excellent diagram, if only setting this up wasnt such a PITA The whole design is just bad.
One thing I would add here(since we're getting into so much detail) is that the thickness of pads is probably ~3mm and the star adjuster is partially covered and secured by top spring that hold the pads together. Because of this adjustment can only be done in 'clicks' where the spring falls into the star adjuster next grove. If the pads lets say wear by a 1mm, you would think that adjusting each wheel is the way to go but that is often not the case because moving the star adjuster one click might be too much. Although the wheel might turn ok when stationary the pads might catch the brake disc while driving and going over bumps as the whole thing is moving inside the brake disc(its only holding on a little pin, spring and a rusty hole in the backing plate). Also because of the whole crappy design adjusting one wheel 'correctly' will often cause the other wheel to lock in drive(and cable adjuster tightened because of the one 'click' adjustment steps that will happily lock the opposite wheel) and you basically have to move from one wheel to another until both wheels actually move freely in drive. Ask me how I know all this
That's the main reason I'm against going anywhere close to these little buggers unless necessary as finding the right balance between all these factors when adjusting parking brake is a real PITA and can take hours, especially on cars where most parking brake components are 20 years old.
To my mind if adjusting one drum with the internal adjuster causes the opposite side to lock up then that would indicate to me that the cable adjuster is too tight?
For what it is worth, the design of the handbrake mechanism was almost universally applied, and is the same as BMW, Porsche, Mercedes of the day.
As far as bleeding the brakes is concerned, I would recommend a pressure bleeder, at low pressure. Take your time, don�t let the reservoir run dry, and don�t touch the pedal. Right hand side rear first, then left hand rear, right front, left front. The pedals on these cars are inherently soft, so be sure to familiarise yourself before you start to bleed. The pedal won�t be rock hard, even after a successful bleed, but there should be no shortcoming in the braking effect or you will need to start again.
Thanks for the responses guys. And just to clarify the above, when you say "Right hand side" do you mean when sitting in the car, so that on my RHD that would be drivers side? Thanks again.
Perfect. That's clarified it for me. I recalled reading something to the effect that you start with the furthest wheel and work around on that basis, as in next furthest, next furthest etc. But I knew for sure you guys would confirm or otherwise.

 12-17-2017, 03:29 PM