When you click on links to various merchants on this site and make a purchase, this can result in this site earning a commission. Affiliate programs and affiliations include, but are not limited to, the eBay Partner Network.
And maybe this weekend I will contemplate the complexity of a rear shock damper change, then just go on a bike ride instead of wrestling with spring compressors.
uhmm....CafeFlyer, my memory not nearly what it used to be....but I don't think you need spring compressors for a rear damper change...
We did the rear damper change on the 1995 XJ6 about a month ago, and we definitely needed them - damper is inside the springs, and getting the spring/collar assembly on and off the car was not possible without it. The rear wishbone's arc of movement was limited by the triangular piece of metal that holds the rear suspension assembly together, and we did not want to remove that (being new to the whole process).
If the collective wisdom of the thread says "remove that triangular plate and let the spring push the rear wishbone until it is done", then I will happily try that!
Spring compressors frighten me, just watching all that potential energy coiled up...
The attached Coolant summary I recently completed may either assist or confuse you -
John Herbert
(1996 XJR )
John-
I did read through that PDF in my research - very helpful!
My lingering question is, does using OAT or HOAT coolant (designed for more modern engines) degrade certain specific older parts at a much faster rate than the simple old green stuff? I seem to have read that on a few posts, and the general conclusion was "stick with the old stuff and just replace it more frequently"
We did the rear damper change on the 1995 XJ6 about a month ago, and we definitely needed them - damper is inside the springs, and getting the spring/collar assembly on and off the car was not possible without it. The rear wishbone's arc of movement was limited by the triangular piece of metal that holds the rear suspension assembly together, and we did not want to remove that (being new to the whole process).
If the collective wisdom of the thread says "remove that triangular plate and let the spring push the rear wishbone until it is done", then I will happily try that!
Spring compressors frighten me, just watching all that potential energy coiled up...
(thanks!)
you didn�t do it right then. pry the plate, force a block of wood in between it. unbolt the shock, then the spring mount and beat spring with a hammer till it comes loose. remove caliper with bracket and set aside. rotate half shaft until you have max downward travel. if you need more travel stand on the hub or a scissor jack
you didn�t do it right then. pry the plate, force a block of wood in between it. unbolt the shock and spring mount and beat it with a hammer till it loosens. rotate the half shaft until you have max travel. if you still need more travel you can stand on the hub or use a scissor jack
That is a much more concise description than in the Service Manual - thank you sir!
When I first test drove the 1996 VPD about six weeks ago, I noticed the throttle was a bit slow to respond. We looked under the hood and lo and behold the plastic barrel where the cable comes out of the traction control unit was broken, and it was kinda held in place with what looked like white medical tape.
When the car got home, we used JB Weld to fix the break right at the base and that seemed to work. Last week I finally got around to playing around with the limp-ish throttle and did the usual "read everything I could find" to get some idea of the proper way to tighten the cable without sending the car into the Idle Hands of the Devil. Horror stories of TPS replacements, mandatory dealer visits, errant vacuum hoses, etc etc held me at bay till I read this post, a more readable version of what a TSB tells you do do. Was kinda cool to see the potentiometer from the Traction Control Unit up close, just by removing two bolts with the car not up on a ramp.
In the process of doing that, I realized that my JB weld was a bit wiggly where the cable comes out of the Traction Control Unit, so I set about thinking about ways to stop the wiggle. The pictures below show the amateur fabrication using metal from an old file drawer and some high temp paint. A bit of JB Weld keeps it tight against the flat side of the Traction Control Unit, and two zip ties on the output side and two on the input side reduce the wiggle to pretty much nothing. And you can still do the cable tightening service after the fact; the bracket does not get in the way of that.
Anyway, was a nice project to wrap up in about two hours over the course of the day, and could be a useful idea for others with that inevitably glued, cracked, or about-to-break plastic guide for the second half of the throttle cable. Maybe someone can 3D print one.... in the meantime, pics below.
{I'll have a helper this weekend to help me check that the kick-down switch engages at the right moment and that a full accelerator pedal compression does just what it needs to and no more}
Note the JB weld at the base of the plastic barrel; hitting the gas pedal would make it wiggle
Figured a small metal bracket that had some depth and a bit of a flange (can't see the flange on the outside of the bracket, but its about 5mm deep) could eliminate the wiggle
Spray painted black, with zip ties on the outer ends, and also near the TCU (note holes drilled in metal for zip ties near the TCU)
buttoned up and JB Welded against TCU (no glue on either barrel in case I need to rip this thing off, but the metal does a nice job of supporting each plastic barrel... the white barrel I noticed had been glued before!)
Hey Cafe Flyer,
Would you mind reposting that coolant info, and any followups, in a new thread? I was baffled by the coolant situation after reading through old discussions, and it would be nice to have your summary in an easy-to-find place.
Meanwhile, here's what I have been up to of late. Cleaning up after POMIL (Previous owner, my late mother-in-law) and her 25 years of smoking continues; I'm putting in about an hour a day just scrubbing and vacuuming. I installed the replacement leaper that I had bought for her in 2013 (!); she was afraid it would get stolen like the first one so it has been resting in the glovebox ever since. The rear driver-side door latch mechanism is on my workbench, in the hopes I can fix the electric lock actuator rather than buy a whole new latch set. And finally I have started deupholstering the headliner and associated bits, including removing the fabric from the sun visors.
-Thos/MA
For ThosMa, a more in-depth write up of what I found, and my conclusions, on what to put into my 1995 and 1996 X300s post-coolant flush:
When your X300 was born, it was likely filled with a green coolant called Jaguar D985 (IAT). Sometime in 1997, VINs 803242 onward, a revised yellow coolant Jaguar D542 (HOAT) was used. A Jaguar technical service bulletin from August of 1997 stated that if VINs in the range 720001-803241 require repairs that involve a major loss of coolant, then you should drain the system and refill with D542, and put a label stating as such on the reservoir.
So… what gives with the change, and where are we today? Read on...
[Excerpt from [url=https://www.jaguarforums.com/forum/xj-xj8-xjr-x308-27/what-coolant-type-use-177031/]link from 2017, underlining and bold type done by me]
IAT is the old green stuff, containing silicates which are the anti-oxidant compounds that keep your cooling system from rusting. Works great, no issues, but the silicates are depleted in about 2 years, possibly 3, so the recommendation is to change coolant every 2 years.
OAT uses organic acids to prolong the anti-oxidant ability of the coolant. These form a molecular layer on contacted metal which is how they inhibit corrosion, and it takes about 5000 miles for this reaction to fully occur. Silicates in IAT coolant react immediately but are rapidly consumed (a buffered pH solution, back to high school chemistry). OAT coolants are supposed to last 5 years. The major neg of this is one of the chemicals, 2-EHA that acts as a plasticizer and weakens certain plastic cooling system components. It also is prone to rust in certain engines that don't have the coolant changed often enough, mostly iron blocks and ones that expose coolant to air more than most.
HOAT coolant is a hybrid of both. Mercedes and Chrysler are the main users of this. IMO HOAT is the best of both worlds. But, it seems most vehicle manufacturers are moving to slightly different versions of OAT coolants for long life/less maintenance/make the the customer happy reasons, plus making environmentalists happier by less ethylene glycol being used/dumped/needing to be recycled.
[Another excerpt from a[url=https://www.jaguarforums.com/forum/xj-xj8-xjr-x308-27/what-coolant-type-use-177031/] different link from 2017, bold and underlining done by me]
Another issue is that OAT and HOAT coolants do not control electrolysis in cooling systems made of more than one metal (especially when one of them is brass), and they do not protect steel water pump impellers from electrolysis or cavitation erosion (which is why plastic impellers were introduced with OAT coolants in the S-Types and X350s).
New formulations of OAT and HOAT coolants continue to be developed, and some "universal" formulations are claimed to be compatible with other coolants. But since many automakers state in their technical literature that IAT should not be mixed with OAT or HOAT, and OAT and HOAT should not be mixed together, the safest route is to use the coolant specified by Jaguar for your model and VIN.
At this point, after reading the above information and the caveats for switching from IAT to OAT or HOAT, I decided to go with something that is as close to what they put in the car at the factory as possible. I am my own mechanic, so doing a coolant flush every two years vs five years was not a big deal.
Now the task was decoding the marketing language around IAT, OAT, HOAT, and “universal” coolants, and translating that into a specific brand or product I could buy with confidence. How to find the good old green stuff, and avoid the other stuff, if that was my choice?
This link from Valvoline, copyrighted 2021, was really helpful to me in decoding content vs brand names
Maybe one day I will switch to HOAT, but this being my first radiator flush ever on my first Jag ever, I thought sticking with Zerex Original or Prestone Prime Conventional Green was a safe bet. And in two years, maybe I’ll do HOAT… [or maybe by then they will throw every additive into a coolant that is all colors of the rainbow compatible in all cars with no flushing and we will know world peace]
And a final shout-out to John Herbert and his “jaguar coolants.pdf” which helps decode some global coolant brands and chemical composition vs D985 and D542 jaguar-branded coolants. Just about every thread has this statement: trust the chemical composition, not the color!
For a couple of years now I've had some contamination on the paintwork on the horizontal surfaces (Water Spots? Tree Sap?). Well Mostly the bonnet actually. I've machine polished it a couple of times previously but it only improved very slightly.
This year I decided I was going for it. So I wet sanded the whole bonnet. I used 2000 paper, followed by 3000 paper then machined polished with 3M Perfect It. (Green, then Yellow, then Blue). I'm pleased with the results. The marks are gone and the paintwork looks good.
It took 3 polishes with the 3M Green (Cutting) before the scratches left by the 3000 paper were gone. I think I should probably have gone to a 5000 paper before machine polish. But I got there.
In the first picture you can see in top left around the light reflection the stubborn contamination marks on the paint that I had, with the right side of the bonnet sanded. 2nd picture is the finished bonnet.
Nice finish on the Daimler there Brendan.
Today I replaced the Alternator and AC with Contitech belts along and a Dayco Idler pulley, There was a lot of dirt and oil residue in there so I degreased the pulley mount and adjuster before reinstalling.
It's surprising how much noise old belts and pulleys make when idling. It's almost silent now.
Last edited by Nobeel Masri; 04-05-2021 at 12:25 AM.
CRacked front exhaust manifold removes,only three hours and swearing and blood loss but I got there 😡
Also so deleted the secondary air injection system whilst I was at it 👌
ive had an annoying wobbly idle the last year or so and found the crack whilst investigating this,I also found one of the front manifold to down pipe bolts wasn�t even snuggled up properly ,this has been letting unmetered air into the exhaust before the o2 sensor as well as the cracked manifold,I suspect this caused my emissions problems at mot and ruined that o2 sensor 🤔
anyway,manifold and gasket still on the way so it will sit there all week now under it�s cover as punishment for biting me 🤣
Restoration update...!!! Today I played with my hydraulic press. Pushed in all the silentblocks, that I have at the moment. Also stub axles. Pressed out bolts from hubs, before wirebrushing, and then pressed everything back again...
Anyone have any idea how to preserve hubs to keep them shiny?
Changed the Fuel Filter and noticed my EVAP test suddenly passed. It hadn't for a few months, so that was nice.
Looked at changing the rear exhaust rubber mounts above the rear axles, but realized it was too much of a pain to get to, so will wait until I have time. The old ones are getting squeaky
Two quick questions, after 90+ minutes of forum/googling last night:
(1) For my 1995 XJ, anyone know what this hose/vacuum line's function is? see pic below:
black and white hose coming out of aft end of intake mfld
I know where it connects to after checking on the red car, but no idea what it does
(2) Are there any good ODB1 testers out there I can use with the 1995 XJ (silver car) and 1996 VDP (red car)? Nothing online gave me confidence...
And in other news...Fun failures over the last week that make me question my parenting, financial sense, and mechanical know-how:
Silver car: 18 year old son returned from long road trip to midwest with gas leak "couldnt find it, neither could mechanic!" Found it in five minutes, leaking around new fuel sending unit he installed while away... haunted by that vacuum hose he plugged, and an hour or so of reading about the weird and complex way those tanks are vented (charcoal... who knew). I cleaned up the mess, and tightened the sending unit FULLY, which he had failed to do. Hopefully that was the only cause of the leak, vs the horror stories I read about back pressure. And I at least got to peer into the gas tank and make sure it was as it should be on the inside, mechanically at least.
Red car: My high idle on the red car is back... I must have over-tightened the throttle cable, or I need to clean the throttle body, or I need to re-calibrate the TPS, or etc etc
Red car: Took the back driver side wheel off to put new Bilstein B6 shock damper on, following procedure in manual (sorry Xalty - could not bring myself to bend that plate!). Weirdly, the spring compressors didn't fit between the springs... holy cow, this spring on the red car has more coils than the silver car... WTF?? I made them fit, did my best to get clearance to get the spring/damper assembly off, but the stupid crown would not release from the body even with the coils I could compress touching each other. Walked away, ate, came back, and re-assembled with original damper, defeated. Only up side is that the rear rotor was recently replaced, and the brake pads are fairly new.
Silver car: Note from pic my poor parenting skills.. in the process of trying to change the oil, my son I think got a little angry and vigorous and broke the fuel rail cover. Sigh.
Red car: meditated on the above failures with some glycerin saddle soap and careful cleaning of back seats with small brush and a cloth. Had some Connolly Hide Feed on order, used a bit on a clean section, and wondered what "white spirits" mean to English folk when combined with Lanolin and bees wax... smelled a bit like turpentine. Left windows down.
back to the email salt mines.
Last edited by cafe flyer; 04-06-2021 at 01:40 PM.
I know where it connects to after checking on the red car, but no idea what it does
I think that is the hose that connects to a steel pipe on the inner wing. It goes from there to the Charcoal cannister for the EVAP system. Presumably to suck out vapour and feed into the manifold - but that's my guess. The EVAP system is a bit of a black art to me.
Are there any good ODB1 testers out there I can use with the 1995 XJ (silver car) and 1996 VDP (red car)?
I've connected my 1995MY car to many different OBD readers over the years - from cheapo stuff from ebay to more expensive ELM327s to high end systems. I've never had a problem connecting with any of them. I currently have a reader that cost 6 GBP that I keep in the car for emergency use. It works fine with Torque Pro on my Android phone.
I think that is the hose that connects to a steel pipe on the inner wing. It goes from there to the Charcoal cannister for the EVAP system. Presumably to suck out vapour and feed into the manifold - but that's my guess. The EVAP system is a bit of a black art to me.
I've connected my 1995MY car to many different OBD readers over the years - from cheapo stuff from ebay to more expensive ELM327s to high end systems. I've never had a problem connecting with any of them. I currently have a reader that cost 6 GBP that I keep in the car for emergency use. It works fine with Torque Pro on my Android phone.
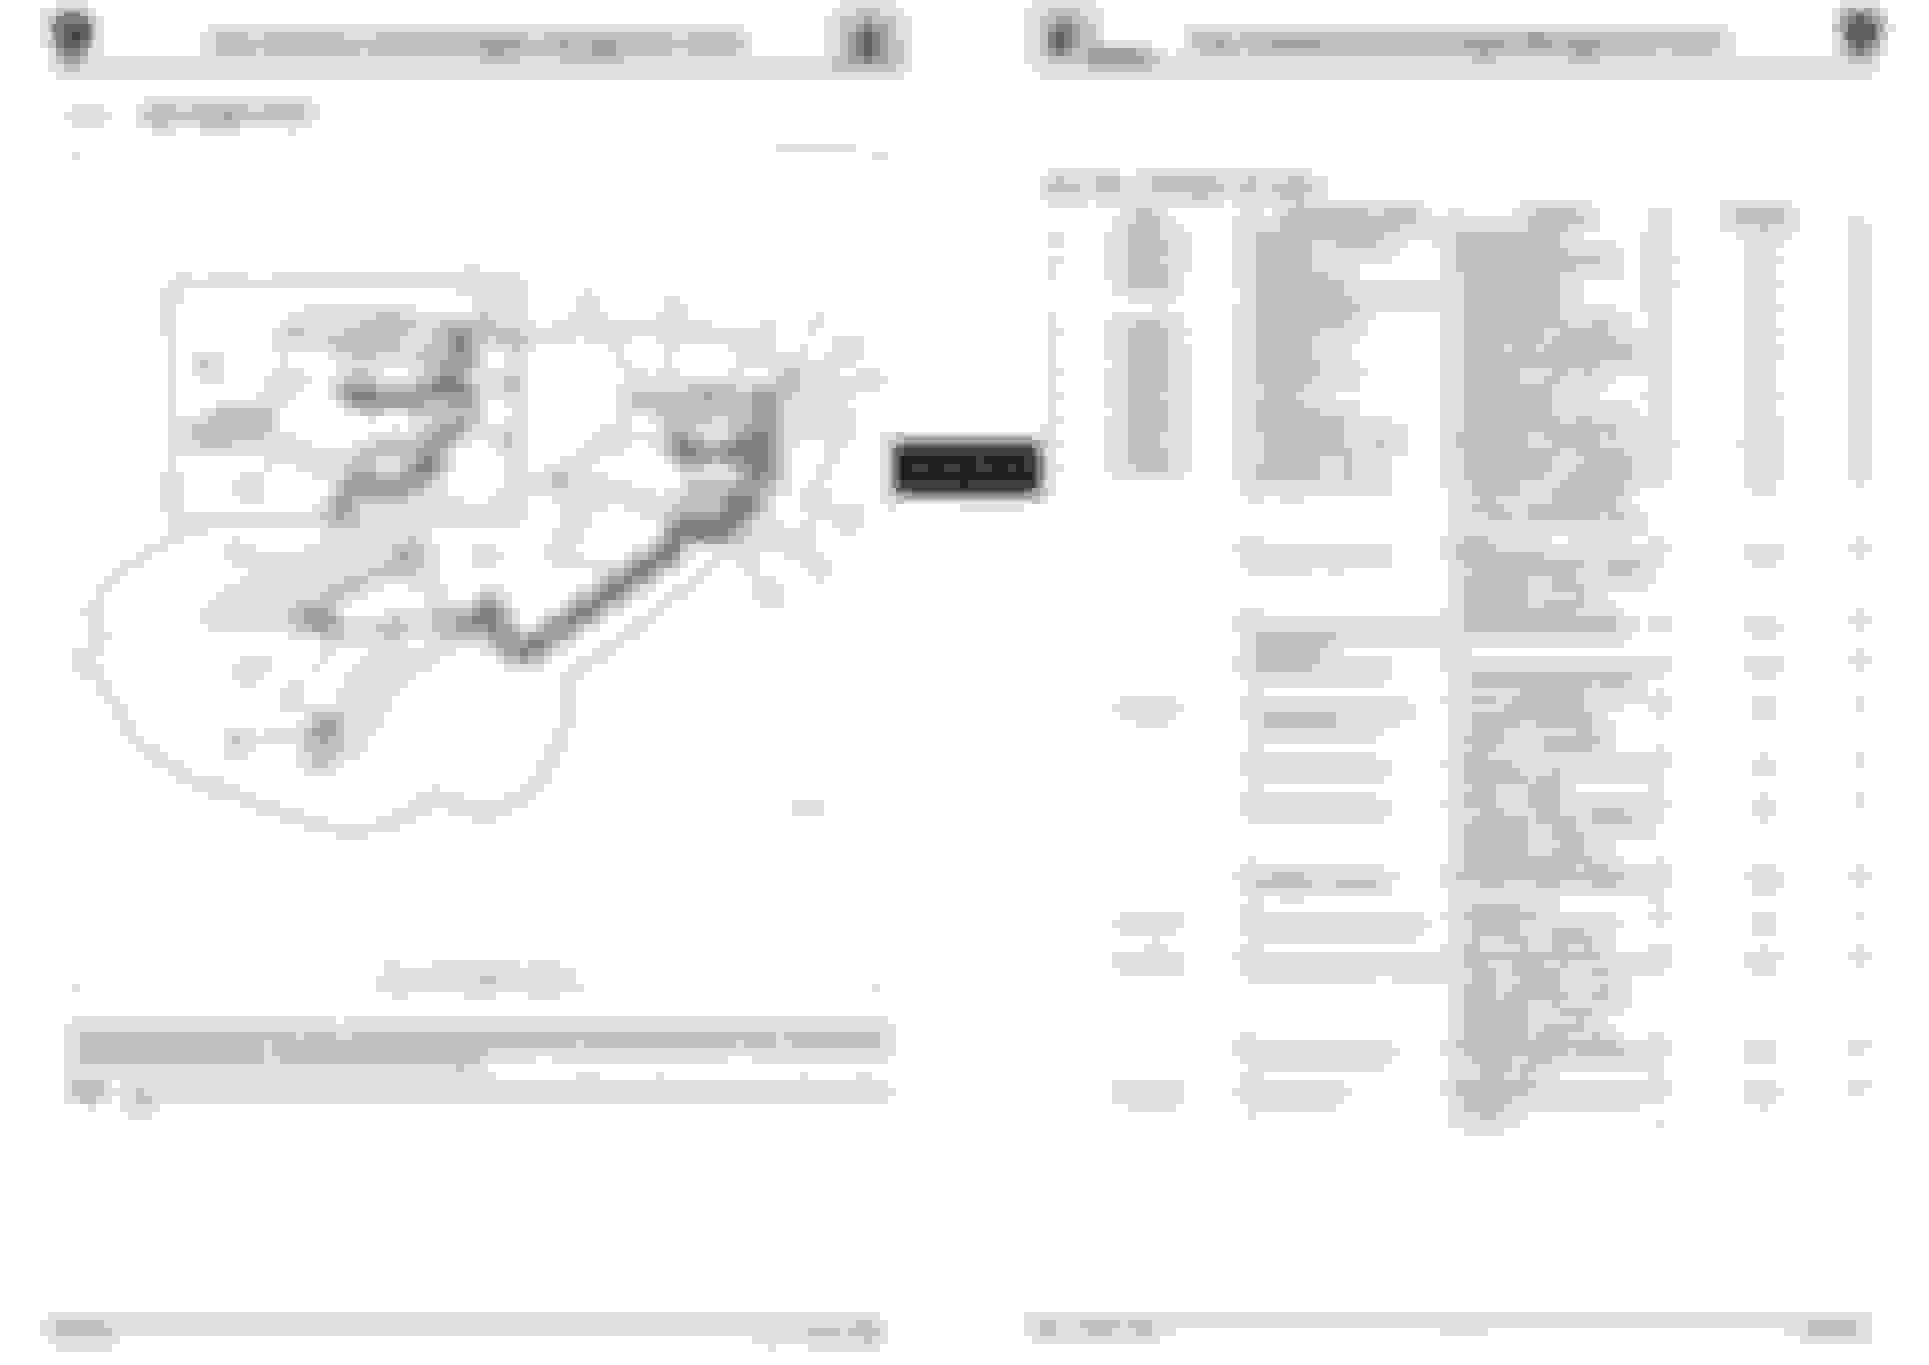
Ok - Now knowing that the errant vacuum hose was fuel-related helped me RTFM and put the pieces together with the diagram below... the hose to the intake manifold is shown as the forward-most in the diagram, but its the rear-most on the car and should go to the Rochester valve. I'll take the rear wheel off again and check its routing. Nice to have a better idea of what those four lines do... and know that on the car there is a fifth line (brake line) that comes after the first three fuel lines and then that line to the Rochester valve. And I got a visual on the charcoal canister, which is helpful. Also turns out that the red car is OBD2 (1996 VDP) and the silver car is OBD1 (1995 XJ). No codes on the red car, yay!
 03-31-2021, 07:18 AM