'01 XJR AC Compressor removal
#1
 06-21-2014, 06:23 PM


Hi All,
Looks like I will need to replace my AC compressor. Had her up on the lift and am not at all clear as to how to get the old one out. I saw another post about removing the radiator splash shield but even then, I have to get past some very large sway bar type components. Likewise, just getting to where the hoses connect to the compressor does not look like much fun, not sure if I can drop the compressor some before undoing those.
Any guidance much appreciated.
Thanks.
Mike
#2
06-21-2014, 08:03 PM

Veteran Member
As I recall, getting the hose block connector loose required several different offset wrenches, then some long socket wrench extensions got two of the three bolts. I broke the third bolt and I assure you that getting the old one drilled and putting a helicoil in is no fun! The one I broke is the long one with the middle of the bolt exposed by a cut in the boss odf the compressor. It allowed corrosion in there.
#3
06-21-2014, 11:14 PM

Veteran Member
Here is Air Conditioning Compressor R&I PDF file created from JTIS:
https://www.dropbox.com/s/b0fabzsz8n...or%20R%26I.pdf
Jim Lombardi
https://www.dropbox.com/s/b0fabzsz8n...or%20R%26I.pdf
Jim Lombardi
#4
06-22-2014, 06:34 AM
Veteran Member
Here is Air Conditioning Compressor R&I PDF file created from JTIS:
https://www.dropbox.com/s/b0fabzsz8n...or%20R%26I.pdf
Jim Lombardi
https://www.dropbox.com/s/b0fabzsz8n...or%20R%26I.pdf
Jim Lombardi
I take it that the P/S pump has to be removed to remove the A/C compressor??
Or does that come out from below??
It's not entirely clear what proceedure to use.
#5
06-22-2014, 09:05 AM
Veteran Member
#6
06-22-2014, 07:35 PM
Veteran Member
I found a diy writeup for 2005 S Type 3.0L A/C compressor - by forum member joycesjag.
It looks like the air conditioning compressor is in the same location as XJ X308 models (Lower LH -looking forward from rear of car).
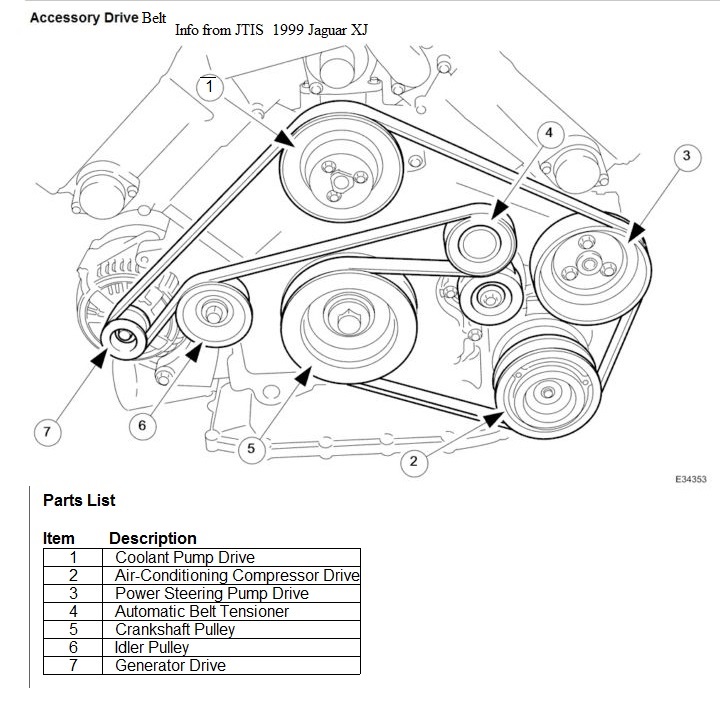
Here is a JPEC of the 1999 XJ accessory drive belt showing location of A/C compressor:
Here is the weblink to the DIY for the S Type A/C compressor - go down to post#1 in the
https://www.jaguarforums.com/forum/s...q-55212/page2/
Summary - removed radiator splash shield to gain access to compressor,
loosen serpentine belt, --- Read the DIY -loosen and remove AC Line bolt ---continue to read Diy---drop the compressor down.
Jim Lombardi
It looks like the air conditioning compressor is in the same location as XJ X308 models (Lower LH -looking forward from rear of car).
Here is a JPEC of the 1999 XJ accessory drive belt showing location of A/C compressor:
Here is the weblink to the DIY for the S Type A/C compressor - go down to post#1 in the
https://www.jaguarforums.com/forum/s...q-55212/page2/
Summary - removed radiator splash shield to gain access to compressor,
loosen serpentine belt, --- Read the DIY -loosen and remove AC Line bolt ---continue to read Diy---drop the compressor down.
Jim Lombardi
#7
06-23-2014, 06:23 AM
Veteran Member
Trending Topics
#9
06-23-2014, 08:05 AM
Veteran Member
I think that we need to start a new tread on replacing air conditioning compressor and see if we can get more detailed information from other forum members.
A forum member like sparkenzap (Ross) or motorcarman or Donb or ???.
A new thread would let us assign a Tag to it and make it easier for other forum members to find it in the future.
I found this photo of a new a/c compressor on Ebay and only adding it to this thread so we can see what it looks like and its electrical connectors:

Also I have no idea why JTIS has steps to pinch off the power steering hose.
It does not seem to have anything to do with the A/C compressor.
Jim Lombardi
A forum member like sparkenzap (Ross) or motorcarman or Donb or ???.
A new thread would let us assign a Tag to it and make it easier for other forum members to find it in the future.
I found this photo of a new a/c compressor on Ebay and only adding it to this thread so we can see what it looks like and its electrical connectors:
Also I have no idea why JTIS has steps to pinch off the power steering hose.
It does not seem to have anything to do with the A/C compressor.
Jim Lombardi
#10
06-23-2014, 09:27 PM
Thanks for all the info.
Yes, clearing the swaybar and crossmember is also what concerns me.
Removal of splash shield seems pointless on the XJ.
I can see how removing PS hose will give some room. Clamping it is probably just to avoid having to bleed the whole steering system.
I actually ordered the new compressor and drier but have not built up the motivation to tackle the job. I know it leaks thanks to uv dye by I could likely get through the season with an evac and recharge.
Keep the info coming. I'm sure others have done this or will need to.
Thx.
Mike
#11
06-24-2014, 06:02 AM
Veteran Member
Now that you mention it, I do remember draining the PS fluid, so I guess that removing the return hose gives clearance. I did not try to save the fluid, figuring after 180,000 miles it weas probabley due for a change!
Although changing the compressor did not require any specialized tools until the recharge, it sure dug deep into my hand tool drares for various offset box wrenches and long and short socket arrangements. Unfortunately, I did not make pictures, but I am sure I followed the RR procedure in the JTIS manual as I usually do for amy significant tasl. And I HOPE NOT TO DO IT AGAIN!!!
Although changing the compressor did not require any specialized tools until the recharge, it sure dug deep into my hand tool drares for various offset box wrenches and long and short socket arrangements. Unfortunately, I did not make pictures, but I am sure I followed the RR procedure in the JTIS manual as I usually do for amy significant tasl. And I HOPE NOT TO DO IT AGAIN!!!
#12
06-24-2014, 04:15 PM
The Jag manual is certainly short on details. The only good thing I can say about my spouse's Buick is that the GM manual practically provides a bolt by description, with tons of diagrams, for jobs like this.
#13
06-24-2014, 08:45 PM
Veteran Member
Yes, for sure! It took some twisting but that part was relatively painless. Note, you must remove the block that the hoses connect to the compressor with before you remove the compressor.
I did not bother to read JTIS, but I just re-read the Alldata step by step and it is not only clear (to me) but specific and correct as far as I can recall. To paraphrase-
1) Remove the belts and the clutch connector
2) Legally remove the refrigerant
3) Remove the power steering return hose (so you have room to get the compressor out)
4) Drain the PS fluid and throw it away- you otta change it anyway
5) Remove the refrigerant blocks on top of pump- (cuss, find all your 8mm box wrenches to try)
6) Remove the 4 bolts that hold the compressor using long extensions and swivel! (Careful on the one you can see through the slot in the boss- it corrodes)
7) Finagle it out
Do the reverse.
Maybe GM mechanics are just less intelligent than Jag mechanics!
If you break the bolt, do not despair! A center punch, a right angle drill and some progressively larger bits will get it out so you can put in a helicoil. That was a pain!
The following users liked this post:
jimlombardi (06-25-2014)
#14
06-25-2014, 10:52 AM


Veteran Member
#15
04-05-2015, 09:24 PM
After putting this job off because I thought it would be a major PIA, I completed the compressor replacement this evening. I have to say that it was not too bad.
Removed serpentine belt, Put her up on the lift, took off the drivers side wheel and the plastic wheel shield.
Gearwrench 8mm flex head was my best friend for fairly easy removal of the hose block connector. I was worrried about breaking one of the 4 mounting bolts but had no trouble there. I used a long extension and a 10mm socket on my (amazing) Miwuakee Fuel M18 impact wrench. I started on power level 1 just to give it some lower torque taps. That loosened two of them, the others came out on high power.
A bit of fanagling to get the compresssor out and down but not terrible. Replacement unit was a new Denso purchased from Amazon for less than the cost of an Autozone rebuilt.
Put new green o-rings on all the fittings and reversed the procedure.
I will say that having a lift makes the job much easier but it would not be impossible if you simply jacked up the vehicle.
You alway want to do a new receiver-dryer when replacing a compressor and I did that as well (again, use the green o-rings purchased seperately).
Vac down the system, make sure it is holding vacuum, recharge and enjoy the cold air.
The following users liked this post:
beady (06-15-2015)
#16
06-15-2015, 07:33 PM

Thanks for the follow-up post on this. My AC clutch just starting going berserk and making an awful screeching/grinding noise at startup, or when punching the gas. Oddly, it will still make awful sounds with the system OFF if I punch it hard, and if I then turn the AC system ON, the sound stops. Works the other way also, if AC is ON and the clutch starts screaming I can turn the system OFF and it stops. Can�t quite wrap my head around what is happening when the system is off, but I need to replace the clutch at least, and it looks like a new unit is probably the way to go.
What did you do about oil? Did the new Amazon unit come with the correct type and amount of oil already in it?
Thanks,
Mike
What did you do about oil? Did the new Amazon unit come with the correct type and amount of oil already in it?
Thanks,
Mike
After putting this job off because I thought it would be a major PIA, I completed the compressor replacement this evening. I have to say that it was not too bad.
Removed serpentine belt, Put her up on the lift, took off the drivers side wheel and the plastic wheel shield.
Gearwrench 8mm flex head was my best friend for fairly easy removal of the hose block connector. I was worrried about breaking one of the 4 mounting bolts but had no trouble there. I used a long extension and a 10mm socket on my (amazing) Miwuakee Fuel M18 impact wrench. I started on power level 1 just to give it some lower torque taps. That loosened two of them, the others came out on high power.
A bit of fanagling to get the compresssor out and down but not terrible. Replacement unit was a new Denso purchased from Amazon for less than the cost of an Autozone rebuilt.
Put new green o-rings on all the fittings and reversed the procedure.
I will say that having a lift makes the job much easier but it would not be impossible if you simply jacked up the vehicle.
You alway want to do a new receiver-dryer when replacing a compressor and I did that as well (again, use the green o-rings purchased seperately).
Vac down the system, make sure it is holding vacuum, recharge and enjoy the cold air.
Removed serpentine belt, Put her up on the lift, took off the drivers side wheel and the plastic wheel shield.
Gearwrench 8mm flex head was my best friend for fairly easy removal of the hose block connector. I was worrried about breaking one of the 4 mounting bolts but had no trouble there. I used a long extension and a 10mm socket on my (amazing) Miwuakee Fuel M18 impact wrench. I started on power level 1 just to give it some lower torque taps. That loosened two of them, the others came out on high power.
A bit of fanagling to get the compresssor out and down but not terrible. Replacement unit was a new Denso purchased from Amazon for less than the cost of an Autozone rebuilt.
Put new green o-rings on all the fittings and reversed the procedure.
I will say that having a lift makes the job much easier but it would not be impossible if you simply jacked up the vehicle.
You alway want to do a new receiver-dryer when replacing a compressor and I did that as well (again, use the green o-rings purchased seperately).
Vac down the system, make sure it is holding vacuum, recharge and enjoy the cold air.
#17
06-16-2015, 08:25 AM
Thanks for the follow-up post on this. My AC clutch just starting going berserk and making an awful screeching/grinding noise at startup, or when punching the gas. Oddly, it will still make awful sounds with the system OFF if I punch it hard, and if I then turn the AC system ON, the sound stops. Works the other way also, if AC is ON and the clutch starts screaming I can turn the system OFF and it stops. Can�t quite wrap my head around what is happening when the system is off, but I need to replace the clutch at least, and it looks like a new unit is probably the way to go.
What did you do about oil? Did the new Amazon unit come with the correct type and amount of oil already in it?
Thanks,
Mike
What did you do about oil? Did the new Amazon unit come with the correct type and amount of oil already in it?
Thanks,
Mike
Yes, it comes with oil. They recommend measuring oil from old compressor and then doing same with new. In my case they were the same. If you are also replacing the receiver / drier (you should do so) then maybe add an extra 1/2 oz although you are likely close enough without doing so. I do not recall if the drier came with new o-rings but you can pick up a set of green viton o-rings on Amazon or any auto parts store.
Been very hot here lately so definitely glad I took care of this when I did.
#18
09-20-2021, 01:05 PM
Hey everybody, I came across this post while looking for information on how to get the compressor out of my 01 XJ8. I have just completed my repairs and am in the process of posting a write up on it complete with a pictorial guide. I have the first two parts up and will soon be posting the third part. The second part details how I removed the compressor. The web link is below. I know this post is old now but perhaps you might find my guide helpful.
https://www.jaguarforums.com/forum/x...1/#post2443688
https://www.jaguarforums.com/forum/x...1/#post2443688
The following users liked this post:
neurojag (09-20-2021)

Thread
Thread Starter
Forum
Replies
Last Post
Currently Active Users Viewing This Thread: 2 (0 members and 2 guests)