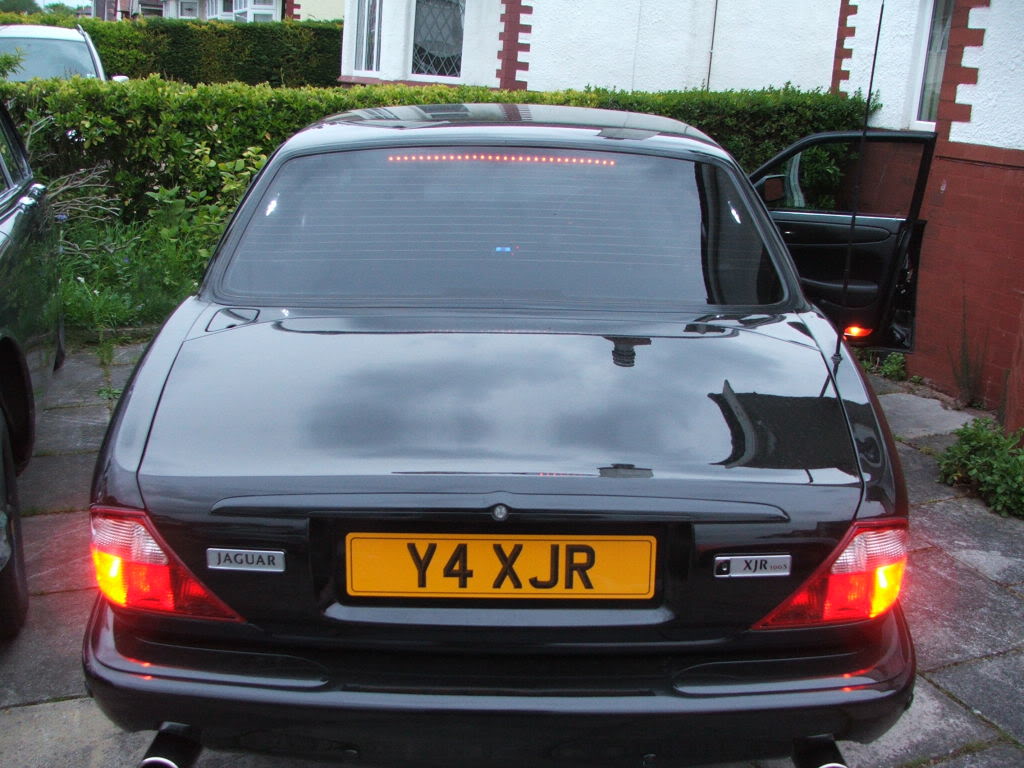
3rd Brake Light has come off.
#1
 07-02-2012, 07:29 PM

I read all the threads we have on the subject,
and the links in those old threads are dead now.
I drove across a bumpy intersection today, and the
bloody thing came crashing off the window. The
right peg (which glues to the window) is still intact,
but the passenger (RH) side of it is missing its peg
now, and the red lens part is pushed deep into
the housing.
This is still plugged into the car and sitting on the parcel
shelf.
Seeing as how I was planning on going to see an
XJR this week, the timing for this is very annoying.
What do I do now? I assume the rear seats all have to
come out, along with the parcel shelf, to get to the
connector, and then it must be replaced. Is there
a w ay to repair the thing?
#2
07-02-2012, 08:11 PM
Senior Member
it's glued to the window with rear view mirror type glue. you might be able to glue it back together well enough that they won't notice and they'll never catch you once you have an XJR.
as far as taking out the back seat etc to get the parcel shelf out I have done that and would recommend you avoid doing that unless you must. maybe you can get a junkyard 3rd brakelight assembly and cut/splice the wires and then electrical tape them and that would be ok
as far as taking out the back seat etc to get the parcel shelf out I have done that and would recommend you avoid doing that unless you must. maybe you can get a junkyard 3rd brakelight assembly and cut/splice the wires and then electrical tape them and that would be ok
#3
07-03-2012, 05:00 AM

Veteran Member
Hi
Not sure why you are saying "all of the links in the old threads are dead now".
Here is motorcarman PDF (Jaguar Factory Repair Procedure) contribution in an earlier thread:
https://www.jaguarforums.com/forum/a...17-03-hmsl-pdf
Here is the weblink to the "Rear Window Brake Light FAQ (there are Tips and Ideas in the tread that will help you fix this issue):
https://www.jaguarforums.com/forum/x...ght-faq-58344/
Look at post 6 - Has JTIS21 extracted PDF on "High Mount Brake Light R&R":
https://www.jaguarforums.com/forum/a...-light-r-i-pdf
Jim Lombardi
#4
07-05-2012, 09:45 AM
I have had to replace one of the 5 bulbs last week-end and I discovered my 3rd brake light was lose as well, just sitting above the rear curtains drums. It probably fell a long time ago and the previous owner just put it back into position and forgot to tell me.
I fixed it with rear view mirror glue (10 euro at autostore). There is an electrical connector inside the brake light housing itslef (excellent links from Jim above) so no need to mess up with removing rear seats or parcel shelf. Just open the brake light housing by removing the tan/ivory cover (be super gentle, I broke a tang so I was good to order a new module of fleebay for 15pounds) and disconnect the cable. Then you just have to clean the lose glass clip (should still be attached to the brake lamp module) and the bonding area on the rear glass and glue it back in place.
I fixed it with rear view mirror glue (10 euro at autostore). There is an electrical connector inside the brake light housing itslef (excellent links from Jim above) so no need to mess up with removing rear seats or parcel shelf. Just open the brake light housing by removing the tan/ivory cover (be super gentle, I broke a tang so I was good to order a new module of fleebay for 15pounds) and disconnect the cable. Then you just have to clean the lose glass clip (should still be attached to the brake lamp module) and the bonding area on the rear glass and glue it back in place.
#5
07-05-2012, 02:03 PM
Veteran Member


The following 3 users liked this post by Sean B:
#7
07-05-2012, 05:06 PM
Veteran Member
Join Date: Nov 2006
Location: Glasgow, Scotland UK
Posts: 47,302
Received 9,010 Likes
on
4,113 Posts

The following users liked this post:
ppc134h7k (04-07-2016)
Trending Topics
#8
07-05-2012, 05:06 PM
I have never liked the Bentley's brake light... reminds me of the LED
strips 99% of all Magnaflow-fitted F150s have tucked beneath their
tailgate.
I have taken off the cover with the 2 tangs, but mine has no connector
as shown in the R&I manual. The wires are soldered right onto the back of the light, no connector is there.
Looks like I have to do this all in-car. The fixture broke before,
but I super-glued it on the spot. It stayed in the window.
The left hand peg has come out. It fell under the parcel shelf.
I may be able to fashion a pencil eraser ( a grey one) to fit this
job.
#9
07-05-2012, 07:39 PM
Well, here is my prgress thus far. I have glued on the left side plastic trim,
and replaced the lost window peg with a grey eraser, which was timmed
to size, and super-glued in.
Now, after this cures, I will use Adhesive/initiator on the back glass,
hopefully securing it permanently.
and replaced the lost window peg with a grey eraser, which was timmed
to size, and super-glued in.
Now, after this cures, I will use Adhesive/initiator on the back glass,
hopefully securing it permanently.
#10
07-10-2012, 03:28 AM
Veteran Member
That back shelf area has got to be the most awkward place in the world to work. No room to move, can't kneel, and the headrests get in the way. Oh, and there is no air circulation unless you open all the doors. Makes you wonder how anyone could ever apply tint back there.
Last edited by plums; 07-10-2012 at 03:31 AM.
#12
10-12-2012, 02:05 PM
A plastic scraper, or a swab with alcohol/ acetone may
be good. I used a gel on my XJR's repair, it just assimilated
with the old glue. It never gets rigid enough to matter.
It is holding up fine, "Loctite Super Glue Ultra Gel Control"
the rearview mirror/ windshield glue = useless. I taped
it to the black let it cure 24h, and it just wouldn't take after a day it
was toast.
The fittings (bosses) are metal, so you can use a razor blade
as a scraper to remove the old glue. Or give them an acetone bath
in your kitchen.
Ian
The following users liked this post:
Richy_Jsy (10-13-2012)
#14
10-12-2012, 03:00 PM
Veteran Member
The following users liked this post:
Richy_Jsy (10-13-2012)
#15
10-13-2012, 06:00 AM
#16
10-14-2012, 07:59 AM
Update.
Cleaned the fittings and glass as well as I could, not completely but an improvement on before, applied loctite as recommended by Ian, and pressed the whole fitting back onto window. Seems to be holding ok. Quite a quick easy fix. Will let you all know if it comes off again, but.......fingers crossed !!
Cleaned the fittings and glass as well as I could, not completely but an improvement on before, applied loctite as recommended by Ian, and pressed the whole fitting back onto window. Seems to be holding ok. Quite a quick easy fix. Will let you all know if it comes off again, but.......fingers crossed !!
The following users liked this post:
Ipc838 (10-14-2012)
#17
10-14-2012, 12:51 PM
One tip, if you use some slow-curing glue, you have to have
the silver bosses taped on for the period recommended.
That gel loctite stuff only needs 15s or so. Did you glue on the
bosses, and then slide the fixture into place? Or, did you glue
the bosses, and the whole fixture went on at the same time?
the silver bosses taped on for the period recommended.
That gel loctite stuff only needs 15s or so. Did you glue on the
bosses, and then slide the fixture into place? Or, did you glue
the bosses, and the whole fixture went on at the same time?
The following users liked this post:
migrosmarket (10-15-2012)
#18
10-15-2012, 06:44 AM
Hi Ian. The bosses were both still in place in the entire fitting, so glued the boss faces and pressed into place on the window. Held it there for half a minute or so and let go. It stayed attached and has continued to. As the guy who fell off a skyscraper said as he passed each floor going down, "So far - so good"
The following users liked this post:
migrosmarket (10-15-2012)
#19
10-15-2012, 07:30 AM

Member
Thanks for all this info...I have the same problem with the whole light fitting lying on the shelf. Had the car less than a month and this is the simplest job I expect and the one job I have not got round to.
I have a couple of rear view mirror pads to try first, then will go and get high on some glue... and try sticking the light as well.
I have a couple of rear view mirror pads to try first, then will go and get high on some glue... and try sticking the light as well.
#20
10-19-2012, 06:53 AM
Member
Just tried the rear view mirror fixing pads. Didn't work. The hi level brake light unit is just too heavy for them. For the moment, I have a folded scarf jammed under the unit supporting it, whilst the fixing pads stop it moving sideways as they still have a bit of sticky to them.
The scarf matches the bodywork, looks rather nice in that position and so unless sharp cornering moves it, this will be my solution!
The scarf was never used as such anyway...
The scarf matches the bodywork, looks rather nice in that position and so unless sharp cornering moves it, this will be my solution!
The scarf was never used as such anyway...