
'99 XJR - Bad fuel pump work-around?
#1
 01-04-2010, 12:01 PM


Hi - first post here.
My '99 XJR is dead in the water. Following info found in this forum, I chased down a fuel pump problem. Pump #1 shows an open circuit when its power lead is tested from the trunk fuse box.
So it is time to pull that pump out. Unfortunately, the car is stuck in an awkward place. I'd like to be able to move it a bit (without getting a tow truck involved!).
My question is this: if Pump #2 (the "high-speed" fuel pump) is good, could it be used to make a work-around for the failed pump?
That is, what if Pump #2 were patched in to Pump #1's circuit. Would that bring the car to life (so I could at least move it into the garage)?
Here is what I propose:
Circuit diagram (existing):
+12 => Relay 4 ====o Fuse #7 o========> to Pump #1
+12 => Relay 1 ====o Fuse #15 o========> to Pump #2
Proposed patch:
(A) Pull both fuses.
(B) Connect one end of jumper to left of Fuse #7 socket.
(C) Connect other end of jumper to right of Fuse #15 socket.
In theory, this should make Pump #2 fire up when the ECM tells Pump #1 to start.
What do you think -- asking for trouble, or a reasonable work-around?
#2
01-04-2010, 12:27 PM

Veteran Member
#3
01-04-2010, 02:01 PM
You don't need to do any kind of wiring hack. The supercharged cars will automatically run pump #2 continuously if the relay for pump #1 is missing.
Just remove the relay for pump #1 and start. It may take a couple of cranks for the ecu to make the switch, but the car will run with only relay #2 inserted (assuming relay #2 and pump #2 operate correctly). You'll get the usual "performance restricted" message, but the car will be driveable.
The effect is intentionally creating an OBD error P1230 -- "Fuel pump relay malfuction: SC – When fault is detected, ECM – Operates fuel pump 2"
TTYL
David
Last edited by DavidB; 01-04-2010 at 02:16 PM.
The following users liked this post:
Jag&Furious (04-07-2019)
#4
01-04-2010, 02:57 PM
Thanks for the suggestion, DavidB.
I tried pulling the relay for pump #1. Cranked but still no fire.
This did show "Restricted performance", and my OBD scanner reported a P1230.
But no go. So maybe both pumps are out. Though pump #2 shows about an ohm of coil resistance, so it seems like the wiring harness is intact. Hmmm.
I tried pulling the relay for pump #1. Cranked but still no fire.
This did show "Restricted performance", and my OBD scanner reported a P1230.
But no go. So maybe both pumps are out. Though pump #2 shows about an ohm of coil resistance, so it seems like the wiring harness is intact. Hmmm.
#5
01-05-2010, 12:06 PM
Senior Member
Thanks for the suggestion, DavidB.
I tried pulling the relay for pump #1. Cranked but still no fire.
This did show "Restricted performance", and my OBD scanner reported a P1230.
But no go. So maybe both pumps are out. Though pump #2 shows about an ohm of coil resistance, so it seems like the wiring harness is intact. Hmmm.
I tried pulling the relay for pump #1. Cranked but still no fire.
This did show "Restricted performance", and my OBD scanner reported a P1230.
But no go. So maybe both pumps are out. Though pump #2 shows about an ohm of coil resistance, so it seems like the wiring harness is intact. Hmmm.
On the Up Side though. My car never had as much get up and go as it did after the two pump switch out. I figure it was always starving for fuel during pedal to the floor. Made a nice improvement on performance. (Not Mileage
PS: Be sure to read the posts carefully to prevent damaging the outlet tubes on the bottom of the tank when removing it. I screwed up and pulled the tank while hoses were connected and pulled one of the metal tubes out. I was aware of this risk when I started, but I had help from my Hercules Son in Law and he pulled before I could say anything. Fortunately, after bending it back into place (A Major Pain in the Butt! No Room for Hands) I was able to plug it back in, and have never had a leak. I lucked out! I think I would do it again with Hoses connected, but I would be the one to pull next time. Removing hoses is almost impossible without dropping the Differential. You may have better luck with that.
Also, I used the Fuel Pumps from AutoZone. $99.00 ea and in stock. Major savings over Jaguar Parts. I think they are a match to some Ford Pumps is why. I just hope they last a decent amount of time. So far, so good.
Last edited by SuperSport; 01-05-2010 at 12:10 PM.
#6
01-05-2010, 04:46 PM
#7
01-05-2010, 04:49 PM
Senior Member
Sorry the workaround didn't work for you guys. I drove my car for an entire week on pump #2 because I wanted to wait until the weekend to tackle the fuel pump replacement job.
Maybe that feature didn't show up until model year 2000? It looks like both of you have 1999's?
TTYL
David
Maybe that feature didn't show up until model year 2000? It looks like both of you have 1999's?
TTYL
David
Trending Topics
#8
01-05-2010, 09:01 PM

Thanks for the suggestion, DavidB.
I tried pulling the relay for pump #1. Cranked but still no fire.
This did show "Restricted performance", and my OBD scanner reported a P1230.
But no go. So maybe both pumps are out. Though pump #2 shows about an ohm of coil resistance, so it seems like the wiring harness is intact. Hmmm.
I tried pulling the relay for pump #1. Cranked but still no fire.
This did show "Restricted performance", and my OBD scanner reported a P1230.
But no go. So maybe both pumps are out. Though pump #2 shows about an ohm of coil resistance, so it seems like the wiring harness is intact. Hmmm.
#9
01-08-2010, 08:01 PM
Before diving in to the dis-assembly job, I did one last electrical test. Now it seems that pump #2 is also bad.
(Details: I dragged out a 15 volt/15 amp adjustable power supply, and plugged it into the relay socket pin that drives pump #2. Set the supply for zero volts, set the current limit to 10 amps, and slowly ramped up the voltage. Got a brief bobble around 4-5 volts, but when that cleared there was no more funny business. No noise from the pump and no current drawn even at a full 12 volts. So the pump is not responding at all.)
It smells to me like the wiring harness could be toast -- that might explain the funny resistance readings. I'll post an update after getting the tank apart.
#10
01-09-2010, 01:13 AM
Senior Member
The following users liked this post:
richard hurford (12-10-2011)
#11
01-09-2010, 08:21 PM
Before diving in to the dis-assembly job, I did one last electrical test. Now it seems that pump #2 is also bad.
(Details: I dragged out a 15 volt/15 amp adjustable power supply, and plugged it into the relay socket pin that drives pump #2. Set the supply for zero volts, set the current limit to 10 amps, and slowly ramped up the voltage. Got a brief bobble around 4-5 volts, but when that cleared there was no more funny business. No noise from the pump and no current drawn even at a full 12 volts. So the pump is not responding at all.)
It smells to me like the wiring harness could be toast -- that might explain the funny resistance readings. I'll post an update after getting the tank apart.
(Details: I dragged out a 15 volt/15 amp adjustable power supply, and plugged it into the relay socket pin that drives pump #2. Set the supply for zero volts, set the current limit to 10 amps, and slowly ramped up the voltage. Got a brief bobble around 4-5 volts, but when that cleared there was no more funny business. No noise from the pump and no current drawn even at a full 12 volts. So the pump is not responding at all.)
It smells to me like the wiring harness could be toast -- that might explain the funny resistance readings. I'll post an update after getting the tank apart.
The other thing that some of us had in common is that we store our cars for 4 to 6 month over the winter.
The job is not diifficult,it just take time and patience,the dealer wanted$1300, to do the job.The parts cost me about $350.
The following users liked this post:
richard hurford (12-10-2011)
#12
01-09-2010, 08:55 PM
Eagle, do you put StaBil ( http://www.goldeagle.com/brands/stabil/default.aspx) or some such in the tank before storing the car? I wonder if gummed up fuel might be the culprit in these pump failures?
________
Dodge slingshot history
________
Dodge slingshot history
Last edited by Markus; 05-14-2011 at 07:55 AM.
#13
01-10-2010, 08:34 PM
Eagle, do you put StaBil ( http://www.goldeagle.com/brands/stabil/default.aspx) or some such in the tank before storing the car? I wonder if gummed up fuel might be the culprit in these pump failures?
#14
01-11-2010, 08:42 PM
I got the tank out today.
All the wiring is fine.
Both pumps are dead. Maybe I'll do a post mortem if I can get them apart.
A couple of points for the next person who tackles this:
1. Autozone has a cheap set of line disconnection tools. Part #25052; $8.39. These seem to be the same as pictured in the writeup at http://skjagtech.co.uk/support-pages...placement.html
2. With the car on jack stands, the best position for me to tackle line disconnection was as follows: I inched the creeper forward from the rear of the car until my nose was just about even with the rear of the prop shaft (feet to the rear), arms reaching around the outside of the parking brake cable, then reaching in and upward until my elbow was just past the edge of the muffler. As others have said, it helps to have long, skinny arms.
The following users liked this post:
richard hurford (12-10-2011)
#15
01-11-2010, 09:08 PM
There seems to be a high incidence of both pumps failing at the same time. That seems strange to me, since they get very different amounts of run time. Maybe they fail with age as often as with usage?
I'm glad you found your issue, I know the fuel pump replacement is no fun in these cars!
TTYL
David
I'm glad you found your issue, I know the fuel pump replacement is no fun in these cars!
TTYL
David
#16
01-14-2010, 08:12 PM
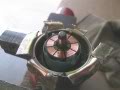
I was curious about why the fuel pump(s) died, so I decided to take one apart.
First, I pried off the bottom (the inlet side of the pump). This revealed a small plastic turbine that spun spun freely. No hint of gumminess or binding. So the bearings were not at fault...
Next, I attacked the top. By peeling back strips of the outer metal surround, it was possible to remove the white plastic assembly that holds the output port and electrical socket.
That revealed the armature in the body of the pump, with its copper commutator looking in fine shape. All windings showed good continuity, so the armature was not at fault, either...
http://i823.photobucket.com/albums/z...commutator.jpg
But examination of the top assembly revealed the problem: One of the brushes was stuck or worn completely flush with the housing, and thus no longer able to make contact with the commutator! It is the top brush in this photo.
http://i823.photobucket.com/albums/z...ad_brushes.jpg
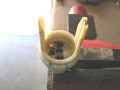
At this point, I don't have a good explanation as to what would cause rapid wear on only one brush.
One possibility is that the plastic holder deformed under heat at some point, and froze the brush in place. That might have happened during a brief electrical overload -- perhaps some small contaminants in the fuel caused the pump to bind slightly, so it drew higher than normal current until the matter was flushed through the pump. Still, it's hard to see why only one of the two brushes would have been affected, since they pass equal current.
Anyone able to read these tea leaves?
First, I pried off the bottom (the inlet side of the pump). This revealed a small plastic turbine that spun spun freely. No hint of gumminess or binding. So the bearings were not at fault...
Next, I attacked the top. By peeling back strips of the outer metal surround, it was possible to remove the white plastic assembly that holds the output port and electrical socket.
That revealed the armature in the body of the pump, with its copper commutator looking in fine shape. All windings showed good continuity, so the armature was not at fault, either...
http://i823.photobucket.com/albums/z...commutator.jpg
But examination of the top assembly revealed the problem: One of the brushes was stuck or worn completely flush with the housing, and thus no longer able to make contact with the commutator! It is the top brush in this photo.
http://i823.photobucket.com/albums/z...ad_brushes.jpg
At this point, I don't have a good explanation as to what would cause rapid wear on only one brush.
One possibility is that the plastic holder deformed under heat at some point, and froze the brush in place. That might have happened during a brief electrical overload -- perhaps some small contaminants in the fuel caused the pump to bind slightly, so it drew higher than normal current until the matter was flushed through the pump. Still, it's hard to see why only one of the two brushes would have been affected, since they pass equal current.
Anyone able to read these tea leaves?
The following 2 users liked this post by R as in Rocket:
richard hurford (12-10-2011),
someguywithajag (11-18-2018)
#18
09-08-2010, 02:03 PM
The following users liked this post:
richard hurford (12-10-2011)
#19
09-08-2010, 02:10 PM
Senior Member
The following 2 users liked this post by SuperSport:
Ice7Burg44VDP (04-14-2023),
richard hurford (12-10-2011)