Aluminum thermostat housing install
#1
 05-02-2012, 08:20 AM


2002 XJ8-I am going to install a new aluminum thermostat housing this weekend and have read alot on the forum on how to do this. I now have the crowfoot to get the back bolts and the kit to change out the plastic housing.
The kit came with a o-ring and flat gasket to mount the housing to the block. Does anyone know if I should use both gaskets for the mounting?
The kit came with a o-ring and flat gasket to mount the housing to the block. Does anyone know if I should use both gaskets for the mounting?
Last edited by hunterpayne; 05-02-2012 at 08:26 AM.
#2
05-02-2012, 05:10 PM

Veteran Member
Hi
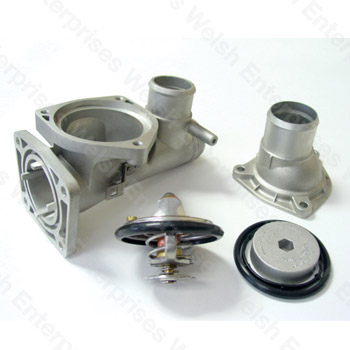
The metal (Aluminum) Thermostat housing kit consists of the thermostat housing, the thermostat cover, the aluminum screw cap and 2 o-rings (shown in the image around the screw cap) also the thermostat per Welsh Enterprises webpage.
Looks like one of the o-rings goes between the thermostat housing and the thermostat cover. The other one seems to between the thermostat housing and the engine block.
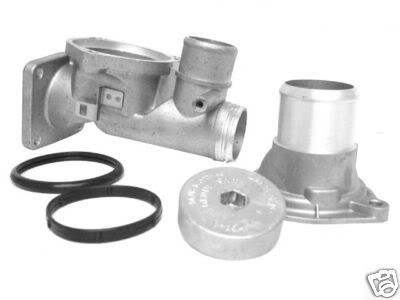
Here are 2 Jpegs of the Thermostat Housing Kits
1st one is from the Welsh Enterprises Webpage:
This second one is from the XKs Unlimited webpage:

Note the 2 o-rings in the 2nd JPEG
See the 2 recessed areas on the Thermostat Housing in the 1st JPEG -
in the area where the cover mounts on the housing and in the area where the housing mounts to the block.
Jim Lombardi
The metal (Aluminum) Thermostat housing kit consists of the thermostat housing, the thermostat cover, the aluminum screw cap and 2 o-rings (shown in the image around the screw cap) also the thermostat per Welsh Enterprises webpage.
Looks like one of the o-rings goes between the thermostat housing and the thermostat cover. The other one seems to between the thermostat housing and the engine block.
Here are 2 Jpegs of the Thermostat Housing Kits
1st one is from the Welsh Enterprises Webpage:
This second one is from the XKs Unlimited webpage:
Note the 2 o-rings in the 2nd JPEG
See the 2 recessed areas on the Thermostat Housing in the 1st JPEG -
in the area where the cover mounts on the housing and in the area where the housing mounts to the block.
Jim Lombardi
Last edited by jimlombardi; 05-03-2012 at 11:43 AM.

#4
05-07-2012, 03:29 PM
#7
09-08-2012, 09:11 PM


Just installed the Welsh kit on my 00 S Type - I paid $65.00 and they included the thermostat.
Here is the deal on the O-Rings:
1) The rubber O Ring with ribs on them goes between the aluminum thermostat housing and the manifold. Take your time installing the O Ring with ribs - make sure it is seated flush into the recess in the aluminum housing.
2) The other rubber O Ring is for the thermostat. The O-Ring that is on the included thermostat is too thick (remember - this thermostat was originally used on the plastic thermostat housings) remove that O-Ring from the supplied thermostat and place the O-Ring that came with the aluminum housing kit onto the thermostat.
3) Finally, there is a small O-Ring - that is for the thermostat housing cap
Hope this information helps...
The following 2 users liked this post by abonano:
davejdoyle (01-30-2015),
jimlombardi (09-08-2012)
Trending Topics
#8
09-09-2012, 06:03 AM
Veteran Member
Just installed the Welsh kit on my 00 S Type - I paid $65.00 and they included the thermostat.
Here is the deal on the O-Rings:
1) The rubber O Ring with ribs on them goes between the aluminum thermostat housing and the manifold. Take your time installing the O Ring with ribs - make sure it is seated flush into the recess in the aluminum housing.
2) The other rubber O Ring is for the thermostat. The O-Ring that is on the included thermostat is too thick (remember - this thermostat was originally used on the plastic thermostat housings) remove that O-Ring from the supplied thermostat and place the O-Ring that came with the aluminum housing kit onto the thermostat.
3) Finally, there is a small O-Ring - that is for the thermostat housing cap
Hope this information helps...
Here is the deal on the O-Rings:
1) The rubber O Ring with ribs on them goes between the aluminum thermostat housing and the manifold. Take your time installing the O Ring with ribs - make sure it is seated flush into the recess in the aluminum housing.
2) The other rubber O Ring is for the thermostat. The O-Ring that is on the included thermostat is too thick (remember - this thermostat was originally used on the plastic thermostat housings) remove that O-Ring from the supplied thermostat and place the O-Ring that came with the aluminum housing kit onto the thermostat.
3) Finally, there is a small O-Ring - that is for the thermostat housing cap
Hope this information helps...
There is no paper gaskets and you don't use any form of sealnt on any of the seals.
With proper design and installation, seal integrity is achieved by simple compression.
Observe the correct torque levels as stated by the manufacturer.
You should leave the large seal on the thermostat as it came...it is designed that way for a purpose.
Most people make the mistake of tightening the bejeesus out of the mounting bolts....DON'T!!
The thermo cover tightens down on the thermstat seal by compression and not face to face with the thermostat housing....this is one of the main reasons why the plastic original fails!
My car has nearly 200,000klm and is still running the original pastics quite happily....although i must say, I have had a Welsh kit on the shelf for 18 months ready for the inevitable day! ;o)=)
The following users liked this post:
jimlombardi (09-09-2012)
#9
09-09-2012, 09:35 AM
As you have found, these are a very well made kit.
There is no paper gaskets and you don't use any form of sealnt on any of the seals.
With proper design and installation, seal integrity is achieved by simple compression.
Observe the correct torque levels as stated by the manufacturer.
You should leave the large seal on the thermostat as it came...it is designed that way for a purpose.
Most people make the mistake of tightening the bejeesus out of the mounting bolts....DON'T!!
The thermo cover tightens down on the thermstat seal by compression and not face to face with the thermostat housing....this is one of the main reasons why the plastic original fails!
My car has nearly 200,000klm and is still running the original pastics quite happily....although i must say, I have had a Welsh kit on the shelf for 18 months ready for the inevitable day! ;o)=)
In taking the plastic thermostat housing apart the thicker O-Ring sits right in the housing acheiving a compression seal just like the thinner O-Ring acheives with the aluminum housing.
Also, the recess in the aluminum housing is not as deep as the plastic thermostat housing. Guess thats why the thicker O-Ring sticks further out of the housing.
Torqued the 8mm bolts to spec, filled the Jag up and started - no leaks from the thermostat junction whatsoever.
I will say the aluminum housing is one hell of an upgrade to that Ford plastic unit.... and peace of mind!
#10
03-08-2016, 05:34 PM


#13
11-15-2016, 06:36 PM


#14
11-15-2016, 06:39 PM
Senior Member
I did mine without having to lift the intake at all.
It just took patience, an open end wrench, a claw attachment, and a lot of sweat, but it was worth it than lift the intake and have to reseal it. That would take a 2 hour job and make it 5 hours.
It took me 1 1/2 hours to remove it and 1/2 hour to get it back together.
It goes back together MUCH easier than taking it apart.
Remember, patience will yield results.
Last edited by Rpach10115; 11-15-2016 at 06:42 PM.
#15
11-15-2016, 06:59 PM
Veteran Member
I had to lift my intake manifold a bit, no way to remove one of the aft bolts without it, even with the plastic housing broken to pieces.
Seems quite a bit of manufacturing tolerances there ....
Anyway, not a big deal, just loosened the 10x intake nuts a couple of turns, and lift the front of the intake while taking out the bolt.
Seals will stay in place as long as you don't rock the intake.
Seems quite a bit of manufacturing tolerances there ....
Anyway, not a big deal, just loosened the 10x intake nuts a couple of turns, and lift the front of the intake while taking out the bolt.
Seals will stay in place as long as you don't rock the intake.
#16
11-15-2016, 08:58 PM
Senior Member
I had to lift my intake manifold a bit, no way to remove one of the aft bolts without it, even with the plastic housing broken to pieces.
Seems quite a bit of manufacturing tolerances there ....
Anyway, not a big deal, just loosened the 10x intake nuts a couple of turns, and lift the front of the intake while taking out the bolt.
Seals will stay in place as long as you don't rock the intake.
Seems quite a bit of manufacturing tolerances there ....
Anyway, not a big deal, just loosened the 10x intake nuts a couple of turns, and lift the front of the intake while taking out the bolt.
Seals will stay in place as long as you don't rock the intake.
LOL, I thought about cracking the housing to get at the bolts, but was afraid that a piece might fall in the engine, but I 100% thought about it after it took me 40 minutes to get the first one out. Took another 40 to get the other one out.
Your thought on the tolerances are right on the mark, but in a good way.
After you break to bolt loose, it's just a matter of turning it ever so slightly with each turn of the OE wrench.
Putting it back in, I put the 2 screws in the housing first, then put it in position. I was able to hand tighten them almost all the way down before I finished up with my OE wrench.
#17
11-16-2016, 12:22 PM
I got it, but I had to take of the manifold because the bolt was starting to strip. I didn't take it off all the way, I removed the 12 bolts holding on the intake manifold and the throttle body and moved them just enough to get to the bolt.
I had some of the gaskets anyways so I went ahead and changed then because they looked to be needing changed.
I will use the same approach should I need to do those hoses in the V
I had some of the gaskets anyways so I went ahead and changed then because they looked to be needing changed.
I will use the same approach should I need to do those hoses in the V
#18
11-16-2016, 05:27 PM
Veteran Member
For the record (if someone else will read this trying to solve his problem in some years to come  ), in some cases the head of the aft bolt(s) gets wedged against the intake manifold.
Trying to further undo will surely result in damaging the thread of the hole.

Lifting the manifold sounds complicated, but really is just a 10 min job, and will allow you to take out the bolt without damaging anything.
Just loosen the intake bolts 2 or 3 turns, which will help keep the manifold in place.
Then just lift it on the front to allow the space needed to take out the bolt.
), in some cases the head of the aft bolt(s) gets wedged against the intake manifold. Trying to further undo will surely result in damaging the thread of the hole.

Lifting the manifold sounds complicated, but really is just a 10 min job, and will allow you to take out the bolt without damaging anything.
Just loosen the intake bolts 2 or 3 turns, which will help keep the manifold in place.
Then just lift it on the front to allow the space needed to take out the bolt.
#19
11-17-2016, 09:29 AM
Veteran Member
Over the years I have been on this forum, half of folks need to lift the manifold, have don't: not a good message on OEM supplier quality control with two different length bolt.
Mine would not get past the manifold until I broke the old housing out with pliers, then the aft bolt could be 'leaned' just enough for that last thread to clear. Use the shorter thermostat bolt when reinstalling (I cut a screw slot in the top of the bolt, but there are other, better choices.).
Mine would not get past the manifold until I broke the old housing out with pliers, then the aft bolt could be 'leaned' just enough for that last thread to clear. Use the shorter thermostat bolt when reinstalling (I cut a screw slot in the top of the bolt, but there are other, better choices.).
#20
11-18-2016, 01:07 PM
Yes! I striped one of my bolts trying to get it out, but luckily I have a parts car and was able to take one of the bolts off of it. Same year, within the same Vin "chunks" and they had different length bolts on them.

Thread
Thread Starter
Forum
Replies
Last Post
05, cap, cover, discovery, gasket, housing, installation, jaguar, location, metal, replacement, ring, thermostat, xj8, xjr
Currently Active Users Viewing This Thread: 1 (0 members and 1 guests)