
Cold Air Intake Divider - Installed!
#1
 03-01-2014, 07:34 PM

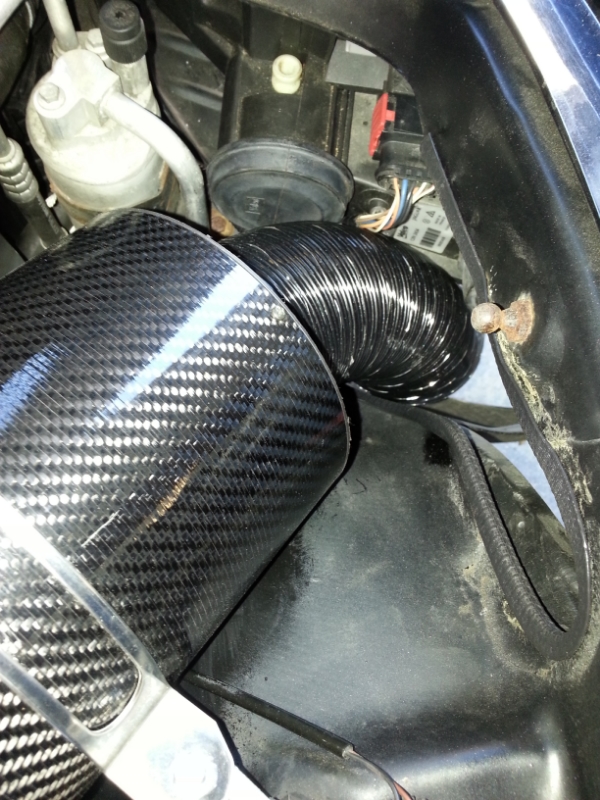
After having added a 3.5" intake it was time to create and install a divider to keep cold air separate from hot engine air as much as possible. (The R loves colder, denser air!)
I bought galvanized flashing, pipe insulation, and flower bed metal edging trim at the hardware store. I got together some cardboard, a marker, straight edge, and scissors for cutting metal/cardboard.
Using the scissors and marker I created a mock up of the divider. I then transferred the cardboard mock up to the galvanized flashing and cut it out. I trimmed pieces of metal edging trim for the edges that were not along the top. I then cut pieces of pipe insulation and fitted them along the top edges as a seal against the hood. Over time I will determine if the seal is good enough; if not, I will replace the current insulation with thicker insulation until I can get a good seal.
A nice plastic molded one that fit perfectly would be great, but I am hopeful my home-brewed creation will get the job done for very little money
I hope this is helpful to others.
Last edited by Dan Hiatt; 03-02-2014 at 11:37 AM.
#2
03-01-2014, 08:03 PM
Let's hope it works...... I must admit I am not a fan of having the filter in the engine bay but looking at the XJ you really are restricted, I've even thought about relocating the washer tank and piping it down there, I may even go the CDA route...... I am unsure yet, my new bumper design does give me more room but we shall see
Well done
Well done
#3
03-01-2014, 08:19 PM
#4
03-02-2014, 03:48 AM
This is what I did on my XK but I no longer feed the breather into the intake, so this particular tube will be sold and I will make another, I have done it now on quite a few XKs with 4.0s, not so much on 4.2s as the breather is a different setup and goes into the tube by the TB

I still like to use an enclosed air box and I am using a Green Cotton twister aluminum case with a large cone filter rated to over 700bhp, the point is I would like do something similar on the XJ
I still like to use an enclosed air box and I am using a Green Cotton twister aluminum case with a large cone filter rated to over 700bhp, the point is I would like do something similar on the XJ
Last edited by XKRacer; 03-02-2014 at 09:30 AM.
#5
03-02-2014, 07:22 AM
#6
03-02-2014, 10:08 AM
I added the strut brace, my XKR is a coupe, I got the idea from the convertibles, when I took a look at the bulk head on my coupe I discovered the same fixings were also present as on the vert so I made them up out of solid aluminum with a stainless ball joint attaching it to the strut tower which also has one of my strut caps on it......
I have noticed the strut top on the XJ is a bolt on steel item, I might remove these and get them chrome plated, I have not thought about attaching a brace but I will take a look.....
I have noticed the strut top on the XJ is a bolt on steel item, I might remove these and get them chrome plated, I have not thought about attaching a brace but I will take a look.....
#7
03-02-2014, 10:38 AM
Veteran Member
This is what I did on my XK but I no longer feed the breather into the intake, so this particular tube will be sold and I will make another, I have done it now on quite a few XKs with 4.0s, not so much on 4.2s as the breather is a different setup and goes into the tube by the TB
I still like to use an enclosed air box and I am using a Green Cotton twister aluminum case with a large cone filter rated to over 700bhp, the point is I would like do something similar on the XJ
I still like to use an enclosed air box and I am using a Green Cotton twister aluminum case with a large cone filter rated to over 700bhp, the point is I would like do something similar on the XJ
Now THAT is the way to do it!
Trending Topics
#8
03-04-2014, 02:47 PM
Prior to installing the cold air divider my intake air temperature (IAT) was running 10-15 degrees warmer than the outside air. Today, I hooked up my OBD2 and watched the IAT. When at a stand still the IAT warmed to about 15 degrees higher than the outside air. However, when moving the IAT dropped to the same temperature as the outside air - a good sign! I will continue to monitor how well it can keep the warm/hot engine separate from the cooler outside air.
#10
03-04-2014, 05:26 PM
#11
03-04-2014, 05:59 PM
Easiest way is water/meth, I did find a website that shows you how to make a setup for $240, CLICK HERE, lots of good info......
The following users liked this post:
Dan Hiatt (03-04-2014)
#12
03-04-2014, 11:08 PM
Veteran Member
This is what I am using Snow Performance Boost Juice Water Methanol Mix 1 Gallon Set of 4 | eBay
Your IAT#1 was showing 10-15 degrees above ambient, but that is BEFORE adding 14 psi of boost. It is the after boosting temp that matters.
Your IAT#1 was showing 10-15 degrees above ambient, but that is BEFORE adding 14 psi of boost. It is the after boosting temp that matters.
Last edited by WaterDragon; 03-04-2014 at 11:19 PM.
#13
03-05-2014, 04:05 AM
Agreed, WD.
All I am saying is that the cold air divider appears to be doing what I was "designing" it for. Namely, to minimize hot engine air from the intake.
Once I have verified it is doing it's job I can move on to lowering the air temp as you and XKRacer have said. Or, to put it another way, I can then move on to the fun stuff!
#14
03-05-2014, 10:35 AM
Veteran Member
Mine reads approx +2-5 degrees over outside air. There might be some air coming in from over the top of where the tube is going through. You could try sealing that area off too. I also used tape to seal off as much as possible.
And I also cut a larger hole behind the headlights on that side, and I'm running a 3" hose from the fog light hole to this area as well.
And I also cut a larger hole behind the headlights on that side, and I'm running a 3" hose from the fog light hole to this area as well.
The following users liked this post:
Dan Hiatt (03-05-2014)


#16
03-06-2014, 12:25 AM
Veteran Member
#17
03-06-2014, 12:38 AM
Veteran Member
The effectiveness of the full intake can be measured by reading the vacuum at full throttle. You want close to 0 mbar, and I think a stock car (so also stock setup), would be somewhere arround 130 mbar or so.
Increasing for instance the supercharger speed, would also increase here the vacuum if you leave the intake stock.
Less vacuum = more power
As long as one doesn't post the vacuum readings with their intake setup you have no idea about its effectiveness at wot.
Increasing for instance the supercharger speed, would also increase here the vacuum if you leave the intake stock.
Less vacuum = more power
As long as one doesn't post the vacuum readings with their intake setup you have no idea about its effectiveness at wot.
#18
03-06-2014, 01:35 AM
The elbow into the TB is different to your stock 4.0, I would not necessarily say it would make that much difference, if anything losing the breather going into it would be more beneficial, having smooth air flow and not having all the baffles help, damn thing looked like an octopus!