Coolant Hose Fitting
#1
I've broken two fittings like the one in the attached picture. They are on the ends of two rigid hoses off my 2000 XJR, one from the expansion tank to coolant bypass and the other from expansion to radiator. I am having trouble sourcing parts for either the fittings or the entire hose assemblies. Any ideas before I call the dealership?
PS Yes I need a manicure. My sissy programmer hands are not enjoying this head gasket project.
PS Yes I need a manicure. My sissy programmer hands are not enjoying this head gasket project.
The following users liked this post:
TJL (07-06-2018)
#4
Hi
Here are diagrams from the Jaguar Electronic Parts Catalog and the JTIS21 Repair Shop manual:
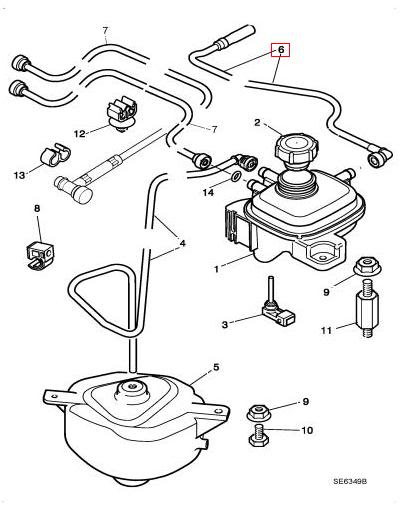
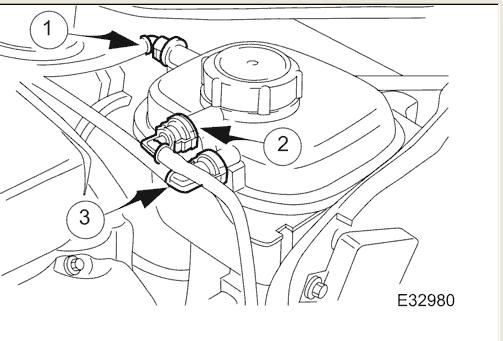
These 3 hoses are rigid plastic and have quick fit connectors on them.
(#4 on top diagram and is #2 on bottom diagram) from expansion tank to recovery tank (part# MNC4468AD) Retail price $29.50
(#6 on top diagram and is #1 on bottom diagram) from expansion tank to Thermostrat Housing (part# MNC4582BC) Retail price $16.55
(#7 on top diagram and is #3 on bottom diagram from expansion tank to radiator (part# MNC4583CB) Retail price $22.35
Top diagram was copied from JEPC and bottom one is from JTIS21.
Try calling Nalley Jaguar - they give the forum members a 15% discount and (free ground shipping on orders over $25).
Jim Lombardi
Here are diagrams from the Jaguar Electronic Parts Catalog and the JTIS21 Repair Shop manual:


These 3 hoses are rigid plastic and have quick fit connectors on them.
(#4 on top diagram and is #2 on bottom diagram) from expansion tank to recovery tank (part# MNC4468AD) Retail price $29.50
(#6 on top diagram and is #1 on bottom diagram) from expansion tank to Thermostrat Housing (part# MNC4582BC) Retail price $16.55
(#7 on top diagram and is #3 on bottom diagram from expansion tank to radiator (part# MNC4583CB) Retail price $22.35
Top diagram was copied from JEPC and bottom one is from JTIS21.
Try calling Nalley Jaguar - they give the forum members a 15% discount and (free ground shipping on orders over $25).
Jim Lombardi
Last edited by jimlombardi; 12-20-2011 at 10:28 AM.
The following 5 users liked this post by jimlombardi:
Don B (03-30-2017),
Heliwilly (02-04-2012),
inactualis (12-20-2011),
Royal Alphys (04-20-2017),
Sarah_D_Rad (05-14-2017)
#6
The following users liked this post:
inactualis (12-20-2011)
#7
I broke one of mine in a stunned moment when I leaned on it. I fixed it by getting a length of rubber tubing that fits over the male end of the fitting (in my case, where it enters the radiator) I used a brass fitting to step it down a bit and then ran more rubber tubing well along the rigid plastic line. I secured it with small hose clamps. I don't think you would have much luck with glue.
That got me on the road again until I could have the proper part brought in.
The home made repair has held up for over a year, so I never bothered to put the replacement line on. It sits in my cupboard awaiting installation to this day. The point where I broke mine allowed the fix to be not too unsightly, so I have not been motivated to replace it.
One pleasant surprise was that the replacement line was quite inexpensive. I think it was less than $25.00 at the dealer.
I tried to attach a jpg photo, but could not make it work. Not sure why, but it seems to fail every time I try.
The following 3 users liked this post by JWT:
Trending Topics
#8
#10
Hi
Here are diagrams from the Jaguar Electronic Parts Catalog and the JTIS21 Repair Shop manual:

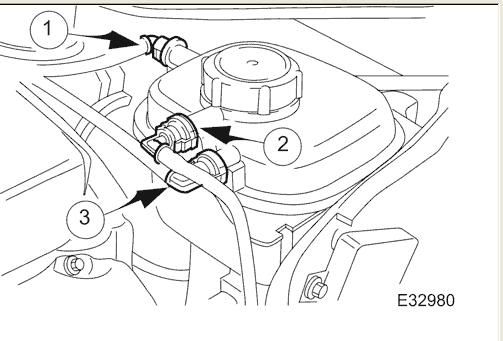
These 3 hoses are rigid plastic and have quick fit connectors on them.
(#4 on top diagram and is #2 on bottom diagram) from expansion tank to recovery tank (part# MNC4468AD) Retail price $29.50
(#6 on top diagram and is #1 on bottom diagram) from expansion tank to Thermostrat Housing (part# MNC4582BC) Retail price $16.55
(#7 on top diagram and is #3 on bottom diagram from expansion tank to radiator (part# MNC4583CB) Retail price $22.35
Top diagram was copied from JEPC and bottom one is from JTIS21.
Try calling Nalley Jaguar - they give the forum members a 15% discount and (free ground shipping on orders over $25).
Jim Lombardi
Here are diagrams from the Jaguar Electronic Parts Catalog and the JTIS21 Repair Shop manual:


These 3 hoses are rigid plastic and have quick fit connectors on them.
(#4 on top diagram and is #2 on bottom diagram) from expansion tank to recovery tank (part# MNC4468AD) Retail price $29.50
(#6 on top diagram and is #1 on bottom diagram) from expansion tank to Thermostrat Housing (part# MNC4582BC) Retail price $16.55
(#7 on top diagram and is #3 on bottom diagram from expansion tank to radiator (part# MNC4583CB) Retail price $22.35
Top diagram was copied from JEPC and bottom one is from JTIS21.
Try calling Nalley Jaguar - they give the forum members a 15% discount and (free ground shipping on orders over $25).
Jim Lombardi
Or do I just buy the whole hose and clamps come with new hose?
thanks
#11
The connectors come with the hose as an assembly -- I recently ordered all of them for my XJR -- the hoses are not expensive .. $20 -$30.
Best to fix it correctly. The only one that will require a clamp is the updated thermostat bleed #6 used on some later models - the others will come with the quick connects.
Best to fix it correctly. The only one that will require a clamp is the updated thermostat bleed #6 used on some later models - the others will come with the quick connects.
The following users liked this post:
KillerKat (09-04-2012)
#12
#13
The connectors aren't too hard to disconnect. There is a tool shaped like a "C" that slips over the side of the connector and pushes out against the little "wings" on the sides. I can't find my picture, but I used two brad nails pushed through the wings perpendicular to the flow of the pipe and squeezed them slightly while pulling. It is not real intuitive, and everybody seems to break them. I heard somewhere that a tool is supposed to be connected to one of the pipes - the little "C" shaped tool - but I never found one. Must be only U.K. cars. ;^(
#14
Hi killercat
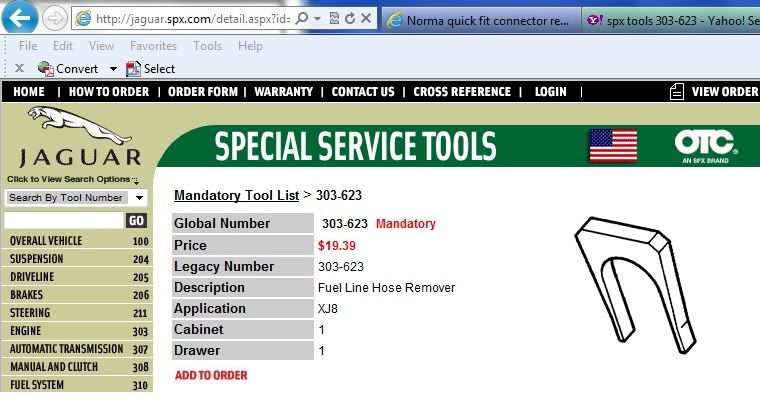
Here is what the special tool looks like and how to use it - motorcarman provided this info in a Jaguar TSB PDF file:
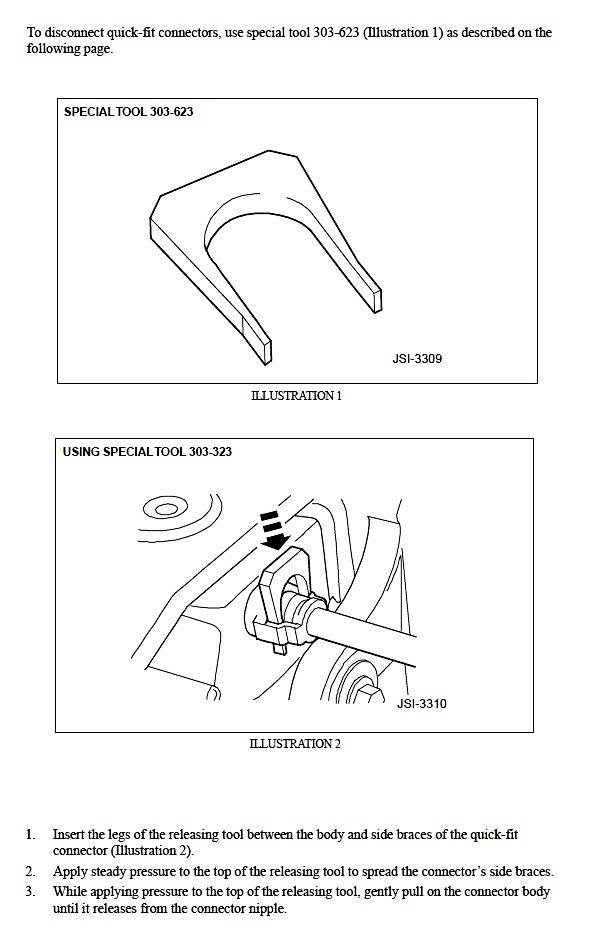
I actually tried to buy this tool online at jaguar.spx.com - I thought it was high priced for what such a small tool ($19.39) and I would have bought it, but the shipping/handling fee was another $15.00.
When I removed the throttle body on our 2001 XJ8, I tried what other forum members sugguested:
"you can use small brad nails - that's what I did. Stick them in at a right angle to the hose in the little slots on each side of the fitting and squeeze them. Many people break these."
"you can improvise with a pair of small flat-blade screwdrivers"
I was not sure how to squeeze properly and I broke the quick fit (norma) connector and I purchased a new hose assembly (over $40).
I still do not know how to disconnect it using the methods quoted above, I think we need one of forum members to post photos of the method used.
Jim Lombardi
Here is what the special tool looks like and how to use it - motorcarman provided this info in a Jaguar TSB PDF file:

I actually tried to buy this tool online at jaguar.spx.com - I thought it was high priced for what such a small tool ($19.39) and I would have bought it, but the shipping/handling fee was another $15.00.

When I removed the throttle body on our 2001 XJ8, I tried what other forum members sugguested:
"you can use small brad nails - that's what I did. Stick them in at a right angle to the hose in the little slots on each side of the fitting and squeeze them. Many people break these."
"you can improvise with a pair of small flat-blade screwdrivers"
I was not sure how to squeeze properly and I broke the quick fit (norma) connector and I purchased a new hose assembly (over $40).
I still do not know how to disconnect it using the methods quoted above, I think we need one of forum members to post photos of the method used.
Jim Lombardi
#15
The following 3 users liked this post by luc:
#17
Here is a photo. Once you get them apart and look at the connection it is fairly obvious. The two sides that stick out have lips under them that snap onto the male fitting and hold the o-ring in. So you need to spread the wings. It seems intuitive to squeeze them, but that won't work.
The following 4 users liked this post by JimmyL:
jimlombardi (09-04-2012),
KillerKat (09-04-2012),
montypeek (09-04-2015),
someguywithajag (08-21-2018)
#18
Thanks JimmyL
Looks like you are using 2 rachet extension bars - one in each lip (both sides) of the connector.
Then you probably grap the top of both extension bars and sqeeze them together while pulling the hose.
Is that correct?
Now I understand what went wrong when I broke the quick fit connector. I was pulling the 2 screwdrivers away from each other, instead of sqeezing closer to each other.
Jim Lombardi
Last edited by jimlombardi; 09-04-2012 at 10:26 AM.
#20


