Foot well lighting
#1
 05-17-2015, 06:27 AM

While installing my microphone-wires for a Parrot, I parallel ran a wire from the roof console down to the foot-well.
I added a light on each foot-well, and want them to be lighted if the courtesy lights come on, incl. the fading-out.
I had a look at fig. 10-1 of the electric guide, and thought to simply splice them in 2 of the 8 wires going to the roof console.
Now, it was either too late, or I make an error in thinking (yes, old school plus and minus guy .. ), but I was not able to measure 12V at any of the 8 wires, while the courtesy lights were on.
Anyone an idea which wires to splice?
Thanks,
Eric
#2
05-17-2015, 01:31 PM
Senior Member
While installing my microphone-wires for a Parrot, I parallel ran a wire from the roof console down to the foot-well.
I added a light on each foot-well, and want them to be lighted if the courtesy lights come on, incl. the fading-out.
I had a look at fig. 10-1 of the electric guide, and thought to simply splice them in 2 of the 8 wires going to the roof console.
Now, it was either too late, or I make an error in thinking (yes, old school plus and minus guy .. ), but I was not able to measure 12V at any of the 8 wires, while the courtesy lights were on.
Anyone an idea which wires to splice?
Thanks,
Eric
British Standard BS-AU7
HTH
Last edited by bdboyle; 05-17-2015 at 01:34 PM.
#3
05-19-2015, 04:39 AM
I'm thinking, british standard wiring colors (BS-AU7) are used in this car, so, normally Red with white tracer is gauge/interior lights (it is on every brit car from late 60s BL to lotus to rolls to ???), so finding the r/w lead, which is the positive side of the equation, and extending that out down into the footwell, then grounding the light socket locally to the body at the footwell would do the trick.
HTH
HTH
These courtesy lights seem to be going from the BP module to ground.
However, my confusion comes from the fact that the front courtesy lights are connected between 2 wires coming from the BP unit (GR and NW).
Do you say if I tap into the "fade 1" (NW) to ground it should work?
Eric
#4
05-31-2015, 01:06 AM
I'm thinking, british standard wiring colors (BS-AU7) are used in this car, so, normally Red with white tracer is gauge/interior lights (it is on every brit car from late 60s BL to lotus to rolls to ???), so finding the r/w lead, which is the positive side of the equation, and extending that out down into the footwell, then grounding the light socket locally to the body at the footwell would do the trick.
Guess it was too late last weekend ...
I just took the FADE1 and the ground, and it works perfectly.
Comes on, and fades out just like the overhead courtesy lights (pic is not the best, the lighting is much more spread and softer, but it gives an idea).
This should have been standard on every VDP.

The following users liked this post:
bdboyle (05-31-2015)
#5
05-31-2015, 08:03 AM
Senior Member
Thanks, you were right.
Guess it was too late last weekend ...
I just took the FADE1 and the ground, and it works perfectly.
Comes on, and fades out just like the overhead courtesy lights (pic is not the best, the lighting is much more spread and softer, but it gives an idea).
This should have been standard on every VDP.
Guess it was too late last weekend ...
I just took the FADE1 and the ground, and it works perfectly.
Comes on, and fades out just like the overhead courtesy lights (pic is not the best, the lighting is much more spread and softer, but it gives an idea).
This should have been standard on every VDP.
#6
01-27-2016, 05:56 PM
Upon request, here some final advise on the installation of the foot well lighting in the front and rear of the car.
The objective is to have lighting which comes on with the other courtesy lighting, and fades out with the same delay.
FRONT:
You will need to hunt for the wire which connects the interior lighting control box with the front courtesy lamps fitted in the overhead console.
The color code is NW / FADE 1 (=brown / white).
I presume you can trace this wire somewhere under the dash in the various cable looms.
However, I spliced a wire from the upper console while I was there to install my Parrot microphone, and ran it through the left A pillar down to under the steering wheel (requires the sunscreen and A pillar covers to be removed to do it properly).
You can then run an additional wire to the passenger side.
There is a very small passage through the transmission tunnel, just next to the OBD plug.
I used a old cloth hanger to poke around a bit, and guide the wire though.
Finally, you will need to run earth wires from both fittings, and connect somewhere to the car (I myself ran a double wire all the way from the roof for power and earth).
For the lamp fittings, I used 2 Jeep well lights which I had laying around, and fabricated some small brackets to keep them in place, out of sight.
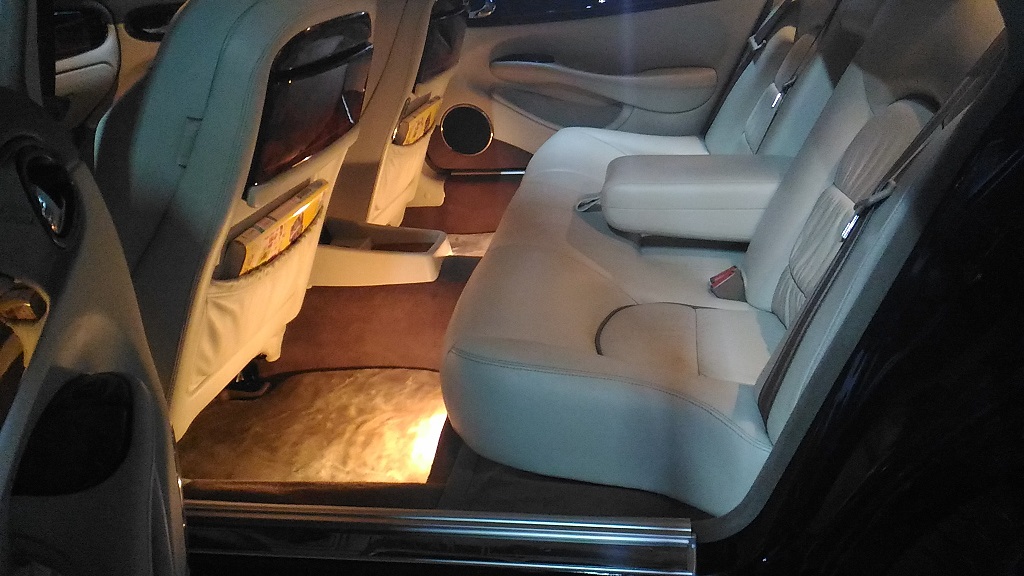
REAR:
The wire for the rear is the wire going to the rear courtesy lamps, fitted next to the headrests.
The color code is RW / FADE 2 (=red / white).
I traced this wire under the rear seat (removing the lower seat cushion is required), and splice 2 wires for the left and right, plus the earth wires.
I made my own little wire-harness for this, following the rest of the wire-looms.
For the rear, I used 2 Jaguar fittings, the ones also used in the trunk/boot and side fenders.
I had a long thought on the location, first wanted to install them in, or under, the front seats, but the difficulties to run wires there withheld me.
I finally decided to install them into the fuse cover-plates.
These are hard plastic, and with some drilling and cutting I made an exact hole, in which the lamp fitting clicks-in.
The carpet on it is very easy to remove, so first cut the plastic, then slowly cut the carpet around the hole.
All in all several hours work to do it properly, but a great reward every time you step into the car.
I keep saying this should have been standard on each x308, and especially on models like Daimler and Vanden Plas.
P.S. pictures are a bit over-modulated, in real it is a very even and warm spread of light.

The objective is to have lighting which comes on with the other courtesy lighting, and fades out with the same delay.
FRONT:
You will need to hunt for the wire which connects the interior lighting control box with the front courtesy lamps fitted in the overhead console.
The color code is NW / FADE 1 (=brown / white).
I presume you can trace this wire somewhere under the dash in the various cable looms.
However, I spliced a wire from the upper console while I was there to install my Parrot microphone, and ran it through the left A pillar down to under the steering wheel (requires the sunscreen and A pillar covers to be removed to do it properly).
You can then run an additional wire to the passenger side.
There is a very small passage through the transmission tunnel, just next to the OBD plug.
I used a old cloth hanger to poke around a bit, and guide the wire though.
Finally, you will need to run earth wires from both fittings, and connect somewhere to the car (I myself ran a double wire all the way from the roof for power and earth).
For the lamp fittings, I used 2 Jeep well lights which I had laying around, and fabricated some small brackets to keep them in place, out of sight.
REAR:
The wire for the rear is the wire going to the rear courtesy lamps, fitted next to the headrests.
The color code is RW / FADE 2 (=red / white).
I traced this wire under the rear seat (removing the lower seat cushion is required), and splice 2 wires for the left and right, plus the earth wires.
I made my own little wire-harness for this, following the rest of the wire-looms.
For the rear, I used 2 Jaguar fittings, the ones also used in the trunk/boot and side fenders.
I had a long thought on the location, first wanted to install them in, or under, the front seats, but the difficulties to run wires there withheld me.
I finally decided to install them into the fuse cover-plates.
These are hard plastic, and with some drilling and cutting I made an exact hole, in which the lamp fitting clicks-in.
The carpet on it is very easy to remove, so first cut the plastic, then slowly cut the carpet around the hole.
All in all several hours work to do it properly, but a great reward every time you step into the car.
I keep saying this should have been standard on each x308, and especially on models like Daimler and Vanden Plas.
P.S. pictures are a bit over-modulated, in real it is a very even and warm spread of light.
Last edited by ericjansen; 01-27-2016 at 06:02 PM.
The following 4 users liked this post by ericjansen:
#7
01-29-2016, 07:43 AM

Trending Topics
#9
01-29-2016, 10:39 AM

#10
01-29-2016, 04:55 PM
Hi Oddman,
As checked by the others, links should work, unless you were travelling in a country which blocks Photobucket ... I still have nightmares after 15 years China .
.
If so, I guess I can send you the pictures by email, just let me know a mail address by PM.
Eric
As checked by the others, links should work, unless you were travelling in a country which blocks Photobucket ... I still have nightmares after 15 years China
.If so, I guess I can send you the pictures by email, just let me know a mail address by PM.
Eric
#11
01-29-2016, 05:12 PM
Veteran Member
The following users liked this post:
ericjansen (01-29-2016)
#12
01-29-2016, 08:31 PM
For me about the same as you; "the ''to do list'' is getting down to little things that likely only myself would notice lol".
The following users liked this post:
King Charles (01-29-2016)
#13
01-31-2016, 08:12 AM
Hi Oddman,
As checked by the others, links should work, unless you were travelling in a country which blocks Photobucket ... I still have nightmares after 15 years China.
If so, I guess I can send you the pictures by email, just let me know a mail address by PM.
Eric
As checked by the others, links should work, unless you were travelling in a country which blocks Photobucket ... I still have nightmares after 15 years China
.If so, I guess I can send you the pictures by email, just let me know a mail address by PM.
Eric
Thanks for feedback, though.
#14
05-15-2022, 07:05 AM

Upon request, here some final advise on the installation of the foot well lighting in the front and rear of the car.
The objective is to have lighting which comes on with the other courtesy lighting, and fades out with the same delay.
FRONT:
You will need to hunt for the wire which connects the interior lighting control box with the front courtesy lamps fitted in the overhead console.
The color code is NW / FADE 1 (=brown / white).
I presume you can trace this wire somewhere under the dash in the various cable looms.
However, I spliced a wire from the upper console while I was there to install my Parrot microphone, and ran it through the left A pillar down to under the steering wheel (requires the sunscreen and A pillar covers to be removed to do it properly).
You can then run an additional wire to the passenger side.
There is a very small passage through the transmission tunnel, just next to the OBD plug.
I used a old cloth hanger to poke around a bit, and guide the wire though.
Finally, you will need to run earth wires from both fittings, and connect somewhere to the car (I myself ran a double wire all the way from the roof for power and earth).
For the lamp fittings, I used 2 Jeep well lights which I had laying around, and fabricated some small brackets to keep them in place, out of sight.
REAR:
The wire for the rear is the wire going to the rear courtesy lamps, fitted next to the headrests.
The color code is RW / FADE 2 (=red / white).
I traced this wire under the rear seat (removing the lower seat cushion is required), and splice 2 wires for the left and right, plus the earth wires.
I made my own little wire-harness for this, following the rest of the wire-looms.
For the rear, I used 2 Jaguar fittings, the ones also used in the trunk/boot and side fenders.
I had a long thought on the location, first wanted to install them in, or under, the front seats, but the difficulties to run wires there withheld me.
I finally decided to install them into the fuse cover-plates.
These are hard plastic, and with some drilling and cutting I made an exact hole, in which the lamp fitting clicks-in.
The carpet on it is very easy to remove, so first cut the plastic, then slowly cut the carpet around the hole.
All in all several hours work to do it properly, but a great reward every time you step into the car.
I keep saying this should have been standard on each x308, and especially on models like Daimler and Vanden Plas.
P.S. pictures are a bit over-modulated, in real it is a very even and warm spread of light.
Attachment 152926
Attachment 152927
The following users liked this post:
ericjansen (05-15-2022)

Thread
Thread Starter
Forum
Replies
Last Post
neruda
S-Type / S type R Supercharged V8 ( X200 )
6
10-18-2015 01:19 PM
rsa760041
XJ XJ6 / XJ8 / XJR ( X350 & X358 )
23
09-25-2015 01:33 PM
Currently Active Users Viewing This Thread: 1 (0 members and 1 guests)