
Jaguar XJ8 Secondary Tensioners
#1
 04-21-2009 | 08:12 PM

Thread Starter
|
Member
Joined: Apr 2009
Posts: 33
Likes: 3
With a little bit of inspiration from the other thread a few pages back that showed how to change the secondary tensioners I decided to do the job my self. I found out it is significantly easier than one might expect.
For $148 I did the job with new style tensioners off of ebay and some gaskets from partsgeek.com I also saved on the tools because I decided I wouldn't need them and could make the only one necessary.
At 148,698 miles I decided to see what the fuss is all about. the entire tear down is very easy up to when the valve covers are off. and then it didn't get much more complicated after that.

the essential tool you need to make is a metal flat bar with 6mm holes drilled 6.75 inches apart. you'll need some .5-.55 inch spacers to support the end of the spacers where the bolts go in.(between the heads and metal tool) these are 6mm sized bolts. you could drill three holes if it made you feel any better but based on the pick you can see two will work. the washers are fitted between the cam flat spot and the next lobe for support reasons. see pic.
[IMG]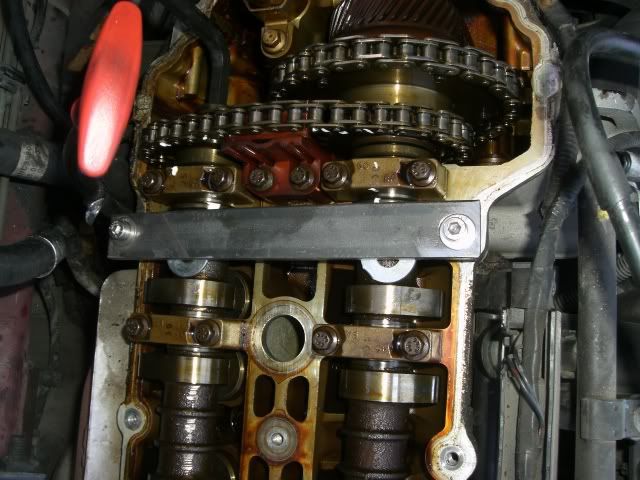 [/IMG]
once the cams were locked i went to town on the both gears, cams, and chain with white out to give a heavy number of reference points for any indication of movement. that done i freed up the bolt holding the gear in place with a 10mm allen wrench and a cheater bar. After that i removed the nut, then the gear with the help of a flathead screwdriver.
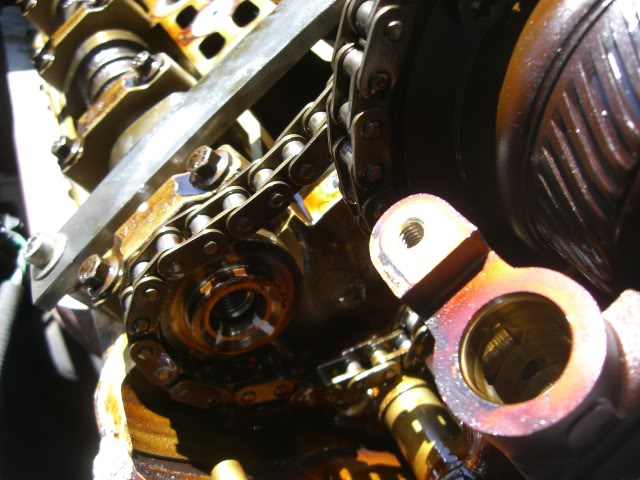
that's the cam with no gear and the tensioner removed. it took this picture to show it's not a touchy thing when working with these parts and how the whiteout make big help. imagine the white marks line up exactly with the gear.
after removal of the old tensioners i slipped the new one in, then replaced the gear to the cam and chain ensuring that all whiteout marks lined up. once done and the cam bolt is torqued to the said 70lbs it was any easy process of bolting everything back together. it's rather simple and like a said before, just time consuming.
each tensioner had some wear and cracks but i only took a photo of the bad one. (right side)
top

and the side
thoughts-
1) didn't need gasket sealant
2) found out that my timing chain guides and primary tensioners need to be replaced
3) car hardly runs any better, i can see how it might if it was just the secondaries
4) you can turn the cams to line up to TDC by cranking the engine and watching. then move it how you want with the 10mm allen wrench in the cam and turning it to desire position (much easier w/out any plugs in)
5) i'm not interested in spending any money on this car.
6) jaguar was to stupid too put a key on the end of the cam for the gear.
7) whiteout is my best friend.
8) i want to see what else is wrong with my car put there's no way on earth i'm paying more than $10 for someone to hook up a computer to the car and read me codes.
the point i wrote this is to encourage others to do their own work. you probably should get better tools than i did but you don't need them. it's a very straightforward process and comfortable for anyone with mild mechanical skills.
For $148 I did the job with new style tensioners off of ebay and some gaskets from partsgeek.com I also saved on the tools because I decided I wouldn't need them and could make the only one necessary.
At 148,698 miles I decided to see what the fuss is all about. the entire tear down is very easy up to when the valve covers are off. and then it didn't get much more complicated after that.
the essential tool you need to make is a metal flat bar with 6mm holes drilled 6.75 inches apart. you'll need some .5-.55 inch spacers to support the end of the spacers where the bolts go in.(between the heads and metal tool) these are 6mm sized bolts. you could drill three holes if it made you feel any better but based on the pick you can see two will work. the washers are fitted between the cam flat spot and the next lobe for support reasons. see pic.
[IMG]
[/IMG]once the cams were locked i went to town on the both gears, cams, and chain with white out to give a heavy number of reference points for any indication of movement. that done i freed up the bolt holding the gear in place with a 10mm allen wrench and a cheater bar. After that i removed the nut, then the gear with the help of a flathead screwdriver.
that's the cam with no gear and the tensioner removed. it took this picture to show it's not a touchy thing when working with these parts and how the whiteout make big help. imagine the white marks line up exactly with the gear.
after removal of the old tensioners i slipped the new one in, then replaced the gear to the cam and chain ensuring that all whiteout marks lined up. once done and the cam bolt is torqued to the said 70lbs it was any easy process of bolting everything back together. it's rather simple and like a said before, just time consuming.
each tensioner had some wear and cracks but i only took a photo of the bad one. (right side)
top
and the side
thoughts-
1) didn't need gasket sealant
2) found out that my timing chain guides and primary tensioners need to be replaced
3) car hardly runs any better, i can see how it might if it was just the secondaries
4) you can turn the cams to line up to TDC by cranking the engine and watching. then move it how you want with the 10mm allen wrench in the cam and turning it to desire position (much easier w/out any plugs in)
5) i'm not interested in spending any money on this car.
6) jaguar was to stupid too put a key on the end of the cam for the gear.
7) whiteout is my best friend.
8) i want to see what else is wrong with my car put there's no way on earth i'm paying more than $10 for someone to hook up a computer to the car and read me codes.
the point i wrote this is to encourage others to do their own work. you probably should get better tools than i did but you don't need them. it's a very straightforward process and comfortable for anyone with mild mechanical skills.
Last edited by Namor; 04-21-2009 at 08:28 PM.
The following users liked this post:
Terry Young (01-30-2014)
#2
04-21-2009 | 08:19 PM

Joined: Mar 2008
Posts: 2,521
Likes: 71
From: Powell, Ohio U.S.A. 43065
The problem is that when someone reads that yours were still relatively intact at almost 150K miles, they think this crucial piece of preventive maintenance has been exaggerated by people like me. I have seen engines severely damaged as a result of secondary timing chain tensioner failure that had half the mileage yours did.
I'm anxious to check out your parts supplier referrals: $148. for both secondary tensioners, four bolts and AJ27 cam cover gaskets and seals is less than my cost. Maybe you could save everyone some time and post the link for the tensioners right here, they must have only been about $50. each.
I'm anxious to check out your parts supplier referrals: $148. for both secondary tensioners, four bolts and AJ27 cam cover gaskets and seals is less than my cost. Maybe you could save everyone some time and post the link for the tensioners right here, they must have only been about $50. each.
The following users liked this post:
Terry Young (01-30-2014)
#3
04-21-2009 | 08:48 PM
Thread Starter
|
Member
Joined: Apr 2009
Posts: 33
Likes: 3
don't be anxious. and i do know the price seems utterly ridiculous. the cost is why i gave a try. even my local shop said just drive it till it explodes.
Got the tensioners form moug1610 on ebay. that's all i've got for you in terms of reference. you should send him a message and see if he has anymore in stock. Both of them together with the bolts were $92 or something. valve cover gaskets together cost $50 from Partgeeks.com i didn't include shipping costs. England was $14 for moug1610 and partsgeek in the U.S. $8 something. that put my total expense around $160-168. i don't add well, always round up.
was going to get the rest of the seals at a local dealer if they looked bad. i decided to stick with em and probably would have been fine with the valve gaskets as they were. (noted: if my car was in better condition and had more life in it i would have replaced every seal and gasket regardless of condition)
and i agree with the 150k mile comment. if i buy another, because they are a good deal, i'll check service records, and to be on the safe side check on the tensioners every 30k or 40k miles. and i certainly don't think you are exaggerating about the issues with these parts, the preventative care is essential. i've been reading up on them for a while now and i think they are one of the reasons they have such low resale.
Last edited by Namor; 04-21-2009 at 09:38 PM.
The following users liked this post:
Terry Young (01-30-2014)
#5
04-22-2009 | 09:02 AM
Veteran Member
Joined: Oct 2008
Posts: 1,790
Likes: 417
From: Virginia Beach, VA
Thanks for the posting Namor. This explains and shows the replacement of the secondary tensioners in plain english. I always wondered why you needed all the special tools if you're just replacing the secondary tensioners, and making the cam locking tool doesn't sound all that difficult. I've worried about the CVT or VVT getting out of whack, but it sounds like you had no issues with that. Good luck with the car, and thanks again.
#6
04-22-2009 | 11:57 AM

Member
Joined: Nov 2008
Posts: 72
Likes: 3
From: New York
good effort...IF you only need to replace the tensioners and are happy keeping the old chains, (their are also ebay vendors out there that will sell you the secondary chain with an open link that means you can replace the chain without having to remove the primary chain assembly). Problem here as you say yourself is that you know the primary tensioners and guides are worn also, so this engine really needs the whole shakedown to make it right. Good approach though if you have a lower milage car that just needs updated tensioners.
#7
04-22-2009 | 02:02 PM
Thread Starter
|
Member
Joined: Apr 2009
Posts: 33
Likes: 3
good effort...IF you only need to replace the tensioners and are happy keeping the old chains, (their are also ebay vendors out there that will sell you the secondary chain with an open link that means you can replace the chain without having to remove the primary chain assembly). Problem here as you say yourself is that you know the primary tensioners and guides are worn also, so this engine really needs the whole shakedown to make it right. Good approach though if you have a lower milage car that just needs updated tensioners.
right now there is an entire timing kit on ebay for $450 new. a very good deal. it's from england but the feedback is good and the shippings good when you consider how much you are going to be saving.
Trending Topics

#9
04-22-2009 | 05:11 PM
Junior Member
Joined: Jan 2009
Posts: 27
Likes: 0
From: Gloucestershire, UK
Hi all, following this thread, I thought it important to illustrate the importance of this work being carried out DESPITE jaguar main dealers advice that "There's nothing to worry about"....
Description of work carried out on my discovery of a sutble rattling noise from left cam bank.
New generation primary AND secondary tensioners with shorter bolts
New chains
New chain guides
New gaskets all round
New Crank bolt
New engine oil
New oil filter
This is what the Jag specialist I used discovered when the engine was stripped down
The shattered pieces of BOTH secondary tensioners were found in the sump along with pieces from the chain guides...
The Jaguar specialists were somewhat surprised that this had not already gone BANG!!!
#10
04-23-2009 | 10:56 AM
Thread Starter
|
Member
Joined: Apr 2009
Posts: 33
Likes: 3
did it run much better after the work was done? doing the secondaries was the first step i've taken in trouble shooting. my jag has all sorts of issues because the previous owner didn't maintain it.
soon i'll break down and get the codes, but really i think it will soon be time to put my VP to sleep.
and your tensioners look worse than mine did.
soon i'll break down and get the codes, but really i think it will soon be time to put my VP to sleep.
and your tensioners look worse than mine did.
#11
04-24-2009 | 04:10 AM
Junior Member
Joined: Jan 2009
Posts: 27
Likes: 0
From: Gloucestershire, UK
It sounds/runs better than when it left Coventry!
More throttle response, better fuel economy and far quieter on start up.
Drives like it's brand new..
As you can see, the tensioners were totally shot, talk about using borrowed time!
It was useful to get the sump off, and thoroughly clean it out of all built up residue and gunked up engine oil..
I will be keeping a close eye on the replacement tensioners, and I will have them inspected every 30k just to be safe...
#12
05-12-2009 | 11:19 AM
Guest
Posts: n/a
http://jeg.serverhouse.com/Jag_docs/Timingchain.pdf
Here you can find how to do the timing chain and tensioner replacement.
dssossg@aol.com
Here you can find how to do the timing chain and tensioner replacement.
dssossg@aol.com
#13
10-26-2009 | 10:10 PM
Guest
Posts: n/a
I've been reading everything that I could find on the web on this subject for a while now but haven't posted before. I wanted to replace the secondary tensioners and chains in my 1998 XJ8 (condition unknown) since I bought it with 115,000 miles. It now has 119,000 miles and runs great, but I was becoming more and more worried that a tensioner failure would cost me mega bucks. So I made two Cam hold down tools, bought a kit on Ebay containing the new metal secondary tensioners, secondary chains with links, and the necessary gaskets. I gathered up the tools that I would need, break cleaner for cleaning the gasket surfaces, permatex, wd-40, white out and everything else that I might need.
Without ever having the cam covers off, I had only pictures that were posted on the web to go by. I formulated a plan of removing the cam covers (after removing everything in the way of removing the cam covers) rotating the engine with a 24mm socket and ratchet, to install the cam hold downs, making marks with white out and then removing a secondary chain by grinding the studs from a link and seperating the chain and replacing the tensioner with the chain seperated. Because I didn't know how much room I would have, I wasn't sure of how I would replace the chain, but I was thinking that I might have to attach the new chain to the old one, remove the cam hold down tool, and thread the chain through by rotating the engine with the ratchet until the new chain was installed and the old one was out, then removing the old chain and connect both ends of the new one with the link that I used to connect the new chain to the old.
As it turned out, that plan sucks for more than one reason, but primarily because the the tensioner can't be removed even with the chain seperated. The The large sprocket for the primary chain is in the way. I realized this after I had seperated the old chain. I hadn't installed the cam hold downs because I had to decided to run the new chain through first since there is no room to install it any other way without removing something else. The exhaust cam sprocket is too close to the casting.
Well, now I found that the tensioner can't be replaced without removing something else either. I needed a new plan. Since I didn't have a tool for removing the cam sprocket, I drew inspiration from a post that I had read about removing the Exhaust cam, but the cam chain was seperated! I considered everything, and came to the conclusion that unless a very strong gremlin were to turn my engine with the 24mm socket and ratchet, I had nothing to worry about. The other three cams would stay in the proper position. And then I realized that it didn't matter whether they stayed in the proper position or not! I could always return them to the proper position. And with the exhaust cam lifted up a little, the seperated chain could easily be put around the cam sprochets and positioned properly even if the chain was off completely.
I could see that the exhaust cam sprocket only had to be raised a couple of inches to provide clearance, so I decided to do it without completely removing the cam. The cam must be raised pretty evenly for the first little bit or the cam will bind at the bearing clocest to the sprocket, I loosened the bearing caps evenly in stages. Then I removed bearing caps completely, put a rag around the cam where the last bearing makes contact, and installed the last bearing cap again very loosly (Just enough to capture the cam and keep it in the general vacinity). Now you can raise the sprocket end to where you need it, and use the last bearing and the tension of the valves (where the lobes are pointing downward) to hold it where you want it.
I then had both hands free to remove and replace the tensioner. Even though the chain was seperated, the cam didn't turn at all, and was in exactly the correct position when I put it down and tightened the bearing caps evenly. You can determine this because the flat spots on the cam (where you would put the cam hold down tool) were in perfect alignment.
With the knowledge of how to do this job (and this is what you need to know), I went to the other head and had the tensioner and chain replaced in anout 30 minutes. This is how it went.
The cam cover was already off. The flats on the cam were already aligned. White out marks were already matching one tooth on each cam sprocket to the link that was on it.
I loosened the Cam bearing caps evenly. I removed the caps. I wraped the last bearing area on the cam with a clean rag and loosly reinstalled the cap. I jammed a rag all around the sprocket and chains to catch anything that I might drop. I removed the 2 bolts holding the tensioner. I lifted the cam sprocket with one hand keeping a little tension on the chain and removed the old tensioner with the other, and placed the new tensioner where the old one came out. I placed the cam back down. The tensioner can't fall out because the large sprocket won't allow it. (If you aren't changing the secondary chains you are done except for bolting the tensioner and bearing caps after removing rags. Don't forget to remove the tensioner pin if there is one. You should torque the tensioner bolts to 124 inch pounds, the cam caps and cam covers should torque to 97 inch pounds. Reinstall everything else that you removed.)
If you are replacing secondary chains read on.
I seperated the chain between the white out marks (use any method that you like, but don't destroy the chain, you will need it as a refference). Lift the sprocket again and remove old chain. Stretch it out on a flat surface along side the new chain. Make white out marks on the links of the new chain that match the marks on the old chain. Making sure that the white out is on the correct side of the chain, feed it down next to the upper cam sprocket not the one that is unbolted. You will need to remove the rag for this. When it is fed far enough capture the beginning of the chain with a bent coat hanger, or some such tool. Continue feeding chain until you can place the marked link on the marked tooth of the upper sprocket. Make sure that it won't fall off the sprocket, but the sprocket can't turn unless the entire engine does. Lift the exhaust sprocket, and bring the captured end of the chain around it until the link with the white out mark can be placed on the marked tooth. Make sure to keep the chain on the sprocket (this sprocket can turn). Put camshaft down. Replace rag to catch droped items. Correctly install link and link clip in chain. Position camshaft. Bolt down tensioner to 124 inch pounds. Remove rags. Remove tensioner pin. Reinstall cam bearing caps and Torque to 97 inch pounds in stages evenly. Check for proper alignment of flats on Camshaft. When done with both sides Reinstall Cam covers and torque to 97. Use proper torque patern. Reinstall everything else you removed. Reconnect battery cable. Top off coolant.
The flats on the camshaft will tell you if anything is out of time. Make sure cams on both heads are correctly alligned at the same time. If they aren't, DON'T START YOUR CAR UNTIL YOU FIX IT!
This isn't a tricky job. It doesn't require any Jaguar tools. It isn't especially hard. It shouldn't be scary. It isn't even all that time consuming if you know what to do and you have some tools to speed it up like a 1/4 inch drive crank handle. Instead of spending any money on Jaguar tools that you won't use again, buy an inch pound torque wrench that reads fron 60 to 240 from Sears for under $60.00
As it turns out, this entire job for me wouldn't have been needed for some time. The removed tensioners were second generation with almost no wear and no cracks. The chains when compared to the new ones were less than 1/16 inch longer and looked new. It is apparent that the PO had the job done not many miles ago. I can only hope that he had the primaries replaced at the same time. I intend to proceed on that assumtion. However I will be listening for chain noise.
For me the job was fun, and now I will be able to drive the car without dread of impending total engine destruction. A bargain at half the price! Good luck.
#14
10-28-2009 | 12:08 PM

Member
Joined: Jun 2008
Posts: 98
Likes: 0
From:
eh well I replaced both my primary/secondary chains guides/blades/ bs etc and it still rattles a bit at startup. Doesn't really knock but there is apparent rattling on first startup, never changed since i've had it. here check my thread from last year.. over 3,500 views chief
you want to see how bad it gets, check my original plastics that went to 79k
https://www.jaguarforums.com/forum/s...ead.php?t=5546
you want to see how bad it gets, check my original plastics that went to 79k
https://www.jaguarforums.com/forum/s...ead.php?t=5546
#15
10-29-2009 | 05:57 PM
Guest
Posts: n/a
Hello Atom,
I assume that your post was meant for me since mine was the first post in over 5 months. However, I don't get your point. Your post reads as if you have taken offense at something in my post. I say this for the following reasons: your title "Eh" your opening "Eh well" your statement "my thread from last year.. over 3,500 views" and referring to me as "Chief". I assure you, that no offense was intended.
As stated in the beginning of my post, "I've been reading everything that I could find on the web on this subject", and your thread was one of thoes that I read. Other than to view the pictures of your used parts, it held little interest for me since I was planning to do the work myself and was looking for advice and the experiences of people that had performed the job themselves.
The fact that, on my car, the job wasn't in need of being performed for some time , doesn't have any bearing on wheather anyone elses car is in need or not. As I stated at the end of my post "It is apparent that the PO had the job done not many miles ago."
I'm also confused that in your thread of last year (after the job was done) you wrote "My sheet is running silent as it should", and in your post of yesterday you wrote "I replaced both my primary/secondary chains guides/blades/ bs etc and it still rattles a bit at startup. Doesn't really knock but there is apparent rattling on first startup, never changed since i've had it."
You seem not to be worried at all by this on going rattle, but if I had someone else do the job for me and it still rattled every time that I started the car, I would be very worried indeed. Eh well, good luck.
#16
01-09-2012 | 01:55 PM

Junior Member
Joined: Jan 2010
Posts: 26
Likes: 1
From: Indianapolis
Namor-
When you said the space between the head and the metal bar has to be .5-.55 inch do you mena anywhere between .5 and .55 of an inch will work. I'm trying to make before I attempt the secondary tension change over and was going to do a spot weld on the spacer and metal bar so they are permantly attached.
Thanks.
Rick
#17
01-11-2012 | 06:40 PM
Thread Starter
|
Member
Joined: Apr 2009
Posts: 33
Likes: 3
Namor-
When you said the space between the head and the metal bar has to be .5-.55 inch do you mena anywhere between .5 and .55 of an inch will work. I'm trying to make before I attempt the secondary tension change over and was going to do a spot weld on the spacer and metal bar so they are permantly attached.
Thanks.
Rick
When you said the space between the head and the metal bar has to be .5-.55 inch do you mena anywhere between .5 and .55 of an inch will work. I'm trying to make before I attempt the secondary tension change over and was going to do a spot weld on the spacer and metal bar so they are permantly attached.
Thanks.
Rick
I've about 4 since this post. Let me know if you have other questions.
#18
01-11-2012 | 07:45 PM

Senior Member
Joined: Jun 2010
Posts: 236
Likes: 27
From: Indiana
Great Write up Namor, Not sure how I've missed this one over time, but, I did. My 99 has been parked since spring, with what I presume to be a failure of the right bank secondary tensioner (have a seperate post from September 2011). Have been too busy to address, but alas, my son has totaled what was the back up vehicle for the Jag when she was down, so now my hand may be forced to finally look at and address. Am considering getting a borescope to have a looksie in the cylinders befor attacking the tensioners. Son drove it home in 'safe' mode. Starts right up with noise from right bank. If I see piston or valve damage, it may be time for a burial. Anyhow, you've inspired me to continue. Glad the moderators haven't revoked my membership. It's been a while, and I haven't been much help.
#19
01-12-2012 | 07:41 AM
Junior Member
Joined: Jan 2010
Posts: 26
Likes: 1
From: Indianapolis
The following users liked this post:
Namor (01-12-2012)
#20
01-12-2012 | 06:28 PM
Thread Starter
|
Member
Joined: Apr 2009
Posts: 33
Likes: 3
I did not. I have done it with the crank locker and and found it unnecessary. What's good about it is that when its in you know that all of the cams are on TDC and that is comforting. (or that perhaps your cams have skipped a tooth or something)
However, I don't find locking the crank necessary because the only thing that is going to move during the process would be the cams. Since they are locked, and I suggest locking both sides at the same time, I don't concern myself about the crank anymore.
Also, I suggest using a breaker bar and appropriate socket for the crank nut at the harmonic balancer to turn the engine over to where you want it.
Rea, get your DTC's scanned before you do anything. You may have a variable valve timing issue. And... if the vehicle won't start after sitting for so long, send me a PM.