Just pressed in lower ball joints
#21
 01-20-2012, 07:54 PM


Senior Member
#22
02-08-2012, 06:52 AM

#23
08-10-2012, 05:14 AM

Doing the Lower Wishbone Ball Joint ?
My Car : 1999 XJ8 4.0 Sov
I was just about to take my front shock out to do some welding on the chassis behind it for some MOT work. Whilst inspecting the the area I found that the rubber boot on Lower Wishbone Ball Joint is punctured. I am guessing the MOT man won't like that if he sees it.
Having looked at the lengthy JTIS procedure ixj8it way looks way better. However I had a couple of questions about the method.
1. To get the vertical link disconnected and out of the way of the lower ball joint do you also have to disconnect the track rod end ball joint. ie is there enough "waggle" room to get the vertical link out of the way and not to bother.
2. It seems you have to "jack" the lower wish bone up to get the lower ball joint separated from the vertical link. As I have just machined up a "bayonet" type tool (like the Front Camber Tie-down Link204-114 (JD 133)) to go through the middle of the spring is this going to be any use to me ? I don't trust my trolley jack over the few days it may take.
3. Other than the F.B. sized 'C' clamp do I need any other special tools like ball joint separaters to get the job done ? I have a lathe and milling m/c etc to hand so I can make packers, spacers and rings for use with the 'C' clamp.
Regards
Neil
My Car : 1999 XJ8 4.0 Sov
I was just about to take my front shock out to do some welding on the chassis behind it for some MOT work. Whilst inspecting the the area I found that the rubber boot on Lower Wishbone Ball Joint is punctured.
Having looked at the lengthy JTIS procedure ixj8it way looks way better. However I had a couple of questions about the method.
1. To get the vertical link disconnected and out of the way of the lower ball joint do you also have to disconnect the track rod end ball joint. ie is there enough "waggle" room to get the vertical link out of the way and not to bother.
2. It seems you have to "jack" the lower wish bone up to get the lower ball joint separated from the vertical link. As I have just machined up a "bayonet" type tool (like the Front Camber Tie-down Link204-114 (JD 133)) to go through the middle of the spring is this going to be any use to me ? I don't trust my trolley jack over the few days it may take.
3. Other than the F.B. sized 'C' clamp do I need any other special tools like ball joint separaters to get the job done ? I have a lathe and milling m/c etc to hand so I can make packers, spacers and rings for use with the 'C' clamp.
Regards
Neil
#24
05-31-2013, 06:27 AM

Junior Member
Join Date: Apr 2013
Location: La Plata Maryland
Posts: 2
Likes: 0
Received 0 Likes
on
0 Posts
Success!!

I left the vertical link hooked to the upper BJ and supported it with a jack stand. I am still waiting on the correct shocks so I can get those swapped in. The lower bushings are trashed, probably because the upper bushings also suck. I found some poly mustang control arm bushings I am going to modify to fit the upper shock mounts. The car drives like a dream with the new joints, I can still tell I have shock problems though.
I also replaced my coolant tank and all the tubes. Things are finally coming together for the old girl
#25
06-04-2013, 03:21 PM
Junior Member
Join Date: Apr 2013
Location: La Plata Maryland
Posts: 2
Likes: 0
Received 0 Likes
on
0 Posts
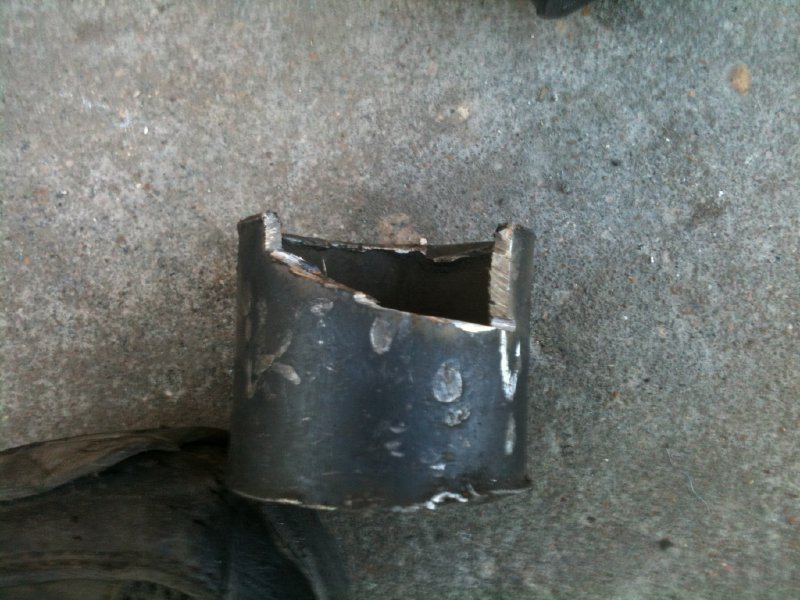
What a nightmare. I had to cut the lip off of the joints in a hexagonal/octagonal fashion so I could have something to press against. This allowed me to do it in the car with out touching the alignment bolts or spring.
Here are some pics:
Pics of the way I cut the the BJ with a cutoff wheel.
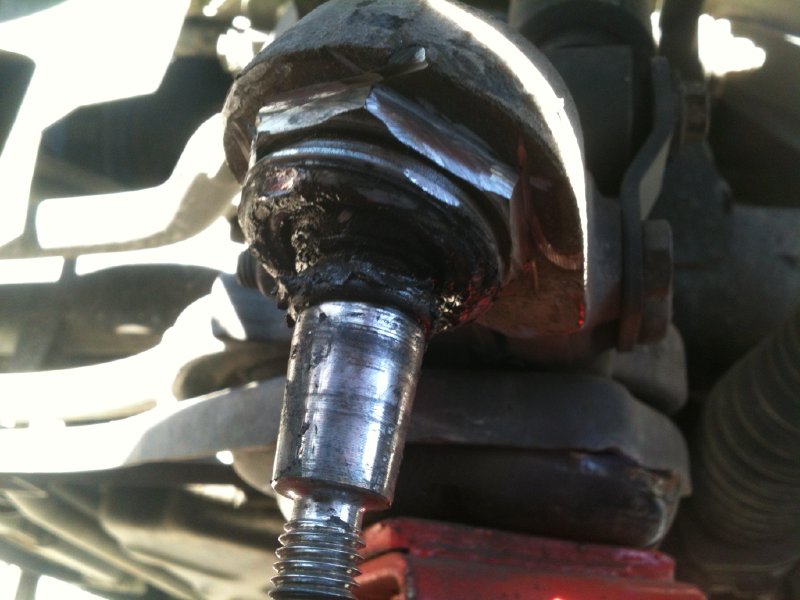
Pic of the tool I made to press the BJ back into the control arm.
Finally got that sucker out! I thought it would never come out. I had to apply pressure with my otc C clamp using a breaker bar. Then whack that with a hammer for them to finally unseat. From there on out, they moved fairly easy.

Pic of the initial setup used to get the ball joint pressed back in.

Pic of the second stage setup (to compensate for the top of the ball joint protruding upward from the top side of the control arm)

Here are some pics:
Pics of the way I cut the the BJ with a cutoff wheel.
Pic of the tool I made to press the BJ back into the control arm.
Finally got that sucker out! I thought it would never come out. I had to apply pressure with my otc C clamp using a breaker bar. Then whack that with a hammer for them to finally unseat. From there on out, they moved fairly easy.
Pic of the initial setup used to get the ball joint pressed back in.
Pic of the second stage setup (to compensate for the top of the ball joint protruding upward from the top side of the control arm)
What is the ball joint lubed with to ease in the press?
Thanks

#27
07-29-2013, 07:59 AM
#28
07-29-2013, 01:27 PM

Senior Member
#29
04-03-2014, 08:47 AM
I was wondering if a shop press like this: 6 Ton A-Frame Bench Shop Press, could be used to press out the ball joint in situ?
Not sure if it would fit, but I was thinking that it might eliminate the whole receiver cup problem, as long as the A arm could rest in the bottom rail of the press.
I could use a press like this for a few other jobs, so the price is easily justifiable.
Not sure if it would fit, but I was thinking that it might eliminate the whole receiver cup problem, as long as the A arm could rest in the bottom rail of the press.
I could use a press like this for a few other jobs, so the price is easily justifiable.
#30
04-03-2014, 12:57 PM

I just did this job - but with a scrap set of wishbones and obviously off the car. I did the bushes as well and they await installation when I can get a few days to tear down the front end. The scrap set did not cost much and allowed me all the time I needed to strip, repaint and re-bush and ball joint them, ready for swapping with the old set on the car.
I bought the same kit as in the original post - around �40 on fleabay.
I can tell you that even with the wishbone arm off the car this was not an easy job, but cutting the ball joint lip was a lot easier than it would have been even though the lower ball joints face downwards. The ball joint kit was a good substitute for a proper press and a good investment, although a couple of solid plates and a receiving cup for installation were necessary (I used the cut down carcass of one of the bushes which did the job but perished in the process !). For reference you need something around 44mm in diameter with one edge partially removed due to the angle of the wishbone arm.
AndyP

Thread
Thread Starter
Forum
Replies
Last Post
JagBrian
F-Type ( X152 )
8
09-21-2015 07:17 PM
Currently Active Users Viewing This Thread: 1 (0 members and 1 guests)