My 308 RealGauge experience.
#1
 10-23-2012, 07:16 PM

Hi folks,
The Jagwrangler, aka WhiteXKR, aka Steve, was kind enough to offer a free RealGauge kit for a draw in the X308 forum. I was lucky to be the winner of the draw, and felt that to make a thread about the experience is the least that I can do for him.
First off, Steve was very prompt about shipping the unit to me. It arrived in a box about the size of a hard cover book.
The contents were nicely packaged against damage, plus it meant I didn't have bits and pieces falling over the place, begging to be lost!
I started by reading the installation instructions on my IPAD. They are very well written, with good pictures, and clear, concise directions. This is not easy to do, and many products have really bad instructions.
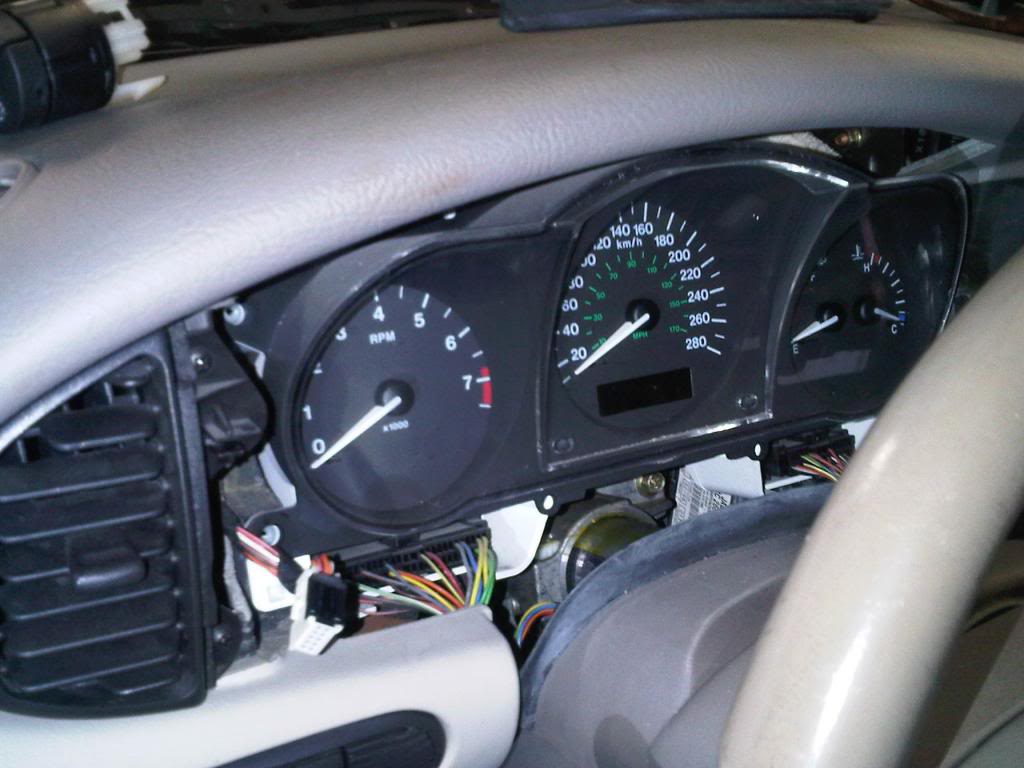
First, off comes the wooden trim panel, by pulling it straight out from it's spring clips.

Next the two button modules come out, after using a small screwdriver to press the tab down.

Four Philips screws later, the whole panel comes out.
Off to the kitchen table, where I followed the directions to install the circuit board. I chose not to install the optional temperature numerical decals, in order to keep the stock appearance.
This is a good opportunity to clean the displays so they look new. Again, the directions to install the board were great.

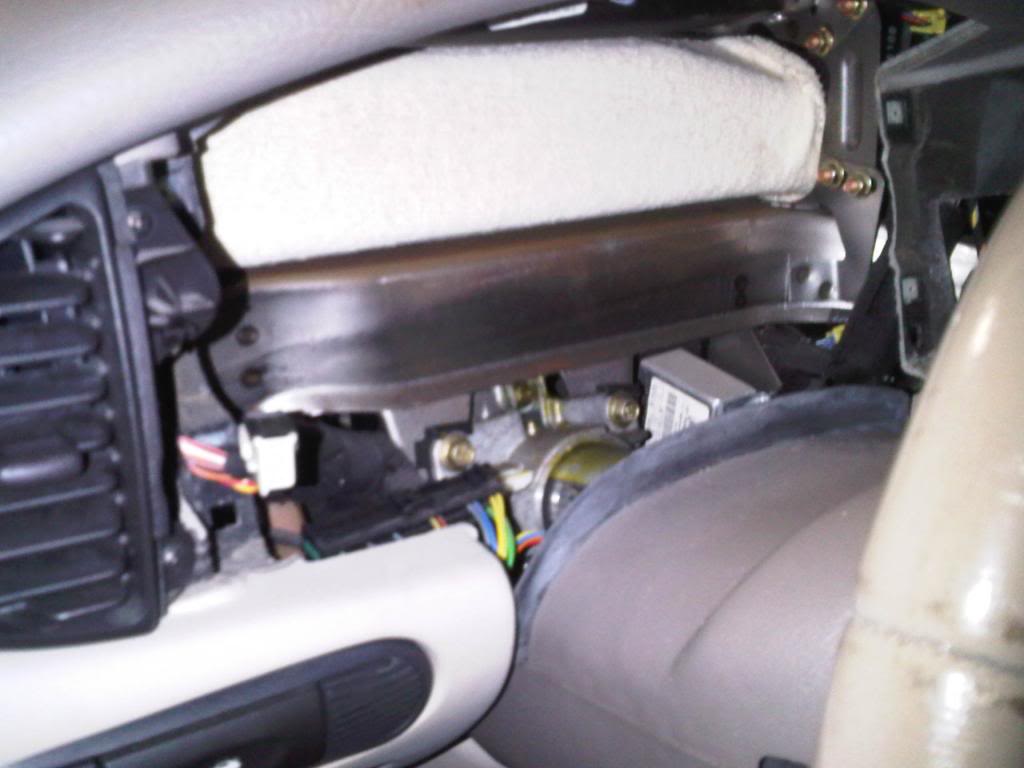
Next came the wiring in the car. Now here, I deviated a little bit from the instructions, and your experience may differ. I did open up the harnesses to get access, but found later that it wasn't quite as necessary as I first thought. I installed the splices closer to the plugs than recommended but it worked out for me.

Finding the wires to splice was easy, again, good instructions and pictures.
Now, lest you think I am in the employ of Jagwrangler, and am posting nothing but good news, here's my take.
I found the hardest part was splicing the wires. I am highly suspicious of any kind of wire tapping device, based on past experience. The Posi taps were fiddly, and more suited to smaller fingers than mine, perhaps!
But, I am forced to admit they did the job nicely, and they are way better than the junk I've seen in the past.
I found that propping the instruments on the steering column worked better than having them in the dash while splicing. After the splicing, it's a straightforward job to reassemble, then start the test procedure.
The potentiometer included in the kit is perfect. The pins fit nicely, and the wires are plenty long enough to sit in the car and adjust the temperature while watching the needle and the OBD II reader.
Speaking of that, Steve offers to lend his customers an OBD II reader! This is unheard of customer support, in my opinion.
More to follow.........
The Jagwrangler, aka WhiteXKR, aka Steve, was kind enough to offer a free RealGauge kit for a draw in the X308 forum. I was lucky to be the winner of the draw, and felt that to make a thread about the experience is the least that I can do for him.
First off, Steve was very prompt about shipping the unit to me. It arrived in a box about the size of a hard cover book.
The contents were nicely packaged against damage, plus it meant I didn't have bits and pieces falling over the place, begging to be lost!
I started by reading the installation instructions on my IPAD. They are very well written, with good pictures, and clear, concise directions. This is not easy to do, and many products have really bad instructions.
First, off comes the wooden trim panel, by pulling it straight out from it's spring clips.
Next the two button modules come out, after using a small screwdriver to press the tab down.
Four Philips screws later, the whole panel comes out.
Off to the kitchen table, where I followed the directions to install the circuit board. I chose not to install the optional temperature numerical decals, in order to keep the stock appearance.
This is a good opportunity to clean the displays so they look new. Again, the directions to install the board were great.
Next came the wiring in the car. Now here, I deviated a little bit from the instructions, and your experience may differ. I did open up the harnesses to get access, but found later that it wasn't quite as necessary as I first thought. I installed the splices closer to the plugs than recommended but it worked out for me.
Finding the wires to splice was easy, again, good instructions and pictures.
Now, lest you think I am in the employ of Jagwrangler, and am posting nothing but good news, here's my take.
I found the hardest part was splicing the wires. I am highly suspicious of any kind of wire tapping device, based on past experience. The Posi taps were fiddly, and more suited to smaller fingers than mine, perhaps!
But, I am forced to admit they did the job nicely, and they are way better than the junk I've seen in the past.
I found that propping the instruments on the steering column worked better than having them in the dash while splicing. After the splicing, it's a straightforward job to reassemble, then start the test procedure.
The potentiometer included in the kit is perfect. The pins fit nicely, and the wires are plenty long enough to sit in the car and adjust the temperature while watching the needle and the OBD II reader.
Speaking of that, Steve offers to lend his customers an OBD II reader! This is unheard of customer support, in my opinion.
More to follow.........
Last edited by avt007; 10-23-2012 at 07:18 PM.
The following 6 users liked this post by avt007:
jimlombardi (10-23-2012),
KillerKat (10-30-2012),
Norri (10-23-2012),
Orthodixie (05-19-2017),
Platinum XJR (10-12-2013),
and 1 others liked this post.
#2
10-23-2012, 07:22 PM


Join Date: Oct 2007
Location: PHX some of the time
Posts: 117,227
Received 6,305 Likes
on
5,493 Posts
#3
10-23-2012, 07:37 PM
Part II
A little background on myself. I am an Aircraft Maintenance Engineer, specializing in Avionics, or the electronics and instrumentation side of things. All my career has been focused on making damn sure the instruments in the flight deck are calibrated and tested, indicating precise, accurate numbers.
Imagine my frustration with various car manufacturers who basically design their guages to lie and cheat! "don't worry your pretty little head, we know what you need to see on the dash, that's a good girl". Aargh!
Before I started this mod, I did my own tests to see what was displayed on the original gauge. Better minds than mine have done this, refer to the thread entitled "the folly of the temperature gauge". OregonJag did some great tests and posted a graph that lays it all out.
I'll add my own results, simplified. at 185 F, the needle is dead centre. It remains there up to 235 F! At 239 F, the needle then moves up a bit, seen here.
50 degrees of temperature change, and you don't have a clue! Thanks, Jaguar.
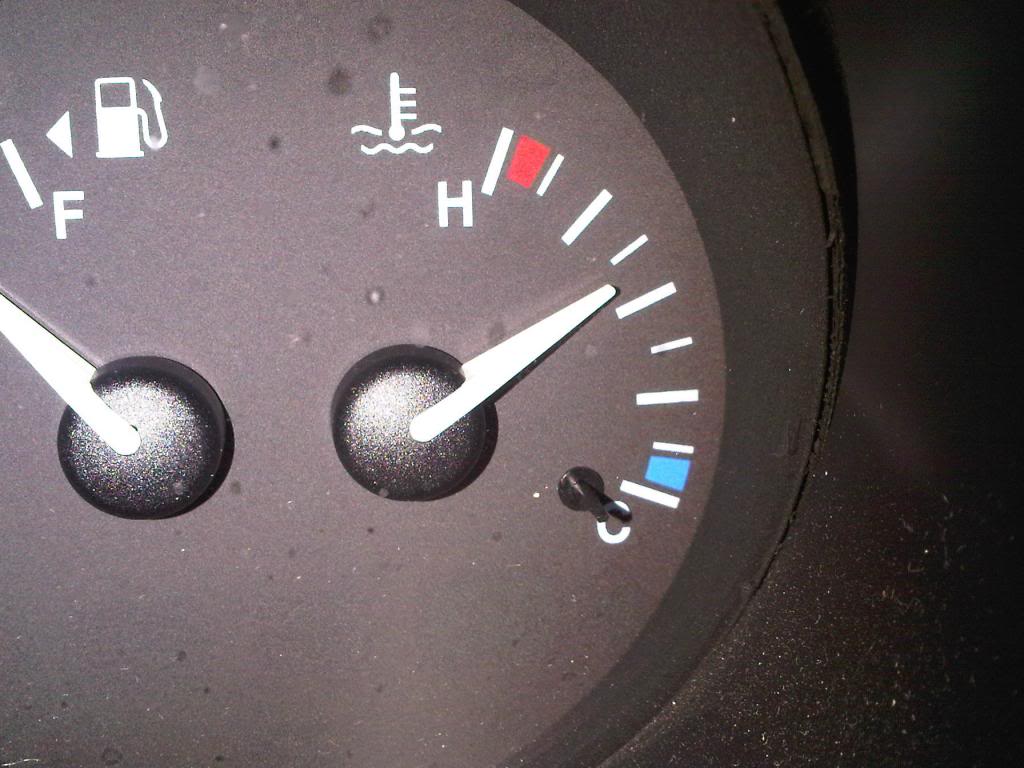
Full deflection and the red light does not occur until 245 F, way beyond what I'd want my engine to reach.
Anyway, after the install, I tested the accuracy using the OBD II, and it was bang on what Steve said it'd be. One thing that I could not do was the calibration procedure, since for some reason, my OBD will not read data unless the engine is running, and the cal feature only works with the engine off.
But like I said, I tested it and there wasn't any need to do the calibration anyway.
It's been a couple days and I haven't had a chance to see much variation in the temp, probably due to the cool fall temperatures of 3-5 degrees C.
Today I did see it above centre though, because I shut it down and started again a minute later after it heat soaked.
To sum up, this is a well built and designed product, with good features like an audible alarm. The install is pretty easy for pretty much anyone, and above all it works as advertised.
I now have peace of mind knowing that I have an accurate indication of what my cooling system is doing.
Well done WhiteXKR!
A little background on myself. I am an Aircraft Maintenance Engineer, specializing in Avionics, or the electronics and instrumentation side of things. All my career has been focused on making damn sure the instruments in the flight deck are calibrated and tested, indicating precise, accurate numbers.
Imagine my frustration with various car manufacturers who basically design their guages to lie and cheat! "don't worry your pretty little head, we know what you need to see on the dash, that's a good girl". Aargh!
Before I started this mod, I did my own tests to see what was displayed on the original gauge. Better minds than mine have done this, refer to the thread entitled "the folly of the temperature gauge". OregonJag did some great tests and posted a graph that lays it all out.
I'll add my own results, simplified. at 185 F, the needle is dead centre. It remains there up to 235 F! At 239 F, the needle then moves up a bit, seen here.
50 degrees of temperature change, and you don't have a clue! Thanks, Jaguar.
Full deflection and the red light does not occur until 245 F, way beyond what I'd want my engine to reach.
Anyway, after the install, I tested the accuracy using the OBD II, and it was bang on what Steve said it'd be. One thing that I could not do was the calibration procedure, since for some reason, my OBD will not read data unless the engine is running, and the cal feature only works with the engine off.
But like I said, I tested it and there wasn't any need to do the calibration anyway.
It's been a couple days and I haven't had a chance to see much variation in the temp, probably due to the cool fall temperatures of 3-5 degrees C.
Today I did see it above centre though, because I shut it down and started again a minute later after it heat soaked.
To sum up, this is a well built and designed product, with good features like an audible alarm. The install is pretty easy for pretty much anyone, and above all it works as advertised.
I now have peace of mind knowing that I have an accurate indication of what my cooling system is doing.
Well done WhiteXKR!
Last edited by avt007; 10-23-2012 at 07:43 PM.
The following 9 users liked this post by avt007:
Alvin Burns (12-13-2012),
fredd60 (10-24-2012),
JimC64 (10-23-2012),
JKo (10-24-2012),
Orthodixie (05-19-2017),
and 4 others liked this post.
#4
10-23-2012, 07:55 PM
Veteran Member
Join Date: Nov 2006
Location: Glasgow, Scotland UK
Posts: 47,302
Received 9,006 Likes
on
4,113 Posts

Rob - Thanks so much both on behalf of the forum members and also Steve ( WhiteXKR ) for coming back here and posting this.
I guess its obvious to say that it serves as a testimonial for Steve, his company, products and excellent customer service, as well as good solid info for members here, considering this upgrade in future.
Much appreciated Rob, happy motoring
#5
10-23-2012, 09:11 PM
Veteran Member
#6
10-23-2012, 09:53 PM

 It does save you paper if you don't want to print the directions.
#7
10-23-2012, 10:00 PM
Veteran Member
If the tick marks on your gauges are rectangularly shaped, usually (but not always) calibration will be very close out of the box. If your tick marks are 'teardrop' shaped, calibration will almost certainly be necessary. Both types appear in '96-'99 vehicles.
As Rob said, I offer a loan of an OBDII scanner to any customer to perform the 10 minute calibration when they order RealGauge.
Last edited by WhiteXKR; 10-23-2012 at 10:05 PM.
Trending Topics
#9
10-23-2012, 11:26 PM
And a bit more info, since I am the **** retentive type and maybe a bit OCD when it comes to this stuff.
I was thinking about how it has behaved since the mod. Much to my dismay, it acts exactly the same! The needle goes to mid scale and stays there, pretty much.
Well I went back and tested it again. Yes, it's mid scale, because it's actually running at 185 F. At idle the fans come on and keep it at that temp. Revving the engine actually dropped it to 179 F and the needle moved to reflect that. It's nice to see a 6 degree change shown by the needle.
I then went and searched for an early post I did on thermostats, and found that mine is a 170 F thermostat because that's all I could get locally, even though 183 is "standard".
So there you have it. If anything interesting pops up I'll let you know.

#11
10-24-2012, 04:55 AM
Veteran Member
Join Date: Apr 2012
Location: Bairnsdale,Victoria Australia
Posts: 1,495
Received 219 Likes
on
181 Posts
Interesting reading and thanks for posting it. I am now concerned that when I get "low coolant" warning i just watch the Temp Gauge and keep on going for hours thinking its OK the the temperature is still showing normal !! Ahhh ****!! How much is a real gauge? Are they serious? I was saddened at the loss of the Oil Pressure gauge! Also the fuel reads empty when filled! Wonder how fast I am really going? What to believe!! Neil.
#12
10-24-2012, 06:45 AM
Join Date: Oct 2007
Location: PHX some of the time
Posts: 117,227
Received 6,305 Likes
on
5,493 Posts
#13
10-24-2012, 07:20 AM
Veteran Member
I found that the needle on my temp gauge is higher on the scale with the RealGauge than it was before. I used the 185 marker for the middle of the temp gauge - that's where it used to sit, and now the needle sits about a tic mark higher at 200 F. But, I now know that this is the "real" temperature, and matches my OBDII readings. It is nice to have a real temp gauge.
#14
10-24-2012, 10:44 AM
Veteran Member
And a bit more info, since I am the **** retentive type and maybe a bit OCD when it comes to this stuff.
I was thinking about how it has behaved since the mod. Much to my dismay, it acts exactly the same! The needle goes to mid scale and stays there, pretty much.
Well I went back and tested it again. Yes, it's mid scale, because it's actually running at 185 F. At idle the fans come on and keep it at that temp. Revving the engine actually dropped it to 179 F and the needle moved to reflect that. It's nice to see a 6 degree change shown by the needle.
I then went and searched for an early post I did on thermostats, and found that mine is a 170 F thermostat because that's all I could get locally, even though 183 is "standard".
So there you have it. If anything interesting pops up I'll let you know.
I was thinking about how it has behaved since the mod. Much to my dismay, it acts exactly the same! The needle goes to mid scale and stays there, pretty much.
Well I went back and tested it again. Yes, it's mid scale, because it's actually running at 185 F. At idle the fans come on and keep it at that temp. Revving the engine actually dropped it to 179 F and the needle moved to reflect that. It's nice to see a 6 degree change shown by the needle.
I then went and searched for an early post I did on thermostats, and found that mine is a 170 F thermostat because that's all I could get locally, even though 183 is "standard".
So there you have it. If anything interesting pops up I'll let you know.
#15
10-24-2012, 06:15 PM
Veteran Member
A low coolant warning needs to be taken very seriously for this reason.
Last edited by WhiteXKR; 10-24-2012 at 06:18 PM.
#16
10-25-2012, 09:08 AM
There is not engine temp sensor on the V8, how dumb is that. Sexy car, dumb engineers.
RealGauge on my purchase list. Does it use the OEM gauge? There is no separate gauge to stick anywhere, if so that would be a setback for me purchasing it.
EDIT: NICE IT USES THE OEM GAUGE!!!!!!, definitely on my to purchase list.
RealGauge on my purchase list. Does it use the OEM gauge? There is no separate gauge to stick anywhere, if so that would be a setback for me purchasing it.
EDIT: NICE IT USES THE OEM GAUGE!!!!!!, definitely on my to purchase list.
Last edited by sbreeden; 10-25-2012 at 09:37 AM.
#17
10-25-2012, 11:24 AM
Veteran Member
#19
10-25-2012, 02:10 PM
Veteran Member
#20
10-25-2012, 03:16 PM
I am wondering what the best running temperature is for power, mileage, engine life,etc.