
My progress/problems/new parts thread.
#1
 05-26-2012, 08:31 PM

When I start to fall for a car I have a bad problem of leaving well enough alone. This has begun my journey with my current passion, my 1998 XJR.
Normally I will start a progress thread as I build a car to not only help others in their endeavors but to also get input and insight on my own modifications. I have come too see that this is a very informative and helpful forum, more so than on any other I have been part of. So I hope to give a little back and at the same time get to show off my baby.
I have done this on a Lincoln forum when supercharging, gear installing, Cobra brake swapped, computer air controlling, suspension and chassis modding my Mark VIII. Did this on Stang forums when going overboard on a 2003 Cobra build etc etc.
Unfortunately I neglected to show the starting stages of the current project so I will try and get everyone up to speed and take some pictures on Tuesday to show current progress.
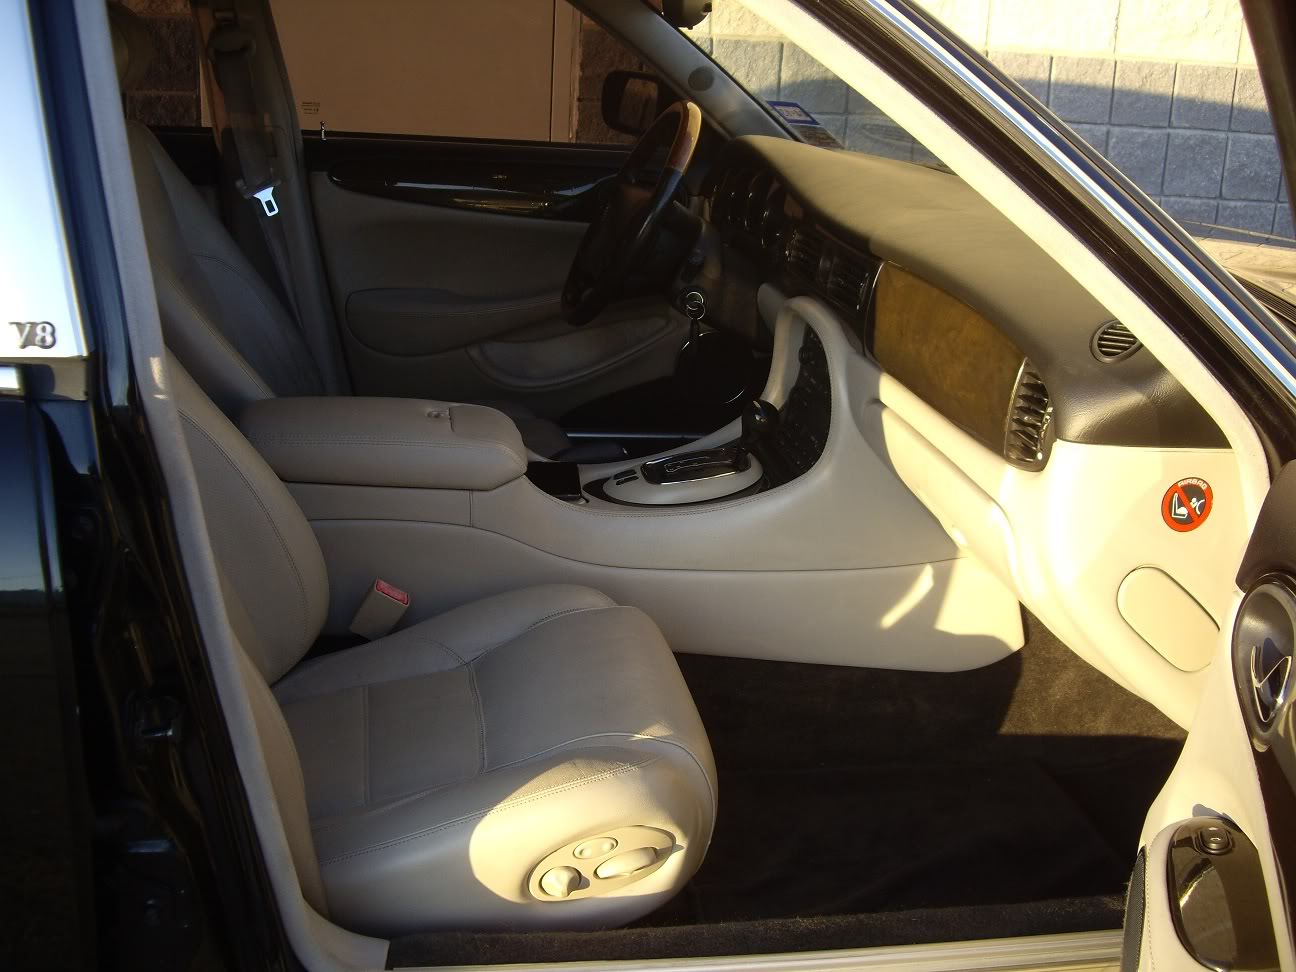
Started off with a sweet deal on a 1998 XJR with 160k that needed some love. Drivers seat and rear seat were worn as was the front end components. Paint was beautiful but the body had many dings.
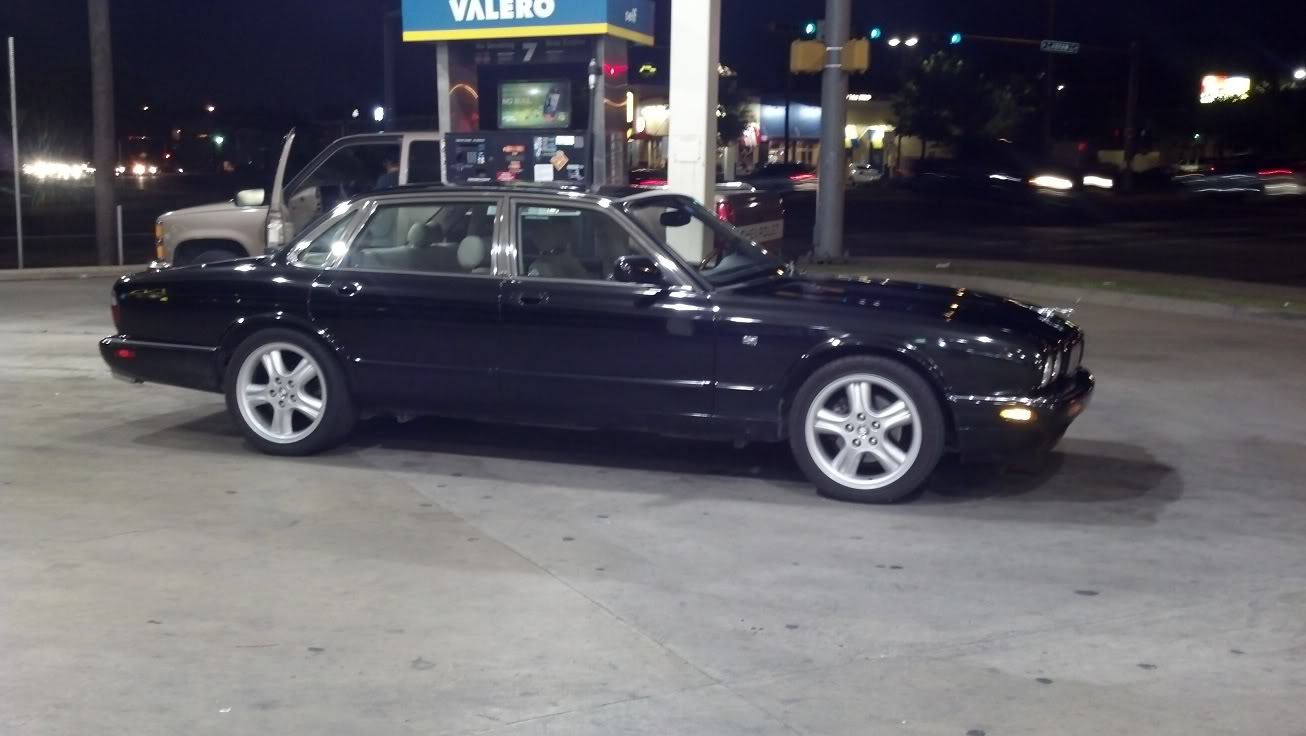
Here she was on her maiden voyage home and my first time to fill it up, thats also my truck on the other side of the pump. On the test drive I could feel the knock sensors pulling power and the guy selling it was putting regular in it so I felt the need to fill it with Premium ASAP.
So that 100 mile drive home allowed me to feel the cars other issues..... which seemed plentiful. Front end chattered, tires bounced, brakes pulsed, belt squealed, rear wasn't stable and there was this terrible roar....... what did I get myself into?
Next day at my shop I got her in the air to see what was what. Well it started off by seeing the underside was nice and clean. No damage at all and not a drip from anywhere. Good show. After that it got sour. Starting from the rear I could see the sway links were bad and someone installed cheap brake pads in it. Also could see the fuel filter looked like it had been there a long long time. Moving up I could see the central exhaust hanger was busted and then I got to the nose. What a mess. Lower ball joints were ready to fail, shocks had no lower bushings, upper shock mounts were almost gone, sway links were shot, rotors had heat spots and were glazed, cheap brake pads, poor alignment, bad belts, worn plugs, dirty oil, clogged air filter, rotted brake lines, hanging caliper, bad wheel bearings, shattered fog light and a bent wheel. Off to work I go!
Seeing as how the car needed all those parts I did the most logical thing, modified the exhaust. LOL
Actually I ordered the parts and had to wait so while bored I cut the rear cans off and put in straight pipes. You cant tell at all unless you were under the car. I aligned them perfectly and the car is still very very quiet.
Got in some Moog rear sway links and changed them up a little. I threw away the crap bushings they come with and used some very high durommeter bushings I had for an old project. I also used the narrower bushings on both sides of the LCA mount to help eliminate any harshness plus it helps pre load the bar. Replaced the fuel filter with a Wix. Old filter you could not even blow through it. No wonder the knock sensors were working so hard.
Moved on to the exhaust hanger. Kept it simple and burned out the rubber, welded a spacer where the rubber used to be and then welded it as a solid but removable mount. Helps keep the flex lines quiet.
Next up would be the parts that tried my patience. The lower ball joints. I didn't want to spend $300 on new arms when the ball joints were only $50. Could not for the life of me press them out so I had to use the hot wrench to glow the LCA and hammer the ball joint out. Had the new ones on ice so all I had to do was drop them in their hole and let the LCA swell back up to grab them.
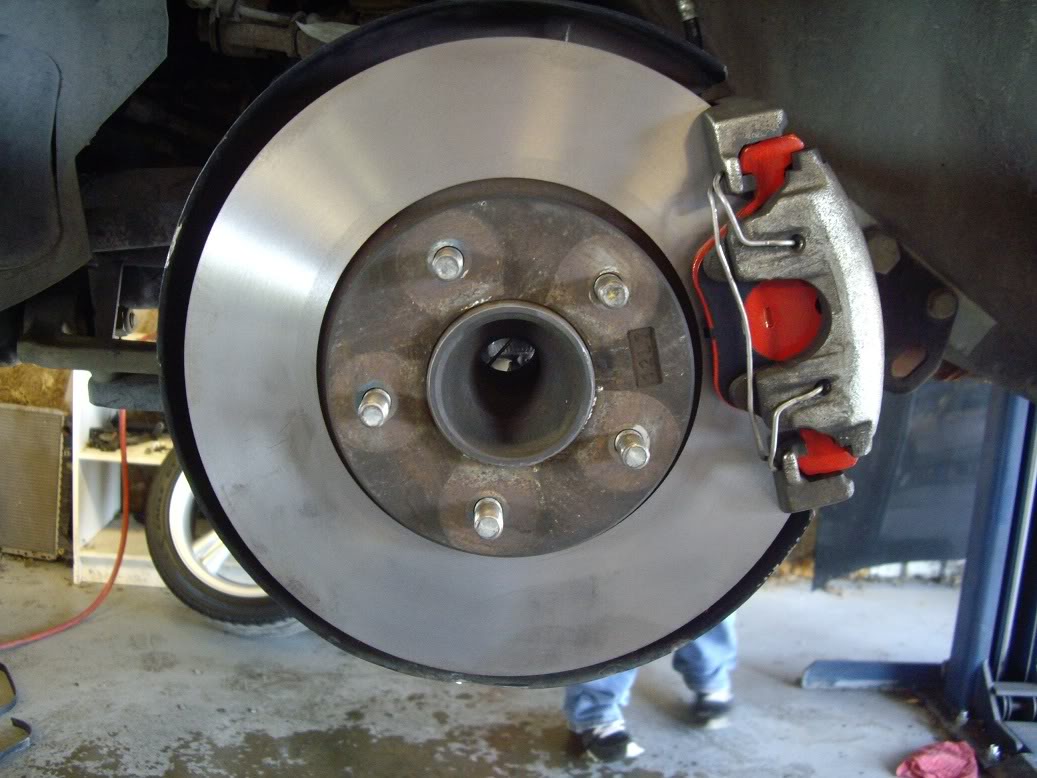
Then it was time to do the wheel bearings. That showed me my next issue..... no $150 ABS ring tool. So I borrowed my friends (hes the area Jag tech) and went to work trying to remove them. After snapping a $180 Matco 1/2" ratchet I humbly went to my friends shop and asked how to do it. Had to use his 1" impact for a solid minute before they broke loose.
Got the rings off and pressed in some new National bearings.
From there I installed new Bosch fine wire plugs and some new Dayco belts while I waited on more parts.
Took the car out for a drive and to show to my Jag tech friend who loved it but promptly pointed out my bypass hose (the one from the water pump to the thermostat housing) was about to explode. Dang. Pampered it back to the shop and the hose popped when I touched it.
So its been parked on my lift since Wed. In thmeanea time some more parts arrived. Did a synthetic oil change, new Moog front sway links with upgraded bushings and my new shocks. Instead of buying the green Bilstiens I bought some KYB HD Euro spec ones. My buddy says they are a nice upgrade from the Bilstien for ride and cornering. Thedon'tnt last as long but for $50 each it was well worth trying them. They seem to be valved firmer compared to the Bilstiens.
I alscouldn'tnt see paying over $600 for upper shock mounts and my hunt turned up some bushings for $60ish. They are a higher durommeter then the stock orange bushings bushouldn'tnt be harsh like Delrin or urethane. Took a little grinding to fit in the cups properly but I am happy with them.
I then took the wheels down to be balanced and to swap the bent wheel with the full size spare wheel. That was pretty straight forward.Unfortunately
ly as I was removing the bypass hose I broke the surge tank feed line at the fitting. I was unable to locate that particular line so I had to fab up a new one. Its now 1/2" heater hose but will do the job fine and I kept it clean.
Also had the car tinted and had the PDR guy come out to remove the major door dings.
Since the air filter was so clogged I decided to give the Mina CAI a try. I know its not really a CAI and that the stock box flows well but I have plans and I like the way it looks.
I turned the rotors myself and they are still in spec so no need to replace and I am waiting on my EBC Red Stuff pads for the front and rear. Already replaced the rotted brake lines with new OEM parts.
I will post pics of all the things I did so people can see whats what but I have to wait till Tuesday.
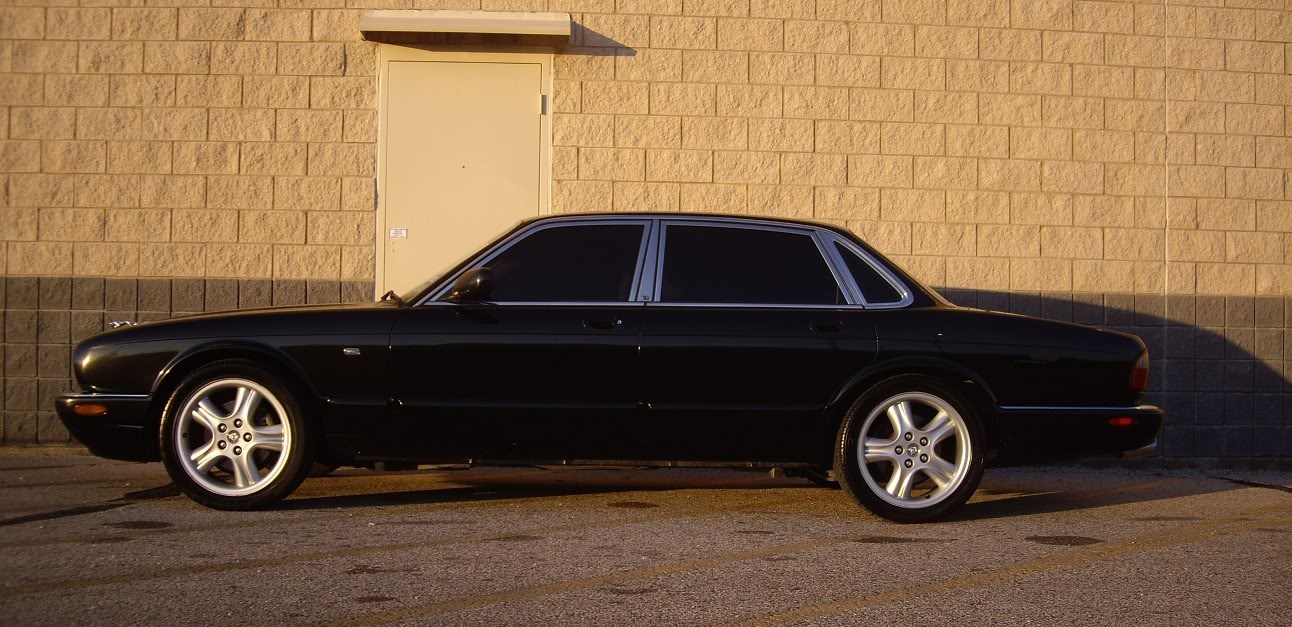
As for the car, this is how she looked before I had the PDR guy come out and before the fog light was fixed.

And here are todays new toy deliveries.

Normally I will start a progress thread as I build a car to not only help others in their endeavors but to also get input and insight on my own modifications. I have come too see that this is a very informative and helpful forum, more so than on any other I have been part of. So I hope to give a little back and at the same time get to show off my baby.
I have done this on a Lincoln forum when supercharging, gear installing, Cobra brake swapped, computer air controlling, suspension and chassis modding my Mark VIII. Did this on Stang forums when going overboard on a 2003 Cobra build etc etc.
Unfortunately I neglected to show the starting stages of the current project so I will try and get everyone up to speed and take some pictures on Tuesday to show current progress.
Started off with a sweet deal on a 1998 XJR with 160k that needed some love. Drivers seat and rear seat were worn as was the front end components. Paint was beautiful but the body had many dings.
Here she was on her maiden voyage home and my first time to fill it up, thats also my truck on the other side of the pump. On the test drive I could feel the knock sensors pulling power and the guy selling it was putting regular in it so I felt the need to fill it with Premium ASAP.
So that 100 mile drive home allowed me to feel the cars other issues..... which seemed plentiful. Front end chattered, tires bounced, brakes pulsed, belt squealed, rear wasn't stable and there was this terrible roar....... what did I get myself into?
Next day at my shop I got her in the air to see what was what. Well it started off by seeing the underside was nice and clean. No damage at all and not a drip from anywhere. Good show. After that it got sour. Starting from the rear I could see the sway links were bad and someone installed cheap brake pads in it. Also could see the fuel filter looked like it had been there a long long time. Moving up I could see the central exhaust hanger was busted and then I got to the nose. What a mess. Lower ball joints were ready to fail, shocks had no lower bushings, upper shock mounts were almost gone, sway links were shot, rotors had heat spots and were glazed, cheap brake pads, poor alignment, bad belts, worn plugs, dirty oil, clogged air filter, rotted brake lines, hanging caliper, bad wheel bearings, shattered fog light and a bent wheel. Off to work I go!
Seeing as how the car needed all those parts I did the most logical thing, modified the exhaust. LOL
Actually I ordered the parts and had to wait so while bored I cut the rear cans off and put in straight pipes. You cant tell at all unless you were under the car. I aligned them perfectly and the car is still very very quiet.
Got in some Moog rear sway links and changed them up a little. I threw away the crap bushings they come with and used some very high durommeter bushings I had for an old project. I also used the narrower bushings on both sides of the LCA mount to help eliminate any harshness plus it helps pre load the bar. Replaced the fuel filter with a Wix. Old filter you could not even blow through it. No wonder the knock sensors were working so hard.
Moved on to the exhaust hanger. Kept it simple and burned out the rubber, welded a spacer where the rubber used to be and then welded it as a solid but removable mount. Helps keep the flex lines quiet.
Next up would be the parts that tried my patience. The lower ball joints. I didn't want to spend $300 on new arms when the ball joints were only $50. Could not for the life of me press them out so I had to use the hot wrench to glow the LCA and hammer the ball joint out. Had the new ones on ice so all I had to do was drop them in their hole and let the LCA swell back up to grab them.
Then it was time to do the wheel bearings. That showed me my next issue..... no $150 ABS ring tool.
Got the rings off and pressed in some new National bearings.
From there I installed new Bosch fine wire plugs and some new Dayco belts while I waited on more parts.
Took the car out for a drive and to show to my Jag tech friend who loved it but promptly pointed out my bypass hose (the one from the water pump to the thermostat housing) was about to explode. Dang. Pampered it back to the shop and the hose popped when I touched it.
So its been parked on my lift since Wed. In thmeanea time some more parts arrived. Did a synthetic oil change, new Moog front sway links with upgraded bushings and my new shocks. Instead of buying the green Bilstiens I bought some KYB HD Euro spec ones. My buddy says they are a nice upgrade from the Bilstien for ride and cornering. Thedon'tnt last as long but for $50 each it was well worth trying them. They seem to be valved firmer compared to the Bilstiens.
I alscouldn'tnt see paying over $600 for upper shock mounts and my hunt turned up some bushings for $60ish. They are a higher durommeter then the stock orange bushings bushouldn'tnt be harsh like Delrin or urethane. Took a little grinding to fit in the cups properly but I am happy with them.
I then took the wheels down to be balanced and to swap the bent wheel with the full size spare wheel. That was pretty straight forward.Unfortunately
ly as I was removing the bypass hose I broke the surge tank feed line at the fitting. I was unable to locate that particular line so I had to fab up a new one. Its now 1/2" heater hose but will do the job fine and I kept it clean.
Also had the car tinted and had the PDR guy come out to remove the major door dings.
Since the air filter was so clogged I decided to give the Mina CAI a try. I know its not really a CAI and that the stock box flows well but I have plans and I like the way it looks.
I turned the rotors myself and they are still in spec so no need to replace and I am waiting on my EBC Red Stuff pads for the front and rear. Already replaced the rotted brake lines with new OEM parts.
I will post pics of all the things I did so people can see whats what but I have to wait till Tuesday.
As for the car, this is how she looked before I had the PDR guy come out and before the fog light was fixed.
And here are todays new toy deliveries.
Last edited by LaserSVT; 05-26-2012 at 08:50 PM.
#2
05-26-2012, 08:37 PM
Crud! So much stuff thats been done this week I forgot about a couple items.
The cars tweeters were all damaged so I replaced them with MB Quart Onyx tweeters. Excellent fit and they are compatible with the stock x-overs and they sound terrific. Shows me the HK mids are a tad muffled though so I will prolly swap them out at some point too.
The stock sub sounded like crap but thats because the surround was rotted out. Ordered the Speakerworks kit and now that little 6x9 sounds great. Plays nice and deep with excellent cone control. Highly recommend it.
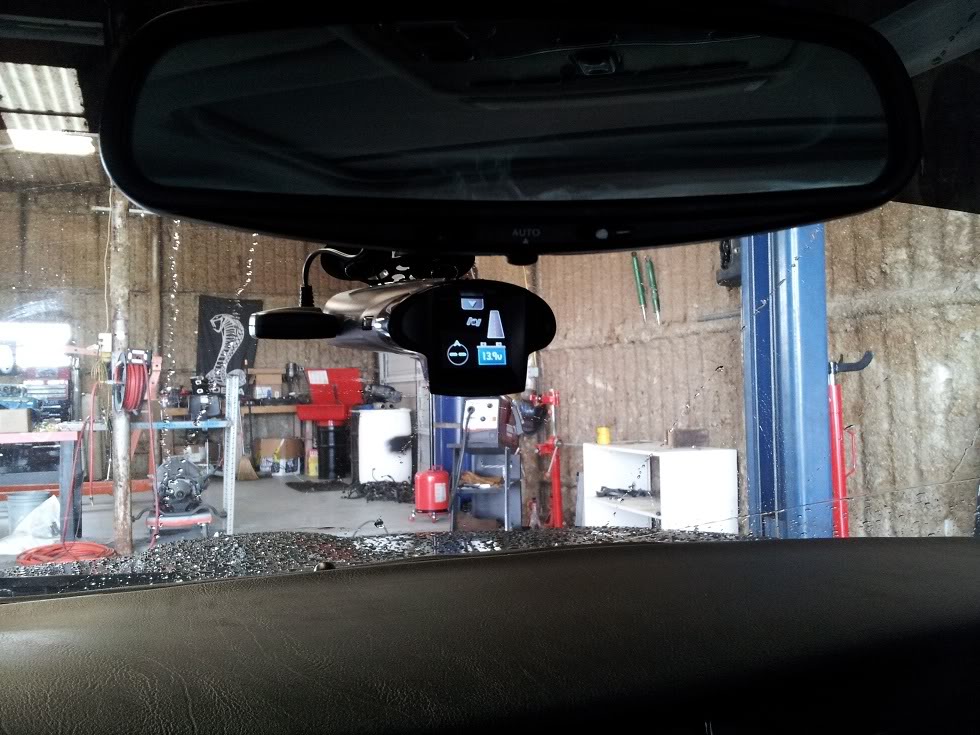
Also in the above picture you will see a power cord next to my bypass hose. That cord is to hardwire in a Cobra 9070G GPS radar detector.
I do have aquestionn though. Are the door window switches supposed to illuminate at night? Minedon'tt and I think it may be a relay issue if they are supposed to.
The cars tweeters were all damaged so I replaced them with MB Quart Onyx tweeters. Excellent fit and they are compatible with the stock x-overs and they sound terrific. Shows me the HK mids are a tad muffled though so I will prolly swap them out at some point too.
The stock sub sounded like crap but thats because the surround was rotted out. Ordered the Speakerworks kit and now that little 6x9 sounds great. Plays nice and deep with excellent cone control. Highly recommend it.
Also in the above picture you will see a power cord next to my bypass hose. That cord is to hardwire in a Cobra 9070G GPS radar detector.
I do have aquestionn though. Are the door window switches supposed to illuminate at night? Minedon'tt and I think it may be a relay issue if they are supposed to.
Last edited by LaserSVT; 05-26-2012 at 08:52 PM.
#3
05-26-2012, 08:51 PM

#4
05-27-2012, 05:04 AM
Veteran Member
#5
05-27-2012, 10:00 AM
The tool was $100.
I am so tempted to drive out to my shop and install the cooling hose and blower pulley right now but my brake pads are still not here and if I went and installed those parts I would be too tempted to drive it with the crappy pads on my fresh rotors.
I have no self control. LOL
I am so tempted to drive out to my shop and install the cooling hose and blower pulley right now but my brake pads are still not here and if I went and installed those parts I would be too tempted to drive it with the crappy pads on my fresh rotors.
I have no self control. LOL
#6
05-27-2012, 10:40 AM
The tool was $100.
I am so tempted to drive out to my shop and install the cooling hose and blower pulley right now but my brake pads are still not here and if I went and installed those parts I would be too tempted to drive it with the crappy pads on my fresh rotors.
I have no self control. LOL
I am so tempted to drive out to my shop and install the cooling hose and blower pulley right now but my brake pads are still not here and if I went and installed those parts I would be too tempted to drive it with the crappy pads on my fresh rotors.
I have no self control. LOL
#7
05-29-2012, 06:17 PM
Here are the pics as prommised. I tried to take during pics but the damn camera memory card failed so I could only take ones after I was done.
Turned rotors and ceramic pads:
New ball joints, sway links and KYB HD shocks.

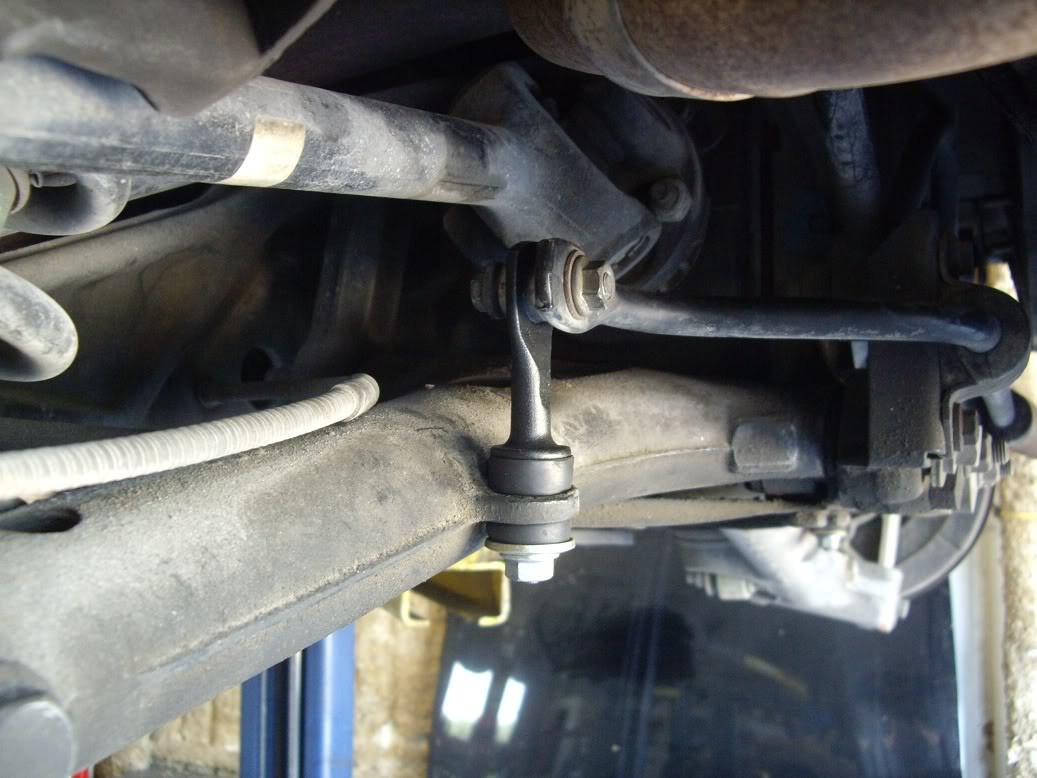
Rear sway links with a little modification:
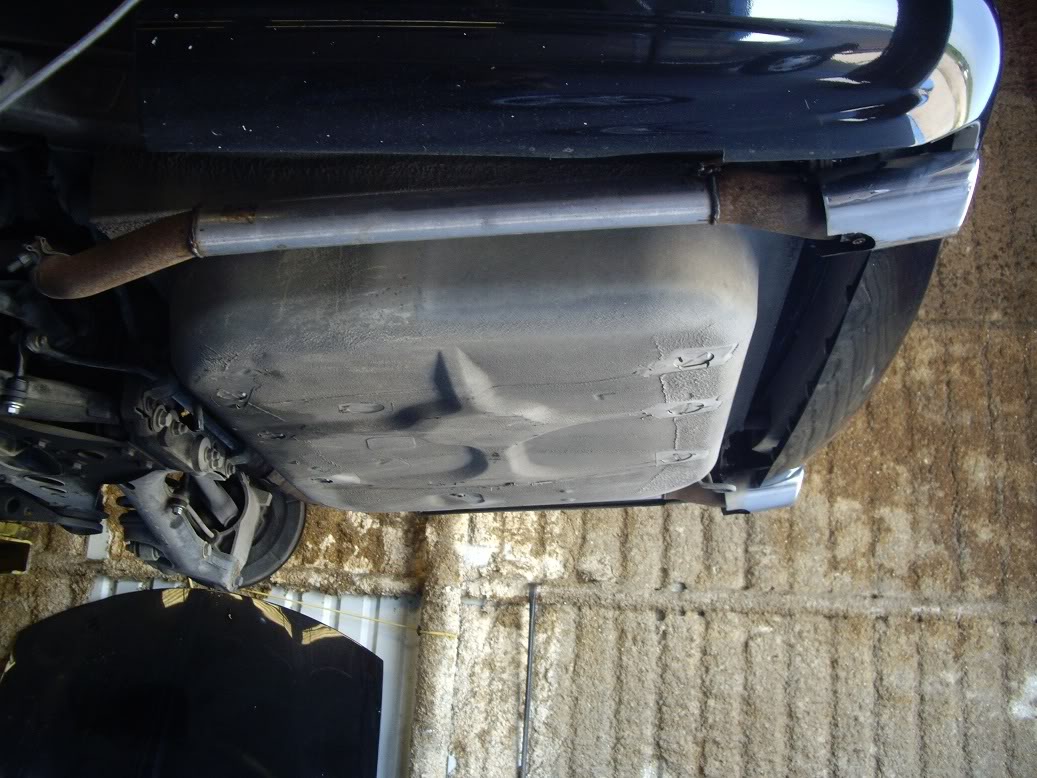
Removed rear mufflers and welded in a straight pipe:
New upper shock bushings:

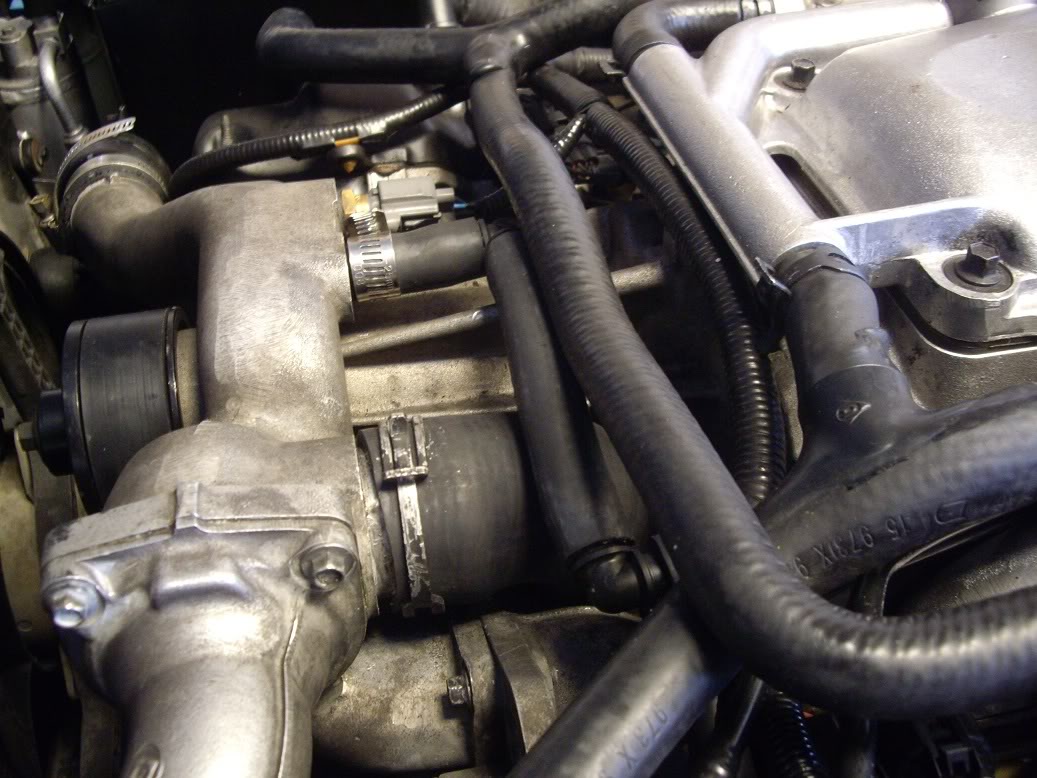
Replaced the water pump bypass hose and had to make a new surge tank hose:
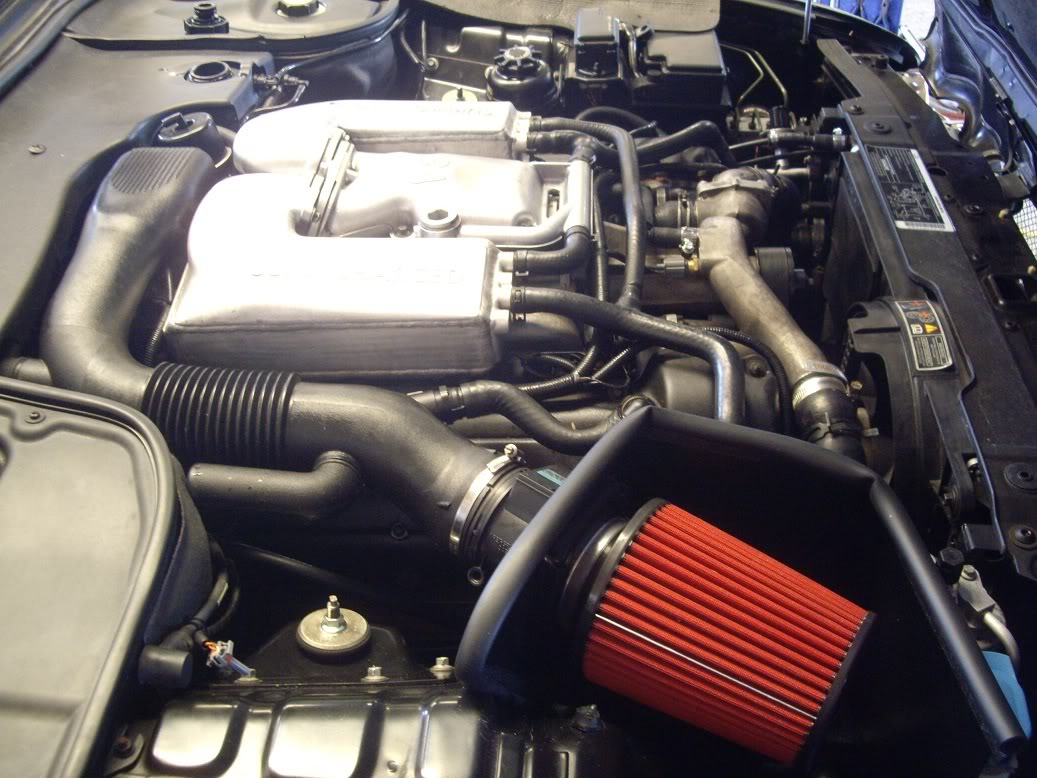
The Mina intake and Eurotoys blower pulley:
Turned rotors and ceramic pads:
New ball joints, sway links and KYB HD shocks.
Rear sway links with a little modification:
Removed rear mufflers and welded in a straight pipe:
New upper shock bushings:
Replaced the water pump bypass hose and had to make a new surge tank hose:
The Mina intake and Eurotoys blower pulley:
The following users liked this post:
plums (05-29-2012)
Trending Topics
#9
05-29-2012, 10:41 PM
Veteran Member
#10
05-30-2012, 06:40 AM
It feels SOOOOOOOOO much better. No more clunking or wandering and the ride is 100x better. The power comes on sooner too and the song the blower sings is great. Unfortunatly I only drove it from my shop to the alignment shop. It will be done today so I can play with it a little tonight but it will be the weekend before I can really enjoy her.
plums, why a picture of the flex section of the exhaust?
plums, why a picture of the flex section of the exhaust?
#11
05-30-2012, 08:54 AM
Veteran Member
Looks like you're doing a fine job getting that XJR back from the nearly-dead. Most regular Joes wouldn't have the wherewithall (sp?) to do the job. BTW, the switch pack in the driver's door should be lit with the lights on. I don't believe the other woindow switches light up - at least mine don't. Keep up the good work !
#12
05-30-2012, 07:43 PM
I am going to jump on the band wagon as for the door switches, do they light up? Also does the steering wheel controls light up too.
I love the interior, my is the same as yours, including the dark brown wood.
Your XJR sound like my too, but I had a 199 mile trip back home, same chucking in the front and rattling in the back. Had a courtsey inspection from a Jaguar dealer and stated the front ball joints are shot, the rear sway bar links needs replacing, the rear sub-frame (differential carrier) is rotted, the rack and pinion is leaking.
But, all of this is covered under the dealers warranty and getting repaired next week, at no cost to me; except for gas back and forth to CT.
My next house will have a large enough gargage to have a lift installed, it is a must needed item if you are a die hard DIY.
#13
05-30-2012, 07:59 PM
Got to put about 50 miles on it and man has she become purrrrrrfect. Drives excellent and I am just addicted to the blower whine. Makes me wish I wouldnt have wasted the money on new tweeters and repair the sub. LOL
Pulled out of my shop which is on a back country road. Turned off the traction and put her in sport mode and just rolled on it off the line. Hit full throttle around 2500 RPM and then it started to spin the tires. Wasnt expecting that but I aint complaining! LOL
Did get a CEL when I let off so I will scan it tomorrow. Bet I need to clock the MAF meter with the new filter it has now.
I just wanna go drive it! Fortunatly gas is down to $3.58 for super.
#14
05-31-2012, 05:54 AM
Veteran Member
#15
05-31-2012, 08:59 AM
Cool, I will check out the window switches. Thanks.
Turnes out the CEL was an EGR code but seems to have worked itself out. Think the car was trying to get used to the new air flow changes as I got the CEL after its first WOT blast. The car is deifnatly quicker now compared to yesterday so I think it is doing fine adapting to the pulley and intake.
Turnes out the CEL was an EGR code but seems to have worked itself out. Think the car was trying to get used to the new air flow changes as I got the CEL after its first WOT blast. The car is deifnatly quicker now compared to yesterday so I think it is doing fine adapting to the pulley and intake.
#16
05-31-2012, 05:08 PM
Veteran Member
how about a few tweaks? did you clean the throttle body, partload breather and MAF? Also check the throttle cable is adjusted so it gives near 100% opening. Follow all this by a hard reset or reboot to put it back to factory.
It'll recalibrate the maf and tb to your new additions just let it idle after reconnection and drive it around a bit to get it to learn your driving style.
Hope this helps
It'll recalibrate the maf and tb to your new additions just let it idle after reconnection and drive it around a bit to get it to learn your driving style.
Hope this helps
#17
05-31-2012, 06:25 PM
Yup, car has already adjusted itself and man has it adjusted itself! LOL
The throttle cable and body were some of the first parts I checked. No slack and no dirt. Throttle body looks newish or at least under 20k miles. MAF is new as well by the first owner.
Another small addition to the fun-o-meter.
The throttle cable and body were some of the first parts I checked. No slack and no dirt. Throttle body looks newish or at least under 20k miles. MAF is new as well by the first owner.
Another small addition to the fun-o-meter.
#18
05-31-2012, 06:41 PM
Veteran Member
#20
05-31-2012, 07:47 PM
Veteran Member