My timing chain rattle..
#1
 11-25-2014, 01:22 PM


So the dreaded sound finally started. It was rattling at idle engine hot, rarely went away.. So I bought the upper tensioners on ebay from Christopher foreign car parts. Very helpful there and he suggested the secondary timing chains also. I went for both.. So I pull the passenger side valve cover and they look nice and tight. After scratching my head for a bit I feel the main chain and it's very loose. Nothings ever easy right lol. I ordered the whole kit upper and lower chains and guides.
1. How common is this for the main chains to be loose and not the uppers?
2. How long does this usually take?
3. Permanex ok to reseal the engine cases?
Any other tips would be awesome so I can tackle this job ASAP as driving the car at this point is a gamble. Thanks in advance
1. How common is this for the main chains to be loose and not the uppers?
2. How long does this usually take?
3. Permanex ok to reseal the engine cases?
Any other tips would be awesome so I can tackle this job ASAP as driving the car at this point is a gamble. Thanks in advance
#2
11-25-2014, 02:18 PM
Christopher's is great, got the whole kit from him a few years ago. I did the work myself with help from posts and info I found on the forum. Based on my experience here's my 2 cents. Get the rest of the kit from Christopher's If your're going to get in there you might as well fix it all. You need to lock it all down to swap them out anyway, while it's there do it all. If you pull the cross over pipe and it's down for a more than a few hours I'd recommend putting it in the bucket you drain the coolant into. I had mine out for a few weeks while I did a handful of PM and repairs. It went into a 5 gal bucket with a few other larger items and stayed dry. Within a week of getting car back on the road the whole thing disintegrated (guess drying out caused a breakdown). While you've got the thermostat tower off, go ahead and order the aluminum upgrade as OEM is same material as the crossover. Replace all your gaskets, I'd do the water pump, thermostat and serpentine belt while I was in there. Be careful with the timing chain cover, either mine was cracked or it cracked while pulling it, finding the correct one (dependent on which version of motor is installed can be a bear). Also be easy on the small coolant lines that run length of Drivers side Valve cover (overflow tank to radiator) be prepared to replace if you aren't patient getting them off, and if you decide to try to do work without removing them. I posted pics and details of my entire process (just do a timing chain search) and there are a handful of others you find as well. I don't recall offhand exactly who but there are links to a very handy full pictorial of the process with notes and suggestions if you look through posts in a search. Good Luck, it's not as bad as you might think. The only tool I bought for the process was the cam lock, everything else I had a buddy make up for me at his shop. There are some specs for homemade cam locks out there, my buddy even welded up a crank tool for me. I've still got all of it so I can post pics if you don't find them in the search.
#3
11-25-2014, 03:21 PM
#4
11-25-2014, 04:09 PM
#5
11-25-2014, 05:43 PM
Someone please correct me if wrong, but unless there's something significantly different between the XJR and XJ8, I don't recall either primary or secondary relying on anything other than spring tension. Does the rattle disappear with an oil change? If components in your car are all first generation they are all made out of plastic. I'd definitely recommend thoroughly checking them all. There are plenty of stories out there and mine was one of them where the plastic had broken, split and significantly pitted or worn and the bolts, and assembled tension were the only thing holding some of it together.
#6
11-25-2014, 05:52 PM

Veteran Member
#7
11-25-2014, 06:54 PM

Christopher's is great, got the whole kit from him a few years ago. I did the work myself with help from posts and info I found on the forum.
Based on my experience here's my 2 cents. Get the rest of the kit from Christopher's If your're going to get in there you might as well fix it all. You need to lock it all down to swap them out anyway, while it's there do it all.
If you pull the cross over pipe and it's down for a more than a few hours I'd recommend putting it in the bucket you drain the coolant into. I had mine out for a few weeks while I did a handful of PM and repairs. It went into a 5 gal bucket with a few other larger items and stayed dry. Within a week of getting car back on the road the whole thing disintegrated (guess drying out caused a breakdown).
While you've got the thermostat tower off, go ahead and order the aluminum upgrade as OEM is same material as the crossover.
Replace all your gaskets, I'd do the water pump, thermostat and serpentine belt while I was in there.
Be careful with the timing chain cover, either mine was cracked or it cracked while pulling it, finding the correct one (dependent on which version of motor is installed can be a bear).
Also be easy on the small coolant lines that run length of Drivers side Valve cover (overflow tank to radiator) be prepared to replace if you aren't patient getting them off, and if you decide to try to do work without removing them.
I posted pics and details of my entire process (just do a timing chain search) and there are a handful of others you find as well. I don't recall offhand exactly who but there are links to a very handy full pictorial of the process with notes and suggestions if you look through posts in a search.
Good Luck, it's not as bad as you might think. The only tool I bought for the process was the cam lock, everything else I had a buddy make up for me at his shop.
There are some specs for homemade cam locks out there, my buddy even welded up a crank tool for me. I've still got all of it so I can post pics if you don't find them in the search.
Vector
Last edited by Vector; 11-26-2014 at 04:38 AM.
The following users liked this post:
bluerdg (11-25-2014)
Trending Topics
#8
11-25-2014, 09:58 PM

The newer replacement primary tensioners have a RATCHET mechanism that will lock the piston extended. To release it you will need to move a lever and insert a pin. Once the piston is extended, the tensioner is locked.
The old plastic body ones could fail and the piston will move in and out if the 'O' ring is damaged. Oil will leak past the seal and the tensioner blade will 'chatter'.
bob gauff
The old plastic body ones could fail and the piston will move in and out if the 'O' ring is damaged. Oil will leak past the seal and the tensioner blade will 'chatter'.
bob gauff
#9
11-26-2014, 08:33 AM
I've had a hard time finding oil pressure specs. Does this sound right?
For a xj8 "OIL PRESSURE SHOULD BE 70 PSI@4000 RPM 30 PSI AT IDLING. MAKE SURE OIL FILTER AND OIL BEEN CHANGED AND MAKE SURE OIL LEVEL NOT LOW.AND YOU USE THE RIGHT OIL.IF ALL IS GOOD OIL SENDING UNIT COULD BE BAD."
OIL and filter are a thousand miles old. Thinking of checking oil pressure with current 5 40 Rotella than again after putting some 5 30 oil. I thougt thicker oil was better for raising pressure though..
If pressure checks out its either the lower tensioner, broken guide (which looked fine from what I could see) or chain stretch.
#10
11-26-2014, 10:46 AM
Pressure at the sender was 60 psi cold at idle dropping to 30 as engine warmed up. 70 psi at 3k rpm, and I believe 60 psi past 1200rpm.. I may raise idle to 1200rpm until I do the job after the holidays..
Need to buy or rent cam holding tool when breaking the nut loose, looks pretty straightforward.. Thanks for all the help.
Need to buy or rent cam holding tool when breaking the nut loose, looks pretty straightforward.. Thanks for all the help.

#12
11-27-2014, 05:09 PM
#13
11-27-2014, 07:31 PM
#16
12-04-2014, 03:53 PM
**** this crank pulley! Lol, I broke the bolt with a huge breaker bar while locking down the torque converter. It still got tight a couple of turns later so I got it red hot and it came right off. Tried to rig up my crank pulley puller and busted the bolts off in the crank pulley. Tried to get it hot and smack it with a hammer than a huge pry bar against the sway bar and middle of pulley. Still no luck. Any help would be awesome
#17
12-05-2014, 11:15 AM
Veteran Member
**** this crank pulley! Lol, I broke the bolt with a huge breaker bar while locking down the torque converter. It still got tight a couple of turns later so I got it red hot and it came right off. Tried to rig up my crank pulley puller and busted the bolts off in the crank pulley. Tried to get it hot and smack it with a hammer than a huge pry bar against the sway bar and middle of pulley. Still no luck. Any help would be awesome
A bit brutal I know, but after 3 days of being gentle ... it was F***ing lucky the blue spanner never came out!
The following users liked this post:
X308XJR (12-05-2014)
#18
12-05-2014, 01:24 PM
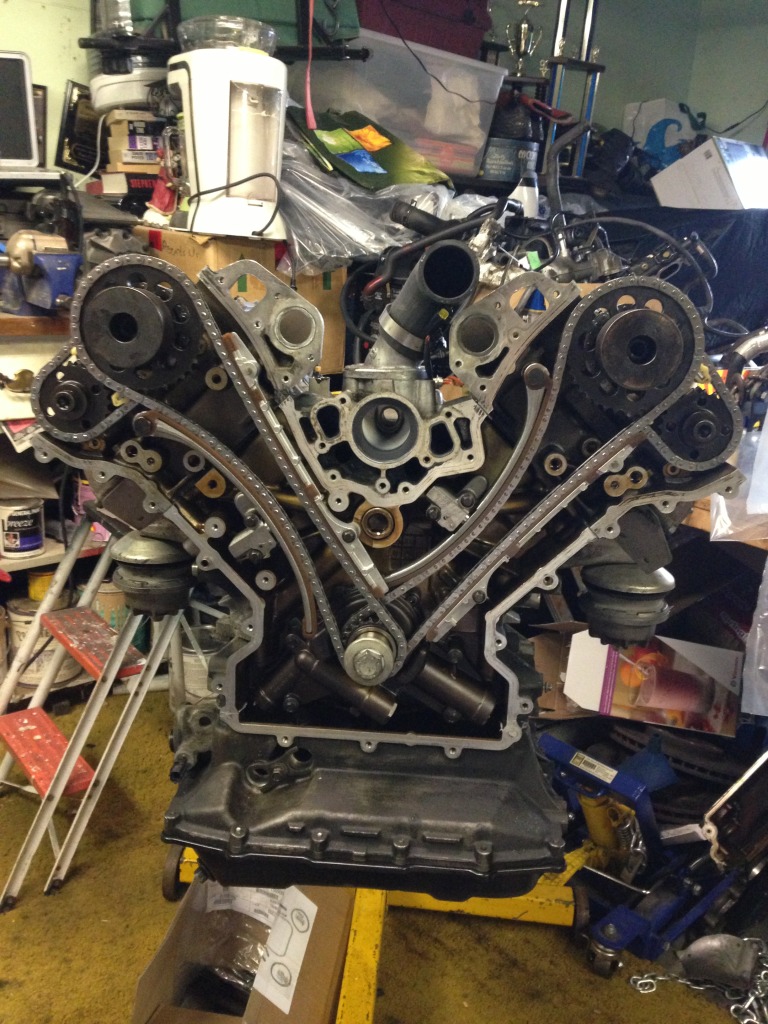
I ended up drilling out the bolt that broke in the pulley and tapping it for a larger 10 mm. Tighten smack with hammer over and over and it finally came. The two upper tensioners had giant splits down the middle but still seemed to be functioning. The main issue was the passenger side primary tensioner did not fully extend making the chain very looses and smack around. Almost all lower guides were cracked but still intact... Now on to timing, I didn't realize cam gear weren't notched to cams.. and my crank lock still has a mm of play so I'm gonna see if I can get the tools overnighted..
Last edited by X308XJR; 12-05-2014 at 03:36 PM.
#19
12-05-2014, 05:44 PM
Setting tension still confuses me a bit on the lower chains..
Buying this
Jaguar Land Rover 3 2 3 5 4 0 4 2 4 4 V8 Engines Timing Tool Set | eBay
Vs renting one of these two, xjr so no vvt..
Jaguar V8 Timing Alighment Tool Set 2000 2008 s Type | eBay
Jaguar V8 Timing Alighment Tool Set 1997 2014 Deluxe Kit | eBay
I just want to make sure the kit for 170 would be everything I need?
Last edited by X308XJR; 12-05-2014 at 05:51 PM.
#20
12-06-2014, 05:06 AM
Veteran Member
Setting tension still confuses me a bit on the lower chains..
Buying this
Jaguar Land Rover 3 2 3 5 4 0 4 2 4 4 V8 Engines Timing Tool Set | eBay
Vs renting one of these two, xjr so no vvt..
Jaguar V8 Timing Alighment Tool Set 2000 2008 s Type | eBay
Jaguar V8 Timing Alighment Tool Set 1997 2014 Deluxe Kit | eBay
I just want to make sure the kit for 170 would be everything I need?
Buying this
Jaguar Land Rover 3 2 3 5 4 0 4 2 4 4 V8 Engines Timing Tool Set | eBay
Vs renting one of these two, xjr so no vvt..
Jaguar V8 Timing Alighment Tool Set 2000 2008 s Type | eBay
Jaguar V8 Timing Alighment Tool Set 1997 2014 Deluxe Kit | eBay
I just want to make sure the kit for 170 would be everything I need?
Me, I would buy the kit. As I believe that money is never wasted on tools.
Any way, by doing the job yourself,( even with the cost of the special tools ) you are still $$$ in pocket.
You could also recover some of the outlay buy renting out to fellow Jag owners, or Lincoln, Ford Thunderbird owners.
The following users liked this post:
X308XJR (12-06-2014)