My XJR headgasket repair.
#61
 08-02-2013, 12:25 AM

Veteran Member
^^
It's absolutely critical. Or at least a really, really good idea.
Since the engine is out, a sheet of plate glass bonded to very fine abrasive sheets works well. Spin the engine to get the block deck horizontal and have at it. Use WD-40 as lube.
Suction cup handles on the glass could be useful.
... umm peanut butter is not really great as assembly lube
Last edited by plums; 08-02-2013 at 12:27 AM.

#64
08-02-2013, 08:27 AM

Veteran Member
Join Date: Jul 2010
Location: Austin tx and Daytona FL.
Posts: 7,362
Received 1,236 Likes
on
943 Posts
NO, old way of doing head gasket sufaces, when gasket gets hot,rough surface tears gasket and bolts(studs) lose clamping force.
less clamp, and gasket starts to pulse back and forth, and its down hill from there.
proven best way is as FLAT and smooth as possible, and an MLS gasket.
without resorting to fire rings in block or head, or hollow gas filled rings in block(big money).
less clamp, and gasket starts to pulse back and forth, and its down hill from there.
proven best way is as FLAT and smooth as possible, and an MLS gasket.
without resorting to fire rings in block or head, or hollow gas filled rings in block(big money).
#65
08-02-2013, 08:26 PM
Today I continue the valve seal replacement, along with cleaning up any valve seats that need it. 32 valves are nice, but a lot of work. Here are some shots of the tooling I used.
[IMG]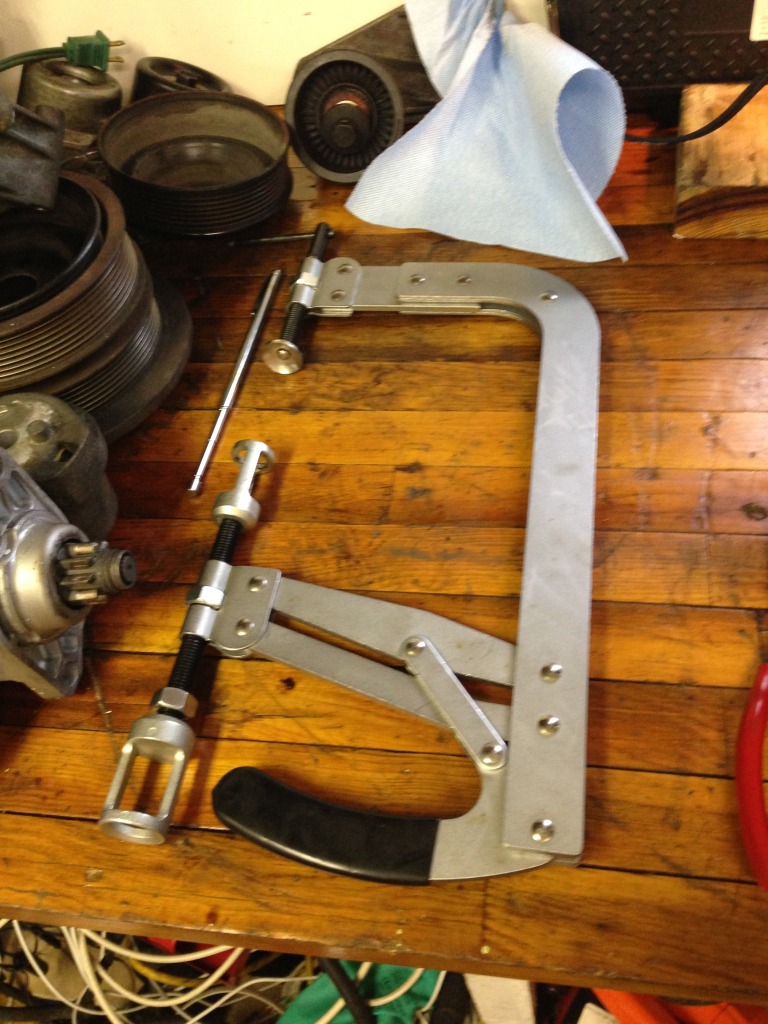 [/IMG]
A magnety works well for removing the keepers.
[IMG] [/IMG]
A small screwdriver with some grease on it holds the keepers for the install.
[IMG] [/IMG]
The seals are easily pulled out with pliers, and a socket helps the installation.
[IMG] [/IMG]
[IMG]
 [/IMG]
A magnety works well for removing the keepers.
[IMG]
 [/IMG]
A small screwdriver with some grease on it holds the keepers for the install.
[IMG]
 [/IMG]
The seals are easily pulled out with pliers, and a socket helps the installation.
[IMG]
 [/IMG]
The following users liked this post:
chris-jag (08-21-2021)
#66
08-02-2013, 10:46 PM
Strange thing - that's exactly opposite of what I have practiced all my life, we work with a coarse mill finish, apparently it stops fire ring chatter. - Each To Their Own. I am just about to do a XJR 4 litre engine, do you know where can I purchase multi layer gaskets, I have never seen them for Jaguar.
Cheers,
DC
Cheers,
DC
#68
08-02-2013, 10:55 PM
Veteran Member
Strange thing - that's exactly opposite of what I have practiced all my life, we work with a coarse mill finish, apparently it stops fire ring chatter. - Each To Their Own. I am just about to do a XJR 4 litre engine, do you know where can I purchase multi layer gaskets, I have never seen them for Jaguar.
Cheers,
DC
Cheers,
DC
On MLS, then for sure you will need to go mirror finish on the mating surfaces. If in doubt, check with some of the vendors.
#69
08-03-2013, 07:30 PM
Today I finished the heads and installed them. For this I used an AC Delco digital torque wrench, then an angle reader on my breaker bar. It works like a dream, and I'm very happy about how it went. Checking off each bolt at each stage on paper is a really good plan.
[IMG]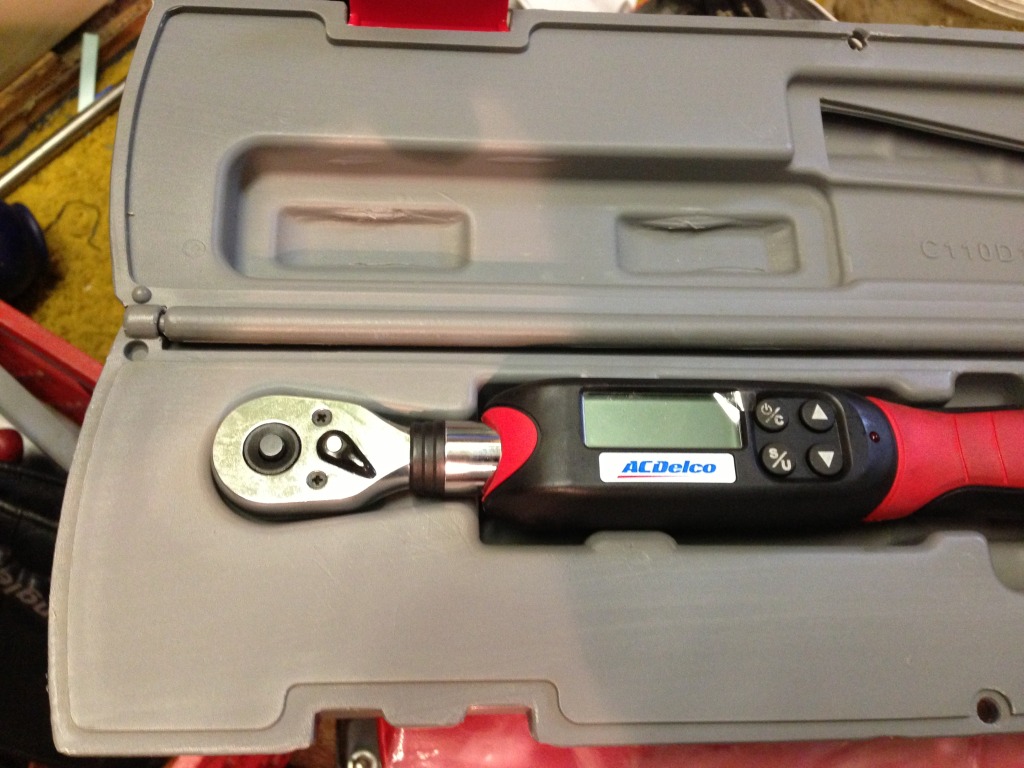 [/IMG]
[IMG]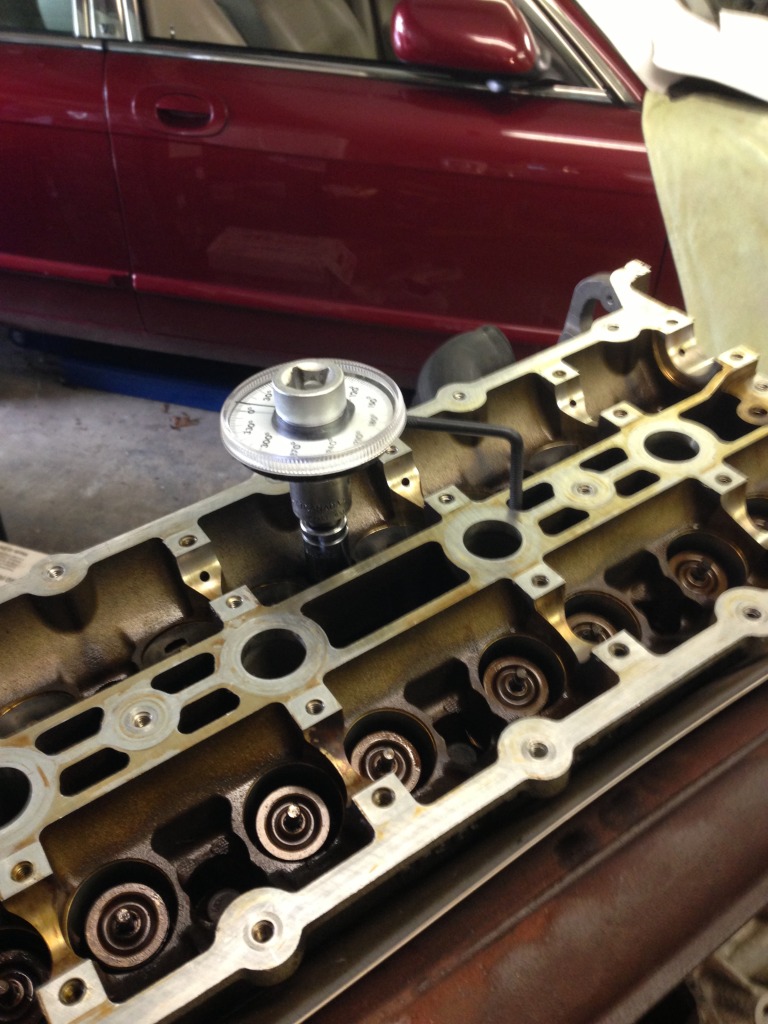 [/IMG]
The cams went on the RH bank, then I got tired, so it's beer time.


[IMG] [/IMG]
[IMG]
 [/IMG]
[IMG]
 [/IMG]
The cams went on the RH bank, then I got tired, so it's beer time.
[IMG]
 [/IMG]
Last edited by avt007; 08-03-2013 at 07:52 PM.
The following users liked this post:
chris-jag (08-21-2021)
#71
08-04-2013, 10:33 PM
Today the timing chains went on. It was pretty easy with the engine out. The tools I bought were great, here's a pic of one or two.
[IMG] [/IMG]
What's the deal with the little pins on the primary tensioners? I pulled the plastic pins, now what about the metal ones that are left? Do they stay in place?
[IMG]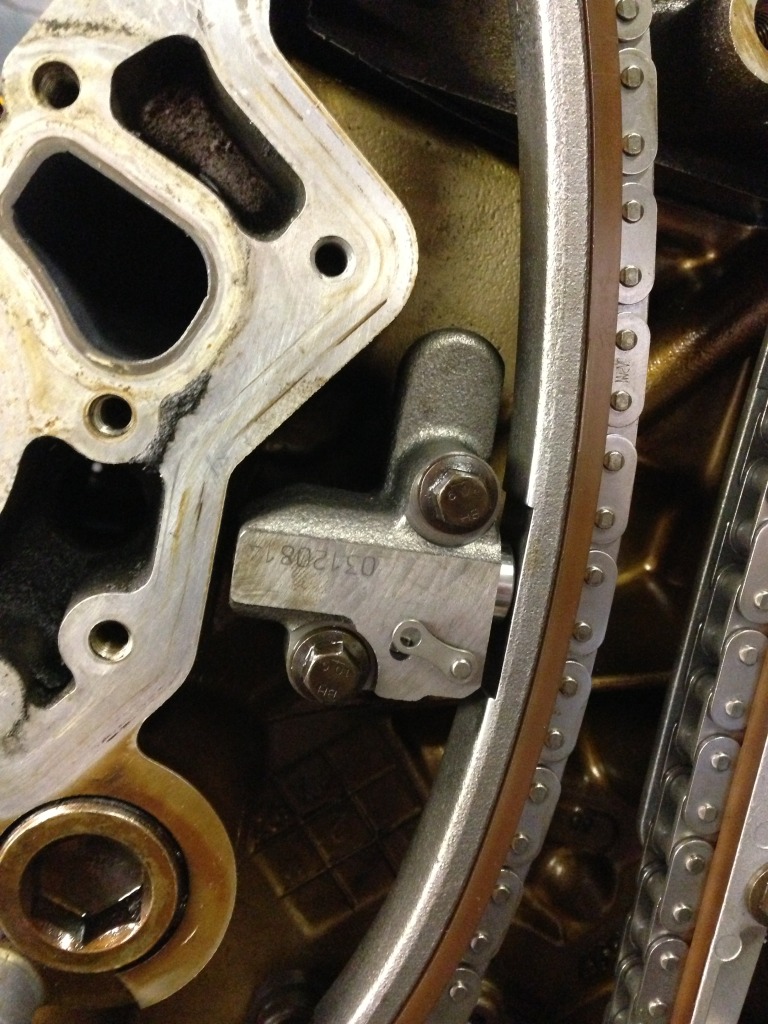 [/IMG]
[IMG]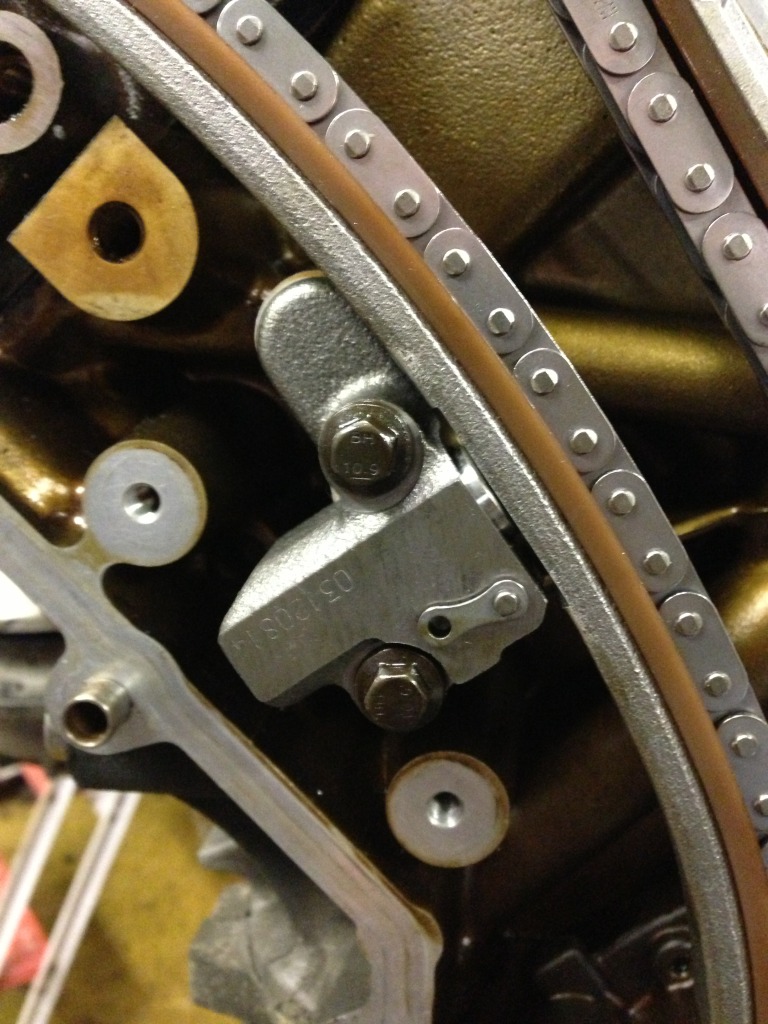 [/IMG]
[IMG]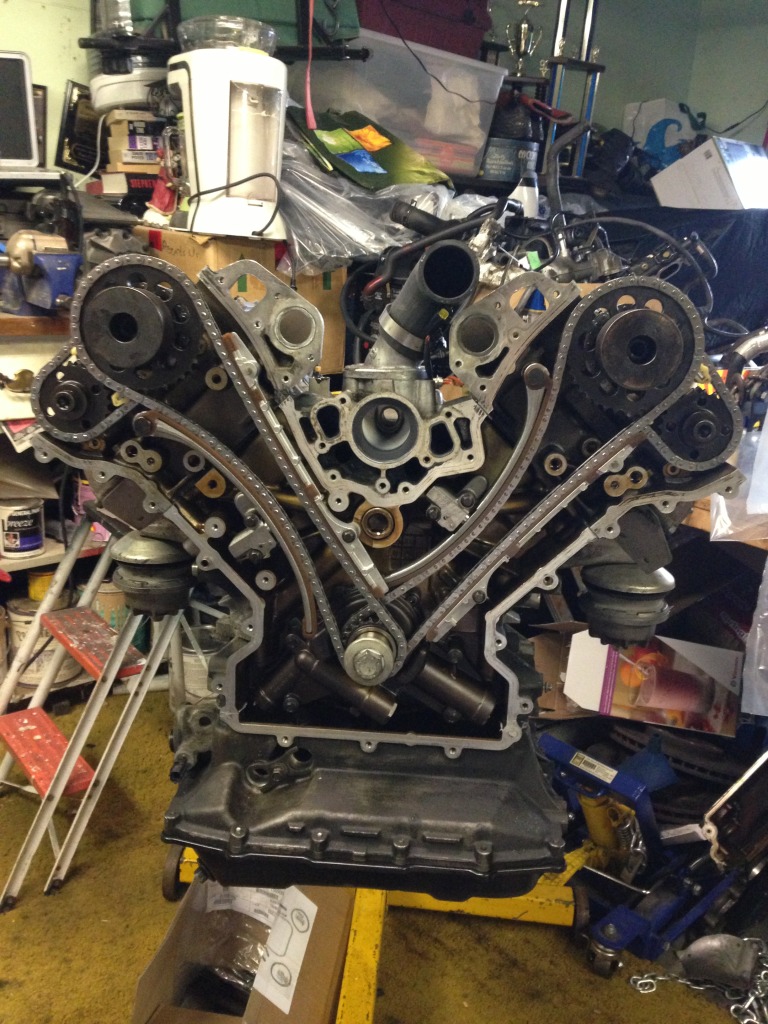 [/IMG]
[IMG]
 [/IMG]
What's the deal with the little pins on the primary tensioners? I pulled the plastic pins, now what about the metal ones that are left? Do they stay in place?
[IMG]
 [/IMG]
[IMG]
 [/IMG]
[IMG]
 [/IMG]
#72
08-05-2013, 09:31 AM

Veteran Member
If you have the pins jammed get them out. If they stay in then they will not take up the wear slack. The primes are activated by oil pressure and will pump up against the pin, not against the internal stop.
When working on replacements, always push the chain so it backs the tensioner off, then remove the pins. The tensioner will then settle into the natural position.
When working on replacements, always push the chain so it backs the tensioner off, then remove the pins. The tensioner will then settle into the natural position.
#73
08-05-2013, 10:37 AM
#74
08-05-2013, 11:27 AM
I should have looked more closely at these before I installed them. I took one off today to check it out. The plastic pin, which looks like a small golf tee, locks the metal arm from rotating. This arm is attached to a spring loaded metal catch, which allows the piston extend with chain wear, but won't allow it to retract.
Long story short, pull the plastic pin, and leave the metal one alone.
[IMG]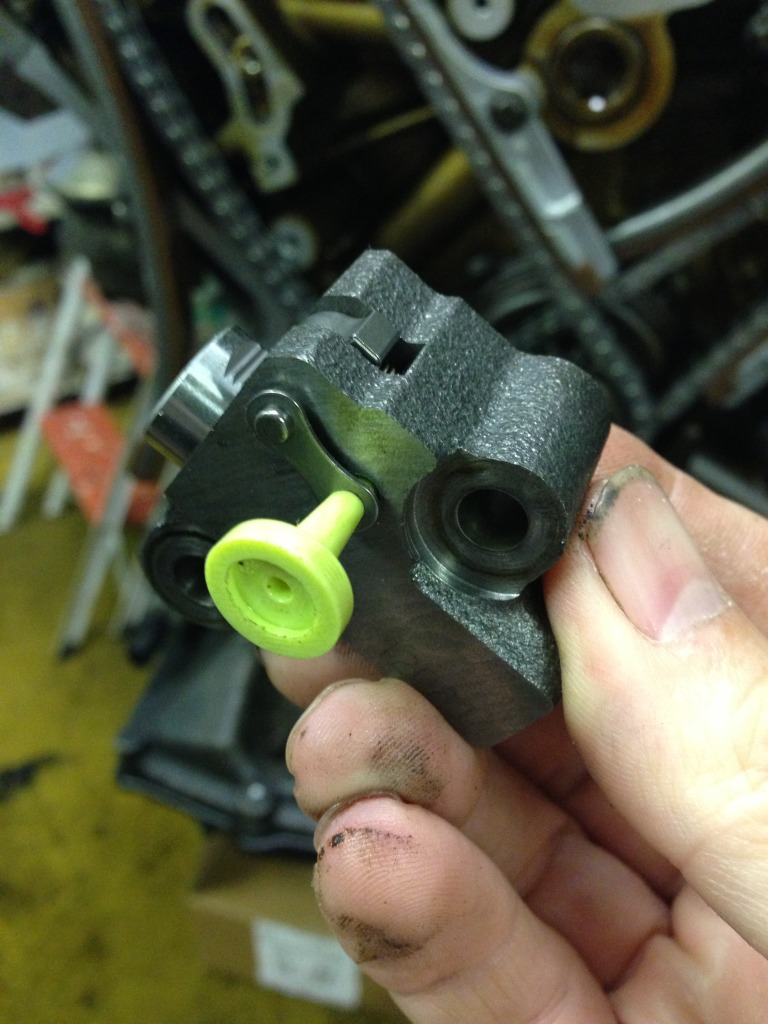 [/IMG]
[IMG]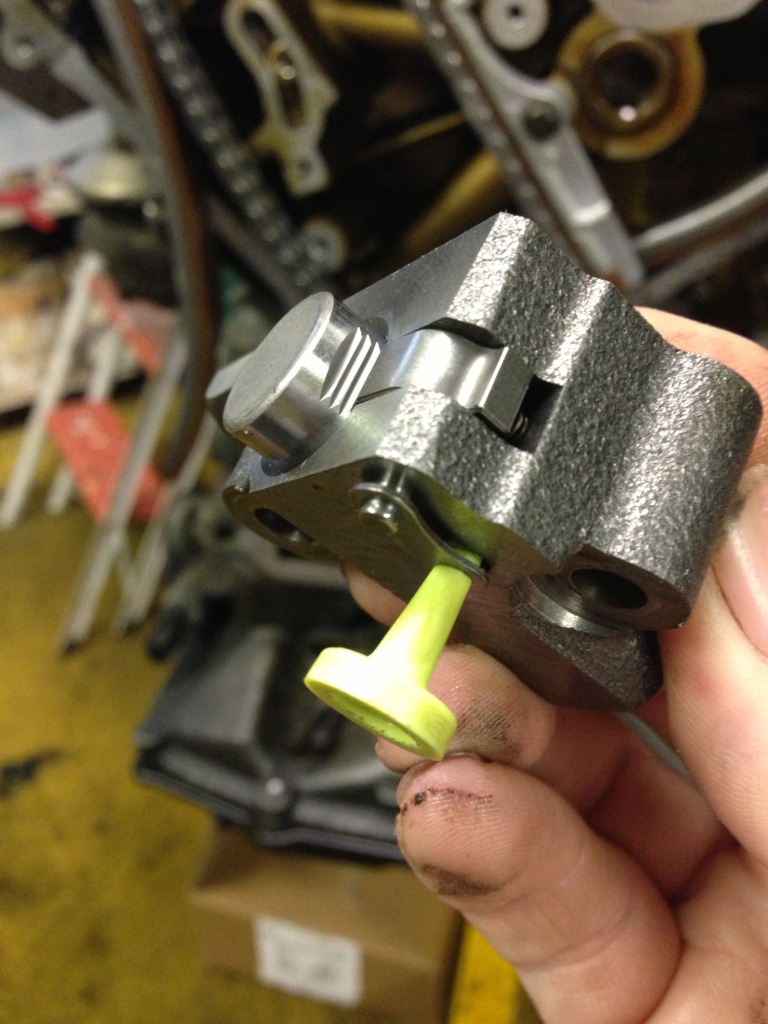 [/IMG]
Long story short, pull the plastic pin, and leave the metal one alone.
[IMG]
 [/IMG]
[IMG]
 [/IMG]
#75
08-07-2013, 10:59 PM
Progress report- the itming chains and cams went in. And out. And in, etc. The valve clearance caused me to buy 4 shims, and install the cams 3 times, but alls well thats ends well.
The timing cover is on, and one valve cover done. Another days work ought to see it in a shape to go back in the car.
If you are going to tackle a project like this, I cannot stress enough the importance of organization (labelled baggies for every bolt and screw) and a thousand pictures of the disassembly.
Onwards and upwards!
The following users liked this post:
chris-jag (08-21-2021)
#77
08-08-2013, 10:57 AM
Veteran Member


#78
08-08-2013, 11:52 PM
More good progress today, until I had to tighten the crank bolt. Long story short, I bolted a steel bar (actually the lawn thatching bar from my lawn mower) through the curved slots of the pulley. A pair 7/16 bolts fit well, with the nuts in the gap between the pulleys. Then a steel tube and steel pipe lying around the garage were used to brace the bar against rotation.
I bought another yet torque wrench, this one good for 300 lb ft. It all worked beautifully, and didn't cost anything for the locking device.
[IMG] [/IMG]
I bought another yet torque wrench, this one good for 300 lb ft. It all worked beautifully, and didn't cost anything for the locking device.
[IMG]
 [/IMG]
Last edited by avt007; 08-09-2013 at 07:02 PM.
The following users liked this post:
chris-jag (08-21-2021)
#79
08-11-2013, 01:55 AM
Well darn. The engine is in, but does not run for more than a few seconds. It fires, revs to 1000 rpm for less than a second, then dies. No amount of throttle will keep it running. I double checkedall the connectors and vacuum lines, still the same. I put 5 litres of fres gas in, it had only an eight of a tank before.
In the morng I'll try a hard reset, test the fuel pumps (not sure how, though) hook up the OBD and see where it goes, Frustrating.
In the morng I'll try a hard reset, test the fuel pumps (not sure how, though) hook up the OBD and see where it goes, Frustrating.
#80
08-11-2013, 05:07 AM
Veteran Member