
Need help! Purchased slow 2000 XJR. No check engine light on
#1
 08-30-2011, 09:20 PM


I sort of know what 300-400 torque and 325 hp feels like from other cars. I purchased a 2000 XJR for the 387 torque and 370 hp. It feels like a regular 280 - 300 hp and gets a consistent 7.5 or so seconds from 0-60. I took it to a foreign car specialist and was informed everything seems to be in working order. The car seems to be slow in the first 2-3 secs. then picks up fast. However, it also seems to be slower than anticipated from 95 or so up. Please Help!!!
#2
08-30-2011, 09:32 PM
Senior Member
sport mode is your friend, little "S" button by the shifter. if that doesn't make you happier you could have a slack throttle cable that isn't giving you wide open throttle, there is a good thread on here about that somewhere.
I have a GTECH performance meter and can pull off 0-60s in the low 5's all day
I have a GTECH performance meter and can pull off 0-60s in the low 5's all day
The following users liked this post:
AaronnJones (09-01-2011)
#3
08-31-2011, 04:08 PM

sport mode is your friend, little "S" button by the shifter. if that doesn't make you happier you could have a slack throttle cable that isn't giving you wide open throttle, there is a good thread on here about that somewhere.
I have a GTECH performance meter and can pull off 0-60s in the low 5's all day
I have a GTECH performance meter and can pull off 0-60s in the low 5's all day
Cheers,
The following users liked this post:
AaronnJones (09-01-2011)
#4
08-31-2011, 08:54 PM

Veteran Member
Hi
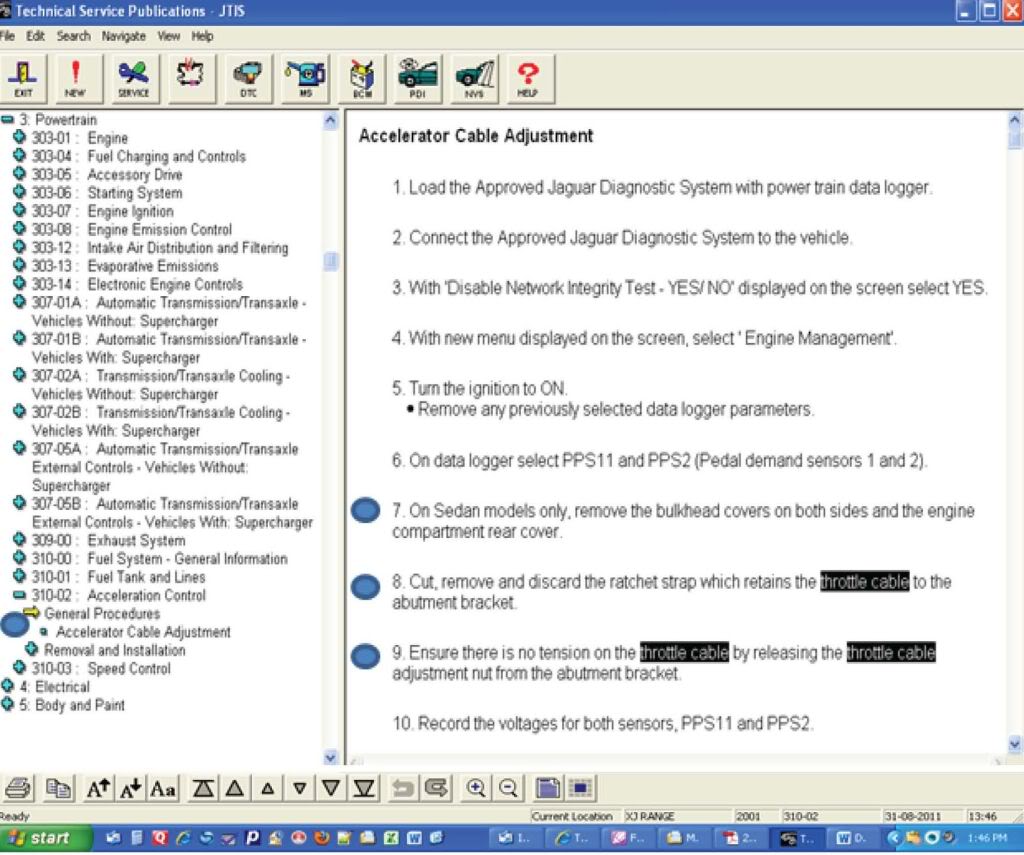
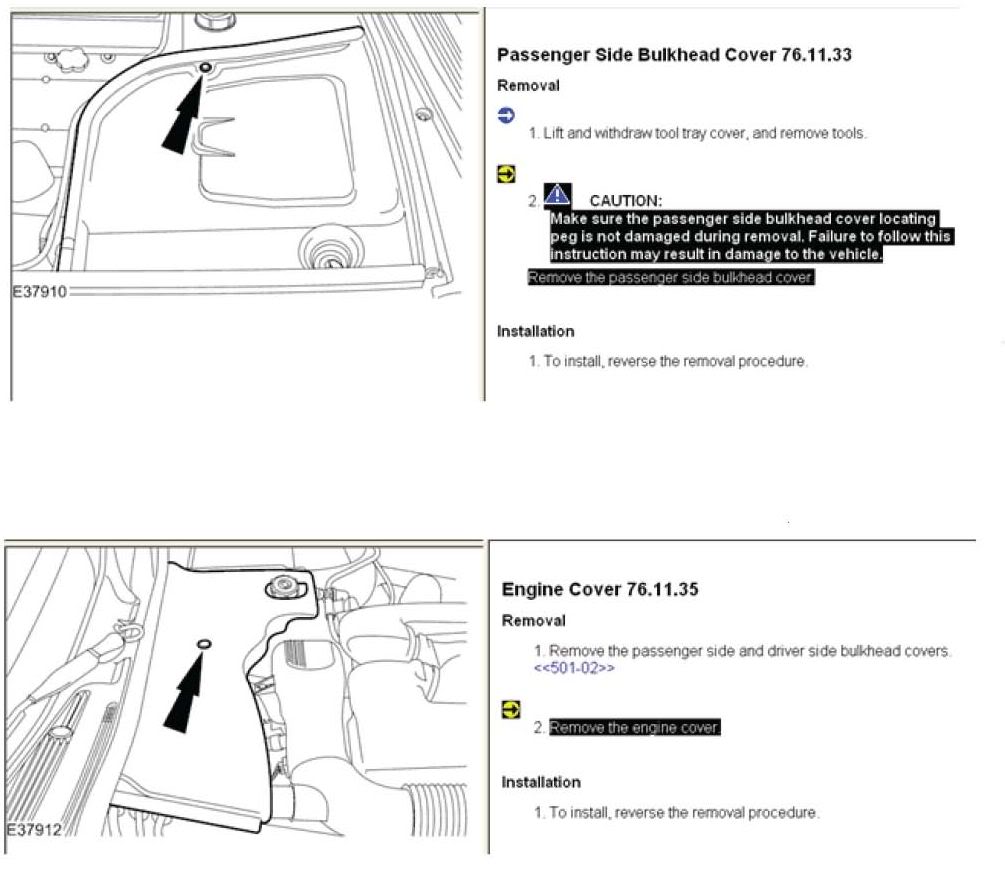
Here are a few JPEG files I created from JTIS21 - I put a Blue Dot on some of the instructions to indicate the only steps probably needed. You can view a larger image of these JPEG files by click on the yellow bar above each of them that has message "This image has been resized. Click this bar to view the full image."
Note the instructions say "Remove both Bulkhead covers on both sides", I found that I only needed to remove the Driver side Bulkhead cover and then the engine rear cover slides out without removing the Passenger side Bulkhead.
The last image is a photo I took of our 2001 XJ8 Engine Compartment showing the Throttle Body and the Throttle cable that might need adjusting.
2001XJ8ThrottleCableAdj2.jpg?t=1315044935

Here is another thread that is on the XK8/XKR forum that has photos and instructions on how to adjust the thottle cable (go down to post# 41):
https://www.jaguarforums.com/forum/x...d-38663/page8/
Also I found this TSB 310-05 on Throttle Cable adjustment with this commentary included:
Take the vehicle to a dealer and have them reset the throttle cable .. you can perform this repair yourself (with patience and tools)but it is best and quicker when done by a dealer using the WDS system ! repair (labor) time on this repair is .6 (35 mins) so do not let them charge anymore ... LOL
LIMP-HOME MODE - DTC P1121 AND/OR P1632 - AJ27 ENGINE - ADJUST THROTTLE CABLE
TECHNICAL SERVICE BULLETIN
Reference Number(s): 310-05, Date of Issue: April 01, 2002
JAGUAR:1999-2000 MY XK8 Range; 1999-2000 MY V8 XJ Series
SECTION:310
VIN:031303-A04950; 853936-F08942
Superceded Bulletin(s): SECTION 310, NO. 05, Date of Issue: August 01, 2000
Related Ref Number(s): 310-05
ARTICLE BEGINNING
Issue
NOTE:Remove and destroy Bulletin 310-05, amended 08/00. Replace with this Bulletin. Procedure has been revised to use the WDS.
Some of the above vehicles may default to limp home mode because the throttle cable is improperly adjusted. The condition will be accompanied by diagnostic trouble code (DTC) P1121 and/or P1632 being stored in the memory of the Engine Control Module (ECM) or Transmission Control Module (TCM), respectively.
Action
On a customer complaint basis only, when diagnostic trouble code (DTC) P1121 and /or P1632 is stored in the memory of the Engine Control Module (ECM) or Transmission Control Module (TCM), follow the workshop procedure outlined below.
WORKSHOP PROCEDURE
Open hood and fit fender protector covers.
On V8 XJ series vehicles only, remove engine bulkhead covers.
NOTE:Check that Worldwide Diagnostic System (WDS) has the latest level software.
Position WDS along side vehicle, switch `ON' and allow software to load.
Open front door and connect Portable Test Unit (PTU) to vehicle diagnostic socket using diagnostic cable.
Enter the VIN, select engine system from content model, navigate to data logger and allow software to load.
Clear all pre-selected signals.
Scroll down available signals, select PPS11 and PPS2.
Select signal-monitoring screen.
Turn ignition 'ON'.
Start recording data.
Cut and remove ratchet strap securing throttle cable to abutment bracket.
Displace and reposition throttle cable adjuster from abutment bracket (throttle in its closed position).
NOTE:Ensure there is no tension on cable.
Note voltage reading of PPS11 and PPS2 on WDS.
Partially insert throttle cable plastic adjuster into abutment bracket.
Re-check PPS11 and PPS2 voltage reading on WDS.
NOTE:If voltage readings are higher than original readings perform the following steps.
Adjust throttle cable until the voltage readings for PPS11 and PPS2 on WDS are at the same value as first noted.
Slacken throttle cable plastic adjuster one more quarter of a turn.
Fully seat throttle cable plastic adjuster into abutment bracket.
Install and secure new ratchet strap around throttle adjuster/abutment bracket.
NOTE:If the voltage readings are the same as the original readings perform the following steps.
Adjust throttle cable until the voltage readings for PPS11 and PPS2 on WDS increase.
Adjust throttle cable slowly until original readings are obtained, do not over-adjust.
Turn throttle cable one quarter of a turn to obtain minimal amount of slack in inner cable.
Fully seat throttle cable plastic adjuster into abutment bracket.
Install and secure new ratchet strap around throttle cable adjuster/abutment bracket.
NOTE:After throttle cable adjustment (carried out above) follow steps 16 to 21.
Check and where necessary, operate throttle pedal twenty times to settle cable.
Adjust kickdown switch. (Supercharged vehicles only)
On normally aspirated vehicles, if the required throttle opening cannot be achieved due a lack of adjustment range, a shorter length throttle stop stud may be necessary. Measure the distance of the length of the hexagonal section (points A and B, Fig. 1). Select the next shortest mounting stud. Refer to the Parts Information for the total of 4 different length studs are available.
NOTE:It is unlikely that a new throttle stop mounting stud will be necessary since this component is hand selected and installed in production where a test of full throttle has been performed and passed.
Order parts on an as-required basis only.
Thats all Folks
Jim Lombardi
Here are a few JPEG files I created from JTIS21 - I put a Blue Dot on some of the instructions to indicate the only steps probably needed. You can view a larger image of these JPEG files by click on the yellow bar above each of them that has message "This image has been resized. Click this bar to view the full image."
Note the instructions say "Remove both Bulkhead covers on both sides", I found that I only needed to remove the Driver side Bulkhead cover and then the engine rear cover slides out without removing the Passenger side Bulkhead.
The last image is a photo I took of our 2001 XJ8 Engine Compartment showing the Throttle Body and the Throttle cable that might need adjusting.
2001XJ8ThrottleCableAdj2.jpg?t=1315044935
Here is another thread that is on the XK8/XKR forum that has photos and instructions on how to adjust the thottle cable (go down to post# 41):
https://www.jaguarforums.com/forum/x...d-38663/page8/
Also I found this TSB 310-05 on Throttle Cable adjustment with this commentary included:
Take the vehicle to a dealer and have them reset the throttle cable .. you can perform this repair yourself (with patience and tools)but it is best and quicker when done by a dealer using the WDS system ! repair (labor) time on this repair is .6 (35 mins) so do not let them charge anymore ... LOL
LIMP-HOME MODE - DTC P1121 AND/OR P1632 - AJ27 ENGINE - ADJUST THROTTLE CABLE
TECHNICAL SERVICE BULLETIN
Reference Number(s): 310-05, Date of Issue: April 01, 2002
JAGUAR:1999-2000 MY XK8 Range; 1999-2000 MY V8 XJ Series
SECTION:310
VIN:031303-A04950; 853936-F08942
Superceded Bulletin(s): SECTION 310, NO. 05, Date of Issue: August 01, 2000
Related Ref Number(s): 310-05
ARTICLE BEGINNING
Issue
NOTE:Remove and destroy Bulletin 310-05, amended 08/00. Replace with this Bulletin. Procedure has been revised to use the WDS.
Some of the above vehicles may default to limp home mode because the throttle cable is improperly adjusted. The condition will be accompanied by diagnostic trouble code (DTC) P1121 and/or P1632 being stored in the memory of the Engine Control Module (ECM) or Transmission Control Module (TCM), respectively.
Action
On a customer complaint basis only, when diagnostic trouble code (DTC) P1121 and /or P1632 is stored in the memory of the Engine Control Module (ECM) or Transmission Control Module (TCM), follow the workshop procedure outlined below.
WORKSHOP PROCEDURE
Open hood and fit fender protector covers.
On V8 XJ series vehicles only, remove engine bulkhead covers.
NOTE:Check that Worldwide Diagnostic System (WDS) has the latest level software.
Position WDS along side vehicle, switch `ON' and allow software to load.
Open front door and connect Portable Test Unit (PTU) to vehicle diagnostic socket using diagnostic cable.
Enter the VIN, select engine system from content model, navigate to data logger and allow software to load.
Clear all pre-selected signals.
Scroll down available signals, select PPS11 and PPS2.
Select signal-monitoring screen.
Turn ignition 'ON'.
Start recording data.
Cut and remove ratchet strap securing throttle cable to abutment bracket.
Displace and reposition throttle cable adjuster from abutment bracket (throttle in its closed position).
NOTE:Ensure there is no tension on cable.
Note voltage reading of PPS11 and PPS2 on WDS.
Partially insert throttle cable plastic adjuster into abutment bracket.
Re-check PPS11 and PPS2 voltage reading on WDS.
NOTE:If voltage readings are higher than original readings perform the following steps.
Adjust throttle cable until the voltage readings for PPS11 and PPS2 on WDS are at the same value as first noted.
Slacken throttle cable plastic adjuster one more quarter of a turn.
Fully seat throttle cable plastic adjuster into abutment bracket.
Install and secure new ratchet strap around throttle adjuster/abutment bracket.
NOTE:If the voltage readings are the same as the original readings perform the following steps.
Adjust throttle cable until the voltage readings for PPS11 and PPS2 on WDS increase.
Adjust throttle cable slowly until original readings are obtained, do not over-adjust.
Turn throttle cable one quarter of a turn to obtain minimal amount of slack in inner cable.
Fully seat throttle cable plastic adjuster into abutment bracket.
Install and secure new ratchet strap around throttle cable adjuster/abutment bracket.
NOTE:After throttle cable adjustment (carried out above) follow steps 16 to 21.
Check and where necessary, operate throttle pedal twenty times to settle cable.
Adjust kickdown switch. (Supercharged vehicles only)
On normally aspirated vehicles, if the required throttle opening cannot be achieved due a lack of adjustment range, a shorter length throttle stop stud may be necessary. Measure the distance of the length of the hexagonal section (points A and B, Fig. 1). Select the next shortest mounting stud. Refer to the Parts Information for the total of 4 different length studs are available.
NOTE:It is unlikely that a new throttle stop mounting stud will be necessary since this component is hand selected and installed in production where a test of full throttle has been performed and passed.
Order parts on an as-required basis only.
Thats all Folks
Jim Lombardi
Last edited by jimlombardi; 09-03-2011 at 05:38 AM.
The following users liked this post:
Cadillac (09-01-2011)
#5
09-01-2011, 07:05 PM
#6
09-01-2011, 10:05 PM
Veteran Member
Soooo.... I was driving yesterday and hit the sport switch- WOW I was definitely impressed.
THEN I look at this thread and said to myself "Self, you should check that real quick" I mozeyed out and grabbed my trusty reader, plugged it in and checked the TPS with the accelerator floored.
66%. Hmm... that can't be right- my car is FAST...
So I reach down and check the kickdown switch and sure enough it is not adjusted toward the floor. now my reading is 77%.
So I did the adjustment above and now it reads 100% so I take it out for a quick drive to get dinner...
HOLY SMOKE. Now the non-sport setting is FAST I can't imagine what sport is going to feel like if I can ever get a clear stretch of road to floor it...
#7
09-07-2011, 05:33 PM
Trending Topics

#10
09-11-2011, 08:25 AM


#11
09-12-2011, 06:12 PM

Member

Thread
Thread Starter
Forum
Replies
Last Post
BrentGardner
XJ XJ6 / XJ8 / XJR ( X350 & X358 )
28
04-26-2024 03:08 AM
philwarner
XJ XJ6 / XJ8 / XJR ( X350 & X358 )
13
12-06-2021 07:13 AM
Currently Active Users Viewing This Thread: 1 (0 members and 1 guests)