A Nightmare on Jag Street!
#1
 12-28-2012, 04:02 PM

So, anyway....
Started work on the Jaaag today, front suspension bush and balljoint change...the knock from the front left was REALLY starting to annoy me....
I have put a small story board together for you all so that you can scream with me....
Before work commenced....me slightly annoyed with car...yes, that's me! Ahem...

Time to get car in the garage....or garaaaaage (same pronounciation as per Jaaaaag....) up on stands.

Wheels off and a quick jetwash......
Scream now!

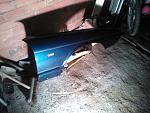
R/H side, behind shock...I knew there was a little rust in there..
Scream more now!

R/H footwell....this going to take longer that the 2 days I was thinking of...
Moving onto L/H side.....Scream loud as possible and shake hands in air hysterically!

Found some evidence of a terrible previous repair in there....bit of hard poking showed the truth....R/H footwell not so bad.....worst is over now....settle back down....just cry for me instead....

So....it's just lucky my trusty Mig welder is sat next to the car.....
Anyway, for better access I thought I should whip the wings off....no more surprises, not bad in fact...

Suprising amount of wet crap up where the wing meets the inner wing....but no rot there amazingly!
So, 2 hours of work and 3 hours of drinking tea sat looking at it and here we are.
So...if anyone is interested I will post a photo diary over the next couple of days of the subframe being dropped, and the welding repairs....to be perfectly honest I am quite looking forward to it....after this work the Jaaag will be Purrfect :-)
Excuse the photo quality, had to use my phone :-)
If anyone that is slightly religious could pray for me, that would be nice ;-)....got work on Wednsday and really don't want to get back in the Landrover....
Started work on the Jaaag today, front suspension bush and balljoint change...the knock from the front left was REALLY starting to annoy me....
I have put a small story board together for you all so that you can scream with me....
Before work commenced....me slightly annoyed with car...yes, that's me! Ahem...
Time to get car in the garage....or garaaaaage (same pronounciation as per Jaaaaag....) up on stands.
Wheels off and a quick jetwash......
Scream now!
R/H side, behind shock...I knew there was a little rust in there..
Scream more now!
R/H footwell....this going to take longer that the 2 days I was thinking of...
Moving onto L/H side.....Scream loud as possible and shake hands in air hysterically!
Found some evidence of a terrible previous repair in there....bit of hard poking showed the truth....R/H footwell not so bad.....worst is over now....settle back down....just cry for me instead....
So....it's just lucky my trusty Mig welder is sat next to the car.....
Anyway, for better access I thought I should whip the wings off....no more surprises, not bad in fact...
Suprising amount of wet crap up where the wing meets the inner wing....but no rot there amazingly!
So, 2 hours of work and 3 hours of drinking tea sat looking at it and here we are.
So...if anyone is interested I will post a photo diary over the next couple of days of the subframe being dropped, and the welding repairs....to be perfectly honest I am quite looking forward to it....after this work the Jaaag will be Purrfect :-)
Excuse the photo quality, had to use my phone :-)
If anyone that is slightly religious could pray for me, that would be nice ;-)....got work on Wednsday and really don't want to get back in the Landrover....
The following 7 users liked this post by richard thomas:
adriaxj8 (12-31-2012),
Highway Star (01-01-2013),
JimmyL (12-29-2012),
Red October (12-28-2012),
RJ237 (12-28-2012),
and 2 others liked this post.
#2
12-28-2012, 04:41 PM
Senior Member
Great post & I know that mine is showing the first signs of going the same way...
Luckily my mate's got all the welding gear & he offered to do any repairs if I stripped the car down for him first.
You can have a prayer on me & I'd definately be interested in the photo diary of the subframe being dropped. I'd already messed about in summer with the front suspension after the front lower ball joints wore out & failed the MOT. They were a right pig to remove & the taper wouldn't break for all the tea in China-I damaged several ball joint splitters & after a blowtorch & hammer failed, I ended up hacksawing the threaded part off & then drilling out the rest of the shank from underneath with a Titanium-tipped drill bit!
Horrible job-especially as I'd only just recovered from a 3 week top-end engine overhaul job on the Bentley after it's head gaskets popped!
#4
12-28-2012, 05:25 PM
Senior Member
I kept wielding the hammer harder & harder-until it slipped off the balljoint splitter & hit my thumb, at which point there were 5 seconds of silence followed by 5 minutes of obscenities...
Then I got angry & reached for the hacksaw, followed by the drill-pretty soon, job done & I could rest my pounded thumb
Then I got angry & reached for the hacksaw, followed by the drill-pretty soon, job done & I could rest my pounded thumb
#5
12-28-2012, 06:05 PM
Senior Member
Rich,
you have my deep sympathy. Just a reminder: after the welding is done don't forget to protect the new metal thoroughly against new rust. And when you sit leant back and with a good cup of tea think about treating your cat a good cavity sealing.
I press my thumbs for you. Please keep us up to date about the progress.
The following users liked this post:
richard thomas (12-28-2012)
#6
12-28-2012, 06:09 PM
#7
12-29-2012, 08:20 AM

glad you can do it your self. mine had gone too far both sides at front , floor footwells chassis cross members subframe etc. so under raps and in prossess of stripping in case any one needs parts , had put new complete exhaust on down pipe, front wings, front disces and pads, new battery, a shame to see her go this way but to much work and expensive to do good luck to richard hope you get her back on road sorry 4ltr sport
Trending Topics
#9
12-29-2012, 09:08 AM
Veteran Member
I've smothered mine in Bilt Hamber Dynax straight from the paint booth (Waxoil is sooo last century). I've seen more like this than hot dinners. Salted winter roads are to blame, and shoddy cleaning. Bet it was the first time it'd had a jetwash in there for years...this area is vital to keep clean of the mud pies...
Sounds like you can patch it up Richard, they all need doing, even the last batch are showing signs. A recent post on here showed someone's repair and welding the subframe mount to the inner wing behind the shock, not something I'd recommend.
Dropping the front sub is the only way to do it correctly.
Keep us posted on progress...
#10
12-29-2012, 10:25 AM
I've smothered mine in Bilt Hamber Dynax straight from the paint booth (Waxoil is sooo last century). I've seen more like this than hot dinners. Salted winter roads are to blame, and shoddy cleaning. Bet it was the first time it'd had a jetwash in there for years...this area is vital to keep clean of the mud pies...
Sounds like you can patch it up Richard, they all need doing, even the last batch are showing signs. A recent post on here showed someone's repair and welding the subframe mount to the inner wing behind the shock, not something I'd recommend.
Dropping the front sub is the only way to do it correctly.
Keep us posted on progress...
Sounds like you can patch it up Richard, they all need doing, even the last batch are showing signs. A recent post on here showed someone's repair and welding the subframe mount to the inner wing behind the shock, not something I'd recommend.
Dropping the front sub is the only way to do it correctly.
Keep us posted on progress...
It's all repairable, but the worst part is getting rid of ALL the rot first....scared me first time I did it but in the long run much easier!!
#12
12-29-2012, 04:16 PM
#13
12-29-2012, 05:33 PM
#14
12-29-2012, 06:34 PM
So....a quick update....after I just spent 2 hours typing a full report which was lost when I tried to preview it before posting...:-( Grrrrrr
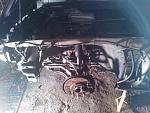
Subframe out, holes are big....but not the worst I've seen....
I was going to give a blow by blow report of this, but after today's events I have drawn the following conclusion:
If you need to read a blow by blow report in order to carry out this task - don't do it....get some other sucker to do it for you and pay them....
Observations from today:
1 - Jaguar suspension parts are very heavy
Or
2 - Jaguar suspension parts are bolted together very tight
Or
3 - Jaguar suspension parts can be both very heavy and bolted together very tight!
I have never in 25 years had a brake caliper bolt defeat me....however the swollen disfigured finger I now nurse is testament to the strength of that gorrilla that put that bolt in back in 1997....
I shall give a better description of events a bit later....but here are some pics to give a flavour of the day...
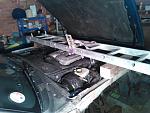
Special jaguar engine support stand (2" blocks, a ladder and ratchet straps...)

It's out....Jeez it's heavy....

Some rust carnage....


Sorry this is a bit short, but after spending 2 hours typing a report worthy of Oscar Wilde...and losing it....and drinking 4 beers in the meantime....I won't even try to repeat it....
Laters....
Subframe out, holes are big....but not the worst I've seen....
I was going to give a blow by blow report of this, but after today's events I have drawn the following conclusion:
If you need to read a blow by blow report in order to carry out this task - don't do it....get some other sucker to do it for you and pay them....
Observations from today:
1 - Jaguar suspension parts are very heavy
Or
2 - Jaguar suspension parts are bolted together very tight
Or
3 - Jaguar suspension parts can be both very heavy and bolted together very tight!
I have never in 25 years had a brake caliper bolt defeat me....however the swollen disfigured finger I now nurse is testament to the strength of that gorrilla that put that bolt in back in 1997....
I shall give a better description of events a bit later....but here are some pics to give a flavour of the day...
Special jaguar engine support stand (2" blocks, a ladder and ratchet straps...)
It's out....Jeez it's heavy....
Some rust carnage....
Sorry this is a bit short, but after spending 2 hours typing a report worthy of Oscar Wilde...and losing it....and drinking 4 beers in the meantime....I won't even try to repeat it....
Laters....
The following users liked this post:
Highway Star (01-01-2013)
#15
12-30-2012, 02:05 PM
Hallo all, bit of an update...
Some more findings today, I shall share with you...
Not so worried about the bushes anymore....that's going to be the easy bit now....going to work in the Landrover Wednesday I reckon....lol.
Done a bit more digging today (quite literally, with a screwdriver...)....rust has taken hold a bit more than I would ever have thought....I will share the pics with you as I progress.
Started in L/H footwell....cut a fair bit out to get rid of ALL the rot, and create access to weld metal back in....going to need to buy a replacement sill for the front end, hopefully use the rest of the sill for the other side.

Top tip: DO NOT CUT THROUGH CABLE LOOM WITH DISC CUTTER!!!! - this is going to take a bit of soldering.....still, not the biggest job to rectify but I did feel STUPID!

Take the time to strip out the interior in the footwell first....a lesson I have learnt before, but my enthusiasm got the better of me...
Moved onto R/H side....I knew that there was a fair bit of work in this footwell too....and I was correct. Looked like a bubble before I started, goes to show what rust can do...


Cut out all the rust at the chassis where the V-mount sits....this side seemed better that the L/H side from the outset....needs a fair bit of work, have left the L/H side alone for reference...there are 3 layers of metal here.

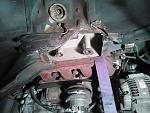
I would suggest that welding a single plate to cover the lot up will not restore the structural integrity, for anyone else having this work done....beware...the 3 layers of metal are not the same thickness, got to build that strength back in...
So, 1 sill to purchase, and a bit more steel plate required...Job on!
Will keep you posted,
Rich.
Some more findings today, I shall share with you...
Not so worried about the bushes anymore....that's going to be the easy bit now....going to work in the Landrover Wednesday I reckon....lol.
Done a bit more digging today (quite literally, with a screwdriver...)....rust has taken hold a bit more than I would ever have thought....I will share the pics with you as I progress.
Started in L/H footwell....cut a fair bit out to get rid of ALL the rot, and create access to weld metal back in....going to need to buy a replacement sill for the front end, hopefully use the rest of the sill for the other side.
Top tip: DO NOT CUT THROUGH CABLE LOOM WITH DISC CUTTER!!!! - this is going to take a bit of soldering.....still, not the biggest job to rectify but I did feel STUPID!
Take the time to strip out the interior in the footwell first....a lesson I have learnt before, but my enthusiasm got the better of me...
Moved onto R/H side....I knew that there was a fair bit of work in this footwell too....and I was correct. Looked like a bubble before I started, goes to show what rust can do...
Cut out all the rust at the chassis where the V-mount sits....this side seemed better that the L/H side from the outset....needs a fair bit of work, have left the L/H side alone for reference...there are 3 layers of metal here.
I would suggest that welding a single plate to cover the lot up will not restore the structural integrity, for anyone else having this work done....beware...the 3 layers of metal are not the same thickness, got to build that strength back in...
So, 1 sill to purchase, and a bit more steel plate required...Job on!
Will keep you posted,
Rich.
The following users liked this post:
Highway Star (01-01-2013)
#16
12-30-2012, 03:30 PM
Quick guide to removing front subframe for those it may help....
A description of how to remove front subframe....mainly highlighting pitfalls that you will find...:-)
Method 1: For poor people, DIY enthusiasts or mugs.....
Top tip 1 - Unless you live somewhere really warm and dry, get the car into the garage! This isn't a 10 minute operation, I was unfazed by the thought of removing the subframe, but it is tricky as we will find out...
Jack the front of the car, and place good axle stands under the front jacking points. Keep in mind the car needs to be high enough to drag the subframe out from the front...more of this later...
Remove front wheels, open bonnet...find bonnet hits overhead garage door motor mechanism before it has full opened...curse, wheels back on, car down....push forward a metre, jack up, axle stands in, wheels off and bonnet open.
Drink tea.
Assess task, ignoring all technical information available....trailblazing now.
Quickest way to drop the subframe, disconnect the brake calipers from the hubs and suspend from chassis with Tyewraps, saving having to break into brake hydraulic system and subsequent bleeding malarky....
Completely fail to undo brake caliper bolts (first defeat ever in the 'removing a brake caliper' category)....resort to various strain bars for leverage, still failed....try last resort of hitting spanner with large hammer...no movement, I know this will end in tears....and it does!
Sit nursing severely swollen and funny colour index finger of left hand for 10 minutes after spanner springs, bounces off inner wheel arch and hits me between the eyes....stop crying, have more tea.
Decide calipers are best left on the hubs, bleeding the brake system is easy anyway (!)....disconnect hose from union on inner wing...fail to prevent large lake of brake fluid forming on garage floor....fluid needed changing anyway....it will now.
Next, disconnect anti-roll bar links at lower ends (nut and bolt)....because the upper ends are a ball joint, and also a ball ache, 'cos they spin...will saw them off later when subframe is removed.
Disconnect ABS sensor loom from the plug at the inner wing, and cut the Tiewrap at the clipping point just aft....that's it.
Apart form the other 2 connectors either side for the bumper spot lamps....disconnect them too.
Next, remove the shock absorbers. Place jack under bottom ball joint and take some strain (lift it an inch or so). Remove lower nut and bolt, then disconnect top end. If you have CATS suspension remove the electrical plug first by squeezing it, then use allen drive and spanner.
All disconnected? Compress the shocker from below, and quickly remove it before it extends again (it will, and quickly - bet it takes you 3 attempts to get the first one out....took me 4....there's a knack - work it out)
Lower the jack. Suspension will rest at maximum lower position, held by balljoints at max travel. It does not hurt the rack, even though it looks a big angle for those track rod arms...
Getting there now....worst yet to come though...
Drink tea, suck teeth (if you smoke, have one now....) decide next action - which is to support the engine as you are removing the subframe, and that's what the engine spends it's life sat on.
Purchase/Hire expensive engine support stand that sits on tops of inner wings....or if you are thrifty like me, use 2" wooden blocks on tops of inner wings, 1 ladder and a ratchet strap around the engine, making sute that no hoses or cables are trapped....(see Pic)
Ok, now it's safe to remove the subframe....if only it was as simple doing it as saying it.....
Support the subframe with a jack on the thick beam that runs side to side....this is a reasonable balance point fore and aft....obviously place the jack in the centre of the subframe side to side or it will end in tears....
Disconnects still to do: Engine mount bolts, V-mount bolts and steering rack and power steering hoses...
Engine mount bolts first....Torx bits accessed from below the subframe in a 'tube'....there is a plastic bung in there with a hole in the middle for the torx bit.....it is quite clever in that it centrally locates the bolt on insertion, and the bolt pushes it down out of the way when you remove the bolt.
Do not waste 30 minutes trying to remove the plastic bung first....you don't need to, and you will end up as frustrated as I was.....:-)
(At this point, I would like to say that I want to meet the man that invented the 'Torx' bolt, and ask him 'Why?'....was the regular hexagonal bolt head that has served the world for years with great success not good enough? What were you thinking of? And more to the point, how on earth did you manage to sell the idea?)
V-mount bolts next....inner chassis, 10 mm head (suspiciously small I thought), However the first 3 are easy. The 4th and last as usual is a pain. It's the forward bolt on the L/H side, which has the Power steering reservoir above it preventing you getting a socket on it straight...
Disconnect the reservoir, and move it out of the way. Realise that the last bolt is the only one that is rusty, and prepare for a horrendous drilling episode.
Have a cup of tea (smoke again if it's your thing...)
Pluck up courage to remove bolt - unbelievably it come out using traditional means!!
Have a cup of celebration tea, and a smoke too - even though I don't smoke!
Subframe is now ready to drop.
No it's not, steering rack is still connected to steering column. Access not good....
Can't drink any more tea, lets drop the subframe a bit and have a look. As the subframe drops, the rack to column joint becomes more visible from the wheelwell...
Realise at this point that the 2 big bolts through the rear subframe arm bushes still need to be removed, or it's going to be pretty much impossible.....
Big Bolts, Big Torque Wrench, Big Extension. Big swing (veins on forehead), and they crack. Realise that there are free spinning nuts on the inside of the chassis legs that need a spanner...get in that wheel well and sweat away, baby!
Now it's ready!
Slowly lower the jack a couple of inches....check balance of subframe on the jack....all ok? Good. If it's not, it's up to you to jack the subframe back up, rebolt it and reposition the jack underneath in a better balanced position...
I got lucky. And if I wasn't I would have dropped the subframe anyway, given that I haven't had a cup of tea for about 30 minutes now....
Ok, last bit - disconnect the rack from the column....undo clinch bolt, persuade joint to part with splined joint. (Right hand side British cars, Wrong hand side everywhere else lol)
Fail miserably.
Become more agressive in removal techniques.
Continue to fail...
Drink some tea. Pray.
Lower subframe a bit more to gain more access. Become rather agricultural with the joint. Fail. Swear.
Lower subframe a little more. Realise as the subframe suddenly drops 4 inches uncommanded that the steering column slides out from further up (whether it is supposed to, I don't know....but it did - hope it goes back together again....:-)....time will tell)
Last things - power steering hoses......remove by unscrewing bolt that holds retaining plate (Torx again, and a nasty one.....)
Pull hoses from rack. Watch as a lake of power steering fluid meets the brake fluid ocean on the floor...wonderful colour mixing (goes brown). Gaze in awe at the sight of �30 of fluid draining away....
Pull subframe out. Observation *1* from previous post - Its HEAVY!!
Realise at this point that the car is 1 inch too low to allow the subframe to come straight out of the front. (Told we would come to it earlier....)
Drag it over to the R/H side of the car, pull it out diagonally forward, ensuring you DO NOT snap off the plastic cooling duct for the alternator that 'may' well be in the way....
Sit back, think about cup of tea....realise that power steering fluid is still making it's bid for freedom, tie both hoses up high as you can (one either side of the car) to stop further expensive fluid loss.
After all this, It's time for a beer....spray all suspension bolts/nuts with liberal amounts of WD40 (or local eezit oil equivilant).....twice.
Enjoy beer, it takes the pain away from swollen finger for a while.
Job done
Good luck!
Method 2: For rich/intelligent people.
Take car to local maintenance garage.
Tell them what you want doing.
Leave it there.
Arrange pick up date.
Put funds aside for reasonably large bill.
Miss tea completely and drink beers straight away.
Job done.
Good luck!
Last edited by richard thomas; 12-30-2012 at 05:41 PM.
The following 6 users liked this post by richard thomas:
fredd60 (01-16-2013),
GerryXJR (02-20-2013),
Highway Star (01-01-2013),
rocklandjag (12-31-2012),
sklimii (12-30-2012),
and 1 others liked this post.
#17
12-30-2012, 04:55 PM

The following users liked this post:
richard thomas (12-30-2012)
#18
12-30-2012, 08:43 PM

Join Date: Apr 2012
Location: Summerville, South Carolina
Posts: 24,645
Received 4,292 Likes
on
3,710 Posts
The following users liked this post:
richard thomas (12-31-2012)
#19
12-31-2012, 07:39 AM
The following users liked this post:
richard thomas (12-31-2012)
#20
12-31-2012, 09:13 AM
Veteran Member
Thanks for a witty and interesting write up which I read all the way through though it's of no use to me at all!
Commiseration on losing the write up.
Connected as I am to the Interweb by a line made from graphite coated knicker elastic rather than copper I do any long stuff in Word then copy and paste it.
Commiseration on losing the write up.
Connected as I am to the Interweb by a line made from graphite coated knicker elastic rather than copper I do any long stuff in Word then copy and paste it.