
Restore oil treatment blows head gasket
#21
 01-22-2013, 07:13 PM


Senior Member
#22
01-22-2013, 07:19 PM
Veteran Member
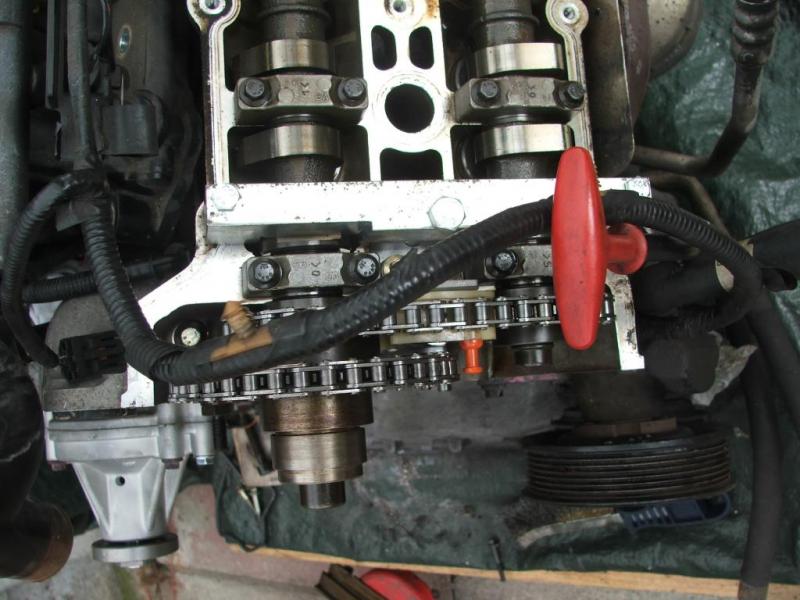
Nothing to fear, it's part of the timing chain tool kit. It goes where the crankshaft position sensor is and fits in a specific hole in the flex plate. when the engine is at the right place the cam flats will line up- then you bolt the plug in place. Leave it there until the cams are put back together with the chains and tensionsers and you are good to go. If you take your time, reassembly should take about 4-5 hours. (excluding beer/parts runs)
#23
01-22-2013, 08:06 PM
#24
01-22-2013, 08:45 PM

I use engine restore treatment all the time...on a '98 nissan quest with 300,000 mile on it. I honestly think its good stuff, but i do feel that its pretty much an oil thickener with some additives. I don't think that's what blew your gasket, but you will see where its blown once you tear into it.
#25
01-22-2013, 09:09 PM
Hi Adam,
It was one of your posts that prompted me to try it.
I really don't know what caused the problem, That's why I am ripping into it myself.
I would say that after about 5 miles of slow running, I tried a coupe of 50-90mph runs and it felt like it was a new car again, but with 203,000 miles it could have been anything, so we shall see.
As for Restore I'm not complaining, it seemed to work great, but it possibly highlighted a weak link somewhere else.
I drive it, I break it, I fix it.
#26
01-23-2013, 04:00 AM
Veteran Member
It's possible you've got a leak, I wonder if there's an IC rad fracture and can they be pressure tested? e.g. connect up an airline and tape the outlets?thinking out loud here!
If this is the case then no full rebuild! Let's see what the story is in the wet IC before we go into tear down mode. There were no external water leaks I'd guess by your reaction and work so far.
If this is the case then no full rebuild! Let's see what the story is in the wet IC before we go into tear down mode. There were no external water leaks I'd guess by your reaction and work so far.
#27
01-23-2013, 08:32 AM
Senior Member
There is a debate as to the merits of using radiator sealants in the intercooling water passages, to effect temporary repairs in the same manner as cooling system radiator sealants.
The risk with those is that some types may have very sharp metallic particles which could migrate through a hole in the intercooler & disappear into the inlet manifold & then the cylinders, causing possible damage.
An intercooler internal water leak will be worst at idling speed or overrun on a hot engine, as you have a high vacuum trying to suck water out the matrix into the inlet manifold as well as the positive pressure from the warm water in the intercooler trying to expand it's way through the leak.
Intercooler is the easiest option to try first-you could source one off ebay or a breakers...
#28
01-23-2013, 09:42 AM
#29
01-23-2013, 09:54 AM
Veteran Member
Hey Roger- I think there is someone that loans them out- Motorcars Ltd Tool Rental Program
Or for purchase- Jaguar 3 2 3 5 4 0 4 2 V8 Timing Chain Kit Range Rover | eBay
Or for purchase- Jaguar 3 2 3 5 4 0 4 2 V8 Timing Chain Kit Range Rover | eBay
#30
01-23-2013, 09:58 AM
Senior Member
The way I understand it Roger (and if I'm wrong someone will correct me!).....the only thing you need is the "flex plate plug", a straight edge, and a cam locking gizmo. Before the cams are connected with chains, you rotate the crankshaft until you can bolt the plug into the hole where CPS was. That fixes all the valves into the correct position. Then you put the camshafts in place, with their flats aligned with the straight edge, and fix them in place with some other gizmo (I forgot what it's called). Once everything is fixed, and can not move, you put the chains and tensioners on.
This should get the timing CLOSE (but I don't think it will be perfect!). That's why I'm saying I would drive it to the Jag dealer after this. Just 1 degree off, will result in poor performance, and I think it's HARD to line the flats to perfection with just a straight edge.
Maybe I'm wrong. Like I said,...I've never done it, I know the principle, but I wish there is something more exact for the cam alignement than the metal ruler.
#31
01-23-2013, 10:18 AM

Join Date: Oct 2007
Location: PHX some of the time
Posts: 117,538
Received 6,330 Likes
on
5,516 Posts
Some food for thought in these threads https://www.jaguarforums.com/forum/x...s-tools-51211/ https://www.jaguarforums.com/forum/x...n-52434/page2/
#32
01-23-2013, 10:31 AM
Veteran Member
Luckily, if the sprockets remain bolted to each cam, you cannot be 1 degree off. The minimum error would be 360/teeth degrees. That is large enough to preclude the flat edge from being anywhere near flat to a careful observer.
If someone is using the same tools and the same procedure as the dealer, the risk then boils down to operator error.
If someone is using the same tools and the same procedure as the dealer, the risk then boils down to operator error.
#33
01-23-2013, 10:45 AM
Senior Member
Luckily, if the sprockets remain bolted to each cam, you cannot be 1 degree off. The minimum error would be 360/teeth degrees. That is large enough to preclude the flat edge from being anywhere near flat to a careful observer.
If someone is using the same tools and the same procedure as the dealer, the risk then boils down to operator error.
If someone is using the same tools and the same procedure as the dealer, the risk then boils down to operator error.
#34
01-23-2013, 11:04 AM
Hi All,
I did not overheat the engine so I do not think I need to rebuild the heads, I figured It's a matter of turning the engine over by hand, getting the cams in the right place, attach the straps to hold the cams in place, and then mark the crank for location.
I want to replace the plastic tensioners, the guides have been done twice, so I think they are OK.
Does anyone have a drawing of the straps?, If I have to go that far into this, I will be making some for sale, it's a metal bar with spacers for gods sake it ain't rocket science.
If anyone has some and can give me basic dimensions I can make them (it helps being a master machinist)
Will be checking the intercoolers for leaks in a few hours, luckily I have a good compressor
#35
01-23-2013, 11:20 AM
Veteran Member
Hey Roger,
If you are a machinist, it will be VERY obvious how to make them when you look at a set and compare it to what you need to bolt them on to. You will not need the VVT tool, so you are only looking at the cam holding blocks, slipper spacers and the flex plate plug. If you can make them under $100 retail (which shouldn't be hard as it is probably less than $20 in materials), I will bet you will have many takers. They don't have to be pretty, just functional. As far as rebuilding the heads, if it is not a matter of $$ I would do it- that many miles and you probably want the valve seats recut, guides checked for play. This will ensure another 200K vs 50k. I was on a very tight budget and the car had pretty low miles, so I lapped the valves and put them back.
If you are a machinist, it will be VERY obvious how to make them when you look at a set and compare it to what you need to bolt them on to. You will not need the VVT tool, so you are only looking at the cam holding blocks, slipper spacers and the flex plate plug. If you can make them under $100 retail (which shouldn't be hard as it is probably less than $20 in materials), I will bet you will have many takers. They don't have to be pretty, just functional. As far as rebuilding the heads, if it is not a matter of $$ I would do it- that many miles and you probably want the valve seats recut, guides checked for play. This will ensure another 200K vs 50k. I was on a very tight budget and the car had pretty low miles, so I lapped the valves and put them back.
#36
01-23-2013, 11:24 AM
Veteran Member
By the way- did you read this:
Tmingi chain and tensioner replacement
I used it to get me through the process.
Tmingi chain and tensioner replacement
I used it to get me through the process.
#37
01-23-2013, 11:48 AM
Veteran Member
Take a look at the setup.
if the tooth to chain relationship is marked at every interface, and the gears are not removed, and the engine is not rotated, and the primary chains remain engaged at the crank, ... then reassembly is just matching the marks.
The ziptie method for changing the secondary tensioners essentially substitutes zipties for marks.
Yes it takes nerve and you have to think it through before starting .. but it's an option.
Last edited by plums; 01-23-2013 at 11:55 AM.
#38
01-23-2013, 12:11 PM
Veteran Member
#39
01-23-2013, 03:06 PM
Veteran Member
A picture paints a thousand words, I've one to hand so I'll grab the dimensions...
3 angle shots of it in situe, once the locate and fit the crank dowl the cams will be aligned, it's possible to do all timing with S/C engines, but better to lock both sides with VVT units.
(Plums suggestion of the zip tie method is ok for secondaries, but if the timing cover is off and you're doing both sets locking the cams is the way)
I hope this helps, done it a few times, if you need advice just drop me a pm.


If I could pop these round I would
3 angle shots of it in situe, once the locate and fit the crank dowl the cams will be aligned, it's possible to do all timing with S/C engines, but better to lock both sides with VVT units.
(Plums suggestion of the zip tie method is ok for secondaries, but if the timing cover is off and you're doing both sets locking the cams is the way)
I hope this helps, done it a few times, if you need advice just drop me a pm.
If I could pop these round I would
Last edited by Sean B; 01-23-2013 at 03:13 PM.
The following users liked this post:
plums (01-23-2013)
#40
01-23-2013, 04:21 PM
Well here is the update, it's not the intercooler, so the head has to come off, which means the cams have to come off !!!
Now I'm quaking in my boots. Everyone covers the tensioners, but has anyone taken apart the heads?
I'm assuming that the cams have pressure on the lobes that are on the valve cups so when I undo the cam bearing posts I need to evenly unload the cams so I don't bend or snap them.
Any suggestions?
Now I'm quaking in my boots. Everyone covers the tensioners, but has anyone taken apart the heads?
I'm assuming that the cams have pressure on the lobes that are on the valve cups so when I undo the cam bearing posts I need to evenly unload the cams so I don't bend or snap them.
Any suggestions?