What did you do to your X308 Today?


#342
 07-11-2013, 09:00 PM

Drove it to work without any warning lights coming on! I found a brand new
clock spring on EBay. Tomorrow night I hope to finally have my intermittent
airbag light fixed. It is doing well for 186,000 miles. The 1 week old Michelin tires help provide a smooth ride. No major malfunctions since last fall. Life is good.
clock spring on EBay. Tomorrow night I hope to finally have my intermittent
airbag light fixed. It is doing well for 186,000 miles. The 1 week old Michelin tires help provide a smooth ride. No major malfunctions since last fall. Life is good.
#344
07-16-2013, 06:02 PM
Veteran Member
I installed and wired up this:
I removed my fog lights so I could run a cold air duct up to my air box area (see the huge rectangular opening just below the head lights I made ) I'm going to run a 4" flexible hose from the passenger fog light hole directly to my conical air filter box.
Now that the fog lights are not sticking back into the windshield bottle, there was room for me to locate the 70 PSI fine mist inter cooler water spray pump in front of the bottle. You will also see in the 2nd photo the low fluid level switch and intake for the Water/Methanol injection at the very bottom.
So from this bottle I'm feeding:
1. The windshield wiper sprayers
2. The Water/Methanol injection (Snow Stage II MAF controlled)
3. The fine mist spray onto the inter cooler radiator, this is good for a 20++ degree F drop in intake air temperatures. This comes on via pressure switch at 5+ psi, or when I push the button seen in picture #5
All the wiring is hidden, the relays in the compartment with the brake res, and the switches wiring is above that little cubby hole to the left of the steering wheel. You can's see it while driving, but it is easy to reach down and feel the switches to turn on/off or press the button momentary switch for a cool water inter cooler spray blast.
Switch 1: Inter Cooler Radiator 12" Pusher fan
Switch 2: Water/Methanol master on/off MAF controlled delivery
Switch 3: master on switch for boost controlled on/off switch + door bell momentary button for Inter cooler water mist spray
In photo #6 are the 3 relays for the fan, meth, and sprayer, as well as the pressure switch for the auto spray for the intercooler, and a boost gauge part I still need to wire up.... Getting closer.
I removed my fog lights so I could run a cold air duct up to my air box area (see the huge rectangular opening just below the head lights I made
) I'm going to run a 4" flexible hose from the passenger fog light hole directly to my conical air filter box.Now that the fog lights are not sticking back into the windshield bottle, there was room for me to locate the 70 PSI fine mist inter cooler water spray pump in front of the bottle. You will also see in the 2nd photo the low fluid level switch and intake for the Water/Methanol injection at the very bottom.
So from this bottle I'm feeding:
1. The windshield wiper sprayers
2. The Water/Methanol injection (Snow Stage II MAF controlled)
3. The fine mist spray onto the inter cooler radiator, this is good for a 20++ degree F drop in intake air temperatures. This comes on via pressure switch at 5+ psi, or when I push the button seen in picture #5
All the wiring is hidden, the relays in the compartment with the brake res, and the switches wiring is above that little cubby hole to the left of the steering wheel. You can's see it while driving, but it is easy to reach down and feel the switches to turn on/off or press the button momentary switch for a cool water inter cooler spray blast.
Switch 1: Inter Cooler Radiator 12" Pusher fan
Switch 2: Water/Methanol master on/off MAF controlled delivery
Switch 3: master on switch for boost controlled on/off switch + door bell momentary button for Inter cooler water mist spray
In photo #6 are the 3 relays for the fan, meth, and sprayer, as well as the pressure switch for the auto spray for the intercooler, and a boost gauge part I still need to wire up.... Getting closer.
Last edited by WaterDragon; 07-17-2013 at 10:26 AM.
#345
07-19-2013, 09:05 AM
Senior Member
I found a bunch of oil in the intake this morning. Thanks to this forum, I was able to quickly determine that the part load breather needed cleaning. Of course, the tube broke in the process of removal, and is now temporarily fixed with electrical tape. Hahaha. I also added some Restore to the oil, and some Seafoam to clean the injectors. What a difference!
Next up, finding the loud air leak that I hear at the rear of the engine compartment. Any ideas? Sounds like it is around the TB somewhere.
If it wasn't for this forum, I would never be able to maintain a car like this. Thanks to everyone for putting their own experiences on these threads. I can't wait until I've had more experience with this car (I'm a new owner), and can help someone else with their problem!
#346
07-19-2013, 09:31 AM
Senior Member
Here is a simple breather hose fix https://www.jaguarforums.com/forum/x...ose-fix-91884/
I am doing an oil change tonight, probably add a little restore as well. Going on a mini-vacation with the family in the XJ8, our first trip in this car.
I am doing an oil change tonight, probably add a little restore as well. Going on a mini-vacation with the family in the XJ8, our first trip in this car.
The following users liked this post:
XJRChad (07-19-2013)
#347
07-20-2013, 10:43 PM

Fitted a RealGauge that's been sitting waiting for a couple of months. Pretty easy, if fiddly. Changed a dead instrument light while I was at it. Got it all back together and about 2 minutes later another instrument bulb died. Bugger! Can't be bothered taking it all apart right now, it'll have to wait till next weekend.
Also went looking for the source of my front end bumps and shimmys. There's a bit of play on the right front wheel jiggling it from 3 to 9 o clock- LBJ, maybe?
Also went looking for the source of my front end bumps and shimmys. There's a bit of play on the right front wheel jiggling it from 3 to 9 o clock- LBJ, maybe?
#349
07-22-2013, 02:04 PM
Senior Member

#351
08-02-2013, 08:45 PM
#353
08-03-2013, 01:32 PM

Senior Member
Took the right hand (driver's) side lower wishbone/control arm off to replace the lower ball joint....couldn't do it in situ, couldn't drive the old one out....got the old one out on the bench eventually using a blowlamp for heat... and now I can't get the new one in....Aaaarrgh!....had to push the car back into my garage on a trolley jack supporting the car on the front cross member as the suspension is in bits, my son and my wife helped - a family effort.....Hey-ho! Just a day in the life of jaguar ownership, LOL ....Allan
#355
08-23-2013, 10:36 PM
Veteran Member
Intermittent ABS light last 3 startups moving the car for the summer, went solid yesterday.
It's covered 1300 miles since the rebuild so it couldn't be the wheel speed sensors.
The battery is fresh off a trickle charge and 12.91V on the car.
Only bloody job I didn't do was the pin check on the ABS module, why bother, got a spare. But thinking about fitting the spare and that part doing the same thing in the future I opted for the fix.
ABS module board and pin pickups for the pump as found.

After a liberal dose of super solder.
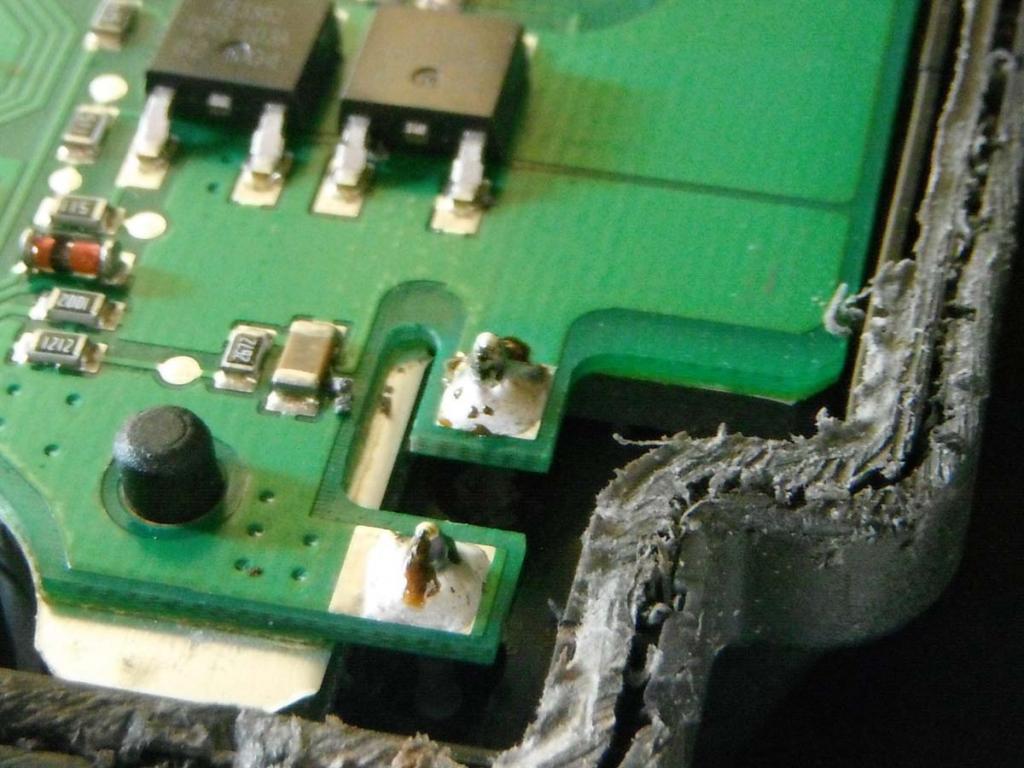
No ABS warning light, all is well.
Mine looked almost identical
I soldered my abs board today.
Last edited by WaterDragon; 08-23-2013 at 11:51 PM.
The following users liked this post:
Maninahat98 (08-24-2013)
#356
08-24-2013, 04:12 AM

Since I'm still waiting for my OBDII code reader to arrive, so I can make some headway on my Restricted Performance issue. I bought an A/C recharging kit. Couldn't find where the low pressure connector was, but they offered a web based support system to show location. Unfortunatley no Jags listed. So a quick search on Jaguarforums.com turned up the required info. A/C now cold as ice. Also got a free A/C cleaner (a bit like a bug bomb) so I set that off as well and car now smells like new.
#357
09-05-2013, 11:32 PM
Been a busy few days.
New front shock upper bushes, sway bar links, RHF LBJ. Tightened things up but still hasn't fixed the clonk over small bumps.
Front Brembos skimmed. Yet again. Under warrantee this time, which is nice.
And today, on the "its the details that count" principle, new centre caps for the wheels. Went for green - bit more subtle against a black car than the red they were originally, and a bit classier than the pink the old ones had become.
#359
09-06-2013, 05:36 PM
#360
09-07-2013, 11:40 AM
Senior Member
Well, I'm hopefully getting the car back from the shop TODAY. They would have had it done yesterday, but the moron who worked on it last had messed up the nylon or plastic fuel hoses that hooked to the lines on the front bottom of the tank. My mechanic is replacing both of them with fuel injection hose, and had to order a fitting to adapt one of them.
The guy who replaced a fuel pump a year or two ago apparently messed up the lines trying to remove the fuel tank. He gave up on that, took off the boot lid (which is scratched to hell because he just set it on the floor of his shop), took out the speaker in the rear window shelf (ripping the wires off it in the process), and removed the fuel pump assembly through the speaker hole.
I'm glad I have a good mechanic to fix this other guy's repair job...