What did you do to your X308 Today?
#381
 10-04-2013, 12:22 PM


Got the fender signal lights (aka repeaters) installed. Thanks Vector!
Used chromed amber bulbs so the bulbs are invisible when off.
Bought a cheap used pair of X300 amber lights just for the little metal clips. Removed clips, gave them a cleaning and a rust converter treatment, and they worked well.
Right side was plug & play. On the left side, I ran the wires through an existing hole where there is a rubber hose going through the fender well to the engine bay. Ran the wiring along the stock harness along the top fender and down to the front signal light. Two wire taps, to the wires leading to the front signal, and that was it. Job done. I really like the look of the white repeaters vs. the stock leaper badges. Aside from being safer, it looks more "modern" and classier IMHO.
Also installed a set of R Performance Badges from the Mina Gallery.
Jaguar Performance Emblem
I thought that these emblems would be nice, but they are MUCH nicer than I had expected. They are made of metal and they are BEAUTIFUL!
Placed one below each repeater and one below the XJR badge on the trunk.
Also ordered a pair of these enamel emblems to replace the V8 badges on the B-Pillars:
I think they will match my new center caps nicely, and get rid of those super cheap looking V8 badges.
Yesterday I ordered a set of new tires:
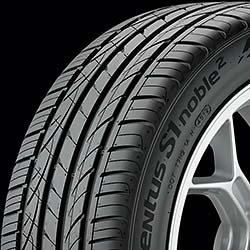
Hankook Ventus S1 Noble2 tires.
255 40 18's.
The car is also getting an alignment.
I have read nothing but good reviews on Hankook tires and I am looking forward replacing the SUPER LOUD Goodyears that are currently on the car.
Finally, I am contemplating on doing the timing chain tensioners myself.
Found several complete kits on eBay.
Doesn't look very difficult if one takes their time.
I have a well equipped garage, and as long as I take my time, I don't see any real pitfalls.
I can save about a grand by doing it myself I think.
That's it for today!
Stewart
Used chromed amber bulbs so the bulbs are invisible when off.
Bought a cheap used pair of X300 amber lights just for the little metal clips. Removed clips, gave them a cleaning and a rust converter treatment, and they worked well.
Right side was plug & play. On the left side, I ran the wires through an existing hole where there is a rubber hose going through the fender well to the engine bay. Ran the wiring along the stock harness along the top fender and down to the front signal light. Two wire taps, to the wires leading to the front signal, and that was it. Job done. I really like the look of the white repeaters vs. the stock leaper badges. Aside from being safer, it looks more "modern" and classier IMHO.
Also installed a set of R Performance Badges from the Mina Gallery.
Jaguar Performance Emblem
I thought that these emblems would be nice, but they are MUCH nicer than I had expected. They are made of metal and they are BEAUTIFUL!
Placed one below each repeater and one below the XJR badge on the trunk.
Also ordered a pair of these enamel emblems to replace the V8 badges on the B-Pillars:
I think they will match my new center caps nicely, and get rid of those super cheap looking V8 badges.
Yesterday I ordered a set of new tires:
Hankook Ventus S1 Noble2 tires.
255 40 18's.
The car is also getting an alignment.
I have read nothing but good reviews on Hankook tires and I am looking forward replacing the SUPER LOUD Goodyears that are currently on the car.
Finally, I am contemplating on doing the timing chain tensioners myself.
Found several complete kits on eBay.
Doesn't look very difficult if one takes their time.
I have a well equipped garage, and as long as I take my time, I don't see any real pitfalls.
I can save about a grand by doing it myself I think.
That's it for today!
Stewart
#382
10-04-2013, 03:01 PM
#383
10-04-2013, 05:19 PM
The following users liked this post:
Platinum XJR (10-04-2013)
#384
10-04-2013, 05:34 PM
Veteran Member

#386
10-05-2013, 04:41 PM
I had the new tires installed and a four wheel alignment done.
Hankook Ventus S1 Noble2.
255 40 18.
These replaced the worn out Goodyear F1's that were on the car when I bought it.
What a difference new tires make!
Obviously I cannot report how well these last, but I my initial impression of these tires is positive.
Never bought Hankook's before. Time will tell.
I am happy, as these new tires are quiet and the car rides and handles MUCH better now.
Stewart
Last edited by Platinum XJR; 10-05-2013 at 05:17 PM. Reason: error
#388
10-05-2013, 07:24 PM
Veteran Member
I replaced 3 door speakers that had failed. Fortunately I did not need to fully remove the door panels to do so, I was able to remove screws and pry the panel open enough to get a stubby screwdriver in there to remove and replace the speakers.
Other than upgrading my brakes, which I am waiting on parts for, and getting my nitrous controller working, my car is DONE!
Now I can spend my time polishing and enjoying it.
Other than upgrading my brakes, which I am waiting on parts for, and getting my nitrous controller working, my car is DONE!
Now I can spend my time polishing and enjoying it.
The following users liked this post:
XJRChad (10-08-2013)
#389
10-05-2013, 08:02 PM
I replaced 3 door speakers that had failed. Fortunately I did not need to fully remove the door panels to do so, I was able to remove screws and pry the panel open enough to get a stubby screwdriver in there to remove and replace the speakers.
Other than upgrading my brakes, which I am waiting on parts for, and getting my nitrous controller working, my car is DONE!
Now I can spend my time polishing and enjoying it.
Other than upgrading my brakes, which I am waiting on parts for, and getting my nitrous controller working, my car is DONE!
Now I can spend my time polishing and enjoying it.
Woo Hoo!
Stewart
#390
10-06-2013, 12:08 PM
Veteran Member
#391
10-06-2013, 04:43 PM
Washed, vacuumed, and detailed the wheels/tires today. It was beautiful outside: 60's, sunny, light breeze. Talked with my neighbor who has a Pontiac G8 GXP about blacking out the chrome on the side windows only, leaving the chrome outlining the windows. "Fixed" (temporarily) my headliner with little upholstery pins (clear head and a spiral-shaped body.
Love my car. I have had a lot of interesting cars over the years, but this one is the best.
Dan
2000 platinum with black XJR
Love my car. I have had a lot of interesting cars over the years, but this one is the best.
Dan
2000 platinum with black XJR
#392
10-06-2013, 09:50 PM
I did an oil change.
Jaguar filter and Castrol Synthetic Oil.
This has got to be one of the easiest cars to change the oil on EVER!
A K&N filter with the welded on nut would make it a bit easier, but really, this oil change was seriously easy.
Since my front bumper side marker lights have not worked since I bought the car, I thought I'd try to fix them.
Cleaned the contacts on both of the front bumper side marker lights.
I removed the clips on the plugs so I could access all contacts and used electronics cleaner on all contact points.
Checked the fuse for this circuit, and it was okay.
Now they both work, BUT, they work differently!
The driver side blinks with the turn signal, and is otherwise "OFF".
The passenger side lights up with the headlights, but does NOT blink.
What the heck?
Any ideas or suggestions?
Do I need an exorcist or an electrician?
Stewart
p.s. I did add fender repeaters / signal lights to the car recently. The front bumper side lights did not work before I did the install, and did not work until today's cleaning of the contacts.
I DID tap into the front left bumper signal and ran that wire to the LEFT repeater. The right repeater was plug and play.
Could tapping into the left front bumper turn signal and adding the fender light cause this?
I am out of ideas, and yes, I did search on this subject.
Last edited by Platinum XJR; 10-06-2013 at 09:53 PM.
#393
10-07-2013, 03:50 PM
#394
10-07-2013, 04:23 PM

Senior Member
#395
10-07-2013, 04:29 PM
Senior Member
#396
10-07-2013, 04:35 PM
Senior Member
#397
10-09-2013, 08:50 PM
Replaced the third brake light aka high mount brake light assembly with one I bought from eBay UK.
I noticed that the UK version of the third brake light assembly does not have the two rubber bumpers that touch the glass. I like that, as I am going to have my windows tinted, and it gives a cleaner look. It is also possible to clean behind it easier without those rubber bumpers.
Also, it wasn't faded and cracked like my original one, and the replacement one I purchased from Washington state.
Another difference was that the UK version has a plug in the red light housing, and both of my US versions of the red housings have the wiring soldered on. I couldn't reach the plug on mine, so I just made a little cutout to let the wiring slide in and out for the housing replacement. The little cutout can't be seen and makes the assembly / removal REALLY easy.
I think the best part is that I got a REALLY clean and nice third brake light entire assembly for about $38.00 US shipped and it only took eight days to receive it.
If anyone needs one, the seller has another AGD one here:
JAGUAR XJ8 XJR HIGH LEVEL BRAKE LIGHT | eBay
He also has a black one:
JAGUAR XJ8 XJR BLACK CASING HIGH LEVEL BRAKE LIGHT | eBay
Good seller, nice parts, and EXCELLENT customer service.
I also got my front side bumper marker lights sorted out.
I decided that I wanted them both to flash with the turn signals, so I cut the wiring to the right front side lamp and piggybacked into the front right turn signal.
Now all of my lights function 100% and no issues whatsoever.
This week I also hope to:
-install the foot rest I bought.
-touch up all of the little rock chips with the MDZ/Clear paint kit I bought.
-replace the driver's side rear door belt line moulding.
A couple of weeks ago, somebody left a two foot long black scratch in mine
Got a beautiful MDZ part and a roll of 3M foam tape to do the install.
That's it for today!
Stewart
#398
10-09-2013, 08:55 PM
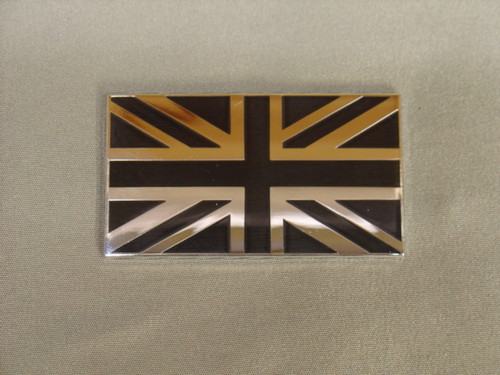
If this was directed to me, you can get the badges here:
Union Jack Self Adhesive Badges Chrome And Black Mini , Austin , Etc | eBay
HTH.
Stewart
#399
10-10-2013, 07:59 PM
Today I replaced the driver's side rear door belt line trim.
A few weeks ago while I was at work, somebody left a nice long scrape in the door trim.
It was down to the plastic material.
Bought a used one from a wrecking yard on eBay in my car's color code: MDZ and it is a perfect match.
The hardest part was removing the stock foam tape. That residue is hard to remove!
I used up a can of 3M adhesive remover and a good portion of a bottle of Goo Gone.
Finished up by soaking a rag in paint thinner to get the last remaining glue off.
Also touched up about ten rock chips at the leading edge of the hood. Filling the tiny chips with a tiny brush was kind of therapeutic.
Tomorrow I'll buff it out and see if I have to add any more paint.
The car looks brand new again!
That's it for today!
Stewart
#400
10-10-2013, 08:22 PM
Veteran Member
