XJ8 DIY Oil Change Write-Up
#1
 06-30-2013, 11:56 PM


This is for non-supercharged XJ8's equipped with a 4.0L V8:
Items Used:
1ea Hydraulic jack
1ea 16" long 2x6
4ea jack stands
1ea 13mm 6pt socket, 3/8" drive
1ea 3/8" drive socket wrench
8qt/2gal engine oil
1ea oil fill funnel
1ea waste oil catch pan/basin
1ea strap filter wrench
1ea oil filter
Misc. rags/towels
Oil Filter Options:
ACDELCO PF2254
Auto Extra 61851228
Beck/Arnley 0418175
Bosch 72209
Fram Full-Flow PH5618
MANN W7197
Motorcraft FL2021
NAPA Gold 1228
OEM EAZ1354
Pentius PLB5618
Pronto PO5317
Purolator Classic L15317
Purolator PureONE PL15317
WIX 51228
Filter in bold is depicted below.
Ensure automatic transmission is in Park
Set the parking brake
Prepare to raise the front of the car with a hydraulic floor jack:
-Position the jack centrally under the front suspension crossbeam
-Place a block of wood between the jack head and the crossbeam
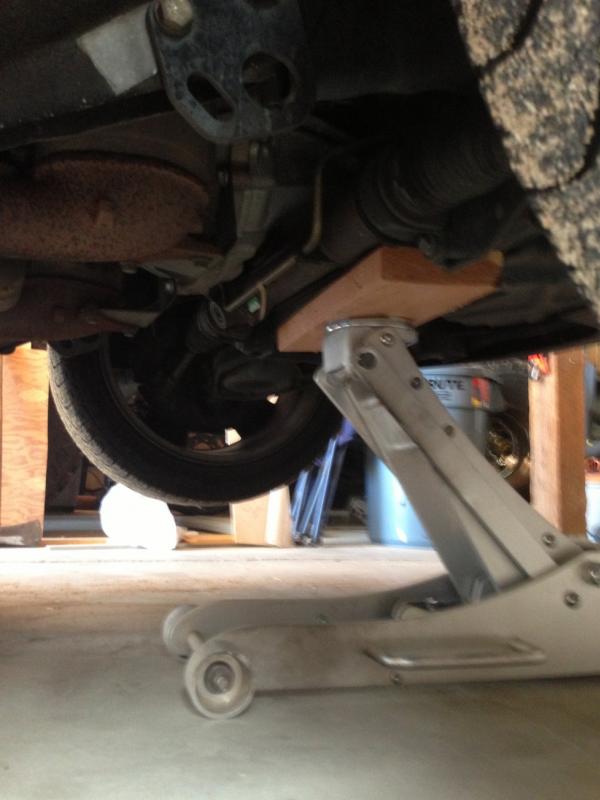
-Raise the front of the car
-Place jack stands in position at the front car jacking points

-Slowly lower the front of the car onto the vehicle stands
Prepare to lift the rear of the car with a hydraulic floor jack:
-Position the jack centrally under the rear suspension sub-frame
-Place a block of wood between the jack head and the sub-frame

-Raise the rear of the car
-Place suitable jack stands in position at the rear vehicle jacking points

-Lower the vehicle onto the jack stands
The car is now securely set on 4 jacks stands.
Pop the hood (bonnet)
Open hood and locate oil fill cap - US driver's side of engine depicted

Loosen oil cap
The oil drain plug and oil filter are located directly under the front of the car towards the US passenger side.

Use 13mm 6pt socket to loosen oil drain plug (counterclockwise) and drain waste oil into waste oil catch pan/basin. This will take a few minutes. This is a good time to wipe off your oil drain plug and inspect the threads and gasket to ensure the plug is in good condition.
Use strap filter wrench to loosen oil filter (counterclockwise) and drain waste oil into wast oil catch pan/basin.
Remove oil filter. There will be some more oil which will pour out and this will take a few minutes.
Prepare your new oil filter by filling partially with new oil and ensuring the gasket has new oil on it.
Wipe any excess waste oil off of the oil pan bung, ensure surface is clear of debris, then install oil pan drain plug (clockwise). Tighten snugly. (I noticed the rubber gasket material squished out to the edge of the plug when properly snug.)
Wipe any excess waste oil off of the oil filter mating surface on the engine, ensure surface is clear of debris, then install oil filter (clockwise). Tighten snugly. (This is a tight area and using of the strap oil filter wrench was easiest. 3/4 turn after hand snug and the oil filter was properly seated.)
Inspect all areas for waste oil collection. The way this was designed, when draining your oil filter, waste oil will collect within the oil pan rim.
Insert oil fill funnel into oil fill hole after removing cap completely. Pour in 6.5qts of oil, then check the oil level on the dipstick. The desired level is within the hatched region between MIN and MAX. (I poured in another 0.5qts of oil, checked the level, installed the oil fill cap, started the car and let it warm up, shut it off and let it set for approximately 5 minutes, then checked the oil level again. I added another 0.5qts of oil to the car and checked the oil level. It was at the top of the hatched section. I believe I could have added the remaining 0.5qts of oil, but decided against it.)
NOTES:
I followed the same shop jack procedure per JTIS.
I could not find a torque specification on the oil drain plug.
I decided to raise the car completely to inspect the entire undercarriage.
A 16" long 2x6 is too long... When jacking the front, the metal on the crossbeam gouged into the wood and I had to pull it off the car. A 12" would work better.
I encourage cleaning everything you remove and reinstall, including mating surfaces.
It was 100*F during this oil change.
Beverage consumption during this procedure is recommended.
Please excuse the dirty engine compartment and shop.
Items Used:
1ea Hydraulic jack
1ea 16" long 2x6
4ea jack stands
1ea 13mm 6pt socket, 3/8" drive
1ea 3/8" drive socket wrench
8qt/2gal engine oil
1ea oil fill funnel
1ea waste oil catch pan/basin
1ea strap filter wrench
1ea oil filter
Misc. rags/towels
Oil Filter Options:
ACDELCO PF2254
Auto Extra 61851228
Beck/Arnley 0418175
Bosch 72209
Fram Full-Flow PH5618
MANN W7197
Motorcraft FL2021
NAPA Gold 1228
OEM EAZ1354
Pentius PLB5618
Pronto PO5317
Purolator Classic L15317
Purolator PureONE PL15317
WIX 51228
Filter in bold is depicted below.
Ensure automatic transmission is in Park
Set the parking brake
Prepare to raise the front of the car with a hydraulic floor jack:
-Position the jack centrally under the front suspension crossbeam
-Place a block of wood between the jack head and the crossbeam
-Raise the front of the car
-Place jack stands in position at the front car jacking points
-Slowly lower the front of the car onto the vehicle stands
Prepare to lift the rear of the car with a hydraulic floor jack:
-Position the jack centrally under the rear suspension sub-frame
-Place a block of wood between the jack head and the sub-frame
-Raise the rear of the car
-Place suitable jack stands in position at the rear vehicle jacking points
-Lower the vehicle onto the jack stands
The car is now securely set on 4 jacks stands.
Pop the hood (bonnet)
Open hood and locate oil fill cap - US driver's side of engine depicted
Loosen oil cap
The oil drain plug and oil filter are located directly under the front of the car towards the US passenger side.
Use 13mm 6pt socket to loosen oil drain plug (counterclockwise) and drain waste oil into waste oil catch pan/basin. This will take a few minutes. This is a good time to wipe off your oil drain plug and inspect the threads and gasket to ensure the plug is in good condition.
Use strap filter wrench to loosen oil filter (counterclockwise) and drain waste oil into wast oil catch pan/basin.
Remove oil filter. There will be some more oil which will pour out and this will take a few minutes.
Prepare your new oil filter by filling partially with new oil and ensuring the gasket has new oil on it.
Wipe any excess waste oil off of the oil pan bung, ensure surface is clear of debris, then install oil pan drain plug (clockwise). Tighten snugly. (I noticed the rubber gasket material squished out to the edge of the plug when properly snug.)
Wipe any excess waste oil off of the oil filter mating surface on the engine, ensure surface is clear of debris, then install oil filter (clockwise). Tighten snugly. (This is a tight area and using of the strap oil filter wrench was easiest. 3/4 turn after hand snug and the oil filter was properly seated.)
Inspect all areas for waste oil collection. The way this was designed, when draining your oil filter, waste oil will collect within the oil pan rim.
Insert oil fill funnel into oil fill hole after removing cap completely. Pour in 6.5qts of oil, then check the oil level on the dipstick. The desired level is within the hatched region between MIN and MAX. (I poured in another 0.5qts of oil, checked the level, installed the oil fill cap, started the car and let it warm up, shut it off and let it set for approximately 5 minutes, then checked the oil level again. I added another 0.5qts of oil to the car and checked the oil level. It was at the top of the hatched section. I believe I could have added the remaining 0.5qts of oil, but decided against it.)
NOTES:
I followed the same shop jack procedure per JTIS.
I could not find a torque specification on the oil drain plug.
I decided to raise the car completely to inspect the entire undercarriage.
A 16" long 2x6 is too long... When jacking the front, the metal on the crossbeam gouged into the wood and I had to pull it off the car. A 12" would work better.
I encourage cleaning everything you remove and reinstall, including mating surfaces.
It was 100*F during this oil change.
Beverage consumption during this procedure is recommended.
Please excuse the dirty engine compartment and shop.
The following 3 users liked this post by mechelement:
#2
07-01-2013, 02:15 AM
Veteran Member
Howdy Mechelement...good and thorough write up but hey,
I'll let you into a little secret ;o)
There is a much easier way of setting the car up for an oil change
without lifting both ends which really isn't necessary unles you intend greasing
rear UJ's and changing diff oil and bleeding the brakes.
What I usually do is position my RIGHT front tyre onto a 2" thick plank
and then position my trolley jack under the REAR LEFT jacking point and lift to a fairly high angle.
This will lift the front of the car on the left hand side high enough to place a jack stand under front left lifting point.
This in effect tilts the car forwards allowing the oil to drain properly and also giving easy access to oil filter.
All quick and done in 20 mins. ;o)
Last edited by xjay8; 07-01-2013 at 02:18 AM.
The following users liked this post:
mechelement (06-22-2014)
#3
07-01-2013, 03:06 AM

The following users liked this post:
mechelement (07-06-2013)
#4
07-01-2013, 05:29 AM
Veteran Member
My garage floor is level, but the driveway slants up to the garage at a very slight angle. Also, the garage floor is about an inch or so above the driveway surface, so...
I back my car into the garage until the front tires are just onto the level garage surface. This gives me plenty of room to get under the front of the car without having to jack it up. Makes for an easy 10 minute oil change.
I've mentioned this before and nobody seems to believe me, so next time I'll take some photos.
The following 2 users liked this post by OldMike:
Dan R (03-02-2015),
mechelement (06-22-2014)
#6
07-01-2013, 07:42 AM
#7
07-01-2013, 07:50 AM
I lifted the car completely to thoroughly inspect the undercarriage. I always notice condensation on the passenger front exhaust clamp. The exhaust clamps were loose and I tightened them back to spec. It didn't stop the condensation.
I was surprised how far in the suspension crossbeams were from the front and rear bumper.
I was surprised how far in the suspension crossbeams were from the front and rear bumper.
The following users liked this post:
OldMike (07-02-2013)
Trending Topics
#8
07-01-2013, 11:31 PM
Veteran Member
My garage floor is level, but the driveway slants up to the garage at a very slight angle. Also, the garage floor is about an inch or so above the driveway surface, so...
I back my car into the garage until the front tires are just onto the level garage surface. This gives me plenty of room to get under the front of the car without having to jack it up. Makes for an easy 10 minute oil change.
I've mentioned this before and nobody seems to believe me, so next time I'll take some photos.
I back my car into the garage until the front tires are just onto the level garage surface. This gives me plenty of room to get under the front of the car without having to jack it up. Makes for an easy 10 minute oil change.
I've mentioned this before and nobody seems to believe me, so next time I'll take some photos.

#9
03-01-2015, 01:34 AM

Old Mike, My garage floor is 4 inches higher than the drive, and has a concrete ramp, some 4 feet in depth, the width of the double garage. Like you I back my car into the garage, front wheels just into the garage. Then, I remove the front bumper, only 2 bolts. Once I am laid down in front of the car, everything is visible and easy to get to. The longest thing is waiting for the oil to drain. Bill W.
#10
03-02-2015, 01:18 PM

Senior Member


Thread
Thread Starter
Forum
Replies
Last Post
Currently Active Users Viewing This Thread: 1 (0 members and 1 guests)