
94 XJ40 blowers not working
#1
 12-09-2012, 07:42 PM


Hi, Up until last week the ac/heater blower fan(s) was working (sort of ..on high only ) but now I have no fans running.
I can hear the flaps click to different positions as I turn the speed control and my heater lights illuminate normally.
I checked the fuses and they seem ok. I read about the microswitch issue on earlier models but am doubtful that would be the problem as the flaps switch audibly as move from low to high and def but hey, I'm just guessing.
The heat still works and I get warm air out of the side vents and to the screen when I'm out on the road but I think that's just the venting - If I want more pressure I have to open the sunroof - not the best kluge for northwest winters!!
Where do I start? Relays? if so where are they located?
#2
12-09-2012, 09:31 PM


Blower motors on those models are common failure points. I have tried to replace the transistor that is usually the failure, with no success. Some other folks may have success. Look for a rebuilder for the blowers or rebuilt blowers. They are tricky and simple to remove, if that makes sense. Look for the repair guide in the XJ40 stickies for advice. I had a 94 where the contacts of the motor itself were just completely worn out that I had to find a good motor. Take the blowers out and inspect. Another note is that they both need to work to get air flow. There is one on each side of the dash and together, push the air into the HVAC system. If one is not working, the air will go the path of least resistance (back through the other blower)
Another thought, was the relay inside the blower box. You still need to take the blowers out to gain access. There is a high-failure-rate relay in the incoming air path. Standard four pin relay. Definitely a good idea to give that a look.
Early (88-89) cars had the microswitch problem.
Another thought, was the relay inside the blower box. You still need to take the blowers out to gain access. There is a high-failure-rate relay in the incoming air path. Standard four pin relay. Definitely a good idea to give that a look.
Early (88-89) cars had the microswitch problem.
Last edited by BlackX300VDP; 12-09-2012 at 09:34 PM. Reason: added info
The following 3 users liked this post by BlackX300VDP:
#3
12-10-2012, 10:21 AM

Hi Lawrence, I managed to repair the blower motors from my 1992 XJ40 a long time ago. From memory, the telltale when the resistors have gone is that the blowers only work on high speeds, not variable like they ought to be. Usually they are really corroded.
The problem I had when repairing (apart from they were a little awkard to remove) was being sold incorrect transistors. Its essential that the correct ones are used. A local electronics outlet sold me the wrong ones (they looked the same) and everything had to come out-that's after figuring out what the problem was!!!
When everything worked it was a very satisfying job.
All the best,
G
The following users liked this post:
Lawrence (12-10-2012)
#6
12-10-2012, 10:31 PM
First of all, I would like to thanks bunch of much to those Gentlement: Master Tech Brutal in Houston Texas; Motorcarman in this forums here; Thanks very much to JSeaman in Jaguarforum.co.uk
When you turn on AC switch, there is no air blow out that's most likely we think straight to blower motor stop working, blow fuses, malfunction blower relays, short in circuits....So We are going to do trouble shooting from easy one first to hard things later.
I/ Check the blower motor fuse. On the passenger site wall, right your feet, pull out the fuse cover, look for 20A fuse# A2 for RH Air Con.Fan/RH Heater and 20A fuse# B1 for LH Air Con.Fan/LH Heater. Use fuse extractor to pull out A2 & B1, visual inspect them, use DOM check continuety if bad, replace new fuse with same specs.

II/ Check the AC switch. In order to do this, I am not writting step by step for this procedure becaue Mr. JSeaman in other Jaguar forum already did. However, copy it and paste here. Once again, Thanks JSeaman.
Please disconnect Negative battery cable, let CPU discharge at least 15minutes before start working any trouble shooting relative electrical circuit.
The heater control panel is in the centre console of the car. This guide will show you how to remove and replace the fan controls but is also useful if you need access to the stereo etc at any point
Step 1 - Open the centre console storage box lid

Step 2 - Remove the two Philips screws on the outer edge

Step 3 - Ensure the ashtray is in the closed position
Step 4 - Lift the ash tray unit out and tip it forwards towards the dash, be careful not to pull on the wiring

When you turn on AC switch, there is no air blow out that's most likely we think straight to blower motor stop working, blow fuses, malfunction blower relays, short in circuits....So We are going to do trouble shooting from easy one first to hard things later.
I/ Check the blower motor fuse. On the passenger site wall, right your feet, pull out the fuse cover, look for 20A fuse# A2 for RH Air Con.Fan/RH Heater and 20A fuse# B1 for LH Air Con.Fan/LH Heater. Use fuse extractor to pull out A2 & B1, visual inspect them, use DOM check continuety if bad, replace new fuse with same specs.
II/ Check the AC switch. In order to do this, I am not writting step by step for this procedure becaue Mr. JSeaman in other Jaguar forum already did. However, copy it and paste here. Once again, Thanks JSeaman.
Please disconnect Negative battery cable, let CPU discharge at least 15minutes before start working any trouble shooting relative electrical circuit.
The heater control panel is in the centre console of the car. This guide will show you how to remove and replace the fan controls but is also useful if you need access to the stereo etc at any point
Step 1 - Open the centre console storage box lid
Step 2 - Remove the two Philips screws on the outer edge
Step 3 - Ensure the ashtray is in the closed position
Step 4 - Lift the ash tray unit out and tip it forwards towards the dash, be careful not to pull on the wiring
Last edited by Zenidyle; 12-15-2012 at 12:29 PM.
The following users liked this post:
Roob0481 (02-08-2015)
#7
12-10-2012, 10:37 PM
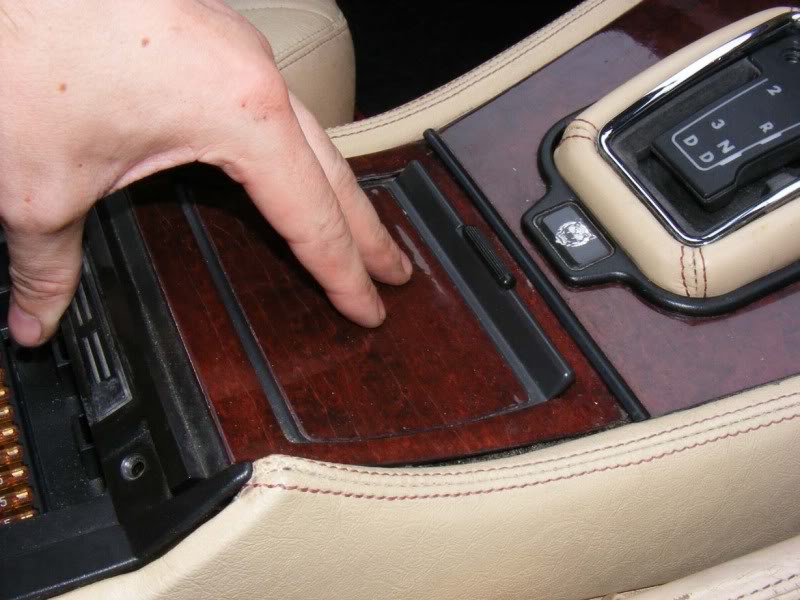
Step 5 - Slide off the two spade clip connectors

Step 6 - There is a small black plastic piece of trim, this should slide out towards the rear of the car and has two tabs (you can see one by my thumb) so don't pull it upwards until you've removed it completely
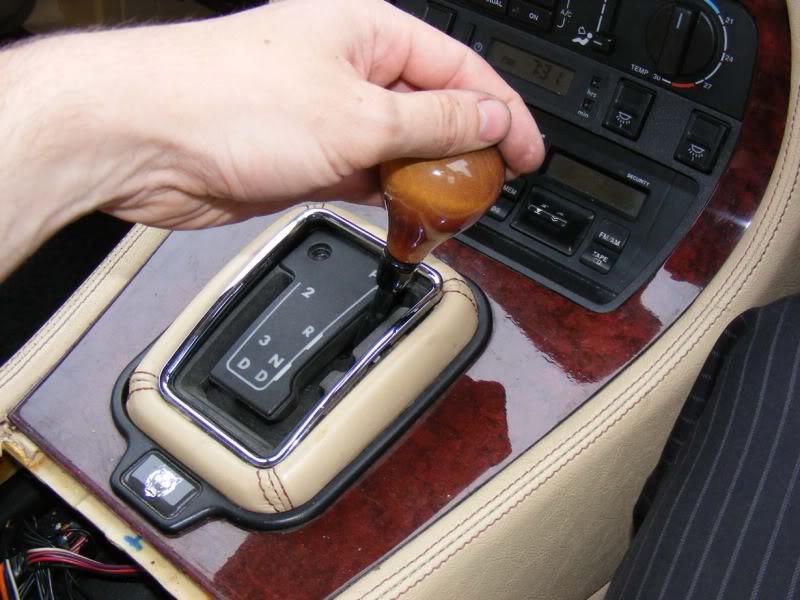
Step 7- Slide the gear shifter into N or D to get some room to work in (you will obviously need to turn the ignition on and press the brake pedal for the transmission lock)
Step 8 - Remove the outer surround which is simply pulled up

Step 9 - Now to the inner black plastic surround, this is also squeezed to release the clips and then lifted up. Be careful because this is only thin plastic

Step 6 - There is a small black plastic piece of trim, this should slide out towards the rear of the car and has two tabs (you can see one by my thumb) so don't pull it upwards until you've removed it completely
Step 7- Slide the gear shifter into N or D to get some room to work in (you will obviously need to turn the ignition on and press the brake pedal for the transmission lock)
Step 8 - Remove the outer surround which is simply pulled up
Step 9 - Now to the inner black plastic surround, this is also squeezed to release the clips and then lifted up. Be careful because this is only thin plastic
Trending Topics
#8
12-10-2012, 10:50 PM
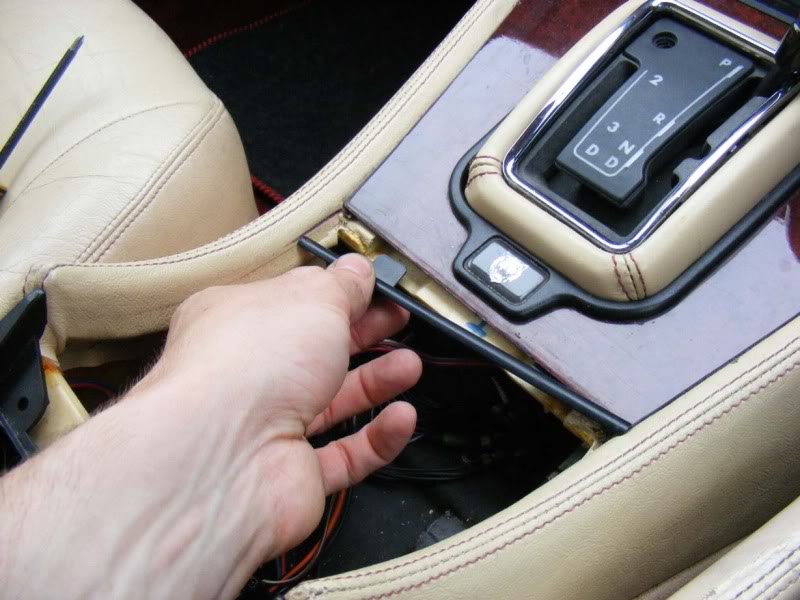
Step 10 - You will find two nylon wing nuts on the underside of the wood trim, remove both of these and catch the wingnuts as they fall

Step 11 - Lift the trim directly upwards to allow the threaded bars to clear the holes as shown. Becareful with wooden piece because it is easy break or cracked if you lift too fast, too high. I did crack mind and made me mad.

Step 12 - Now slide the whole wooden piece towards the rear of the car and it should pull out with little resistance. Be careful not to tug on the wood at any point or you risk cracking the lacquer. I did crack mind, that's hurt me.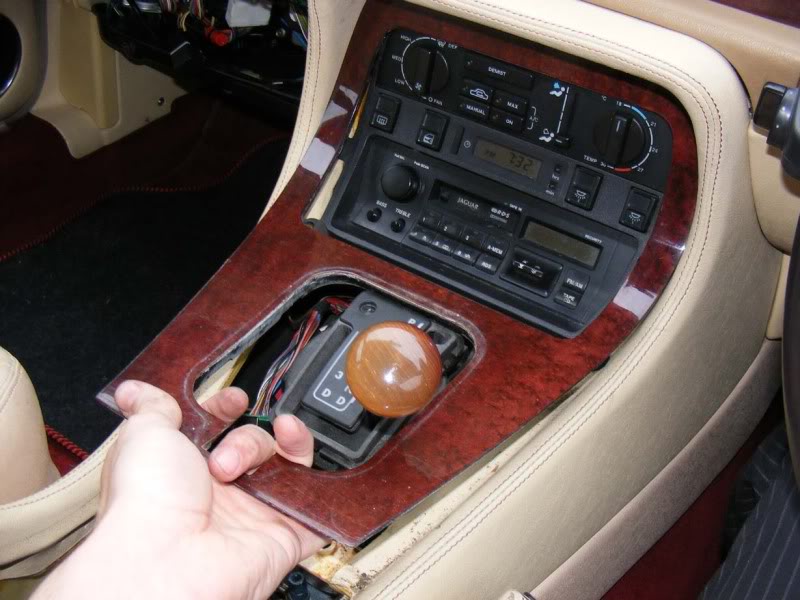
Step 11 - Lift the trim directly upwards to allow the threaded bars to clear the holes as shown. Becareful with wooden piece because it is easy break or cracked if you lift too fast, too high. I did crack mind and made me mad.
Step 12 - Now slide the whole wooden piece towards the rear of the car and it should pull out with little resistance. Be careful not to tug on the wood at any point or you risk cracking the lacquer. I did crack mind, that's hurt me.
#9
12-10-2012, 10:57 PM
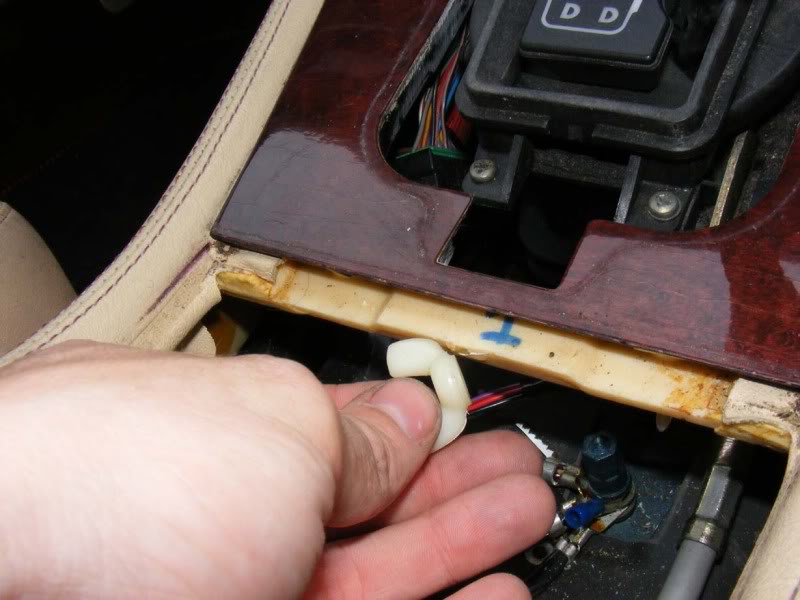
Step 13 - There are 6 Philips screws holding the dash electronics in place, two on either side and then two at the top, remove all of them

Step 14 - You should now be able to slide the whole unit forwards, be careful not to damage the tabs for the screws

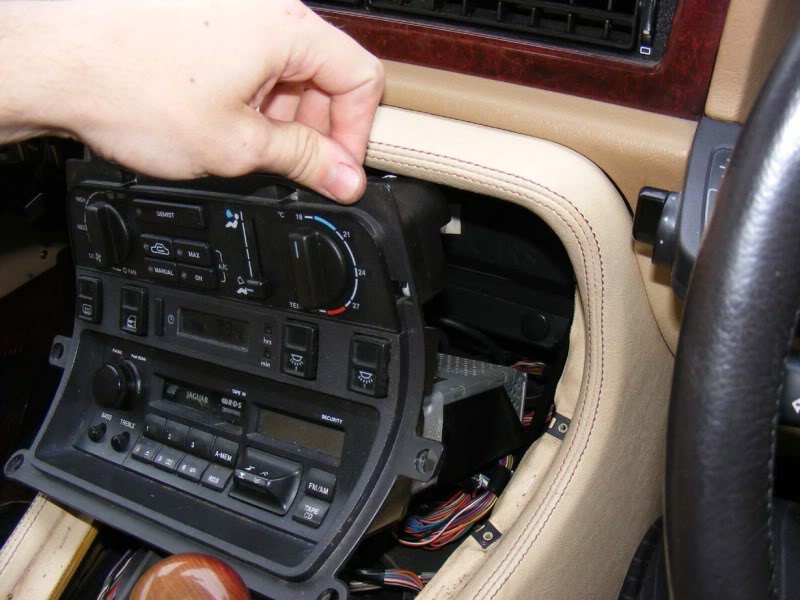
Step 15 - Depress the multiplug connector on the back of the fan control unit and remove it

Step 14 - You should now be able to slide the whole unit forwards, be careful not to damage the tabs for the screws
Step 15 - Depress the multiplug connector on the back of the fan control unit and remove it
#10
12-10-2012, 11:13 PM
Step 16 - Four screws remain (two at the top and one either side) before the control panel comes out completely. The picture shows the unit removed so you can easily see screw positions

Step 17 - Slide off the rotational control AC switch - it simply pull forwards
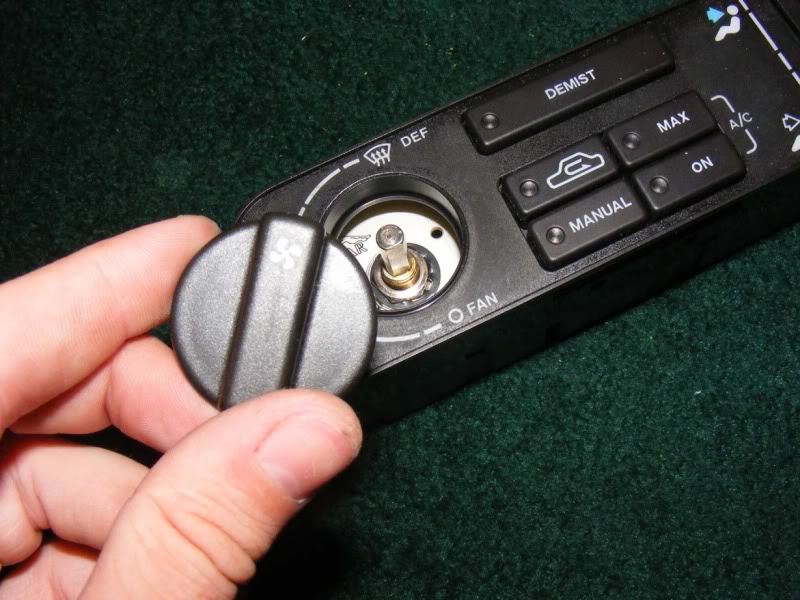
Step 18 - Slide off the rotational controls temperature switch - it simply pull forwards.

Step 17 - Slide off the rotational control AC switch - it simply pull forwards
Step 18 - Slide off the rotational controls temperature switch - it simply pull forwards.
#11
12-10-2012, 11:17 PM
#12
12-10-2012, 11:28 PM
Step 19 - Press the back of the plastic as shown to release the hooks holding the two parts of the fan control box together, it's a little bit fiddly but you don't need a lot of force or use flat screw driver bend and release them.

Step 20 - left the AC control face up

Step 21 - Slide the front board forward and lift it clear of the box. Your model could be difference front PC board but the main thing what we are going to replace the AC fan switch.

Step 20 - left the AC control face up
Step 21 - Slide the front board forward and lift it clear of the box. Your model could be difference front PC board but the main thing what we are going to replace the AC fan switch.
#13
12-10-2012, 11:47 PM
Step 22 - You may look for this switch
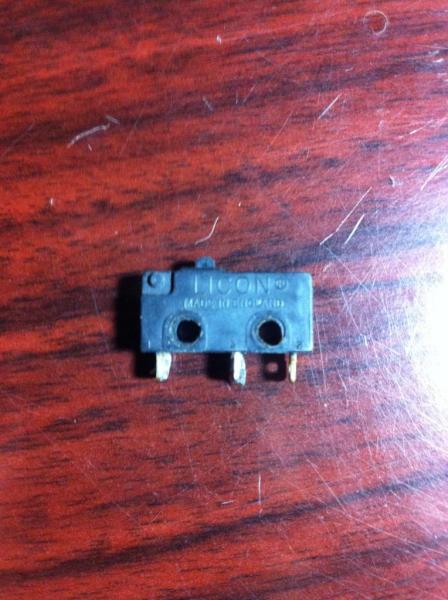
Here is its location:
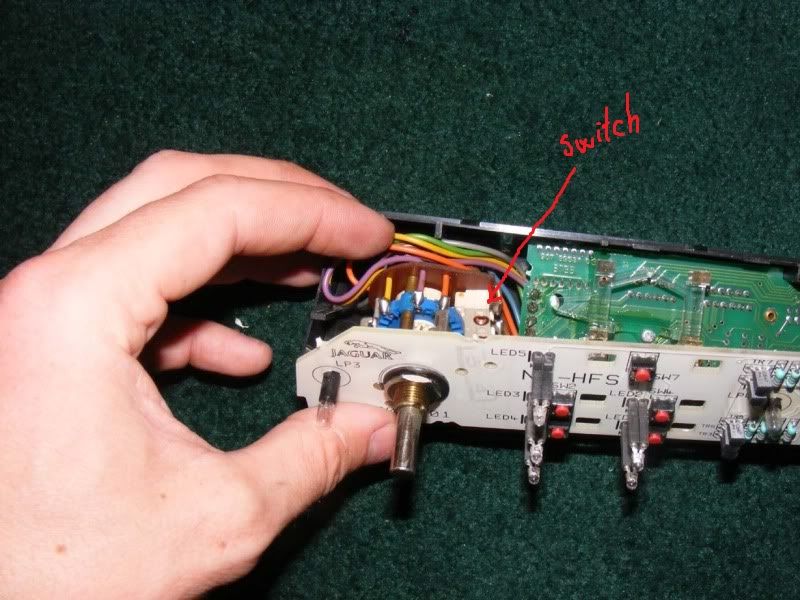
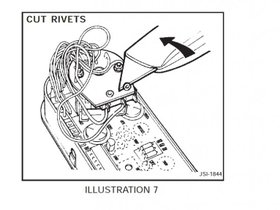
Step23 - Unsolder 2 wires connect to switch, use driller with small blade to drill through 2 rivets nuts and then remove the swith. You can use knife to cut 2 rivets nut.
bth_53.jpg?t=1355204739
Here is its location:
Step23 - Unsolder 2 wires connect to switch, use driller with small blade to drill through 2 rivets nuts and then remove the swith. You can use knife to cut 2 rivets nut.
bth_53.jpg?t=1355204739
Last edited by Zenidyle; 12-11-2012 at 02:29 AM.
The following users liked this post:
Wannabeted (02-15-2015)
#14
12-11-2012, 12:04 AM
Step 24 - So this switch is 80% culprit. When this switch is malfunction, you will have nothing air blow out when turn on AC. Use DOM to check continuety between midle terminal with other terminal pin#1. It should be continuety on/off when you press the little notch on top to turn it on and on the contrary it's no continuety when it off. (see pic above). If you have no continuety between 2 these terminal, that's bad switch. Do not go to Jaguar dealer buy the new swith because they are going to ripp off you with some around $200 with little toy swith. Looking for Radio Shack close to you, ask them you look the switch model 275-016. This is only $3 in Radio Shack so why you spend $200 if you have money and would like to spend so go for it but I am not.

Last edited by Zenidyle; 12-11-2012 at 12:18 AM.
#15
12-11-2012, 12:12 AM
The following 3 users liked this post by Zenidyle:
#17
12-11-2012, 09:43 AM
Senior Member
Zenidyle,
Great job on this post!!!
Pictures really help many people get through some of these repairs, the task doesn't seem so difficult when a person can visualize what's happening.
Please keep up the great effort and contribution. Far too often people post up when they're in a difficult spot, then rarely follow-up with the results or to thank members for helping them out with advice and guidance..... really sad and selfish.
I'll be anxious to see the conclusion to this post.
Good luck and Thank you
#18
12-11-2012, 10:10 AM
Senior Member
#19
12-11-2012, 06:08 PM
#20
12-11-2012, 06:20 PM
Step 25 - If you can not find the Micro-switch in your local Radio Shack. Here is link so you can order it online: SPDT Switch Without Roller : SPDT Switches | RadioShack.com
What difference between original switch and SPDT Switch in Radio Shack is the little bar on the top.
bth_049-1.jpg?t=1355309368
Use cutter trime off or break off the little bar on the top, use sanding papper to sand the shape metal remain. So you have same original micro switch.
Step 26 - I bought those screws and nut below from Radio Shack also, they are so cheap with couple bucks. You all need just only 2 screws and 2 nuts to re-install the SPDT Switch back, and resolder 2 wires to terminals of new micro switch, remember that you need install same way where you took off.
Last edited by Zenidyle; 12-12-2012 at 05:24 AM.