When you click on links to various merchants on this site and make a purchase, this can result in this site earning a commission. Affiliate programs and affiliations include, but are not limited to, the eBay Partner Network.
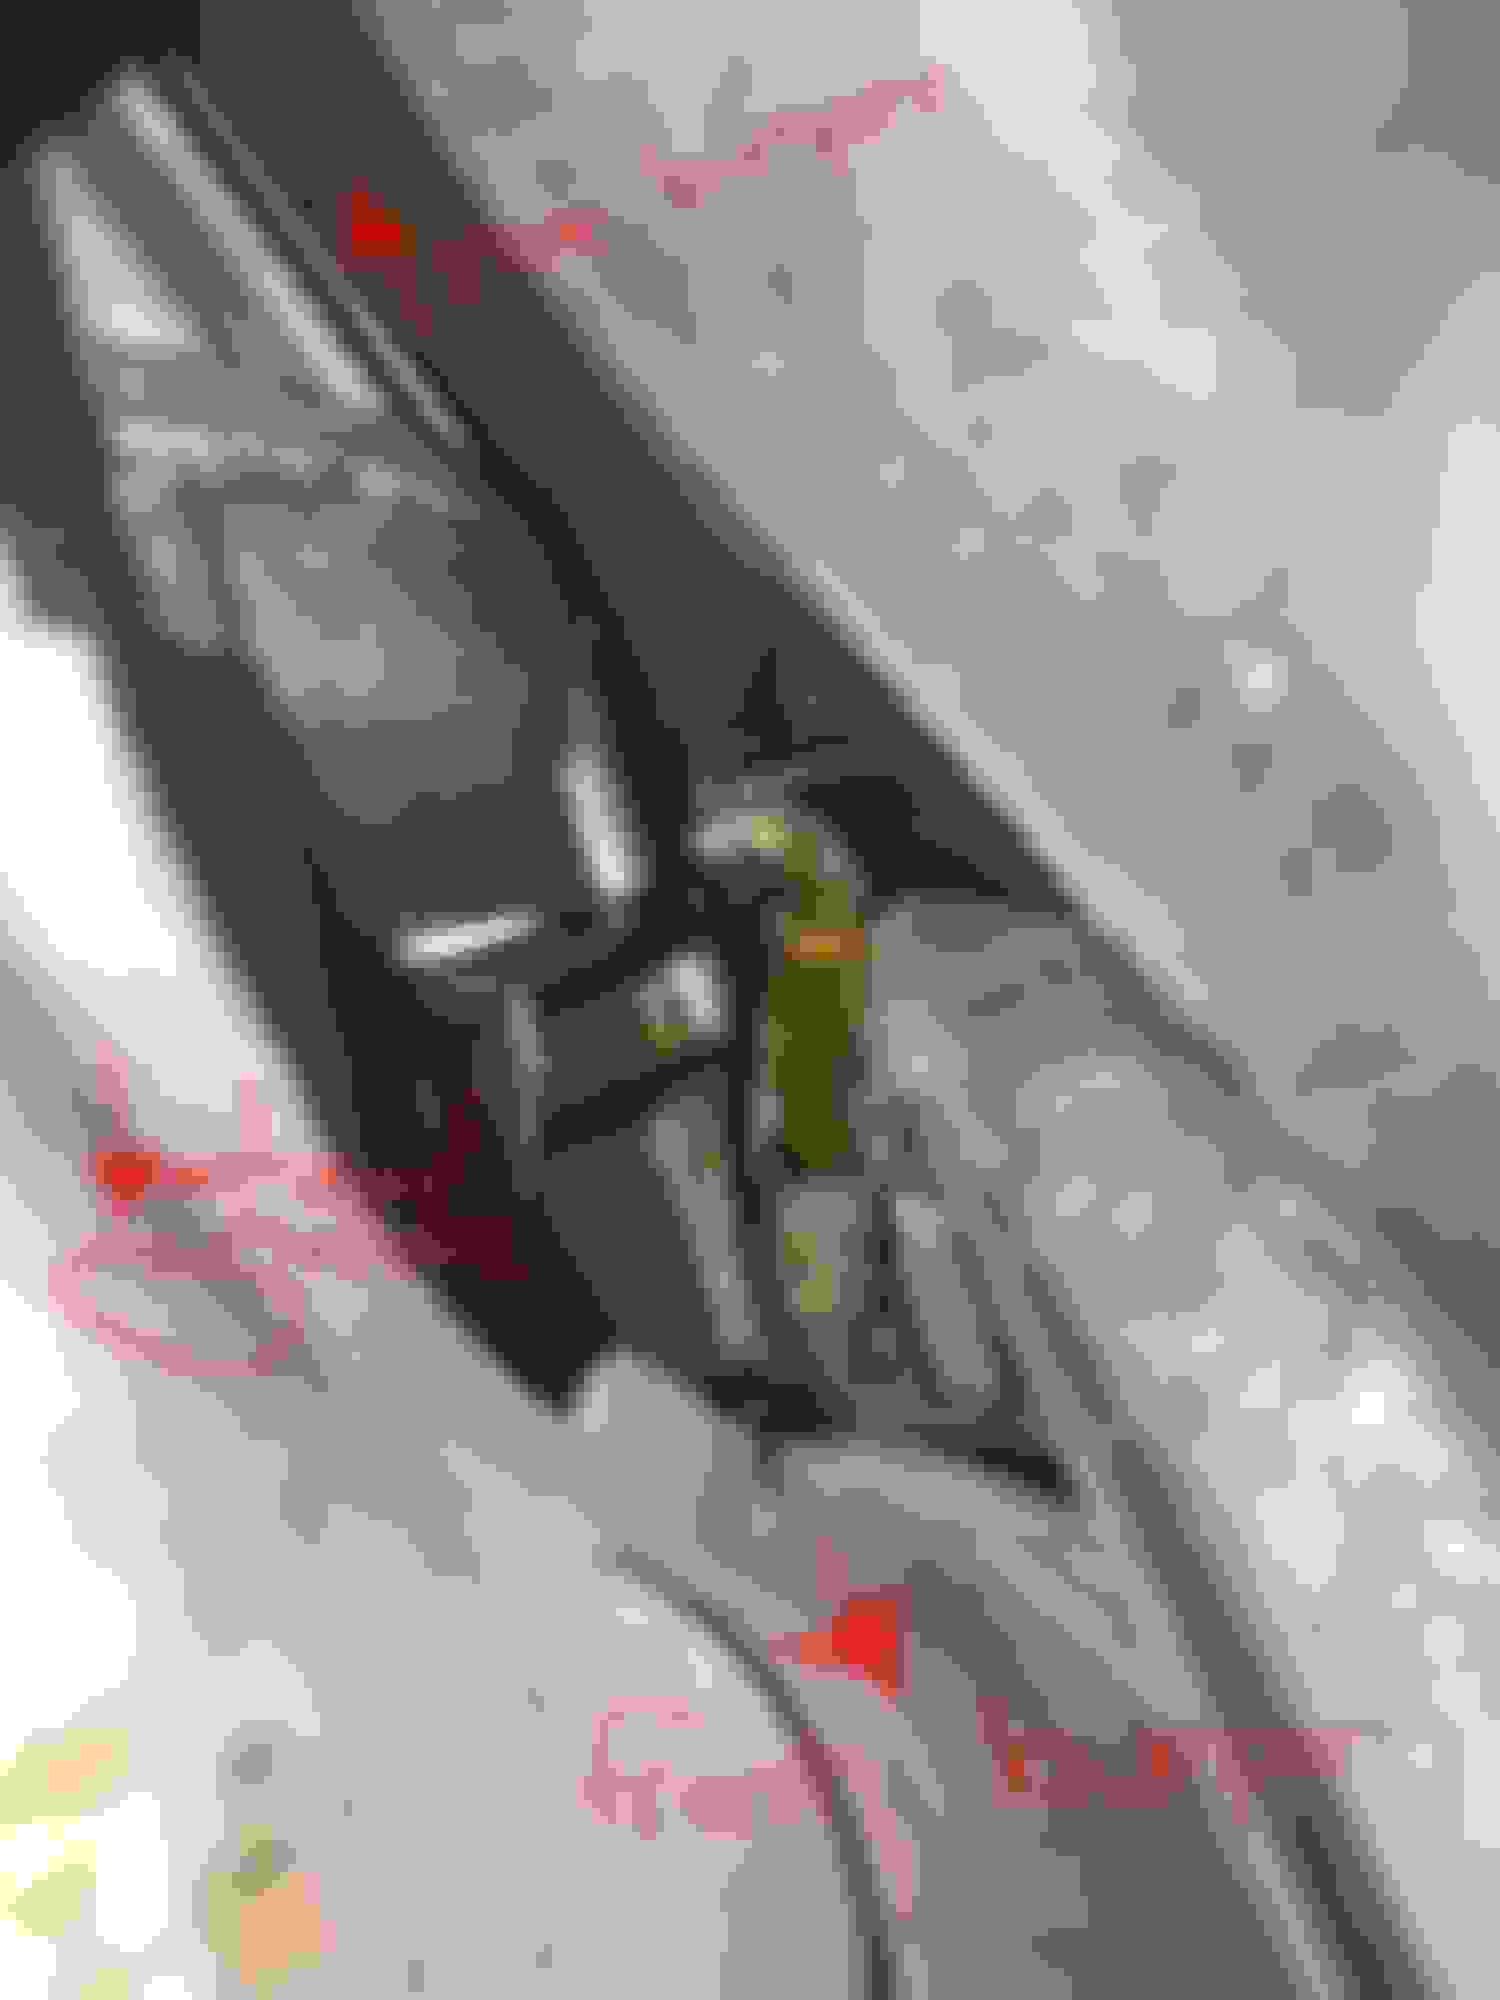
So I believe I finally found my coolant leak! Now how do I fix it?! And what is it? Here is a picture I was able to take laying on my back on the LH side/passenger side. 1991 Jaguar XJ6. I'm not ruling out a headgasket fail but I hope this is what is causing me to top off every 50 miles or so. I just drained my coolant and getting ready to change my water pump and "******* hose" hopefully.
Laying down on my back looking up. RIGHT *edit hand side of the car. Right above the exhaust. Any one know what it is? Is that even coolant or green mineral oil for power steering?
Since the leaking fluid is visible on the exhaust side of the engine, I assume you really mean the right side/passenger side?
The only thing I can think of that might be in that area is a high-pressure pipe from the power hydraulic system pump, so that green fluid could be Hydraulic System Mineral Oil (HSMO), or it could be conventional green ethylene glycol coolant. You could wrap part of a paper towel around a long screwdriver and reach up and take a sample of the fluid. If it smells like coolant, I would suspect your water pump is leaking. Pressure-testing your cooling system would probably reveal the leak point very quickly.
If the fluid smells like mineral oil, you may have a leak in the power hydraulic system. You can download the manual at this link:
Hi Don, yes that is what I meant sorry, right hand side/passenger side of the car, the exhaust side. Here is another picture for reference, the pipe I outlined, if you follow that and trace it back that is where the green fluid is located. I was able to rub my finger on it and it had a UV glow to it that I put in my coolant system awhile back to try to locate my leak. Comparing that to when I dipped my finger in HSMO, HSMO didn't leave my fingers yellow. So I am assuming it is coolant! I do suspect my waterpump is leaking from the weep hole, how would it make it all the way to where you see the green fluid?? Thanks! Excited to discover a leak, I'm hoping this is what is causing my loss of coolant and not a headgasket! Looks like the fix might be difficult though.
the green fluid you see in my first post, is on this pipe the connects into the exhaust
Here is another picture for reference, the pipe I outlined, if you follow that and trace it back that is where the green fluid is located.
Those are the Secondary Air Injection pipes that connect to the exhaust manifold. They don't carry any coolant, so the coolant is coming from somewhere else and dripping down the pipe. I can't remember on the '90-'92 cars how those pipes are routed, but I think they wrap around the rear of the engine like the EGR pipe. They connect to the air switching valve and check valve on the left side of the engine.
Replacing the water pump isn't too difficult - you just replace the front plate with the impeller and pulley - you don't usually have to replace the rear housing.
Typically, if your leak is at the water pump weep hole, it only leaks while the engine is running, and the coolant is blown back against the hot engine block by the radiator fan and evaporates. But you can often see dried coolant residue in the area below the water pump. If your head gasket is leaking coolant to the exterior, you may be able to find coolant on the rear of the head with a bright light and inspection mirror.
Here are some more picture, any obvious signs of head gasket failure to you guys?? I just want to be certain before I start dissembling the head. I have done a block combustion test and results were good. I will try a compression test again later tonight and figure out how to do a leak down test as well.
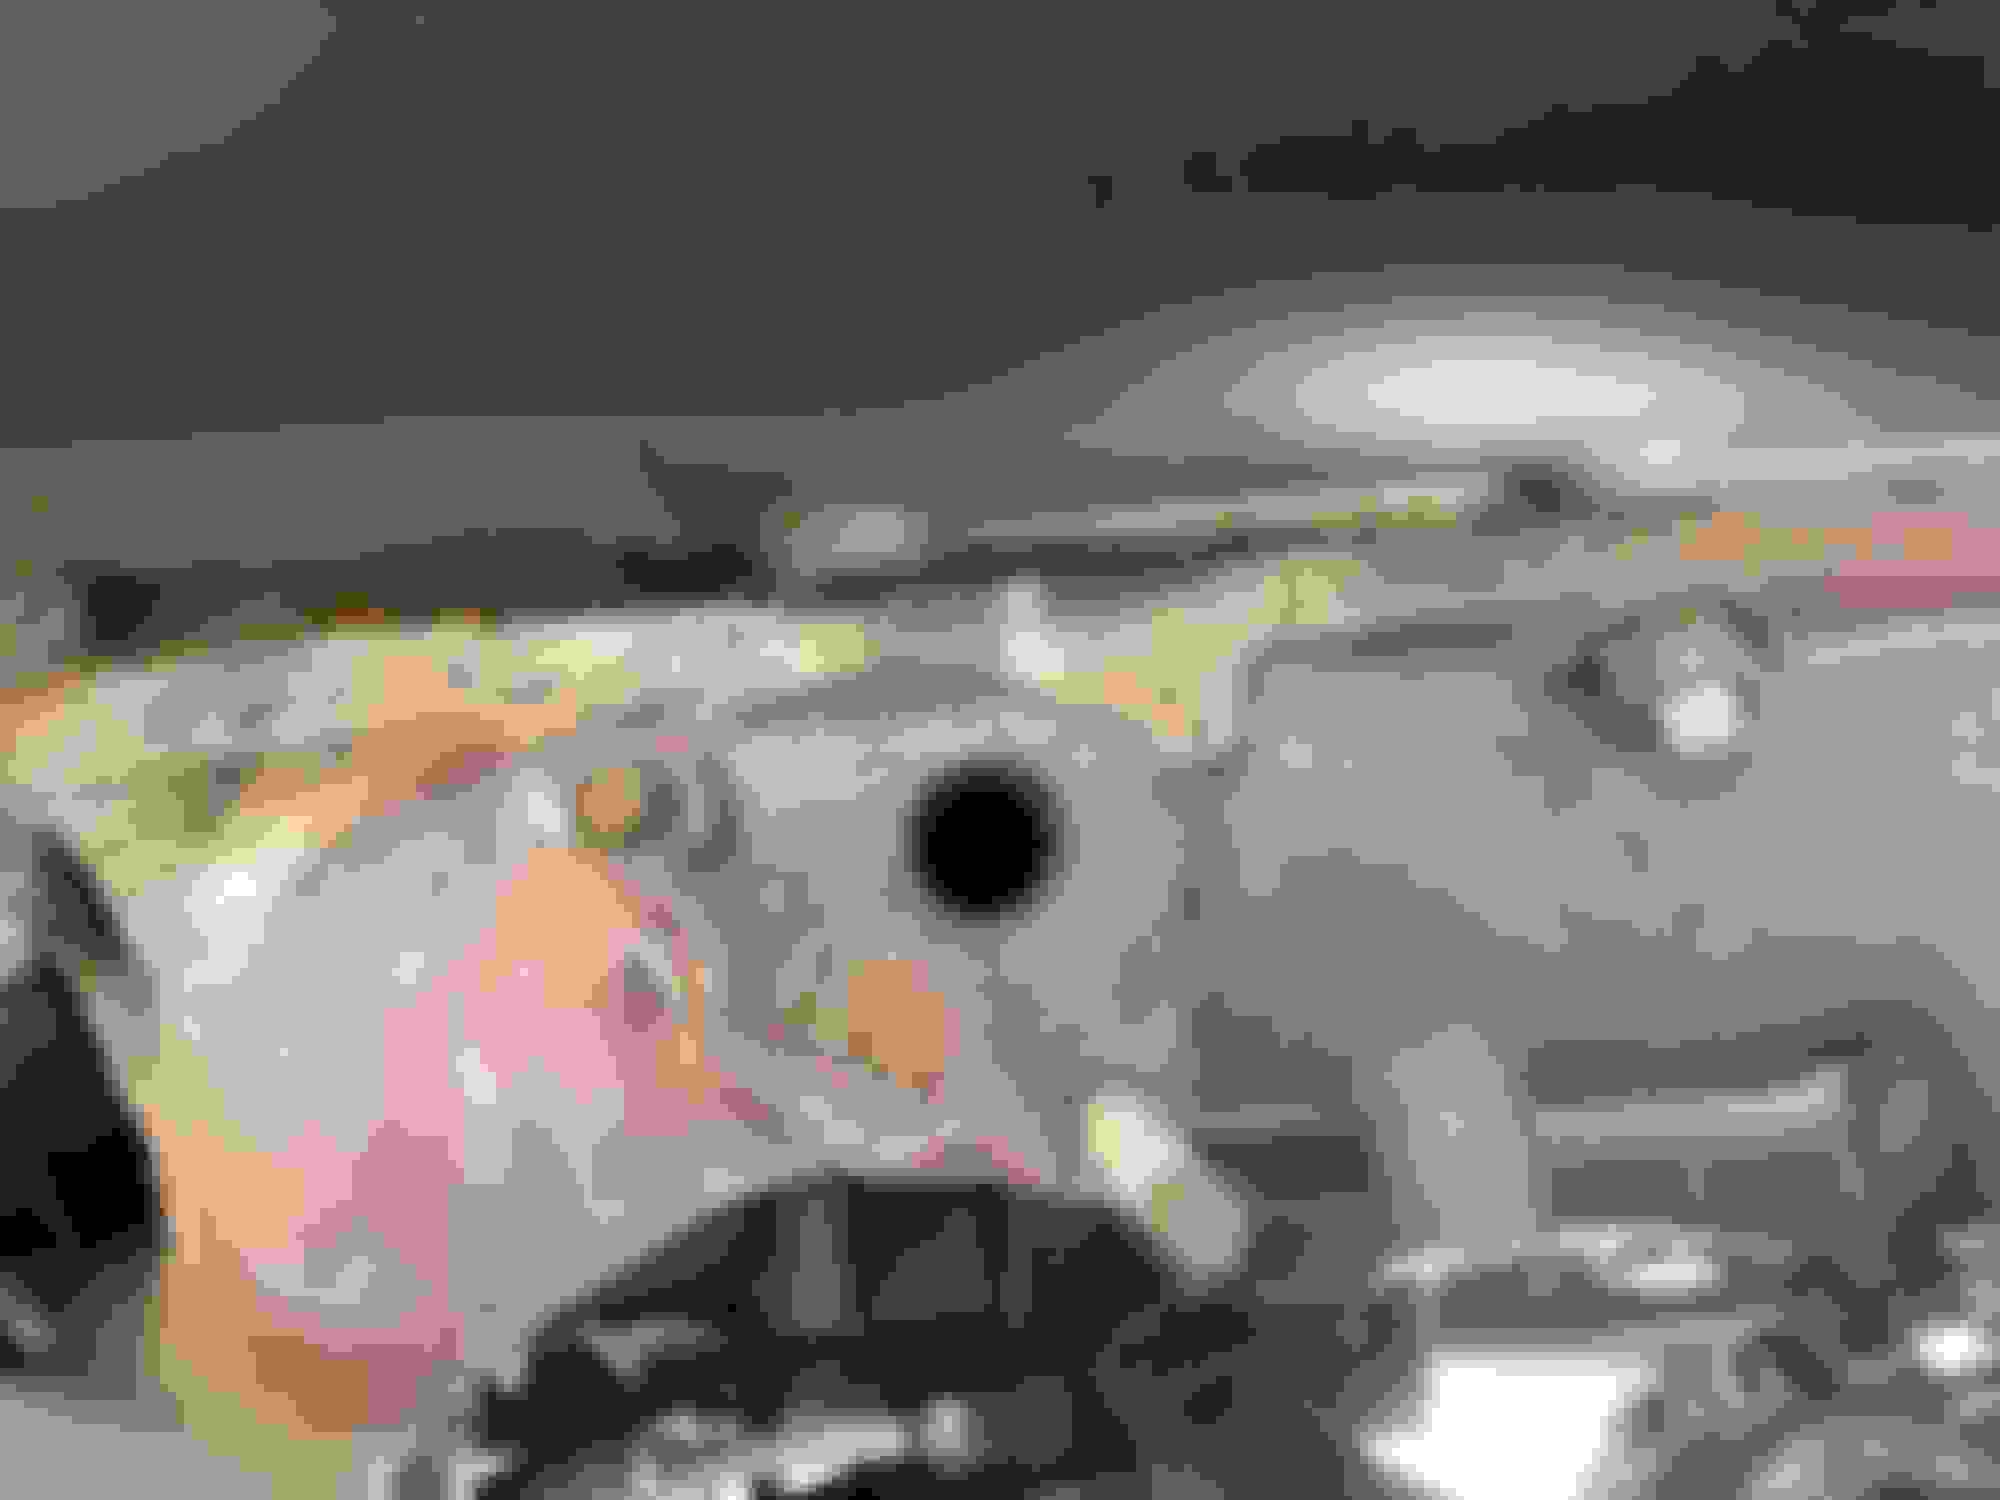
behind my exhaust manifold heatshield exhaust manifold, some dried up stuff on the edges sand like substance when draining coolant, can be picks up with magnet right about my original picture showing green coolant
Thanks for the help everyone! Doesn't look like my upper radiator hose is leaking at all.
I did a compression test and got 149 on all cylinders. I did find some obvious green dye/coolant on my rear cover. What are your guys thoughts on these pictures? It does look like my water pump and �******* hose� is leaking very little as I see white dried up small deposits in that area. I will most likely take off the intake manifold too replace all the coolant/heater hoses and water rail gaskets. Just still deciding what to do about the head gasket, I already purchased the cam timing alignment tool.
coolant looks to be leaking out from the bottom of the rear cover? WOuld that indicate head gasket failure? does this look normal? where the exhaust manifold connects?
Changing the b*****d hose is a PIA, not difficult just a PIA to do. My recommendation, particularly on a car with age and mileage is to complete a total maintenance on the intake side of the engine; all gaskets, hoses, switches, cleaning, hardware replacement and so on. Along with replacing the b*****d hose I recommend removing, cleaning and replacing the gaskets and hardware of the water rail. DO NOT remove the four water rail bolts without heat and beeswax to remove the screws. The aluminum oxide that cements the screws into the block is stronger than concrete! The only solution I have found that works is heat (a small torch) to heat and break the hold of the aluminum oxide and beeswax applied to the screw to be drawn into the joint lubricating the screws and easing removal. They WILL break otherwise. Clean the rail, replace the gaskets and screws lubricating the screws with never seize.
One more possibility I can think of before you dive in to the head gasket job is to check the heater hoses where they connect to the firewall. It's possible that if one of them had a pinhole leak it could spray coolant onto the back of the engine in the area of the rear cover.
A few more things to address while you have the intake manifold tied back away from the engine:
Oil filter housing gasket
Oil cooler lines or bypass U-pipe O-rings
Oil filler tube seal (unless your car has the oil filler in the cam cover)
Oil dipstick tube O-ring
Clean the Throttle Body (TB)
Drill drain holes in the Throttle Position Sensor (TPS) case and flush it out with zero-residue electronic contact cleaner spray
Clean the carbon out of the EGR and Purge Valve port on the bottom of the intake manifold
Consider replacing your Fuel Pressure Regulator (FPR)
Consider replacing your heater control valve
Remove the oil pressure transducer or switch, clean threads in the block and either clean the threads on the transducer/switch or replace it, and clean the electrical connector
Clean all the gunk out of the air intake and crankcase breather plumbing
Replace the intake manifold gasket
Clean the ground harness eyelet terminals, nuts, and intake manifold studs where they mount, and clean the ground point on the firewall behind the cylinder head
Thanks again everybody for the help. I'm starting to get into it now slowly. Doesn't look too bad now, a lot of vacuum hoses and how they are routed to keep track of! Your photoalbums on jaglovers helps a lot Don, I wish I was able to enlarge them ! All keep everyone updated. Going to start with removing my intake manifold and replacing all the water hoses
Good luck! The work involved is not particularly difficult or even time consuming. If you don't already own one, buy a small MAPP gas torch to heat and remove screws. I repeat! Don't try to remove the water rail without heating the screw heads and applying beeswax or similar. Replace the gaskets and screws. You can buy new screws in any chain auto parts store.
Okay I am pretty deep in now, no turning back! I do need some help figuring things out though! I have removed everything on the left side, intake manifold, all the hoses, water pump, etc. still no sign of any obvious leaks! I have removed the nuts on the right side exhaust manifolds but cant figure out how to tie them back, they don't seem like they like to move, any tips on unmating the exhuast manifold from the head and tieing it back?
Last how do I time everything? I have the camshaft alignment tool, I tried finding the "carat" marker on the crank but no luck. In the Haynes manual its telling me to remove "Camshafts and valve lifters" Page 2A-11, I don't necessarily understand these steps can someone translate it to plain DIY language please? Thanks!
For the AJ16 engine, which is close enough to yours, I found that unless I unbolted the exhaust at the catalytic converter, nothing was going to move. Once you do that, you will need new exhaust donuts and apparently one time use nuts to get everything back together. Oh, and at least one of the stud bolts would not come out, so I had to replace those too. You may as well get new exhaust manifold gaskets too. I'd just order all of that now.
This is what I needed: (again, for AJ16, but you should use as a reference): EBC11330 - Gasket Manifold EBC2909AA - Gasket Manifold EAC9388 x2 - Donut Downpipe Gasket FN110041J x14 - Manifold Locknuts JZN100024 x4 - Downpipe Locknuts EAC3823 x4 - Downpipe Studs EBC10827 - EGR Pipe Gasket
You'll need your full assortment of socket extensions, the wobble kinds will be most helpful here. I remember needing to get to those bolts and nuts from under the car. You'll get a straight shot at it, but the socket extensions will be required. Possibly a two man job for tightening and loosening, although I was able to do it myself. It wasn't hard, just "complicated".
The service manual directs you to install the downpipes once the manifolds have been tightened up. I found that the best way it make sure the downpipes can be alighted with the manifolds is to leave the manifolds loose on the studs, without any nuts.
That's the time to attach the Downpipe nuts and torque them to the specified 30Nm.
Once tightened then secure the manifolds to the block, tightening them to 50Nm.
The loose manifolds allow the downpipes to force the manifolds to perfectly align with each other.
You may be able to get the head off by just disconnecting the exhaust manifolds from the downpipes and removing the head with the manifolds attached. But if you already have the exhaust manifold nuts removed, you may be able to gain the play you need to pull them away from the head by disconnecting the forward exhaust hangers so the entire exhaust will move.
Thanks Vee and Don. I finally got the exhaust manifolds pulled away from the head. I undid the 4x nuts from the downpipes to the exhaust manifold, not sure if that helped but I also pried a lot harder and was able to pull them away from the head finally, the exhaust manifold and downpipes are still mated however (thinkin about skipping replacing these gaskets). I did try to find the "forward exhaust hangers" that connect to the transmission(?) but had no luck in locating those!
Here are some pictures on my progress, already loosened the 14x head bolts, now just have to make sure I timed it correctly (please verify) and figure out how I am going to lift the head (going to do the the sit on the windshield method) and transfer to the floor. Also if anyone needs more pictures, please let me know!
Timed correctly? Timed correctly? I'm under the impression the the metal rotor has to line up with the notch on the distributor housing, but this is how it sits now and my car ran fine when it was running Using my wife's finer nail polish to mark the sprockets. Is this how you mark it? (never done this before) Left side of AJ6 engine with air pump, water pump, thermostat housing, water rail pipe, and various hoses removed Left side of AJ6 engine with air pump, water pump, thermostat housing, water rail pipe, and various hoses removed pt2 Left side of AJ6 engine with air pump, water pump, thermostat housing, water rail pipe, and various hoses removed pt3 Screwdriver in cylinder one
 05-08-2021, 10:33 PM