When you click on links to various merchants on this site and make a purchase, this can result in this site earning a commission. Affiliate programs and affiliations include, but are not limited to, the eBay Partner Network.
I swopped out the factory AJ8700 with a new Pioneer radio.
I wanted to share what I did.
After disconnecting the battery:
First, I removed the knobs either side of the existing radio and unscrewed the retaining nuts behind them and removed the radio surround.
Then remove four plastic plugs either side of the radio ( don't drop and loose them), slide the old radio out, disconnected the ground strap and two electrical connectors. One connector is for the speakers and the other for the power.
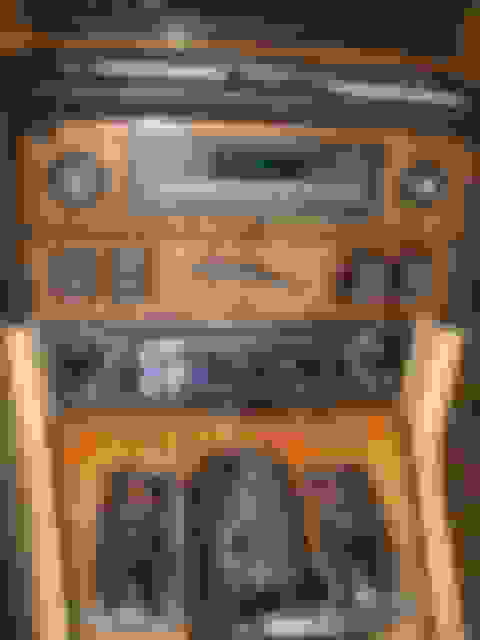
The existing radio has two mounting brackets either side at the front. I made two new brackets for the new radio. These are made out of thin steel plate 2 inches tall and 3 inches long. I drilled holes so that they lined up with the mounting holes on the side of the new radio and the existing mounting holes on the fascia.
This shows the Jaguar radio with brackets and the new mounting brackets on top
The Speakers have "bullet" connectors attached to the connector.
I used a 1.5 volt battery to check which pair of wires went to which speaker (the speaker will crackle with a voltage is applied) and connected the new radio speaker wires to the correct speaker pair, per radio wiring.
The Power connections are a little tricky.
The existing Jaguar RED wire is the constant 12V supply, and connects to the new radio YELLOW wire.
The existing Jaguar YELLOW wire is the switched ignition, and connects to the new radio RED wire.
The existing Jaguar WHITE wire is to the antenna relay, and connects to the new radio BLUE wire.
The exiting ground strap, I connected to my bracket along with the new radio black wire.
The hands free Microphone was mounted above the center switch panel and clips under the small shelf.
Above the radio opening there are two screws which allow you remove the switch panel and feed the microphone wire down to the radio.
To put it all back.
Replace the center switch panel and screw it back in.
Fit the wiring connector on the back of the new radio and the antenna wire.
Insert the new radio, line up and insert the plugs through the new mounting brackets and in to the existing holes.
Put the radio surround over the radio and tighten up the nuts and press the knobs back into position.
Lastly press the new radio bezzel into position.
Note: I did not use the new radio surround/mounting box.
what are those two square things on top of the old radio?
I believe those are the brackets that he made to get the new one in.
My cassette doesn't work so i've been thinking about doing this also, but I don't need a CD player, I need to plug my phone into it for lots of different reasons.
On top of the old Jaguar radio are the new brackets, all I did was cut out 3 x 2 inch rectangle and put a 90 degree bend at 1 inch and drill the holes.
I don't own a cassette tape any more to test the Jaguar radio.
The main purpose of the upgrade was to link to a cellphone. The new radio does not have a cd but has a memory stick port so I can store hundreds of tunes to my taste.
There were a lot of questions before I installed it:
Would it fit? Yes
Did I need to cut out a bigger hole? No
How was I going to mount it? Easily
Where to put the mike to make it easy and simple? Just above the center console
Would it work with the existing antenna? Yes
Would it look good? Yes
Installed radio
John
Last edited by jpipe; 06-21-2015 at 08:38 AM.
Reason: AddPicture
Should be a easy adjustment to the Settings... would look "better"... mine is Red for better visibility at night as I have no other Jaguar
device with colors in the S1 dash.
Should be a easy adjustment to the Settings... would look "better"... mine is Red for better visibility at night as I have no other Jaguar
device with colors in the S1 dash.
Unfortunately, This unit only has a blue display, but you can dim the display and it auto dims between adjustable times.
I swopped out the factory AJ8700 with a new Pioneer radio.
I wanted to share what I did.
After disconnecting the battery:
First, I removed the knobs either side of the existing radio and unscrewed the retaining nuts behind them and removed the radio surround.
Then remove four plastic plugs either side of the radio ( don't drop and loose them), slide the old radio out, disconnected the ground strap and two electrical connectors. One connector is for the speakers and the other for the power.
The existing radio has two mounting brackets either side at the front. I made two new brackets for the new radio. These are made out of thin steel plate 2 inches tall and 3 inches long. I drilled holes so that they lined up with the mounting holes on the side of the new radio and the existing mounting holes on the fascia.
This shows the Jaguar radio with brackets and the new mounting brackets on top
The Speakers have "bullet" connectors attached to the connector.
I used a 1.5 volt battery to check which pair of wires went to which speaker (the speaker will crackle with a voltage is applied) and connected the new radio speaker wires to the correct speaker pair, per radio wiring.
The Power connections are a little tricky.
The existing Jaguar RED wire is the constant 12V supply, and connects to the new radio YELLOW wire.
The existing Jaguar YELLOW wire is the switched ignition, and connects to the new radio RED wire.
The existing Jaguar WHITE wire is to the antenna relay, and connects to the new radio BLUE wire.
The exiting ground strap, I connected to my bracket along with the new radio black wire.
The hands free Microphone was mounted above the center switch panel and clips under the small shelf.
Above the radio opening there are two screws which allow you remove the switch panel and feed the microphone wire down to the radio.
To put it all back.
Replace the center switch panel and screw it back in.
Fit the wiring connector on the back of the new radio and the antenna wire.
Insert the new radio, line up and insert the plugs through the new mounting brackets and in to the existing holes.
Put the radio surround over the radio and tighten up the nuts and press the knobs back into position.
Lastly press the new radio bezzel into position.
Note: I did not use the new radio surround/mounting box.
What are some options to fix my Ken wood replacement. No power after I replaced the battery.

 06-20-2015, 02:10 PM