'72 XJ6 rear brake overhaul
#1
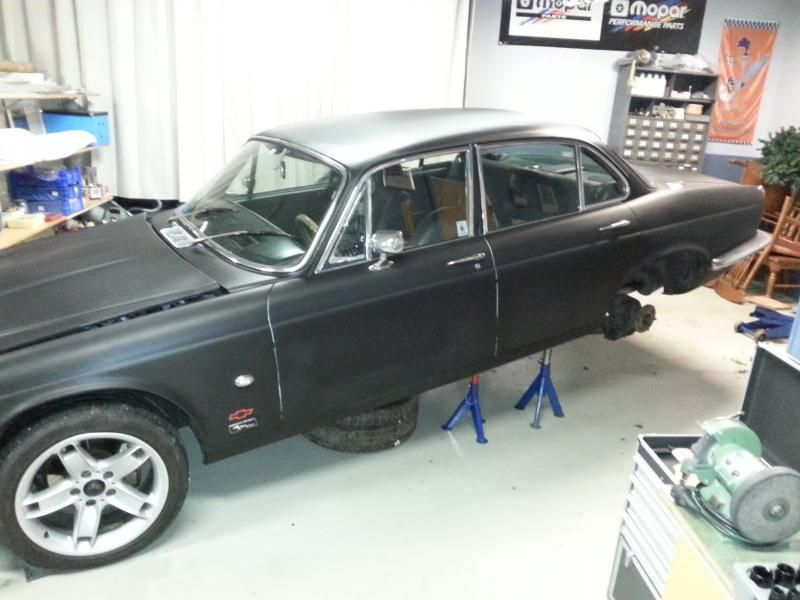
Well here she sits, patiently waiting for spring to arrive.


Before we get that far however, she's gonna need new rear brake rotors, pads and p-brake pads. I'll rebuild the calipers with new stainless steel pistons, and new seals. The pinion seal has a leak, so a new one is going in. New brake hoses are a given. I replaced the left side wheel bearings last fall, so I'll tackle the right side now while I'm at it. I'll also degrease, clean and buff up the IRS a bit, but probably won't go completely overboard. We'll see how I get on and how much time I'll be able to put into it.
I allready sourced the rotors, pads, hoses, wheel bearings and the pinion seal from a local supplier. The other stuff will be ordered from SNG, but I'll tear the IRS apart first in case there are other bits that needs to be on the order.
I'll try to update this thread with a few photos as I get the job going.
Cheers
Tor
#2
Join Date: Jan 2014
Location: Delaneys Creek,Qld. Australia
Posts: 28,381
Received 6,327 Likes
on
4,370 Posts
If you are going that far, then I would suggest doing the output shaft seals while you have to rotors and calipers off.
Unless of course you weren't planning on pulling the diff to bits. From what I saw you could do the pinion seal with the diff assembled. Mine was already stripped before I bought parts so I couldn't say for certain.
Unless of course you weren't planning on pulling the diff to bits. From what I saw you could do the pinion seal with the diff assembled. Mine was already stripped before I bought parts so I couldn't say for certain.
Last edited by o1xjr; 01-21-2015 at 05:39 AM.
#3
Yeah, I've given it some thought, but I really don't want to pull the diff apart. Unless I find they are leaking when I get the rotors off, I think I'll leave the output shaft seals well alone. From what I gather the pinion seal can be replaced by pulling the flange off. No need to dissect the diff.
#4
Join Date: Jan 2014
Location: Delaneys Creek,Qld. Australia
Posts: 28,381
Received 6,327 Likes
on
4,370 Posts
I didn't really take a lot of notice of what could be done assembled/unassembled. My fire pretty much destroyed all seals and brake pad material, brake lines and anything else that didn't like heat. Basically all rubber mounts and bushes were toast as well as springs and cables,fuel lines etc.
Everything had to be done.
Everything had to be done.
#5
Have done this several times now.. changing all the needed parts when it is on the floor is just grungy work. E-brake is tedious, the new hose in the rear is "required"... I went to the trouble of making my "pretty" with paint and new cover but I am the only one to see the progress. Plywood piece used is shown in the picture. I also changed the four (4) rubber "V" mounts that hold it all in place... after 40+ years they were in bad shape.
I changed the gears last time to 2:88 LSD since I now have plenty of low end torque and a (4) speed OD with the V8... speedo/odometer mods is a whole other story for a Series 1 since that gear ratio did not exist...
I use a piece of heavy plywood and my floor jack... easier with another person helping keep it "level". Jack stands for the car since it has to be high (18 inches off the ground) and chocks under the front wheels will keep it off your body!
Getting the radius arms off with the curved tool is easy enough, press in
new ones and you are ready to go... be sure to replace the stock safety wire
holding them on safely.
The following 4 users liked this post by Roger Mabry:
#6
Thanks for your input. I allready replaced the V mounts last winter as 2 of them had perished. I hopefully won't need to replace them this time around. I have a Chevy 350 in mine with a 700R4 tranny. I have the original 3:31 gears and the thought of getting longer legs has crossed my mind. 3:07 or maybe even 2:88. Would I be better off getting an old diff for parts in that case, or can you buy the gears alone somewhere?
#8
Most Series 3 Jag have the 2:88 LSD - 3:07 with LSD would be more
ideal for your smaller torqued motor and the higher 4th gear in your 700R OD. They came in some 4.2 Litre (3rd type) cars - gears are 43/14 and the part number is C.41050/D.
You can purchase just the gears many places... but certain carriers take certain gear sets. These are Dana 44 type differentials and that is the cover
I used on mine for the "pretty look".
The S1 speedo/odometer heads only came in certain ratios but they can be "adjusted" by a few good shops... I spent many hours figuring how to
get mine very close to perfect with the speed and odometer portion.
How close to perfect is the speed shown on your car now compared with a GPS or timing a measured mile?
The following users liked this post:
314jjwalls (03-07-2015)
#9
Thanks. A friend of mine has an old jag diff lying around, he was going to check the gears, as he couldn't remember what they were. I might take it off his hands, for parts if nothing else. I'll most likely stay with the 3:31 as that and the 700R is a pretty good combo. It takes off like a rocket, and I get about 1750 RPM at 80 km/h.
I haven't compared the spedometer to a GPS or anything, but I think it's pretty accurate. When following traffic I'm usually at or very close to the speed limit. Unless everybody is speeding or driving to slow, it must be pretty much spot on. Adjusting that would be a matter of changing the plastic gears in the rear hub of the 700R right?
I haven't compared the spedometer to a GPS or anything, but I think it's pretty accurate. When following traffic I'm usually at or very close to the speed limit. Unless everybody is speeding or driving to slow, it must be pretty much spot on. Adjusting that would be a matter of changing the plastic gears in the rear hub of the 700R right?
#10
#11
Looks like memory is starting to fade! My diff is not 3:31, it's 3:54. If my friends diff is 3:31 I might look into replacing it with that. Would drop RPM's a bit on the highway, and still get her going decently I think.
This is a handy tool if you know all the numbers.
http://www.boosttown.com/gearbox_dif...calculator.php
This is a handy tool if you know all the numbers.
http://www.boosttown.com/gearbox_dif...calculator.php
Last edited by Aviator-Olav; 01-22-2015 at 05:49 AM.
#12
The following users liked this post:
314jjwalls (03-07-2015)
#13
Join Date: Jan 2014
Location: Delaneys Creek,Qld. Australia
Posts: 28,381
Received 6,327 Likes
on
4,370 Posts
I had to heat my pipes to get them off, hardest part of the whole job.


The following users liked this post:
LnrB (01-23-2015)
#14
When I did the '72 car, I rebuilt the exhaust to exit under the IRS (ala late model Corvettes) with flanges (next time ball joints!). Then the mufflers were put into the place the Jag resonators used to live and tips put on at that time. Makes any future IRS/rear brake servicing much easier... no cutting of pipes or soaking connections that will be hard to remove. No snaking of exhaust pipes through the IRS and all the rubber mounts that fall apart over time, there is no ground clearance problems.
Ended up replacing the original after market large tips with the "S" curved ones from a S3 to cut down on the exhaust fumes with the windows open. Made the car lots
quieter and the smell went away entirely... Jaguar knew what they were doing in this instance.
Next time (my own '71 Jag) I will have the round Magnaflow mufflers in the same place (so the look is better as the oval ones hang down a little) with the S curved tips to start with. They currently exit under the rear valances (PO like that method and filled the old exhaust holes - I have new valances to replace with now).
Last edited by Roger Mabry; 01-23-2015 at 11:45 AM.
The following users liked this post:
LnrB (01-24-2015)
#15
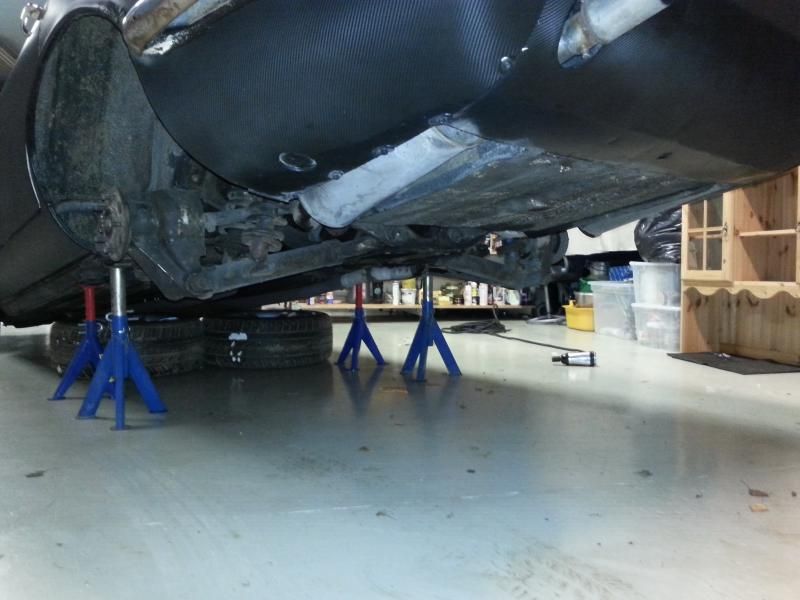
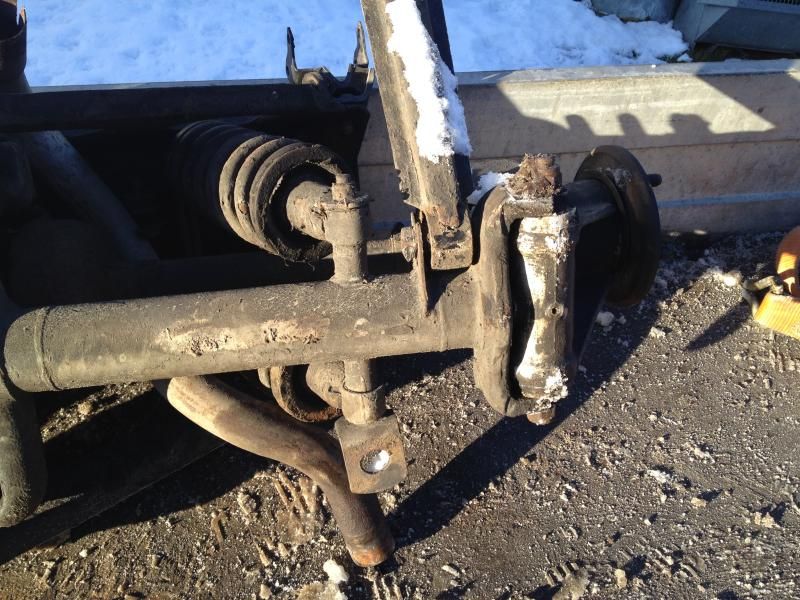
It's out! It came out a lot easier than I had anticipated. Even the exhaust came apart without too much trouble! It took me exactly two hours start to finish.

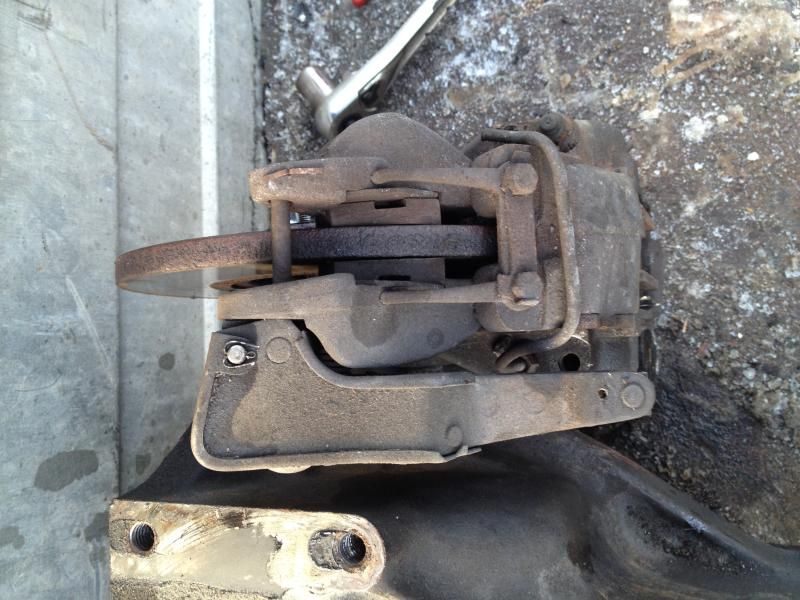
The IRS looks surprisingly good, Not all that rusty, the calipers and p-brake mechanism is fairly clean and mooves freely. I'll try to disassemble it tomorrow and get it into my basement for refurbishment work. The car is in a garage about 20 mins from my house at the moment.

Now for a glass of red!

The IRS looks surprisingly good, Not all that rusty, the calipers and p-brake mechanism is fairly clean and mooves freely. I'll try to disassemble it tomorrow and get it into my basement for refurbishment work. The car is in a garage about 20 mins from my house at the moment.

Now for a glass of red!
The following 2 users liked this post by Aviator-Olav:
314jjwalls (03-07-2015),
Ahabiam (01-24-2015)
#16
Join Date: Jan 2014
Location: Delaneys Creek,Qld. Australia
Posts: 28,381
Received 6,327 Likes
on
4,370 Posts
#17
When I did the '72 car, I rebuilt the exhaust to exit under the IRS (ala late model Corvettes) with flanges (next time ball joints!). Then the mufflers were put into the place the Jag resonators used to live and tips put on at that time. Makes any future IRS/rear brake servicing much easier... no cutting of pipes or soaking connections that will be hard to remove. No snaking of exhaust pipes through the IRS and all the rubber mounts that fall apart over time, there is no ground clearance problems.
Ended up replacing the original after market large tips with the "S" curved ones from a S3 to cut down on the exhaust fumes with the windows open. Made the car lots
quieter and the smell went away entirely... Jaguar knew what they were doing in this instance.
Next time (my own '71 Jag) I will have the round Magnaflow mufflers in the same place (so the look is better as the oval ones hang down a little) with the S curved tips to start with. They currently exit under the rear valances (PO like that method and filled the old exhaust holes - I have new valances to replace with now).
Ended up replacing the original after market large tips with the "S" curved ones from a S3 to cut down on the exhaust fumes with the windows open. Made the car lots
quieter and the smell went away entirely... Jaguar knew what they were doing in this instance.
Next time (my own '71 Jag) I will have the round Magnaflow mufflers in the same place (so the look is better as the oval ones hang down a little) with the S curved tips to start with. They currently exit under the rear valances (PO like that method and filled the old exhaust holes - I have new valances to replace with now).
#18
The following users liked this post:
314jjwalls (03-07-2015)
#19
#20


