When you click on links to various merchants on this site and make a purchase, this can result in this site earning a commission. Affiliate programs and affiliations include, but are not limited to, the eBay Partner Network.
Hey all! I'll start out by saying that I'm still fairly new to the jag community and I'm still learning the anatomy of the cars themselves, so I'm treading lightly so I don't come off as a huge dumbass lol.
I recently purchased this series 3 xj6 and the guy before me had it sitting in the sun with the wood damaged in the process. It looks like he tried to strip it and re-paint it and did an awful job. There's patches of the polyurethane on the wood still mixed with plastic and several different colours of the wood.
Needless to say; the wood is tarnished. I was wondering if anyone had any place, website, or online seller to buy new wood trim. I'm really not looking to take it out of my car and ship it somewhere to be fixed. I'd rather pay for a new set.
Thanks! -James
(I'll try and get some pictures of the current state of the wood. I'll put a "Warning, Graphic Image" to let people know it isn't for the faint of heart lol
I've sourced panel parts from www.myrtleltd.com in the UK. They supply the panels from scratch, not core or refinish. I recently put some pictures of my car in the thread "Ok, so I like my XJ6" down a ways in this forum. The main panel is NOS but the others are from Myrtle Ltd.
I've sourced panel parts from www.myrtleltd.com in the UK. They supply the panels from scratch, not core or refinish. I recently put some pictures of my car in the thread "Ok, so I like my XJ6" down a ways in this forum. The main panel is NOS but the others are from Myrtle Ltd.
Awesome, thank you for that. Is the installation pretty easy? I've disassembled the dashboard and gotten the wood out. I'm more curious about the side caps and center console and how exactly to change them out
Needless to say; the wood is tarnished. I was wondering if anyone had any place, website, or online seller to buy new wood trim. I'm really not looking to take it out of my car and ship it somewhere to be fixed. I'd rather pay for a new set.
From what I've heard, cgauto isn't reliable and a lot of people don't even get the wood they order. But I'll give Madera a call tomorrow and see what they say.
Thanks,
I think the main instrument panel is probably the most difficult.
The entire console has to come out to replace the upper part (where the trip computer is). The upper and lower console components screw together and it's tough to separate them in the car. Then it's just how far you want to go. The ski slope is easy, on the Myrtle part the shift opening is a bit tight. The switch holes need to be cleared of the lacquer that accumulates on the opening edges. The AC-radio panel is tedious because the AC control panel needs to be disassembled including all the fiber optic illumination. There are 2 of these panels available: one for the later DIN radio (shown on their website) another for the early post mount radio (you have to request this). The side rails on the doors are easy once the door panel is removed from the door. The rear console panels on the VDP cars is again just disassembly and reassembly.
I'd characterize the job as tedious, not hard. If you're replacing rather than refinishing fairly straightforward.
British Autowood in Florida. What I did was order some old used wood from David at everydayxj.com and had him ship directly to Saul at British AutoWood who then did a beautiful job re-veneered the pieces and he then shipped them to me. They are absolutely spectacular and reasonably priced.
When I replaced my woodwork in both of my cars I made three videos which may help you. The dashboard removal is a series II style but is the same as my series III.
it is a complete dismantling of the dash so do not expect an easy job. And if you do not mark where every wire goes, you will never forgive yourself during reassembly.
I think the main instrument panel is probably the most difficult.
The entire console has to come out to replace the upper part (where the trip computer is). The upper and lower console components screw together and it's tough to separate them in the car. Then it's just how far you want to go. The ski slope is easy, on the Myrtle part the shift opening is a bit tight. The switch holes need to be cleared of the lacquer that accumulates on the opening edges. The AC-radio panel is tedious because the AC control panel needs to be disassembled including all the fiber optic illumination. There are 2 of these panels available: one for the later DIN radio (shown on their website) another for the early post mount radio (you have to request this). The side rails on the doors are easy once the door panel is removed from the door. The rear console panels on the VDP cars is again just disassembly and reassembly.
I'd characterize the job as tedious, not hard. If you're replacing rather than refinishing fairly straightforward.
I'll take note of that. Thank you for your help. I also just looked at your thread, your car looks amazing! Where did you find the toolset for the boot? I can't find one for the life of me ):
When I replaced my woodwork in both of my cars I made three videos which may help you. The dashboard removal is a series II style but is the same as my series III.
Hey man! I immediately saw your videos when I thought of replacing my wood. I already removed my dashboard and I used your video to the tee. Great stuff! Subscribed and liked (: thanks for your help
British Autowood in Florida. What I did was order some old used wood from David at everydayxj.com and had him ship directly to Saul at British AutoWood who then did a beautiful job re-veneered the pieces and he then shipped them to me. They are absolutely spectacular and reasonably priced.
Jeff
I didn't even think about doing that, what a great idea. Thank you
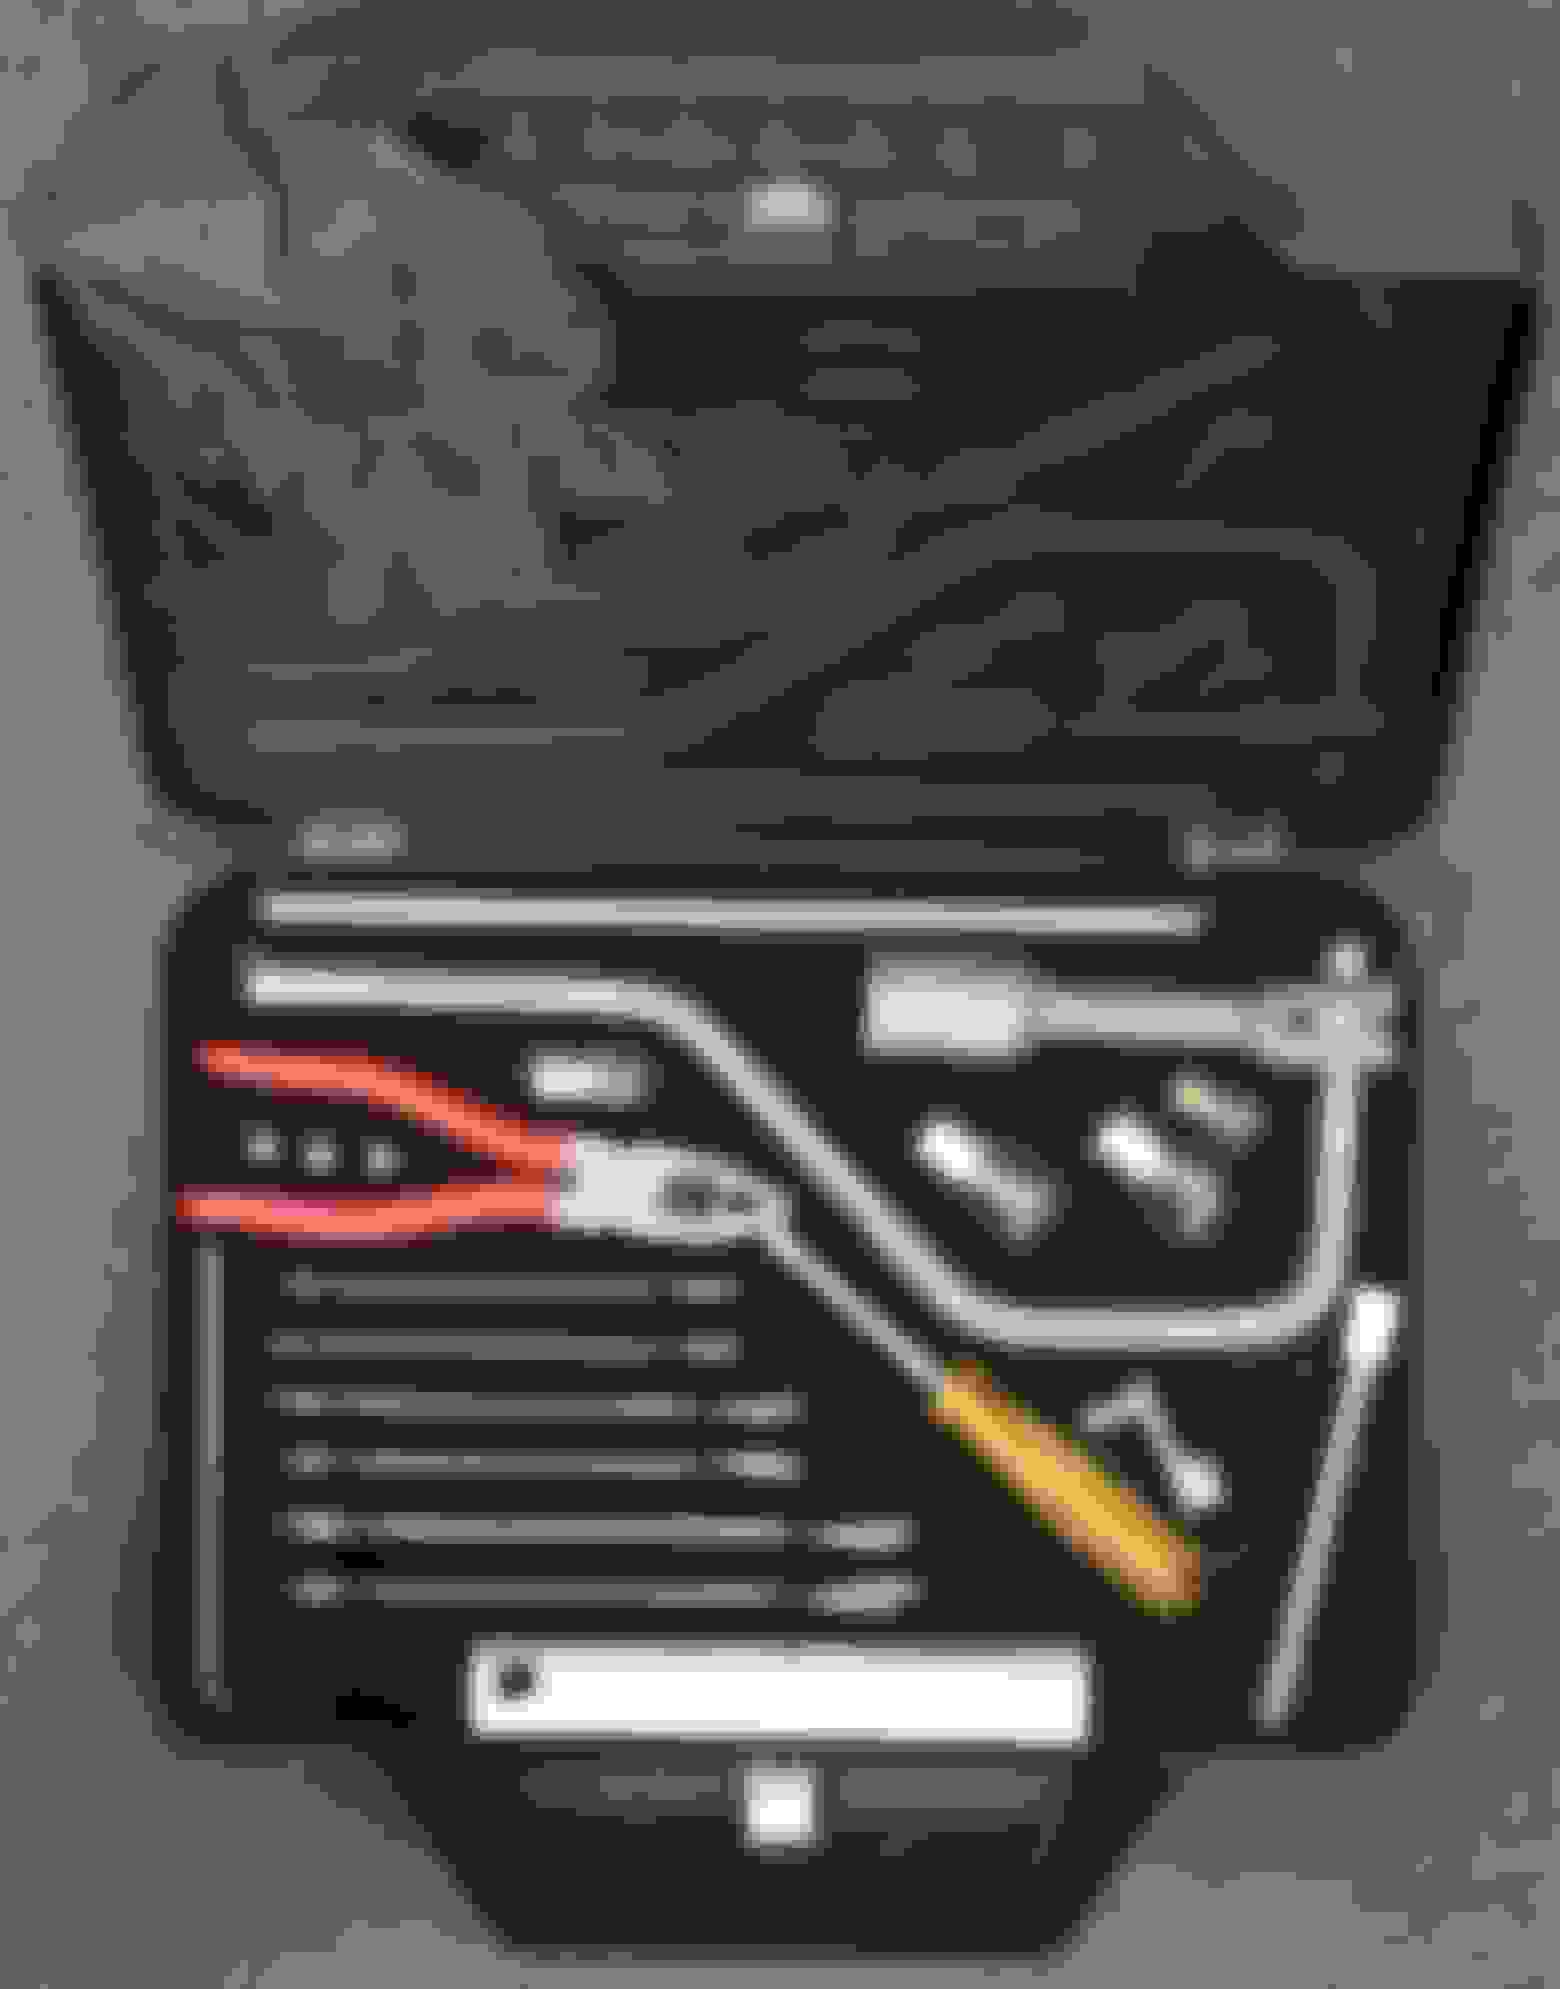
The tool kit in the trunk came from a lot of patience and bits from eBay and other places. It has all the components shown in the parts manual, plus a workshop rag and a pair of nitrile gloves. I've even had the occasion to use some of the tools. The mount for it is a replica of the factory mounting I reverse engineered from a photograph of one in Australia. I water-jet cut the parts, spot welded them together and mounted it to the car in the holes already existing. Came out nice.
I have another kit, but its for an XJ12. The tools are slightly different, most significantly the spark plug wrench.
The tool kit in the trunk came from a lot of patience and bits from eBay and other places. It has all the components shown in the parts manual, plus a workshop rag and a pair of nitrile gloves. I've even had the occasion to use some of the tools. The mount for it is a replica of the factory mounting I reverse engineered from a photograph of one in Australia. I water-jet cut the parts, spot welded them together and mounted it to the car in the holes already existing. Came out nice. I have another kit, but its for an XJ12. The tools are slightly different, most significantly the spark plug wrench.
..
Hi, yes the toolkit shown above is/was for the XJ-6. The V12 toolkit is a larger case with one extra tool
Right, but the XJ12 toolkit I have is the same case as that of the XJ6. The SNG website shows the toolkit, but few of the components are available.
The main difference is the spark plug wrench, the V12 seems to use the smaller hex plugs than the 6. Also it has a universal swivel to make it easier to use. But the notion of changing the plugs on a V12 in the field seems remote. Also my kit doesn't have the hub cap remover although it's shown in the SNG image (item 5). There is neither to place to put it in the case.
yes and the tommy bar in the V12 kit makes no sense either since there is no separate spark plug socket in the kit
When I bought my 1984 XJ-6 it had the toolkit, sometime later I found out it was not stock but a Dealer Courtesy item also sold separately in the accesory catalogs of the 1980's. However it looks like the V12 cars came with the tookits standard..

 09-21-2021, 07:02 PM