
Five pin headlight relay...
#1
 06-02-2013, 05:10 PM


#2
06-02-2013, 05:26 PM


Veteran Member
Join Date: Mar 2008
Location: Pacific Northwest USA
Posts: 24,821
Received 10,871 Likes
on
7,150 Posts
Not all created equal by any means. Many variations.
In the case of your headlight relay it has a "latching" feature that allows the high beams to stay on once the relay has been activated. This is required because the high beam/column stalk lever itself does not latch into position.
There might well be a good substitute out there somewhere but I don't have any info.
The headlight relay can be opened up to clean the contacts. This usually brings 'em back to life. However, if the plastic latch is melted, you're sunk
Cheers
DD
The following users liked this post:
adenshillito (05-03-2016)

#4
08-13-2013, 06:10 PM
Veteran Member
#5
08-13-2013, 06:49 PM
Veteran Member
Join Date: Mar 2008
Location: Pacific Northwest USA
Posts: 24,821
Received 10,871 Likes
on
7,150 Posts
Get a good used one, open it up, clean the contacts....it'll probably last for years.
As far as I know there are two common causes for failure:
1) Dirty contacts = high resistance = heat = failure
2) Holding the "pull back for headlight flash" too long which overheats the plastic latch
Cheers
DD
#6
08-14-2013, 08:51 AM
Get a good used one, open it up, clean the contacts....it'll probably last for years.
As far as I know there are two common causes for failure:
1) Dirty contacts = high resistance = heat = failure
2) Holding the "pull back for headlight flash" too long which overheats the plastic latch
Cheers
DD
As far as I know there are two common causes for failure:
1) Dirty contacts = high resistance = heat = failure
2) Holding the "pull back for headlight flash" too long which overheats the plastic latch
Cheers
DD
#7
08-14-2013, 10:05 AM
Veteran Member
Join Date: Mar 2008
Location: Pacific Northwest USA
Posts: 24,821
Received 10,871 Likes
on
7,150 Posts
I see similar idiots almost every day on my daily commute. Why so many people disregard proper lane usage is beyond me.
At some point they usually realize they're in the wrong lane and, to let faster drivers continue on, decide to move to the right. This lane change always seems to occur six feet in front of ME!
Now MY peaceful, relaxed, and well-spaced progress is all bollixed up !
Grrrrr.

Cheers
DD
Trending Topics
#8
08-14-2013, 10:17 AM

Veteran Member
Join Date: Jul 2012
Location: Walnut Creek, California
Posts: 6,796
Received 2,399 Likes
on
1,880 Posts
The following users liked this post:
davidboger (02-26-2016)
#9
08-14-2013, 10:29 AM
Update on the price...if one is available!! $185.00 plus shipping. OUCH! Someone's gotta have a $3 substitute idea....please!!!
#10
08-14-2013, 02:25 PM
Veteran Member
Join Date: Jul 2012
Location: Walnut Creek, California
Posts: 6,796
Received 2,399 Likes
on
1,880 Posts
The following users liked this post:
davidboger (02-26-2016)
#11
08-15-2013, 08:46 AM
Today I pick up my new $200 headlight relay. OUCH! I don't want to go thru this again so I've been doing some research into how to prevent that. In my research I've found also that the headlight dimmer switch (turn signal) is carrying the full load of the 'low beam' headlights. I don't want to guess how much that baby costs!
I found an article by a guy who 'bypassed' the dimmer switch by adding another ($3.00) relay to that circuit ( RELAYS-2 ). I decided before I put in the new and expensive relay I'm going to add the relay as he's suggested PLUS one more $3.00 relay to also pick up the load off the expensive relay to power the high beams too.
The diagram he used for the added relay to relieve the dimmer switch is as follows:
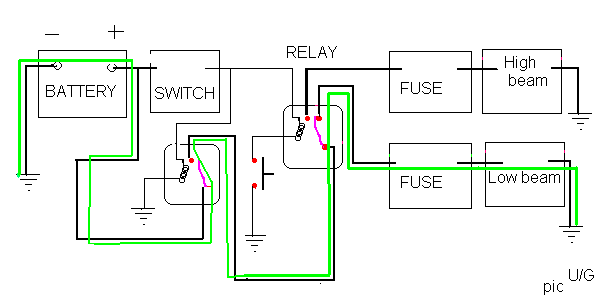
Simple enough to add the one relay on the left for this purpose. I'll also throw one on the high beam circuit and relieve the load on the main relay. Its purpose now will only be to activate the second relay and if I have to replace anything again, it will be the $3.00 relays.
Will report back on the success but it seems (on paper anyway) that it'll work.
I found an article by a guy who 'bypassed' the dimmer switch by adding another ($3.00) relay to that circuit ( RELAYS-2 ). I decided before I put in the new and expensive relay I'm going to add the relay as he's suggested PLUS one more $3.00 relay to also pick up the load off the expensive relay to power the high beams too.
The diagram he used for the added relay to relieve the dimmer switch is as follows:
Simple enough to add the one relay on the left for this purpose. I'll also throw one on the high beam circuit and relieve the load on the main relay. Its purpose now will only be to activate the second relay and if I have to replace anything again, it will be the $3.00 relays.
Will report back on the success but it seems (on paper anyway) that it'll work.
Last edited by Padrino; 08-15-2013 at 08:49 AM.
The following users liked this post:
Ahabiam (08-21-2013)
#12
08-15-2013, 09:04 AM
Veteran Member
Join Date: Mar 2008
Location: Pacific Northwest USA
Posts: 24,821
Received 10,871 Likes
on
7,150 Posts
Well, no, actually it isn't.
The dipper switch (column stalk that you pull rearwards) only does one thing: closes a ground circuit to energize the headlight relay.
Supply voltage for the low beams goes thru the headlight switch and then thru the relay. Note "thru the relay" and not "provided by the relay"
However......
Adding the relays is a good idea (or at least a "can't hurt" idea) because the load of the low beam lights is carried by the headlight switch itself (perhaps that's what you meant to say?)
Some guys also increase wiring size to the headlights. This, with the added relays, can improve headlight brightness....especially if the old connections were weak.
OTOH, some will say....and they're not entirely wrong, mind you.....that a circuit/switch/relay design that lasts 25 years before needing attention isn't particularly sub-par.
Cheers
DD
#13
08-15-2013, 11:09 AM
Well, no, actually it isn't.
The dipper switch (column stalk that you pull rearwards) only does one thing: closes a ground circuit to energize the headlight relay.
Supply voltage for the low beams goes thru the headlight switch and then thru the relay. Note "thru the relay" and not "provided by the relay"
Cheers
DD
The dipper switch (column stalk that you pull rearwards) only does one thing: closes a ground circuit to energize the headlight relay.
Supply voltage for the low beams goes thru the headlight switch and then thru the relay. Note "thru the relay" and not "provided by the relay"
Cheers
DD
Now to install the 2 new 40 amp relays to take the load off the switch and if I've figured it correctly, off the main relay ALSO. Although it's been working correctly since 1987, and I do have the 'British' version to allow the fog lights to operate separately, I want to put as much of the load off on some $3 parts in lieu of the expensive stuff.
More later.
Last edited by Padrino; 08-16-2013 at 09:44 AM.
#14
08-18-2013, 05:38 PM

Veteran Member
R3018. About $35.
#15
08-18-2013, 05:58 PM
Veteran Member
Join Date: Mar 2008
Location: Pacific Northwest USA
Posts: 24,821
Received 10,871 Likes
on
7,150 Posts
#16
08-20-2013, 03:13 PM
I've been trying to find the time to write in detail but that isn't happening and I had to put this out there.
My Jag mechanic couldn't source an original headlight relay so he's been using a Volvo one. About half the price at a bit over $100. I put it in but I ALSO wired in the 2 spst $7.00 40 amp relays to pick the load off the main headlight relay so not to risk burning it out again. (next time I'll include that diagram and info on the Volvo relay).
The interesting part is (besides it all works which even amazed me ), is that my dashboard and shift indicator lights are now brighter. I'd bypassed the rheostat before so that doesn't come into play. Just simply, the dash lights are now a bit brighter which is truly enjoyable.
WTF???
My Jag mechanic couldn't source an original headlight relay so he's been using a Volvo one. About half the price at a bit over $100. I put it in but I ALSO wired in the 2 spst $7.00 40 amp relays to pick the load off the main headlight relay so not to risk burning it out again. (next time I'll include that diagram and info on the Volvo relay).
The interesting part is (besides it all works which even amazed me
), is that my dashboard and shift indicator lights are now brighter. I'd bypassed the rheostat before so that doesn't come into play. Just simply, the dash lights are now a bit brighter which is truly enjoyable.WTF???
#17
08-22-2013, 09:15 AM
Found some time to input what I've done.
First was that my Jag mech couldn't source another new stock relay and said he'd been referenced to using a Volvo relay with a "bridge" connector added. I've included a photo of this relay, the info and a pic showing the white 'bridge' wire. Seems to work as I connected it up before my adding my 2 relays to the circuit.
The intent of the added 2 relays was 1.) pick up 'some' of the load off the main headlight switch and 2.) pick up the highbeam load off the main relay. I've added 7" headlights (which are GREAT) so the load is more. Figure my original relay burned out due in part to that load. I found that to get the 'latching' of the main relay to work, I needed to leave the lowbeam circuit intact but with the added relay and wiring to it I seemed to have picked up at least part of the amp load off the main (and expensive) relay.
I couldn't be more pleased. Other than the figuring the circuits out and some trial and error (more error than trial by the way) it took me about 30 minutes of making the connector wiring and installing. Total cost without the new 'main relay' was only about $20.
My wiring included just making short jumpers with 10 and 12 ga wires so as to easily work everything in. The 40 amp relays were only about $7 each so I figured it would be cheaper to replace these than the main relay...if I got it all to work, which I did. I couldn't be happier with this cheap modification. Excuse the poorly drawn schematic wiring diagram.
Pics and info are attached. Somehow, it all works and my interior dash lamps are much brighter out of all this.
Last edited by Padrino; 08-22-2013 at 09:26 AM.
#19
03-10-2015, 06:48 AM
Thanks Sean and Padrino
Last edited by JagLoverT; 03-10-2015 at 06:54 AM.
#20
02-24-2016, 12:38 AM
Veteran Member
The following users liked this post:
jagent (02-24-2016)