Fuel tank problem, please help!
#1
Hi all, Iím new to the forum and as Iíve just inherited a 1984 4.2 XJ Iím sure I will be on here very often 
The car has been well looked after throughout the years but I have a bit of a mystery problem with the fuel tank. The N/S tank has been cracked or split for a long time and was never used so only the drivers side tank is used. I have noticed that somehow it intermittently leaks fuel out of the left tank but only the right side is being used. Is there a fuel line that links the 2 tanks and also can it be capped off? I know the long term and correct solution would be to get a new tank but at this moment I canít do that plus I wouldnít even know a garage that specialises in classic jags in London that would take on a job like that.
If someone could give me any advice I would appreciate it a lot.
thanks
Sean
#2
Hi,
For what it's worth both tanks on my Series 2 Daimler 12 were absolutely rotten with rust although the car itself was surprisingly rust free. I was not prepared to install new tanks as at that very early stage of the restoration as I was reluctant to spend money until I knew more about the car's potential for restoration. I purchased a sealing kit that contained various detergents, rust converter and a 'special' paint that was guaranteed to seal anything. So far it has actually worked. Only time will tell of it's permanency but so far so good.
regards
Al
The following users liked this post:
SeanXJ61984 (11-25-2019)
#3
yes, one tank flows unto the other and viceversa. How to plug the connection between both tanks? I have no clue.
Maybe Doug knows.
However, removing the tank is no big deal, the first time is the hardest because you've not done ir before.
if you are handy, you can do it yourself following the steps in the service manual.
To browse the service manual, you can download all sections from my website free.
Jag Upgrades Home
The following users liked this post:
SeanXJ61984 (11-25-2019)
#4
Join Date: Jan 2012
Location: Newport Beach, California
Posts: 5,637
Received 2,633 Likes
on
1,814 Posts
SNG Barratt, one of the forum sponsors, has new tanks for just a little over 200 quid. Here is a listing for the NS tank:
https://www.sngbarratt.com/UK/#!/Eng...1-2e33d9893b08
The fuel tanks fitted to the XJs are a know failure point, so it's best to replace it if you intend to have the vehicle pass MoT. The fuel senders are also known to 'sink' and can be replaced with the tank(s) in situ by removing the tail lamp for access.
The following users liked this post:
SeanXJ61984 (11-25-2019)
#5
Join Date: Mar 2008
Location: Pacific Northwest USA
Posts: 24,825
Received 10,875 Likes
on
7,152 Posts
Either tank can be fully divorced from the rest of the system.
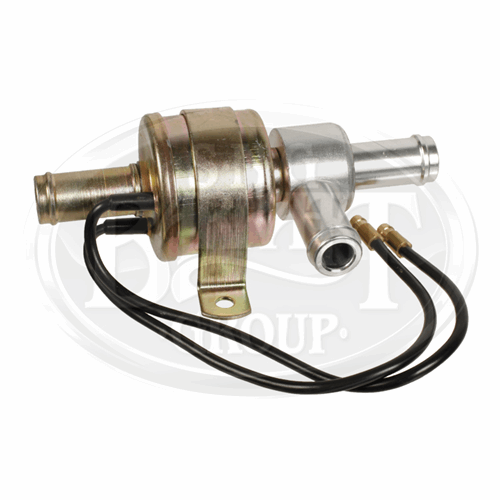
In the boot, aft of the spare tire, is the changeover valve. Three fuel hoses: one from each tank and one to the fuel pump. The hose from the N/S tank can be removed and plugged with something suitable; a piece of 1/2" wood dowel would do the trick. The now-vacant nipple on the changeover valve can be capped-off with a rubber cap.
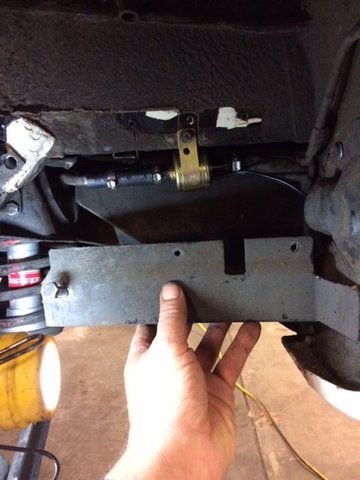
Next you'll have to do the same basic procedure with the return valve, which is located in the rear wheel well, behind a (roughly) rectangular sheet metal plate. Remove the hose from the valve and cap-off appropriately.
With these things done you've isolated the tank as far a liquid gasoline goes. There is a venting system shared by both tanks but I don't think it is necessary t do anything with that.
Cheers
DD
The following users liked this post:
SeanXJ61984 (11-25-2019)
#6
Join Date: Mar 2008
Location: Pacific Northwest USA
Posts: 24,825
Received 10,875 Likes
on
7,152 Posts
The following 3 users liked this post by Doug:
#7
Thanks for the advice Jose. I think Doug has answered the question of how to isolate either tank from one another. But I have been checking out the process of how to remove the bumpers/tanks and I’m sure I’m handy enough to get it done (maybe when the weather gets a bit better though!)
Cheers
Cheers
Trending Topics
#8
#9
Sean, you welcome. Half of the job is removal of trim, meaning the side bumper blade, the quarter body panel under the tank, the tail lamp lens and housing, disconnecting the sender, and inside the boot, the carpet-covered upholstery or "trim" panel which is easy.
if the quarter panel screws and bumper blade bolts and nuts are rusty, bathe them in advance with rust blaster spray for a few days.
The two studs where the chromed bumper blade meets with the center chromed piece usually will break when loosening their nuts, so more rust blaster treatment is needed there in advance. Those studs are welded to the chromed blade before chroming so if they break it is a difficult problem to resolve later. I resolved it by screwing and gluing an aluminium "neck" to the remaining stud thread, then threading the neck itself to the nut size. Tap and Die job.
Then comes tank removal, the fun part.
Last edited by Jose; 11-25-2019 at 12:42 PM.
#10
If memory serves (a big if), there's 12v going to the changeover valve when running on the right-hand tank, and 12v to both of the return valves. When you switch over to the left-hand tank, power to all three valves is cut. [This seems counterintuitive because you push the switch in to change to the left tank.]
I think you have an intermittent short to the left return valve, or the left return valve itself is failing (not always closing completely).
Have I got that the right way around, everyone?
I think you have an intermittent short to the left return valve, or the left return valve itself is failing (not always closing completely).
Have I got that the right way around, everyone?
#11
When I had to weld in a new boot floor, a rear valence, plus other repairs nearby, I removed the fuel tanks and found it reasonably straightforward but very time consuming. One problem I came up against was removed the filler cap assemblies. These can be a rail PITA to remove, and one has to be extremely careful not to damage the paint. Removing the 1/4 bumpers and 1/4 panels was reasonably straightforward. There is a lot of securing locations on these tanks, and it is best to remove the rear silencers as well to get at everything as there are several securing bolts to undo. There are also two little pipes about 5" long connecting each tank to the changeover valve, with hose clips to undo. On reassembly, I welded in the boot floor and rear valance, fitted new Jaguar 1/4 panels, repaired the rear of the wheel arches and used stainless steel fasteners.
Of course, doing all this in the late 80s/early 90s meant there was still a lot of original Jaguar stuff around, I managed to find a proper Jaguar valance that fitted absolutely perfectly when offered up prior to welding. I had thrown away the "pattern" one I had bought that didn't fit, and could never have fitted as it did not have the very subtle horizantal curve on its top edge. There are very few straight lines on a Jaguar XJ !!
Of course, doing all this in the late 80s/early 90s meant there was still a lot of original Jaguar stuff around, I managed to find a proper Jaguar valance that fitted absolutely perfectly when offered up prior to welding. I had thrown away the "pattern" one I had bought that didn't fit, and could never have fitted as it did not have the very subtle horizantal curve on its top edge. There are very few straight lines on a Jaguar XJ !!
Thread
Thread Starter
Forum
Replies
Last Post
Currently Active Users Viewing This Thread: 1 (0 members and 1 guests)


