When you click on links to various merchants on this site and make a purchase, this can result in this site earning a commission. Affiliate programs and affiliations include, but are not limited to, the eBay Partner Network.
From now on i´ll create a topic that I can update weekly or monthly! I´ll do a lot to this jaguar XJ6 to have it in better conditions than now.
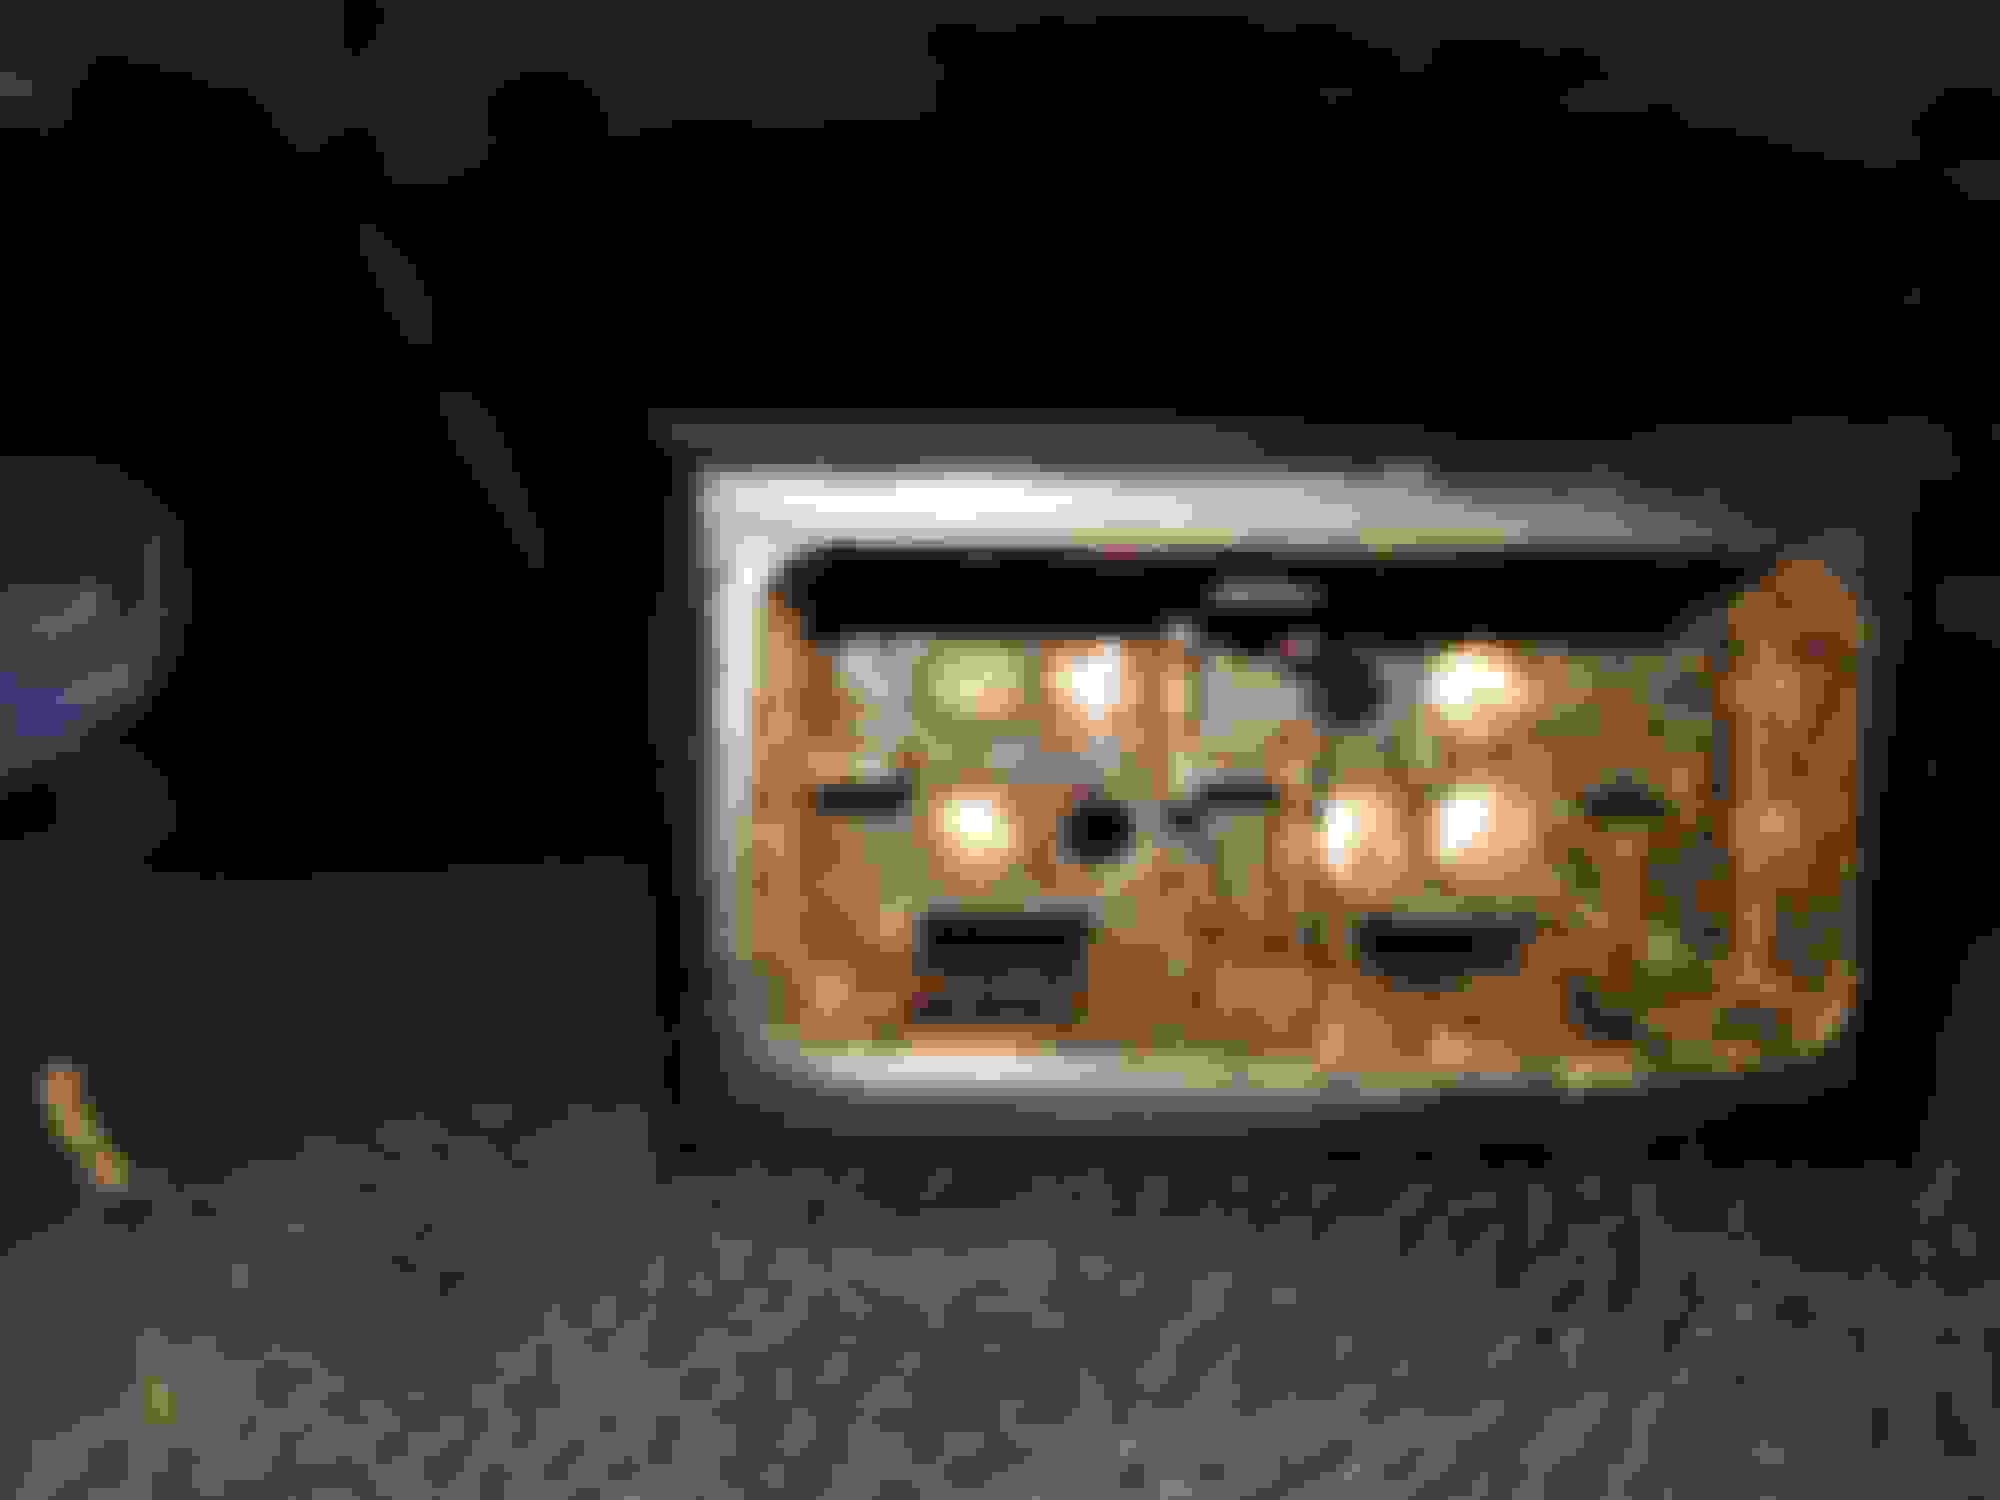
I have had some issues with my light switch: I took it apart and tried to fix the issues, after sanding down the coper parts, it does work, but so not nice yet. Its quiet heavy and if i wiggle the switch, its flickering the lights. Not satisfied yet, but nice to show you guys the inside!
Left light doesn't work yet. Will replace!
21-04-2018
Yesterday at an Jaguar forum (Dutch) meeting, I have found this amazing peperpot wheels!
Today I also bought my: Jaguar STAKEDOWN, HOLDDOWN KIT, TAPPET GUIDE, SELF-TAPPNG - NBM0001 set.
I have had serious ticking in the area of my my valve covers. This must be an issue with the valve tappet guide that has come loose.
it could be the fuses in the engine compartment headlights fuse box not being tight inside their brass "spring" connectors. Have you checked those fuses?
there are 5 fuses, one per headlight. The 5th fuse is for the auxiliary electric fan.
also, the insides of the headlights switch needs dielectric grease, it looks too clean.
So the result may be not perfect, but I am very happy. I have picked up a second set of pepperpots in Groningen (very north of Holland), in good condition, but the best part is they had the original logo's in them. So that was great!
They have left the logos during spraying, so a lot of overspray from the previous owner was on them.
I started using Terpetine (almost everything came off)!
Yesterday I finished the 2 component paint. 2 layers, and the final result is more than OK for me
Those look like brand new wheels! Did you sand the center stars smooth or fill them?
Rusty
Originally Posted by GGG
You were lucky to find a set of Pepperpots. Great refurbishing job.
Graham
Great gentleman, thanks for your replies!
I found actually 2 sets, and refurbishing them both. This was my very first set where I did a proper job. Learned a lot.
The process:
1: Sand blasting (did not do that perfect, and that is why I still have some rough edges.
2: even then out with an epoxy primer /filler, 2component (see previous post)
3: 3 layers of silver
4: 2compnent clear coat
5: not yet but will bring them to a shop where the edges will be polished completely.
Then I want to see the overall result, do it all again with my 2nd set and that one goes on eBay for a nice price or maybe I can sell it on the forum! (I'll do it because I like the process, I work for a software company and this is what I really enjoy next to the office. Haha).
I could only ask ? What media was used to blast them. Sand is a rough substance. Glass beads or even 'softer" media available.
Not a criticism, by far, only a question.
During the project before the Jaguar, I had a medium sized blast cabinet. It lead to a larger compressor. Not big enough for a wheel.,
But, I did hubs and a ton of smaller stuff. rust removal was my challenge. It "finished off " my old shoulders so it is gone. I do miss it from time to time, shoulders and all.
They are getting a work out today. Ugh, laundry and floors and bedding swap.
Carl ,
.
Hi Carl!
Nice post, thanks. I used sand, and this big cabin.
45 minutes including material €52 (65 usd?)
Photo 1: It can clearly be seen that something has already been performed at the middle (right sdie) shim guide. This is the "Simple" way of solving this problem. (High engine damage can occur because the camshaft can "break" the entire conductor tube. What also immediately is spotted by me on the right set, that the camshaft has "run-in damage". Also if you look underneath, you also see immediately that the entire "conductor" is worn by the camshaft, if you compare left (extremely) with Right (one-to-last) you see an extremely worn shim conductor tube.
Photo 2: Here we see a quick example of how the metal plates should hold the aluminum conductor tubes.
Photo 3: Here a zoomed picture of the camshaft / shim guide * (completely worn down). Time to secure it.
Photo 4: I use strong magnets to get everything in place so that I can drill.
Photo 5: Here is another angle of the affected shim conductor tube that the previous owner already dealt with himself.
The camshaft had to be removed to remove the previous "repair". I will not do this. So I leave it that way. (with my own metal plate)
Photo 6: The new valve cover gasket. Here you see on the right two sides that I have put the shim conductor tubes. Left (first test) I have unfortunately failed, here I drilled with a 3.5MM drill, and the thread was 4MM so too much force broke the bolt. It's a shame, but these shim conductor tubes look like new, so I'll leave this for now. (yes I am a hobbyist, and not a perfectionist) I think its successful.
Photo 7: Test ride, warm engine, and NO tapping noices anymore!! YAHOO !! It has all worked. Totally spend 6 hours on this job.
So, i have been busy with the window wiring, and it was a complete nightmare!! I can do a some things myself, but wiring, damn, next level! haha Never went deep in to that.
I brought my car to: Beek Classic Wire a local guy who does amazing work.
So, here's an BEFORE photo, trust me, i disconnected the battery every day haha!! seriously, looks horrible. The previous owner tried to make it work, he actually did until 1 stopped working last week, that was the moment I took of the arm rest and found this mess. Directly went to a prof to make this in good condition:
Today i picked it up and it looks like brand new. Patrick even used the original wire thickness, correct colors and 4 new connectors:
Personally when i had some spare time, I tried to refurbish my window switches: Great result, and all work fine!
Before:
After:
Trying to find out why my electric windows are not working! did not found the problem yet.
I"ve also taken off the antenna as it was broken!
The windows work fine, the right front window motor is broken, so need to replace that one!
So lately, i have been working at the right front window. Its been a job, my god!
I had fitted the new (ebay) arm & motor in, but it did not want to work correctly, the glass as in the video below, was hitting the central locking unit.
I was missing bits here and there...

 04-22-2018, 11:08 AM


 Never went deep in to that.