Jaguar XJ6/XJ12 Common rust locations and repair methods
#1
 04-24-2013, 09:11 PM


Howdy Folks---
I'm currently getting deeper and deeper into my 71 XJ6 project and while I'm carefully weighing my drivetrain options I decided to start stripping the car down to metal for paint. My car is originally from Atlanta and has been in the hot New Mexican desert for around 15 years. I saw a few minor rust spots on the body when I bought it but seeing as the floors and jacking points are in great shape, I wasn't that concerned about it.
I should preface this post by saying I have equipment to weld in new panels/patches and am fairly adept with body filler. I'm really looking for what is the best method for repair. How deep to go? It seems like everybody knows about the windscreen rot but where else are common rust areas? When is a car too rusted to reasonably repair?
While I know you guys from the UK and the rust belt will hate me for the negligible amount of rust on this 42 year old car, my project has escalated (don't they all) and I'm going to be spending a good chunk of change on the paint. I'd hate to have this pop back up in a year or two and have to repaint the car.
First up, driver's side rocker panel. Either it is rusting along a seam or It looks like someone has already gotten in there and replaced it, albeit crudely. If its a repair, its tacky but I'm awfully temped to put some filler on it and call it done. The other rocker is fine, lots of bondo filled dents, but solid and not rusted.


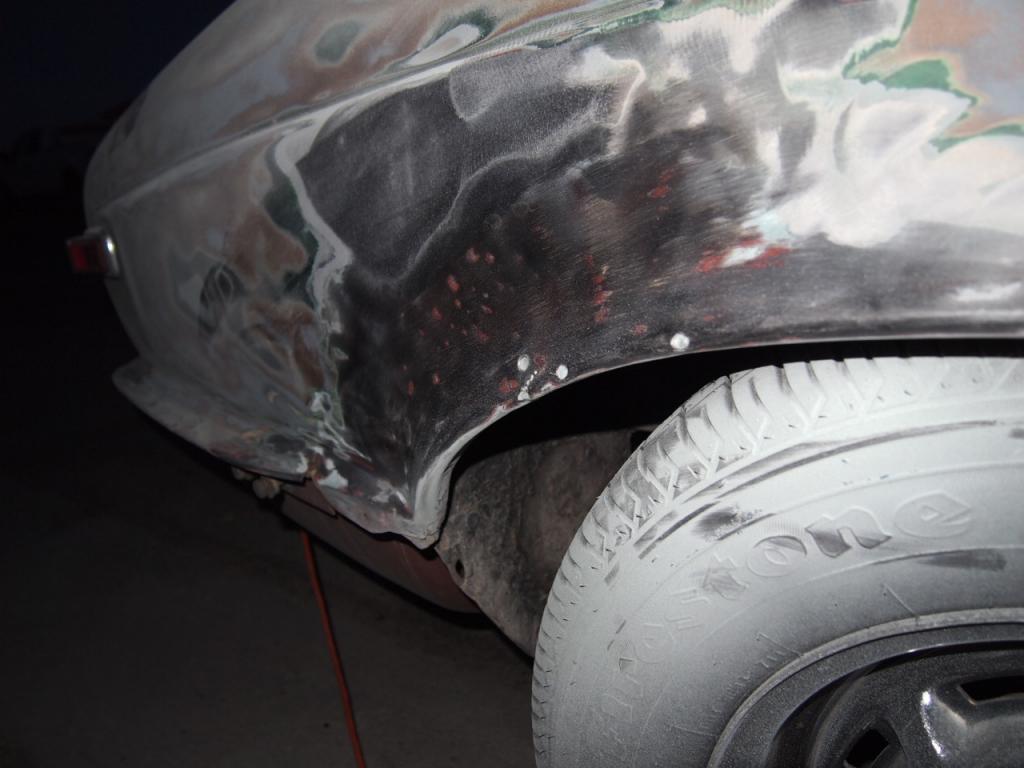
Next up is directly in front of the rear wheels. One side is worse than the other and will certainly need welding. Can I get to the backside of this and coat it with a rust preventative of my choosing to help slow the inevitable? Is this a sign of deeper corrosion that is just now manifesting itself?


Finally, it looks like the car was involved in some kind of accident on the right hand side. A TON of filler was covering up this 70's era repair. I'll be buying a stud welding gun to try cleaning this hack job up a little bit.
I'm currently getting deeper and deeper into my 71 XJ6 project and while I'm carefully weighing my drivetrain options I decided to start stripping the car down to metal for paint. My car is originally from Atlanta and has been in the hot New Mexican desert for around 15 years. I saw a few minor rust spots on the body when I bought it but seeing as the floors and jacking points are in great shape, I wasn't that concerned about it.
I should preface this post by saying I have equipment to weld in new panels/patches and am fairly adept with body filler. I'm really looking for what is the best method for repair. How deep to go? It seems like everybody knows about the windscreen rot but where else are common rust areas? When is a car too rusted to reasonably repair?
While I know you guys from the UK and the rust belt will hate me for the negligible amount of rust on this 42 year old car, my project has escalated (don't they all) and I'm going to be spending a good chunk of change on the paint. I'd hate to have this pop back up in a year or two and have to repaint the car.
First up, driver's side rocker panel. Either it is rusting along a seam or It looks like someone has already gotten in there and replaced it, albeit crudely. If its a repair, its tacky but I'm awfully temped to put some filler on it and call it done. The other rocker is fine, lots of bondo filled dents, but solid and not rusted.


Next up is directly in front of the rear wheels. One side is worse than the other and will certainly need welding. Can I get to the backside of this and coat it with a rust preventative of my choosing to help slow the inevitable? Is this a sign of deeper corrosion that is just now manifesting itself?


Finally, it looks like the car was involved in some kind of accident on the right hand side. A TON of filler was covering up this 70's era repair. I'll be buying a stud welding gun to try cleaning this hack job up a little bit.

#2
04-24-2013, 10:13 PM
Veteran Member
Those rocker panels look really suspect. I would open then up now and
take a look inside.
They are probably gone inside, there are lots of articles about replacing
them on the web, some with really good photos and methods...
Re-painting is too much work and expense to not prepare properly in
advance and have problems show up later.
My 1974 SII is a great example, the PO overlooked the real problems, put on
Bondo and paint...the rust monster appeared again.....I did not know better
then as it was my first Jaguar...
#3
04-25-2013, 09:44 AM

Veteran Member
That's typical series 2 rust. You need to check the rear jack points carfully and the frame rail inside of the rear jack point with a pick. If they are thin your series 2 needs major repairs. Also check the front jack point and the seem at the bottom of the rocker where it meets the floor pan. The correct way to repair rust holes is to cut back the surrounding metal until it's solid and replace it with new metal and treat the back side with rust inhibitor. Metal finish the front, prep and paint. The incorrect way is to cover it up with fiberglass or body filler. Somehow moisture gets inside these cavities on the series 2 and rots it from the inside out.
Last edited by icsamerica; 04-25-2013 at 09:51 AM.
#4
04-26-2013, 03:53 PM
That's typical series 2 rust. You need to check the rear jack points carfully and the frame rail inside of the rear jack point with a pick. If they are thin your series 2 needs major repairs. Also check the front jack point and the seem at the bottom of the rocker where it meets the floor pan. The correct way to repair rust holes is to cut back the surrounding metal until it's solid and replace it with new metal and treat the back side with rust inhibitor. Metal finish the front, prep and paint. The incorrect way is to cover it up with fiberglass or body filler. Somehow moisture gets inside these cavities on the series 2 and rots it from the inside out.
So if I'm understanding you correctly, the rust in front of the rear wheels is in a "closed" cavity with no access to the backside. This obviously changes how I'd be approaching the repair.
I just took a look at all the jacking points again and they look and sound very solid. The rocker has been replaced, I saw a double seam along the front where I photographed. It almost looks like they tacked another rocker on top of the original rocker.
Do I have access to any of this from the interior of the car?
#5
04-26-2013, 04:32 PM
Veteran Member
http://www.jag-lovers.org/v.htm?id=1354994724
Teddykan has many photo albums at this link that you will find "interesting",
just push the button to see his 400+ albums dealing with all the Jaguar problems.
The other Forum has a Picture Album section that has many repairs like the
one you are attempting. This link is from the "master" of all...he has done
most everything.....
There are supposed to be entry points at each end of the sills for applying
rust preventative stuff. Located behind the small covers....have never
been in there since my S1 cars were from CA and have no noticeable rust.
Last edited by Roger Mabry; 04-26-2013 at 04:38 PM.
#6
04-26-2013, 07:37 PM

Senior Member
I logged some photos years ago called "hidden dangers" showing a car that I had purchased from Ohio.
It looked a little bad when I picked it up, but when I really tore into it all the hidden stuff came to the surface..
Here is the link:
Welcome to Jag-lovers - Members Photo Viewing Page
Cheers
David Boger
It looked a little bad when I picked it up, but when I really tore into it all the hidden stuff came to the surface..
Here is the link:
Welcome to Jag-lovers - Members Photo Viewing Page
Cheers
David Boger
#7
04-27-2013, 08:51 AM

Veteran Member
Join Date: Jul 2012
Location: Walnut Creek, California
Posts: 6,796
Received 2,399 Likes
on
1,880 Posts
The following users liked this post:
davidboger (04-28-2013)
Trending Topics
#8
04-27-2013, 04:05 PM

Senior Member
Very nice Ray!!!
I'm sort of betting that mine will a worse rust bucket than any I've seen so far!!!
There's some useful pics and ideas on Fiboys site FiBoy's XJ12C restoration; rebuilding a Jaguar XJ V12 Coupe
I'm sort of betting that mine will a worse rust bucket than any I've seen so far!!!
There's some useful pics and ideas on Fiboys site FiBoy's XJ12C restoration; rebuilding a Jaguar XJ V12 Coupe
#9
04-28-2013, 05:41 PM
Senior Member
Thanks Carl..
Here is the link for the complete dissection of a Series 3 shell..
There is a page 2, a small clickable link at the bottom of the page will take you to it.
Anatomy of a Series 3 XJ
Cheers
David
Here is the link for the complete dissection of a Series 3 shell..
There is a page 2, a small clickable link at the bottom of the page will take you to it.
Anatomy of a Series 3 XJ
Cheers
David
The following users liked this post:
Mark Scotton (04-30-2013)
#10
04-29-2013, 12:24 AM
This is great guys. I went through a bunch of TeddyKan's galleries on JagLovers...I can't believe he didn't just get a different car. Once of his pictures joked that he had more weld steel than stamped metal on his car. I don't think he was joking!! It was a relief to see the XJ that David tore apart. I'd like to think mine is closer to that than the rusted hulk living in the UK.
While TeddyKan's pictures scared the hell outta me, I realized that I'm in far better shape and its shouldn't be too much of a bother fabricating some repair plates to fix the rear arches and rockers. Its just a car after all, something I've been learning over and over since I bought my XJ.
I just bought another S1 which has decent arches and I might swap the entire quarter to avoid having to fix the awful dent repair that I inherited. Does anyone know the best place to stitch a complete quarter in? I was thinking along the C pillar near the windscreen and follow the boot lid seam down. I need to take another look at it in the daylight to see what I can salvage from the parts car.
Again, thanks guys, I was worried about what rust I had...Now I'm emboldened and ready to weld the world!
Last edited by Johnny Bouncewell; 04-29-2013 at 12:26 AM.

Thread
Thread Starter
Forum
Replies
Last Post
BrentGardner
XJ XJ6 / XJ8 / XJR ( X350 & X358 )
28
04-26-2024 03:08 AM
1964Daimler
MKI / MKII S type 240 340 & Daimler
2
09-02-2015 11:41 PM
Currently Active Users Viewing This Thread: 1 (0 members and 1 guests)