
New XJ coupe project - 2015
#1
 02-09-2015, 09:30 AM


I've been working on a new coupe project and I'm off to a humble start. One of my coups has been patched and developed on so much its never going to be as nice as I want. So one day I came across a solid coupe shell. With all the development done with the ABS, Fuel injection, suspension and interior I have the knowledge and skill to start again, transfer what works and make a really nice and well done coupe.
This coupe is getting the ABS, Wilwood brakes, ZF rack, Late XJS convertible IRS, two stage exhaust system and an all forged 406 with a 4/7 swap LPE 219 cam and Super Ram intake. It's also getting 275 series tires out back and a considerable amount of chassis stiffening using rigid foam, struts and tubing like Fiboy did but taken to the next level. The car will also receive a considerable amount of weight management and will be lightened where prudent and possible.
This coupe is getting the ABS, Wilwood brakes, ZF rack, Late XJS convertible IRS, two stage exhaust system and an all forged 406 with a 4/7 swap LPE 219 cam and Super Ram intake. It's also getting 275 series tires out back and a considerable amount of chassis stiffening using rigid foam, struts and tubing like Fiboy did but taken to the next level. The car will also receive a considerable amount of weight management and will be lightened where prudent and possible.
Last edited by icsamerica; 02-09-2015 at 09:33 AM.
#2
02-09-2015, 10:29 AM


Veteran Member
Join Date: Mar 2014
Location: Tehama County, California, USA
Posts: 25,447
Received 9,212 Likes
on
5,387 Posts

#3
02-09-2015, 10:37 AM
The following users liked this post:
LnrB (02-09-2015)
#4
02-09-2015, 11:13 AM

I'll look forward to seeing more pictures as your project progresses.
I painted my coupe Regency Red and then clear coated it. The clear coat really changed the way the color presents itself in different light. In the shade, it looks maroon, as expected. In bright sun it looks red. Under streetlights, it looks black.
Right now I am putting it back together after the repaint.
#7
02-10-2015, 02:39 AM

Trending Topics
#8
02-10-2015, 03:01 AM

Join Date: Jan 2014
Location: Delaneys Creek,Qld. Australia
Posts: 28,381
Received 6,327 Likes
on
4,370 Posts
#10
02-10-2015, 07:29 PM
Thanks for the interest. With 4 kids, a business and a home renovation in progress updates are going to be occasional. Oh and there's a V12 BMW that need some love too. For now... I'm trying to find a auto rotisserie 2nd hand. No luck yet, I'm going to need it to do the sill reinforcements. After that's done progress should be quicker. I'm going to give it another month or so and then bite the bullet on a new one. I'll be doing small projects here and there till then.
I wonder if Fiboy follows these forums? I talk to Jaguar enthusiasts and many of them know of his work and admire it.
#11
02-15-2015, 07:43 PM
Sill augmentation started.... 3.5 inch holes were drilled in both front and rear sill end plates so the tube could be inserted the full length. The rear part of sill was opened and the inner sill was reinforced in the rear quarter area with 16 guage metal that was dimpled. I expected to see soft metal from thrust stresses and rust but the metal was solid. Both the other coupes I've done this to were Swiss cheese in this area and I expected the same. I reinforced it any way with T shape metal so now it's triangulated and is much more solid than original. The sill, rear quarter post and front door pillar will tied in to the tube for solidity along the length of it. Once the welding is complete the tube will be welded shut at one end and filled with catalyzed rigid foam so it will be rock solid.
Last edited by icsamerica; 02-15-2015 at 08:06 PM.
The following users liked this post:
ronbros (02-19-2015)
#12
02-19-2015, 05:13 PM

Veteran Member
Join Date: Jul 2010
Location: Austin tx and Daytona FL.
Posts: 7,362
Received 1,236 Likes
on
943 Posts
ICS, nice work,good to see someone deep into solid resto/mod XJC.
little off topic, i'm still looking for an Audi V12 diesel engine and computor,wiring,
comes from factory twin turbo, direct injection,etc.
twice the HP of Jag V12, and triple the torque, far better MPG, also 25-30lbs lighter than jag V12, i'd mate it to a GM 4L85E gearbox.
i do believe it would make a great vehicle, seems not many available tho!
#13
02-20-2015, 03:12 AM
#14
02-21-2015, 03:50 PM
Senior Member
#16
02-25-2015, 09:02 PM

Senior Member
Some great work!
Are you planning to weld/ stitch the tube to the inner sill (I think FiBoy did)?
There was a write up on the mods for the convertible (or maybe it was the racing coupes) which gave some info on the mods but I can't find it now...Doh! From memory as well as the inner sills (plated rather than tubed), and the front A pillars, they also beefed up the transmission tunnel.
When I had the last XJC I was seriously considering making it into a convertible. I met this very nice chap in Dartford, kent and had a discussion about what he did. I was also considering a Targa top ALA the XJ-SC or corvette. But XJCs were more plentiful then.
How are you bracing the door gaps, and how did you get them in the right position. gap setting?
#17
02-25-2015, 10:35 PM
Thanks.
I thought about it but I dont see the point. The tube is round and rolls away from the sill so there is no way to do it well with out adding a significant amount of metal and weight. The rear of the door opening vertical member was welded to the tube with some plate and the front upright was also weled to the tube. I also braced the body to the tube in a few spots by cutting access points in the inner sill. The sills are structurally insignificant with tube in place. In any case, I plan on bonding the top of the inner sill to the tube with spot rigid from ever 6 inches or so by dilling a 3/8 hole and using 2lb catalyzed expanding foam. I'm being very judicious with the amount of metal added, weight for this project is a serious consideration. I'm trying to add the maximum amount of rigidity with the least amount of additional weight. For example the dimpled 16ga plate added to the rearward inner sill is far more rigid and weighs slightly more than the 20 gauge undimpled metal that was replaced.
Yeah they are getting rare...any pricy here too. If I had a series 3 donor I'd be tempted to transfer the sunroof for sure.
The gaps looked great before I started. I took careful measurements and with out the engine in place there is no stress and no detectable body flex. Everything appears to be where it is supposed to be. When measuring I found no measurable differences to 32nds of an inch from side to side and across. This suggests the Jig that Jaguar used to assemble these car was precise, I didn't expect this. This is why I'm not removing the whole outer sill. They are original and I want all the body lines where they should be.
More picts soon. Thanks for the interest.
Are you planning to weld/ stitch the tube to the inner sill (I think FiBoy did)?
There was a write up on the mods for the convertible (or maybe it was the racing coupes) which gave some info on the mods but I can't find it now...Doh! From memory as well as the inner sills (plated rather than tubed), and the front A pillars, they also beefed up the transmission tunnel.
There was a write up on the mods for the convertible (or maybe it was the racing coupes) which gave some info on the mods but I can't find it now...Doh! From memory as well as the inner sills (plated rather than tubed), and the front A pillars, they also beefed up the transmission tunnel.
More picts soon. Thanks for the interest.
Last edited by icsamerica; 02-25-2015 at 10:41 PM.
The following users liked this post:
ronbros (02-26-2015)
#18
02-26-2015, 07:23 PM
Senior Member
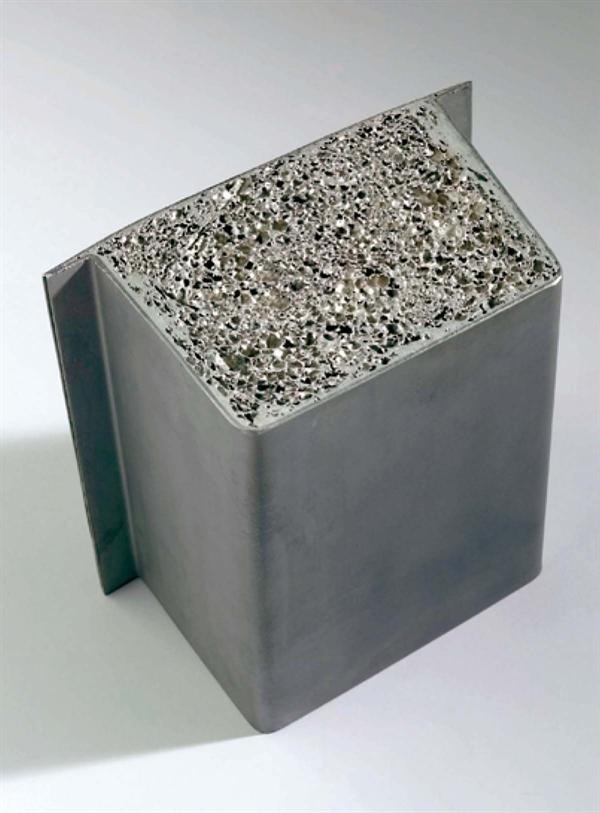
The ultimate tube to use is Alulight aluminum foam.
Lots of good, progressive compression rates during high-impact collisions.
The molten aluminum foam, mixed with argon gas and silicates, can be extruded inside aluminum or stainless steel. It is being used as military vehicle armor but is very lightweight.
Lots of good, progressive compression rates during high-impact collisions.
The molten aluminum foam, mixed with argon gas and silicates, can be extruded inside aluminum or stainless steel. It is being used as military vehicle armor but is very lightweight.

Last edited by Giovanni LiCalsi; 02-26-2015 at 07:28 PM.
The following 3 users liked this post by Giovanni LiCalsi:
#19
02-27-2015, 08:29 AM
Veteran Member
Join Date: Jul 2010
Location: Austin tx and Daytona FL.
Posts: 7,362
Received 1,236 Likes
on
943 Posts
The ultimate tube to use is Alulight aluminum foam.
Lots of good, progressive compression rates during high-impact collisions.
The molten aluminum foam, mixed with argon gas and silicates, can be extruded inside aluminum or stainless steel. It is being used as military vehicle armor but is very lightweight.

Lots of good, progressive compression rates during high-impact collisions.
The molten aluminum foam, mixed with argon gas and silicates, can be extruded inside aluminum or stainless steel. It is being used as military vehicle armor but is very lightweight.
#20
02-27-2015, 06:46 PM
Senior Member
It can be welded, also epoxied, with rivets.
It also comes in cylindrical shapes.
The molten aluminum foam thermally bonds to stainless steel.
This can be welded to the steel rocker panels.
The compression tests are impressive.
Almost like shock absorbers.
It also comes in cylindrical shapes.
The molten aluminum foam thermally bonds to stainless steel.
This can be welded to the steel rocker panels.
The compression tests are impressive.
Almost like shock absorbers.
Last edited by Giovanni LiCalsi; 02-27-2015 at 06:49 PM.
The following 3 users liked this post by Giovanni LiCalsi: