When you click on links to various merchants on this site and make a purchase, this can result in this site earning a commission. Affiliate programs and affiliations include, but are not limited to, the eBay Partner Network.
Thank you, Dave,
I do know of a few people 40 years older than I am who are still driving, one or two even get into trouble driving "Spiritedly"once in a while, and it makes astonished and incredulous news reports when that happens. I think it might be a real Hoot to be a Little Old Lady With A Lead Foot! (Of course I will probably never be "little")
I specifically searched for H rated tires, the problem is getting the size I wanted; 215-60-15, cuz Jaguars came with 205-70-15, which are relatively abundant out there. However, I don't like such tall profile tires on Nix (nor so narrow), they make her look like she's holding her pant legs up, tippy toeing through puddles afraid of getting wet or something. They also raise the center of mass quite noticeably, affecting cornering, which everyone here knows how I'm addicted to that. And, 60 series tires make her look Slinky and a bit Snarly. I like that a Lot!!
So, I found some Riken Raptor HR, H rated, for less than $100 each and had the Hot Rod shop mount them and do a full alignment. All that remains is to DRIVE THEM OFF!!!
(';')
Thanks Elinor, I found that size/brand online and they look great. And thanks for the Hot Rod Shop link, I remember reading it, but couldn't find it again. The picture of Nix on the lift, is that with your "before" tires? What size were they? I want a smaller tire to help offset the very tall gear ratio, but I'd like to keep a nice reveal in the wheel well while lowering the car a bit. I'm sitting pretty high in front with the new engine even after removing the 1/8" spacers in the springs and dropping the spring pan 1/4".
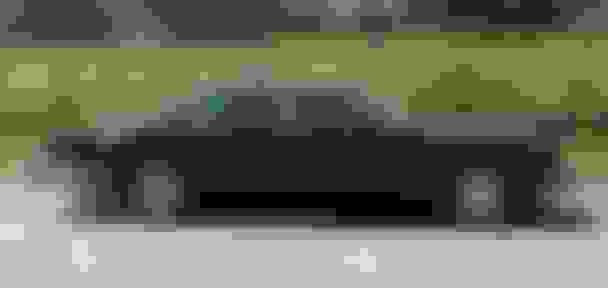
If you have a side view picture of NIx with new shoes, could you post it? A picture is worth a 1000 or so words.
I think (know) my car was lowered at the time of conversion in 1986, and the springs were either changed or shortened. There were no spacers in either the springs or spring pans, but the car sits quite lower than standard Xj6. I *Like* it that way!
I'll get a profile photo in the next couple days. I don't have one with latest tires.
(';')
Dave, my XJ was lowered a lot when I installed 235/60/15 tires. I did not have to alter any suspension components that could affect handling or geometry. The tires did the lowering.
Recently I replaced the tires with 225/60/15 sold at Walmart and the height did not change much if any.
the car retained its low cat-on-the-prowl stance which I prefer.
No issues with rubbing or damages to exhaust or suspension parts. The top center of the front wheel opening is at 25.25 inches unladen. ( 25 and a quarter inches). Any lower and it looks like a pimped Honda.
Fortunately the XJ wings came with flared wheel openings. Jaguar was ahead.
Jose, I have your post that shows your car and 235/60/15 Dunlop tires. I'm hoping to find a slightly smaller tire with a higher speed rating. All options and opinions are on the table at this point, but getting much closer to decision time. In the spirit of the "sleeper look" I'm trying to achieve, I will stay with the mundane stock alloy wheels until they prove to be a detriment. Nothing says modified like loud exhaust and spiffy rims.
I just went out to the shop and measured the stance on the front. Are you sitting down? Shop floor to top of wheel arch on left side: 29 5/8". Right side: 29 7/8". Entirely too high. I now have the complete engine/transmission installed and 95% hooked up. Goes to the muffler shop this Thursday. What I don't have installed yet is the front bumper (complete), front valance, radiator/condenser/cooling fans, coolant, and the bonnet. I'm estimating another 170-200lbs that would be directly over the front springs. Right now, if I stand on the lower radiator support, I get almost zero movement, if I bounce up and down I can get it to move less than an inch. I've taken the nylon spacers out of the front springs and lowered the spring pans 1/4". This thing is going to sit like a Baja racer, which is the opposite of what I want.
Startup is about a week away and I'll see what happens when I take it for a couple of short drives.
Dave,
I just now measured Nix at the fender wells, and she sits 27-3/4 at the top of the arch on both sides.
Center of the headlight measures at this moment, 24 inches off the floor, 2 full inches higher than previously.
Jumping on the front bumper makes little difference.
I might be dismayed about this, BUT, the car was completely jacked up and all the suspension was air-borne.
This happened before so I'm not worried about it. As soon as I take it out on the road (maybe even later today) it will settle to previous measurements just as it has in the past.
(';')
Elinor,
It sounds like we are in the ball park with each others current ride height. You are just under 2" lower than me and after I replace the remainder on my front end pieces, mine should come down a little. What I like most about your comment is that when the weight is completely taken off the suspension, it may take some driving for it to sag back to it's natural position. As you know, mine was suspended on jack stands for about 2 years. I think Carl mentioned this too in a previous post. On paper, mine should be lower than it is, but I won't worry about it until it gets some road time.
I have just returned from a 30+ mile drive to town for the usual Wednesday Hit Run.
I'm glad I didn't have to get used to the Poly Radius Arm bushings, cuz these Metalastik ones beat them hands down in every category!!
Ride: Ride is now Very smooth, almost silky with none of the harshness and vibrations the Poly bushings passed on to the cabin.
Noise: What noise? The Poly bushings in the radius arms, some might remember I mentioned (maybe it was another thread) they were noisy and harsh, rather like greatly overinflated tires. These Metalastik bushings have no such noise to contribute to the normal road noise of a 40+ year old Jaguar.
Handling: I didn't connect it at the time, and I still don't understand why, but the the car wandered quite a lot with the Poly radius arm bushings. It wandered so much in fact, that I thought something must be wrong with the new tires. All that nonsense is gone with Metalastik bushings! Tires go around quietly, stick to the road in a Very positive manner and they corner Just Fine!
Someone asked above about Handling in the rain with all these new bits.
If I have anything to say about it, the car will Never be in the rain!
In fact, if there's a cloud in the sky, she stays home!
The car sits a little higher with new tires and suspension rubber which disappoints me (higher by about an inch, but all the rubber is NEW so it might settle more as time goes on), but that gives me the opportunity to USE THE TIRES UP!
Dave asked for an After profile picture, see below:
I think I'm Finished with Suspension for about 40 years.
(';')
Thank you, Dave,
I neglected to mention that the day's trip settled the suspension by one inch.
I agree though, another inch lower would be Wonderful!
But this is what it is, and probably will be for some time to come.
(';')
Elinor, as you and Carl have said, the suspension will settle a bit once it's back on the ground and driven for awhile. The car has been on it's wheels now for about 3 months and I can see some distance between the rubber frame stop and the upper wishbone. I can't "bounce" it because of the shocks, but it looks like it may settle a bit more.
It goes to the muffler shop in the morning to have the exhaust built. I may have the courage to start it this weekend. Big step.
LnR
That car looks magnificent, it could be a factory publicity shot.
The poly bushes wreck the ride/handling because the compliance of the metalastik bush is an integral part of the design of how the suspension works mechanically. If all the rubber parts of the rear suspension were solid bearings, the rear suspension could not move up and down at all, as the radius arms geometric path through its arc is not the same as the up and down path of the rear wishbone/driveshaft/hub. The two arcs (which are at 90 degrees to each other) intersect at the normal stationary suspension height, and any movement from that has to be accomodated by the large radius bush, mainly. The cage mounts also allow flex to an extent. The entire cage/suspension assembly is meant to move slightly also, to produce some toe-change effects on cornering. This all works wonderfully because of the correct rubber specification of the parts concerned.
Poly bushes effectively have no compliance, so the rear suspension cannot move as designed by the great Bob Knight - who allegedly was telling William Lyons in 1955 that the cars needed an independent rear, so Lyons told him to design one; which he did over a weekend and drew up the detailed design in a month.
The solid large radius arm bushes force the cage to accommodate the geometry changes caused by the suspension movement in un-designed ways, mainly stressing the cage metal and the cage mounts, so the intended toe-changes on cornering, and other designed-in movement, cannot happen. Hence the rubbish handling.
Incidentally, this is also the reason that racers modify the mechanics of the rear suspension, ICSAmerica, on here, alters the radius arm pickup points (as did TWR with their ETCC XJSs) in order to eliminate the road-going designed-in geometrically conflicting arcs. Obviously in racing you want no compliance, and an adjustable suspension too, so the radius arms are turned into A frames with their car-mounted bearings in line with the diff-mounted inner fulcrum of the lower wishbone; thus eliminating the conflicting arcs, and with that the need for rubber compliance.
Mechanical suspension design is, in my view, the absolute peak of the automotive art. And modern ones, with their computer-controlled fixes, cannot hold a candle to our Jaguar fully independent suspensions, in any of the durability, reliability, driving satisfaction, or even ride-quality and comfort stakes.
Last edited by Greg in France; 08-26-2021 at 02:05 AM.
The Jag suspension really is a marvel. For the longest time (and to this day) Jaguar road manners rec'd great praise...and the competition were surely rankled.
My only objection is that Jaguar tuned things a wee bit too soft...but that's easily corrected. These old Jags respond very well to minor tweaks and, IMO, for a road car you wouldn't want to do more than that.
AHA!!
Thank you, Greg for this Wonderful explanation!! It's all clear to me now!
What's also clear to me is that I made the right decisions with this and the Front suspension re-bush projects, but only with the help, counsel and advice of those who have been down this road before me.
I couldn't have done it without input from the lot of you.
(';')
Found this on a USA site for removing Radius Arms worked great
Tech Tip #11- Rear Suspension Trailing Arm Removal for 70-87 XJ6 and all XJSFrom time to time, and particularly when the rear (inboard) brakes need to be rebuilt, removing the rear suspension on XJ cars is required. For the 70-87 XJ6 and all XJS models, the cage-mounted rear suspension also includes a pair of forward-facing trailing arms. These arms need to be disengaged from the body to remove the suspension in one piece but are often difficult to disconnect. Specifically, the large front bushing, which engages a metal nub on the underside of the floor pan, is a catch point for water and dirt, often "welding" itself to the body with rust. Just removing the attaching bolt through the bushing and prying on the outside of the arm doesn't help. That point is rubber insulated to the inner attaching area (to the body) and any prying just stretches the rubber. I'm sure there is probably some special removal tool that will work here, but I have found another way, that seems to work 99% of the time.
I usually use a special pry bar called a "rolling wedge". Craftsman makes one (part number 0942892), and I'm sure other suppliers do as well. The key here is the specially formed curved head which can fit inside the inner cup of the large training arm bushing and can wedge on the body mount. Then by levering the free end by hand, the bushing will usually pop loose. Occasionally, with 30-year-old pieces on my 75 XJ6C, some tapping (sometimes hard) on the end with a hammer gives just the right amount of shock to break them loose.
Here are some pics of the parts in question, the tool, and how it's used.
^^^
Yes, thank you, I saw that recommended earlier and gave it my best shot. I have a variety of sizes of this bar but none of them worked as stated (I should have mentioned that). For this reason I used the Loooong bar pictured in the post.
I am a fan of giving a good, sharp >WHACK< with a hard object of considerable mass to persuade stuck components to part ways though. It's a tried and true method of the Bigger Hammer School of Fine Adjustment and Repair, from which I'm an honor graduate.
Could please explain what the tip of the hook pushes down on?
I have a set of Rolling Head pry bars but don't understand how they can break the radius arm free.
Ours came off via a 2-man operation with a 6 foot long straight fencing crow-bar (AKA a Darwin Toothpick). The tip was placed on the top of the inner collar with the "underdog" holding it in place. The leverage pivot point was the underside of the body with strong seams. Then the "topdog" pushed down towards the bush while simultaneously levering up. One side took 2-3 goes, t'other popped off 1st shot.
I soaked mine *Liberally* in penitrant for 3 days before even attempting to remove them. Even at that, the curved hook wouldn't work. If I had the space (only had a single car slot) I might have got a copy of the "Darwin Toothpick" mentioned above. As it was, the bar pictured above worked Just Fine... after a fashion.
(';')
The process to remove the small end of the radius rod:
Jack up the rear until the tires come off the floor (full droop); take the front nut off the long bolt holding the bottom of the shocks; slide the bolt back enough to release the front shock and make clearance for the radius rod bolt; slide the radius rod bolt out.

 08-22-2021, 09:51 AM